Marketing Products
- Use the Search API module and views to create a product search page.
- Build a product catalog with facets and add-to-cart functionality.
Possible future sections/pages
- upselling / cross-selling / featured products (commerce_pado module)
- grouped / related products
- product categories / tags (menus for categories?)
- includes SEO (links to relevant modules: pathauto, facets_pretty_paths, etc.)
- product reviews/ratings (fivestar?)
- product stories (blog articles, applications, user stories, etc.)
Product Search
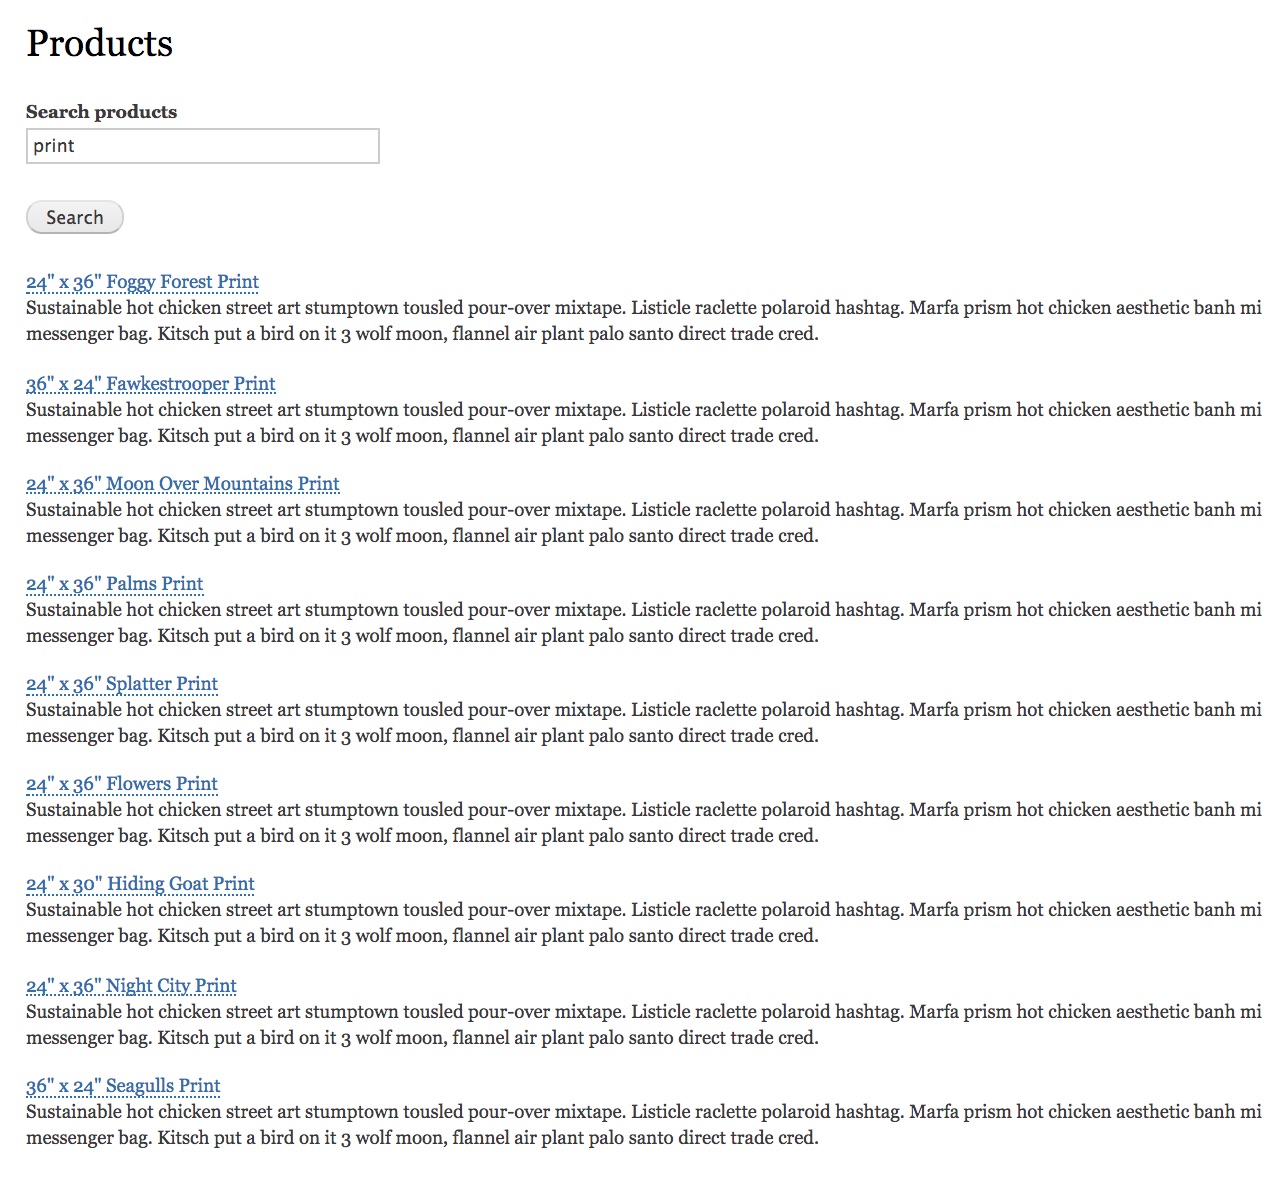
In this section we'll walk through the process of using the Search API module and the Drupal 8 core Views module to create a basic product search page like this:
Configure Search API module for product search
Search API is a contributed module that provides a framework for creating searches on Drupal entities. The general steps for setting up search functionality for products (or any type of data) with Search API are:
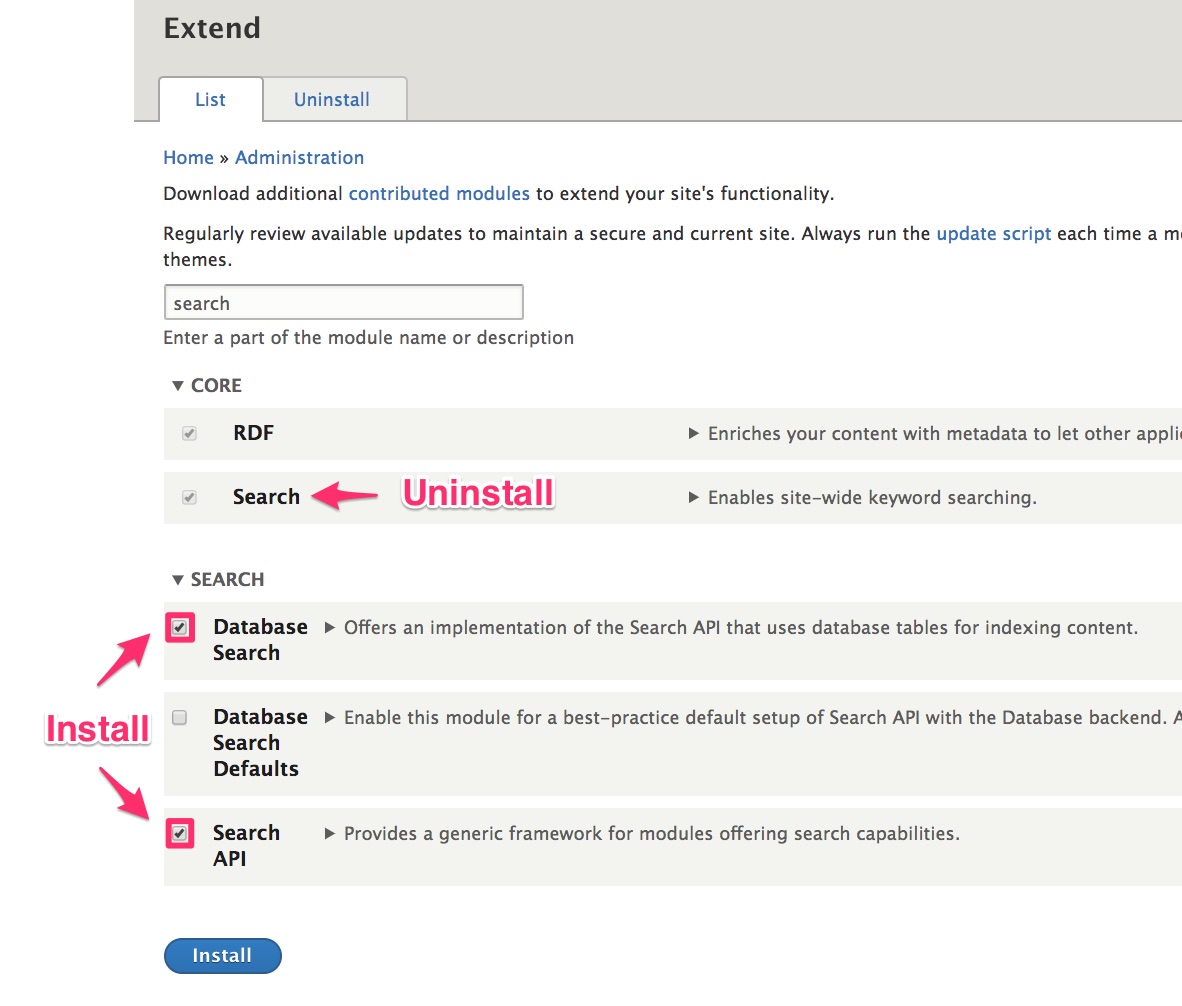
Step 1: Install the Search API module and uninstall the Search module provided by Drupal 8 Core. - Typically, you will want to uninstall the Core Search module for performance reasons.
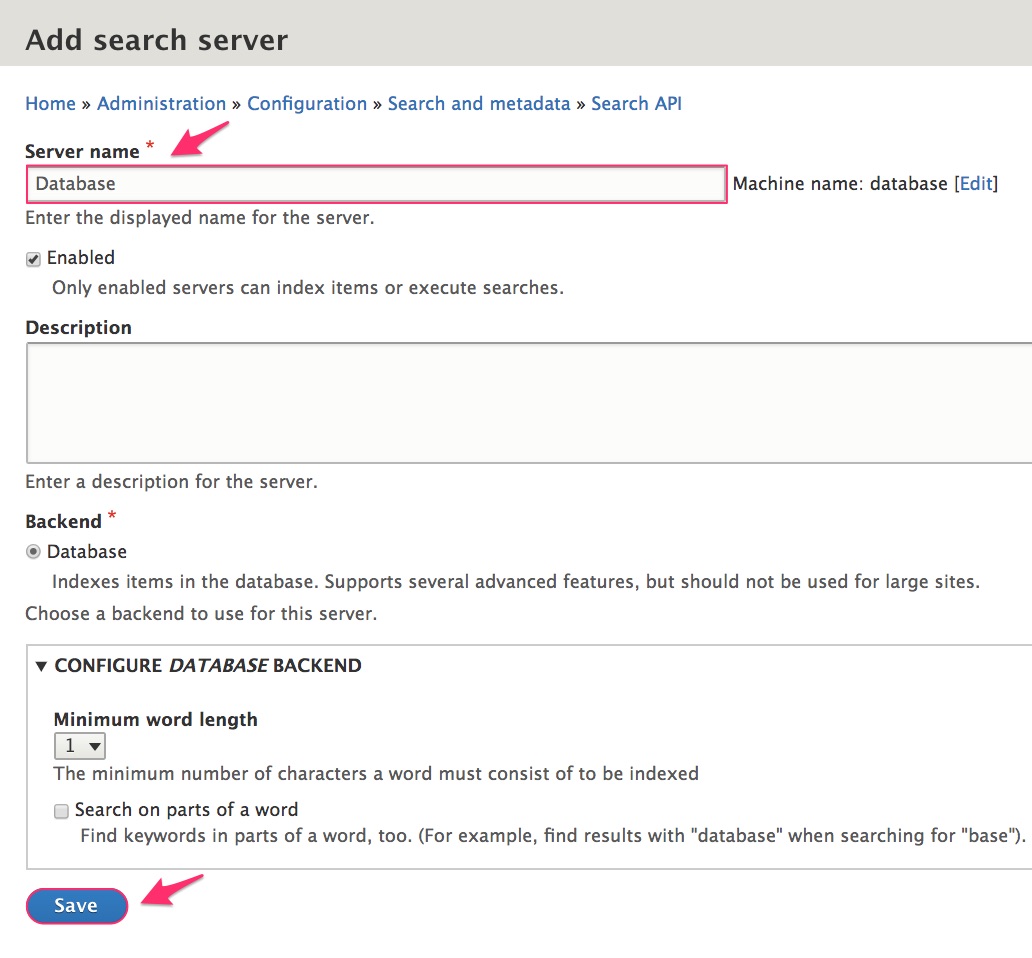
Step 2: Add a search server with Drupal's own database as the search backend. - Typically, most sites will want to use a more powerful backend like Solr or Elasticsearch instead of Drupal's own database.
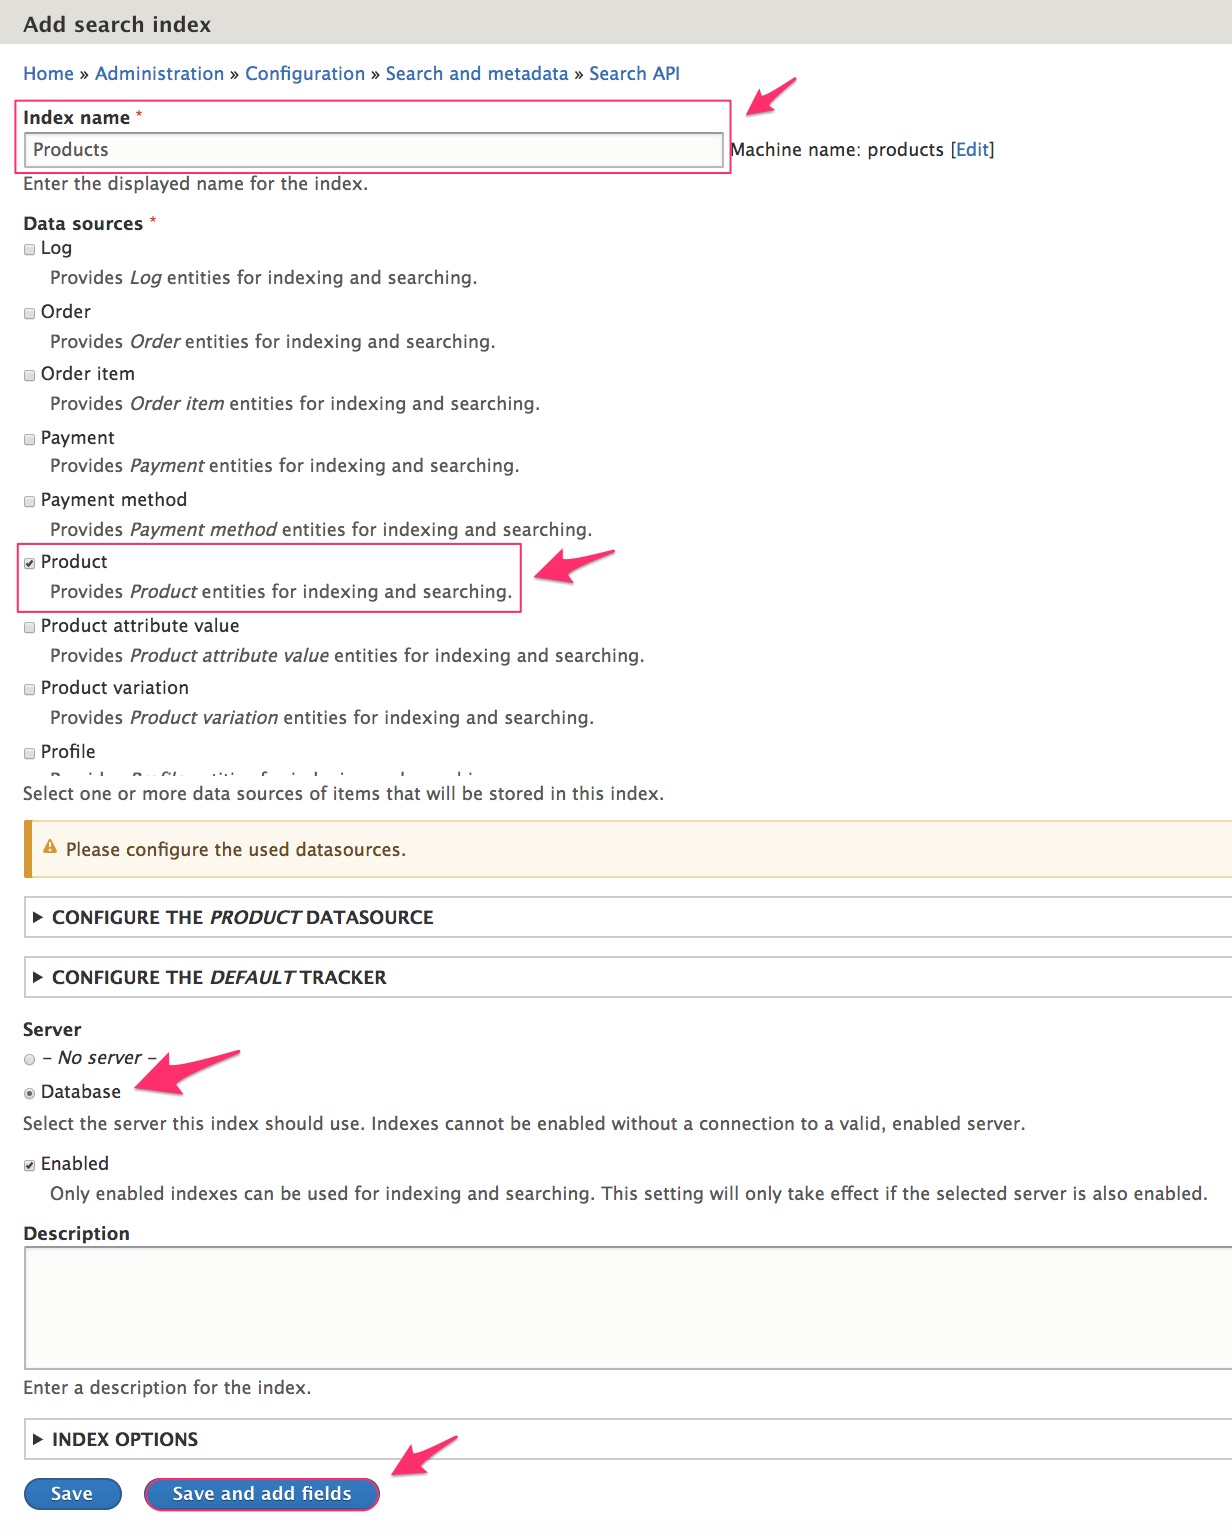
Step 3: Add an index for products. - The index's settings determine what data is indexed and how it is indexed.
Step 4: Specify which product fields should be indexed and set their data types and weights. - The data type of a field determines how it can be used for searching and filtering. - A boost value is used to give additional weight to fields to affect the ordering of the search results.
Step 5: Enable some basic processors for our index. - The Processors page in the Search API documentation guide provides a good overview of processor options.
Step 1: Install Search API modules
Example
- Add the Search API module to your site. (See the documentation on extending Drupal Commerce.)
- Navigate to the Extend page at
/admin/modules. - Install the Database Search and Search API modules.
- Also, it is recommended that you uninstall the Core Search module whenever you are using Search API.
Step 2: Add a server
Example
- Navigate to the Search API configuration page at
/admin/config/search/search-api. - Click the Add server button to add a server.
- Enter "Database" for the server name.
- Click the Save button.
Step 3: Add an index
Example
- Return to the Search API configuration page at
/admin/config/search/search-api. - Click the Add index button to add an index.
- Enter "Products" for the index name.
- Scroll down the list of Data sources until you see Product.
- Select Product as the type of data you want to index and search with this index.
- Select Database (the server we just created) for the Server.
- Click the Save and add fields button.
Step 4: Select the indexed fields
Example
- Navigate to the Search API field management administration page at
/admin/config/search/search-api/index/products/fields. -
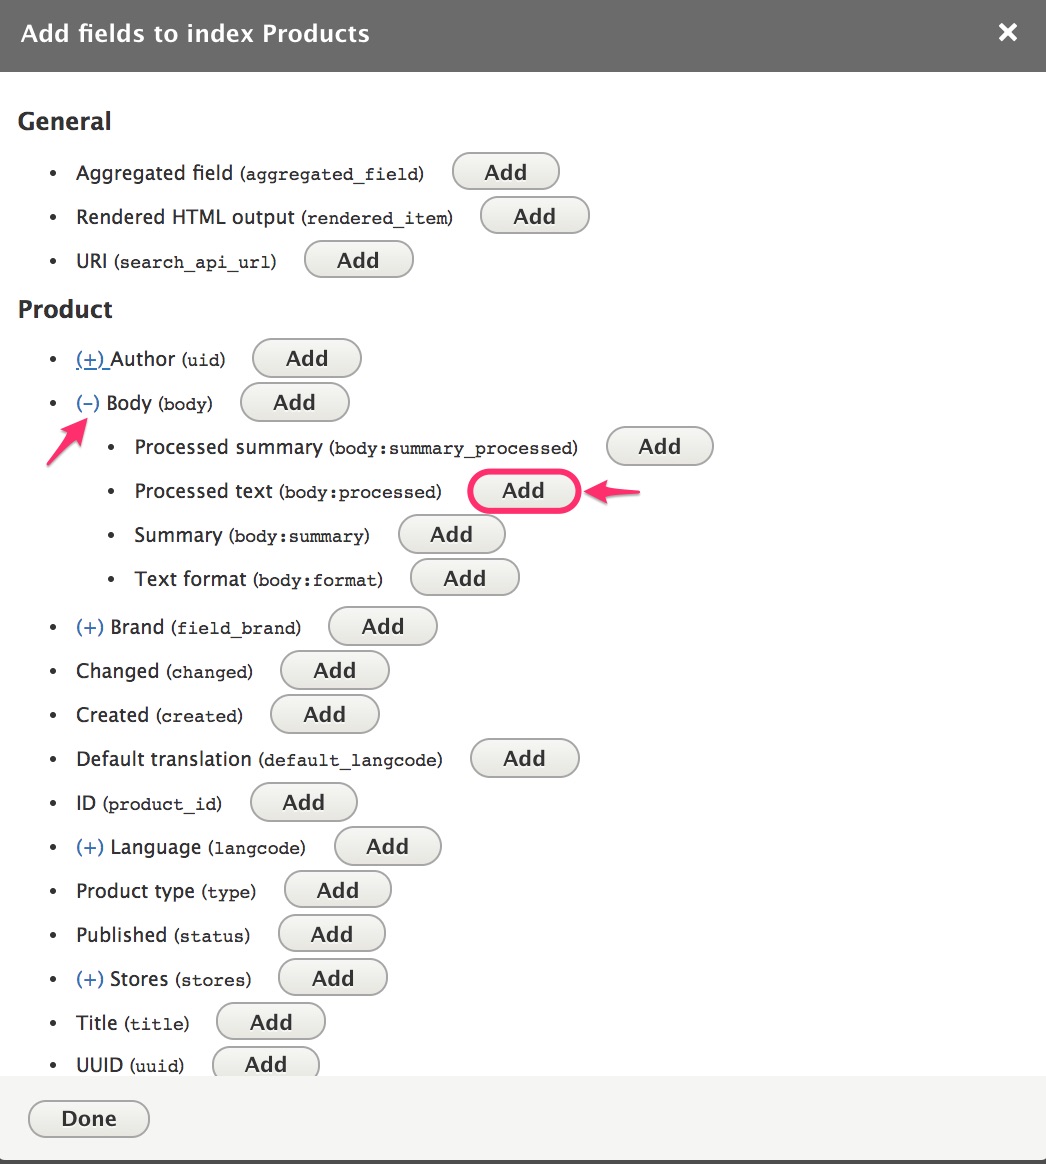
Use the Add fields button to select all the field properties you want indexed. Search API will store data on the search server for each of these fields. In some cases, you will need to drill down into the options to locate the exact property you want. For example, for the Product Body field, it's the Processed text property that we actually want to index and search by:
-
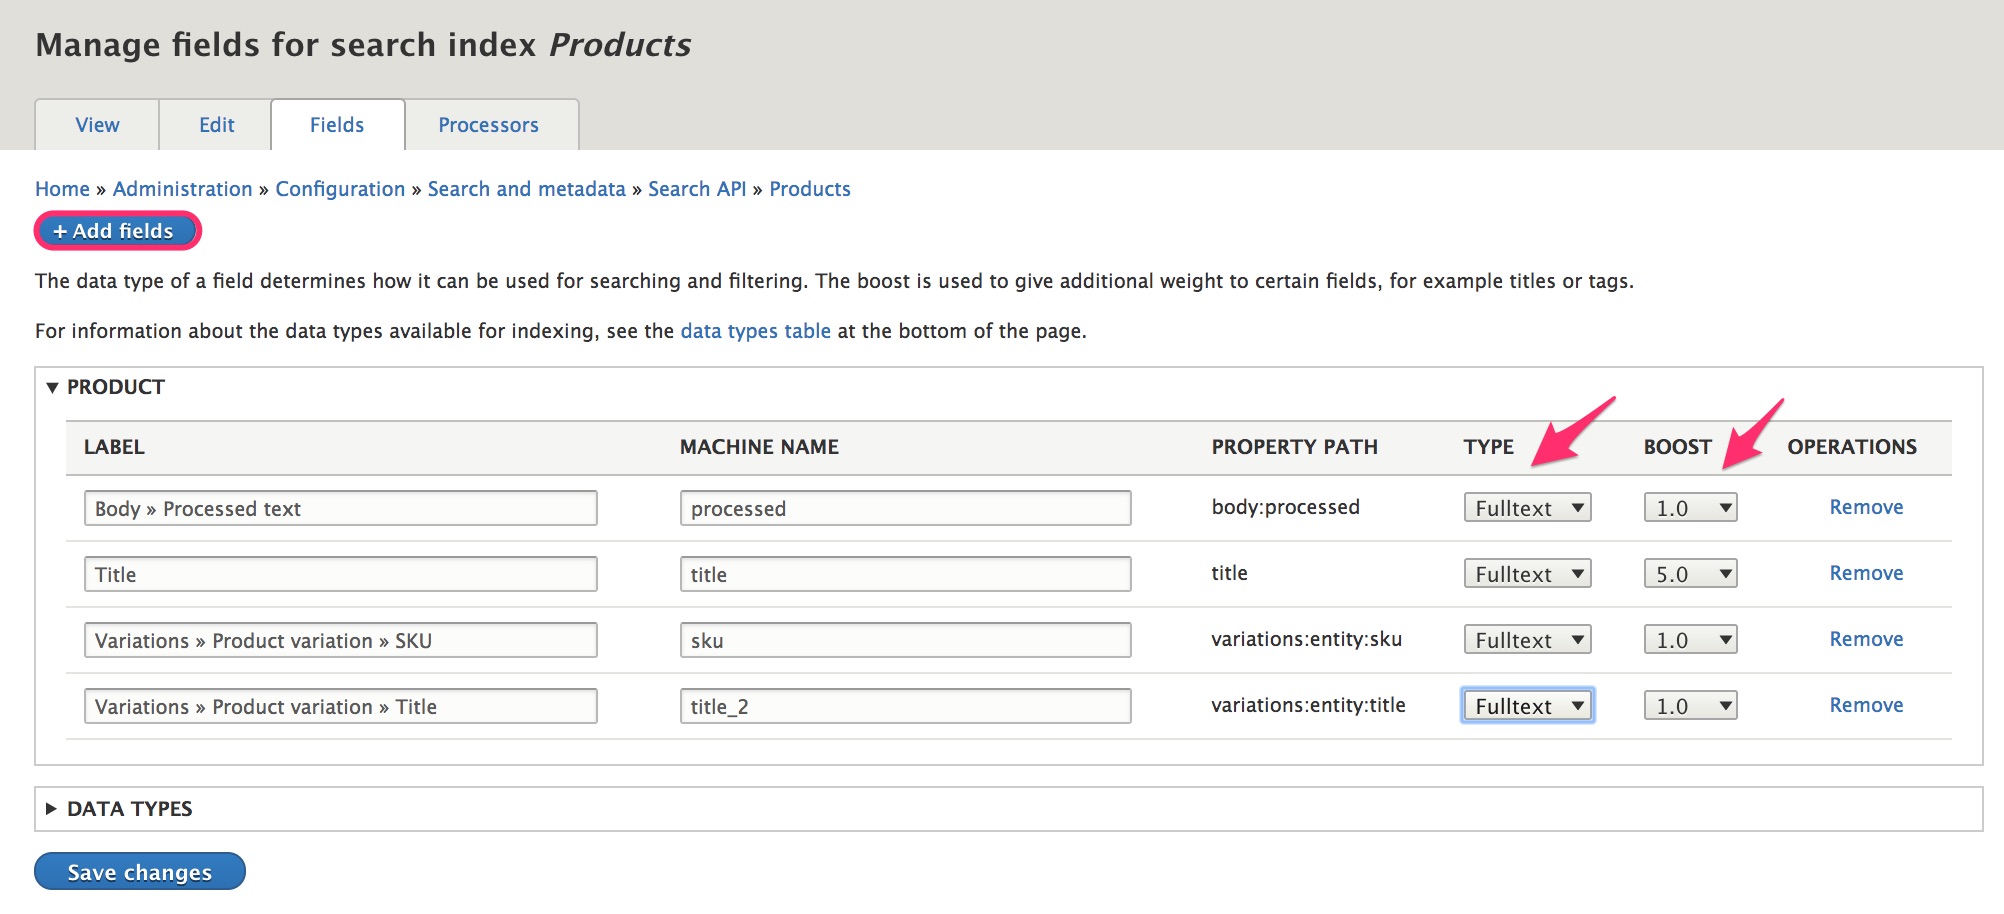
Specify the Type for each of the added fields. We've added Title, Product variation SKU, and Product variation Title fields to this search index. Since we want to be able to find individual words contained in our search fields, not just the whole field value, select Fulltext for each of the fields. (You can use non-Fulltext field types when you only want to use a field for filtering or sorting.)
-
Set the Boost value for each of the added fields. Fields with higher boost scores will be boosted towards the top of the search listings. For example, if the Product Title has a boost score of 5, and other fields only have a boost score of 1, then products with the search term in their title will appear higher in the search results than products that only have the term in other fields.
Step 5: Configure processors
Example
- Navigate to the Search API processors administration page at
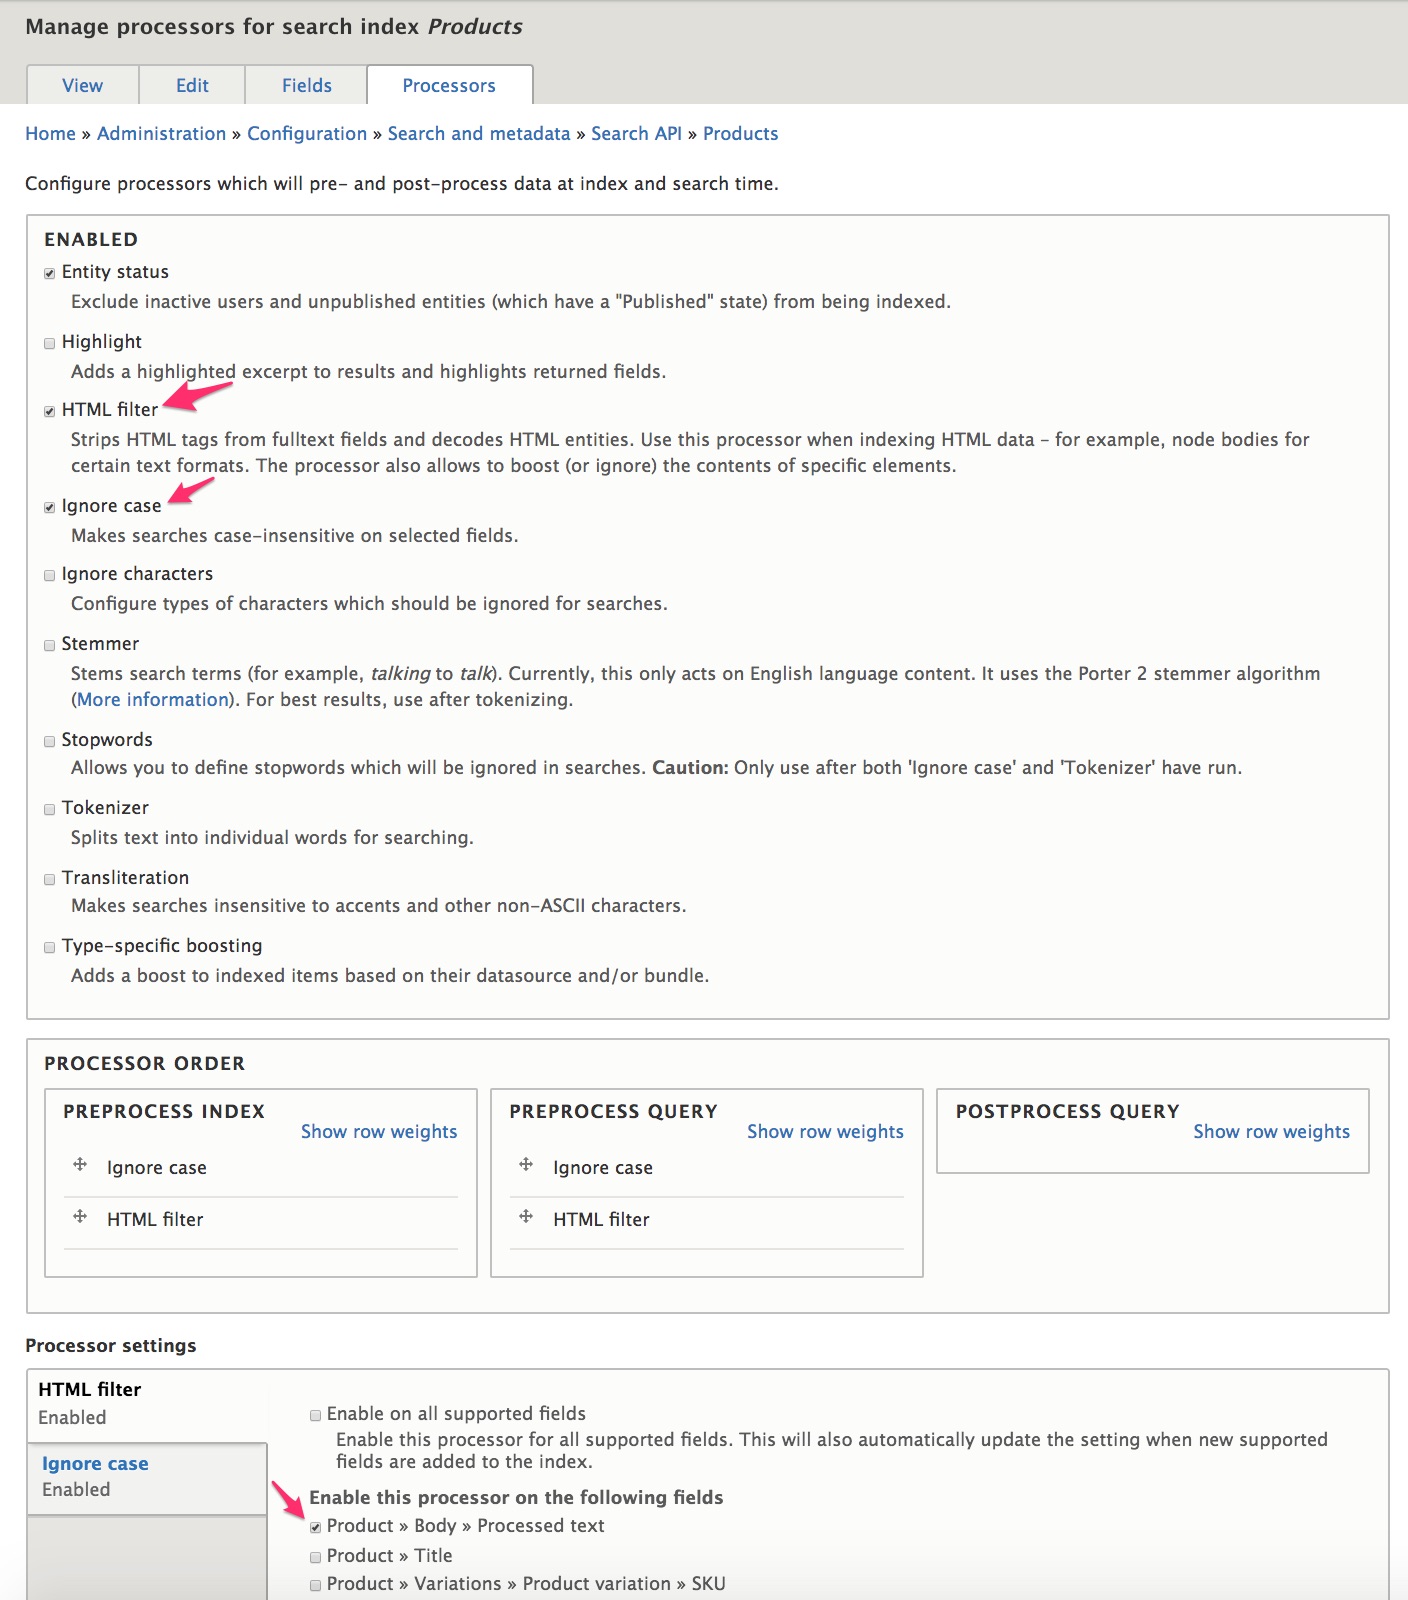
/admin/config/search/search-api/index/products/processors. - Enable the processors you want to use. We'll select Entity status, HTML filter, and Ignore case.
- You can use the default settings for the Processor order settings.
- Then, for each of the selected processors, you may have some additional settings to configure:
- For the HTML filter processor settings, we only need the processor to be enabled for the product Body field. So deselect the other options. Leave the Tag boosts as is.
- For the Ignore case processor settings, just use the default settings.
Create a basic product search page
Next, we'll set up a basic search page for our indexed data using Views and the Drupal core Block layout functionality.
Step 1: Create a products search view
Example
- Navigate to the Views administration page at
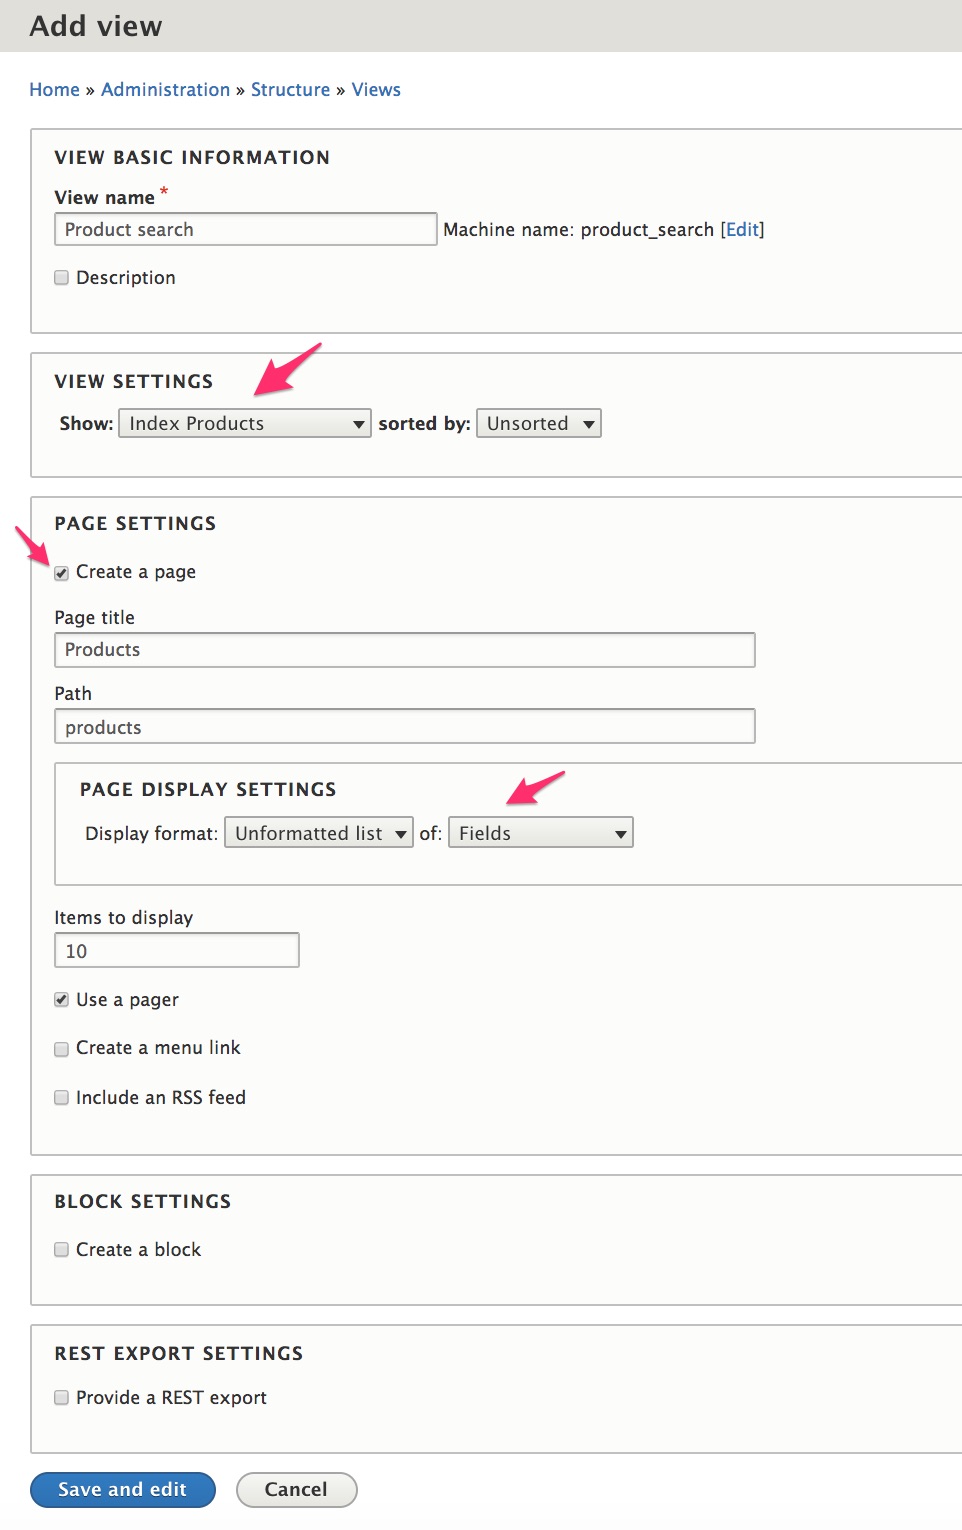
/admin/structure/viewsand click the Add view button. - Enter "Product search" for the view name.
- Select Index Products for the Show setting, under View settings. This is the index we created previously and named Products.
- Select Create a page, under Page settings.
- Enter "Products" for the page title and "products" for the path.
- For the Page display settings, select Unformatted list of Fields.
- Click the Save and edit button.
Step 2: Configure the products search view
Example
- In the Fields section, remove the Product datasource: Body >> Processed text field.
- In the Fields section, add and configure the Product datasource: Title field.
- Select the Plain Text formatter.
- Select the Link to the Product option.
- In the Fields section, add and configure the Product datasource: Body field.
- Select the Summary or trimmed formatter.
- Enter "300" for the Trimmed limit
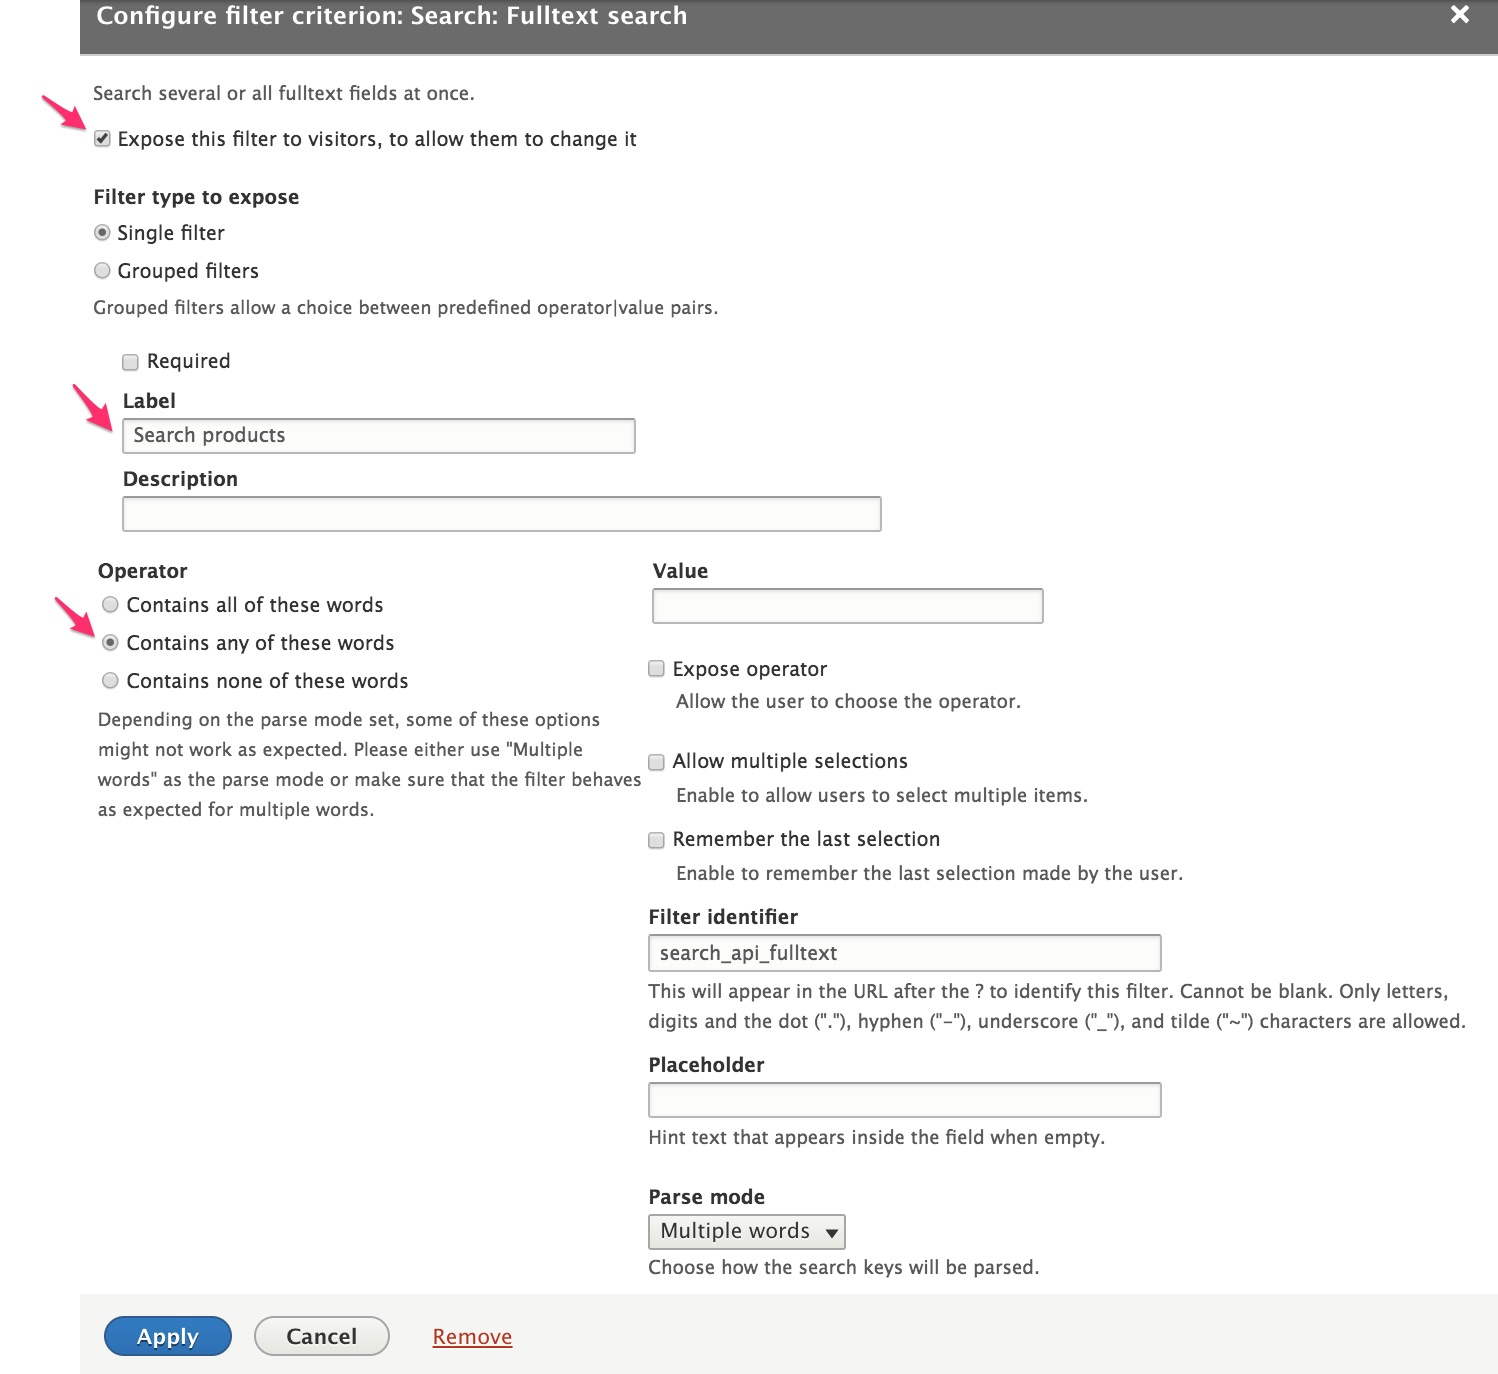
- In the Filter criteria section, add and configure the Fulltext search item:
- Select Expose this filter to visitors, and allow them to change it.
- Enter "Search products" for the Label.
- Select Contains any of these words for the Operator.
- In the Sort criteria section, add and configure the Relevance option.
- Select Sort descending for the Order.
- In the Exposed form section of the Advanced settings, click the No link next to Exposed form in block to change the setting to Yes.
- In the Exposed form section of the Advanced settings, click the Settings link next to Exposed form style to change the Submit button text to "Search".
- Click the Save button to save your changes.
Step 3: Add the search block to your pages
Example
- Navigate to the Block layout administration page at
/admin/structure/block. - Click the Place block button for the Content region.
- Click the Place block button for the Exposed form: product_search-page_1 block.
- Set the Visibility settings so that the block only appears on the
/productspage.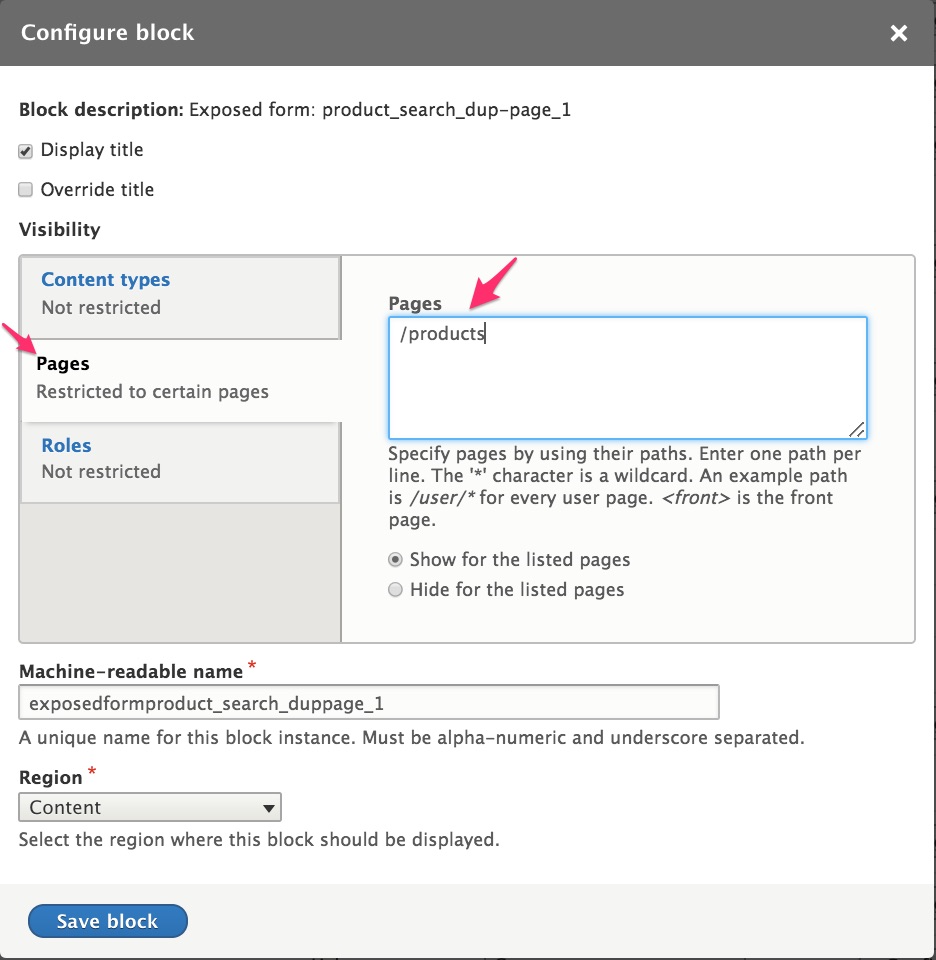
- Rearrange the Content blocks so that the Exposed form: product_search-page_1 block appears right below the Page title block.
- Click the Save blocks button at the bottom of the page.
- Navigate to your Products search page at
\productsto try your new search form.
Optionally, you may want to add a menu link to the \products page or add the search block to all pages, perhaps in the Header region.
Product Catalog Facets
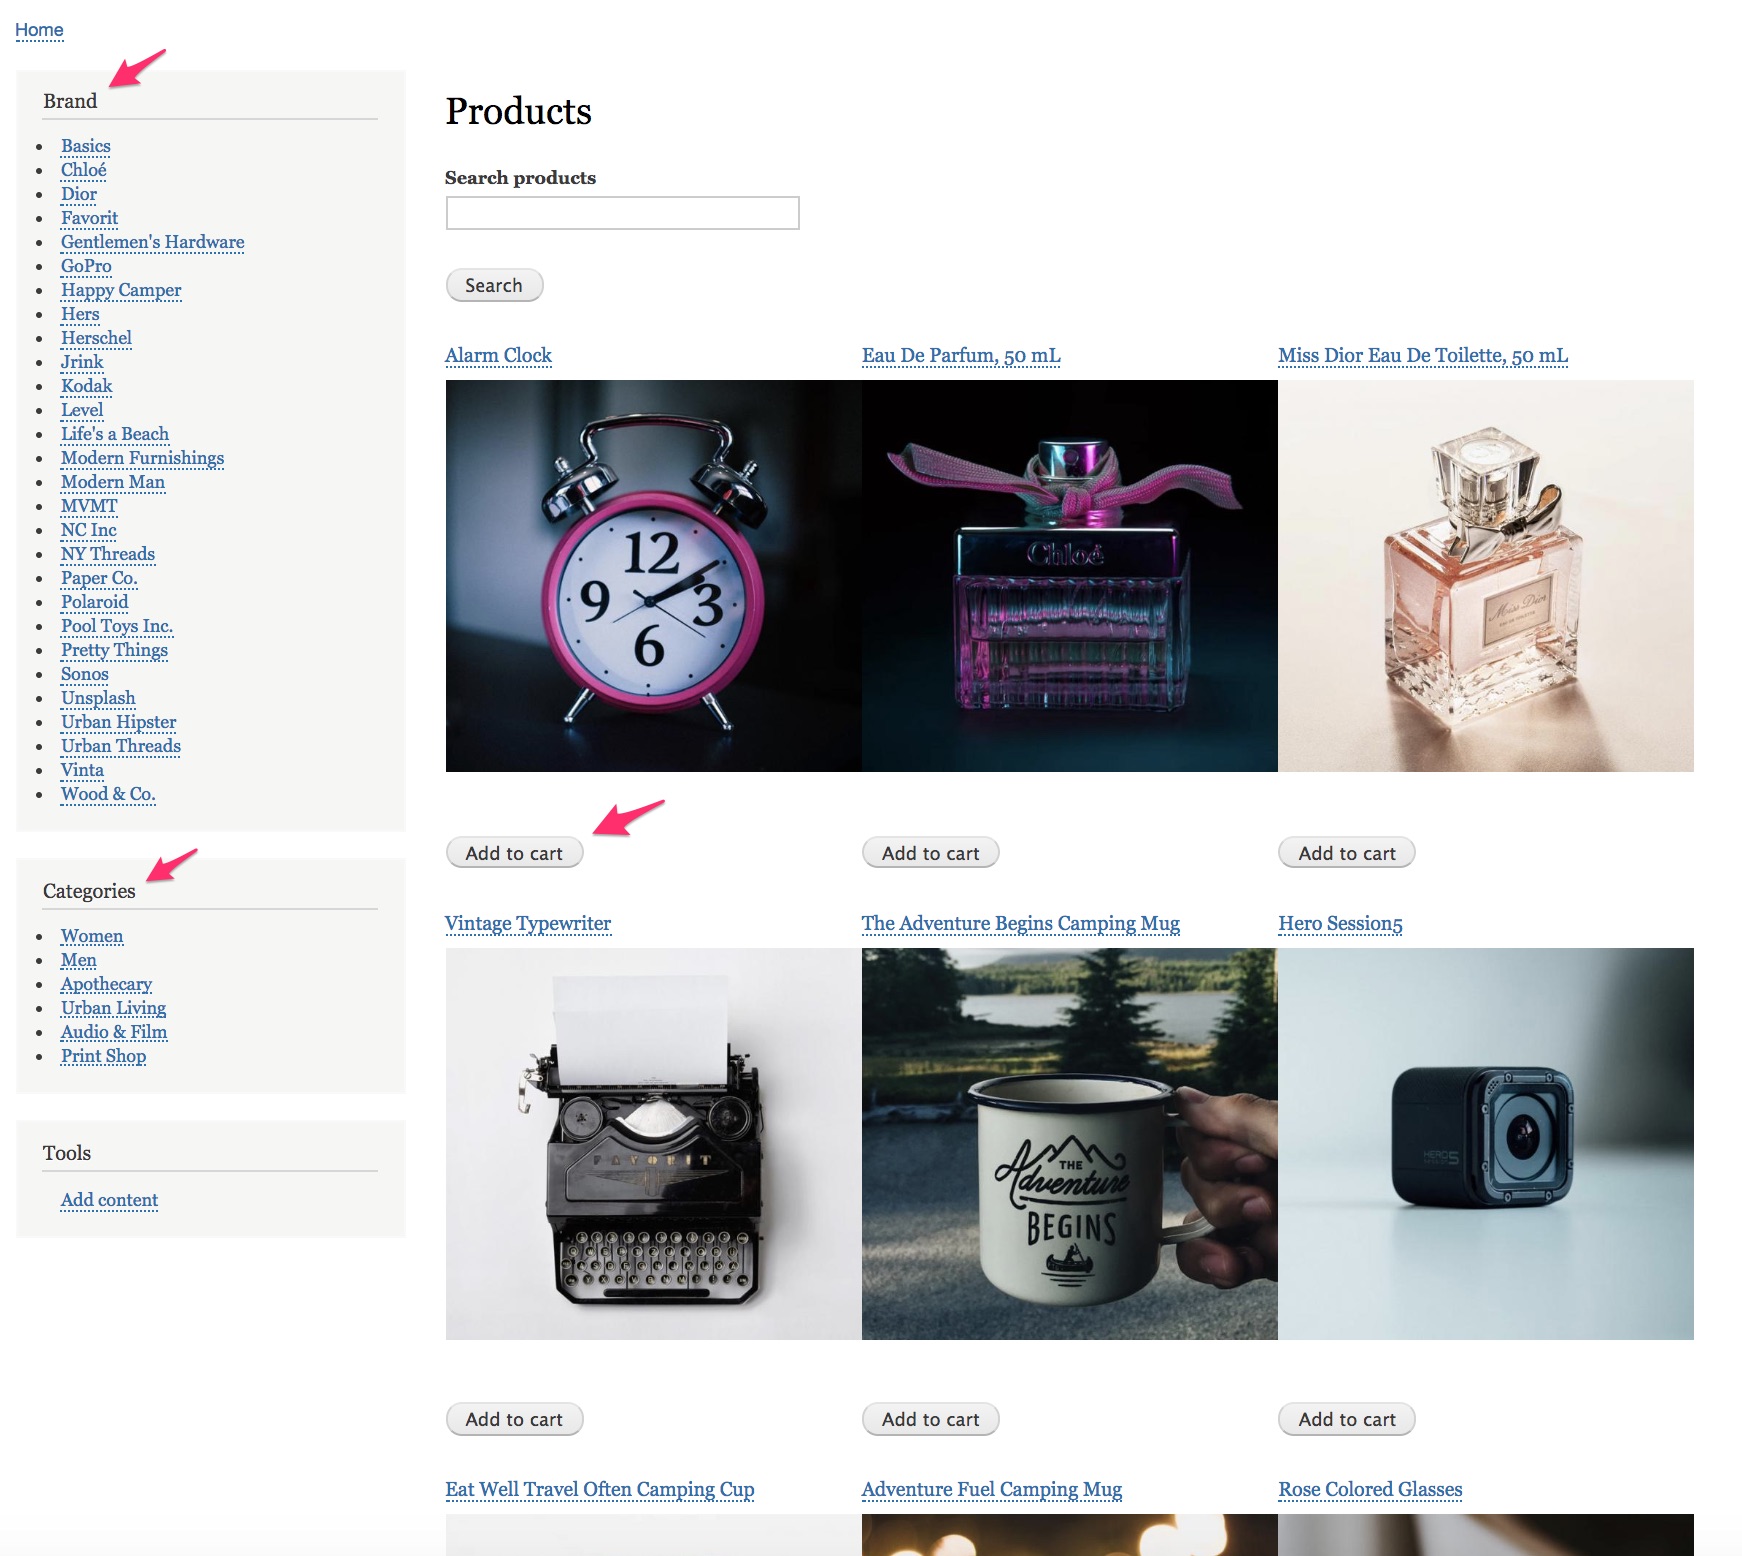
In this section, we'll transform the Basic product search page we already created into a Product catalog page with faceted search functionality. We'll use the Brands and Product categories taxonomies we created in the Product categories documentation. We'll also incorporate the Add to cart form into our product catalog listing to encourage browsing users to become buying customers.
Configure Search API
For the Basic product search, we installed Search API modules, added a server and an index, and selected the fields to be indexed for the search. For a faceted product catalog, we can use the same server and index. We'll just add a few additional fields and configure an additional processor.
Add fields to the Products search index
- Navigate to the Products search index fields administration page at
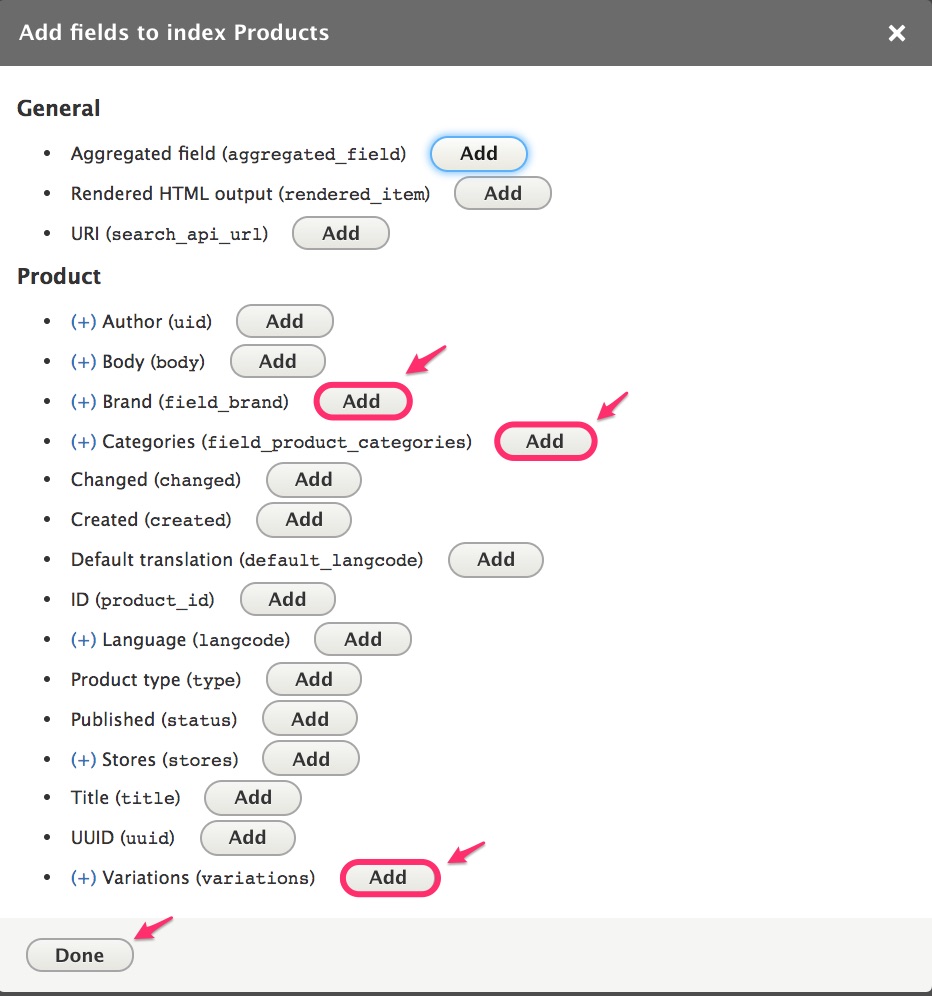
/admin/config/search/search-api/index/products/fields. - Click the Add fields button.
- For the facets, add the Brand and Categories fields.
- For the Add to cart form, add the Variations field.
- Click the Done button to add the fields.
- Click the Save changes button.
Enable the Index hierarchy processor
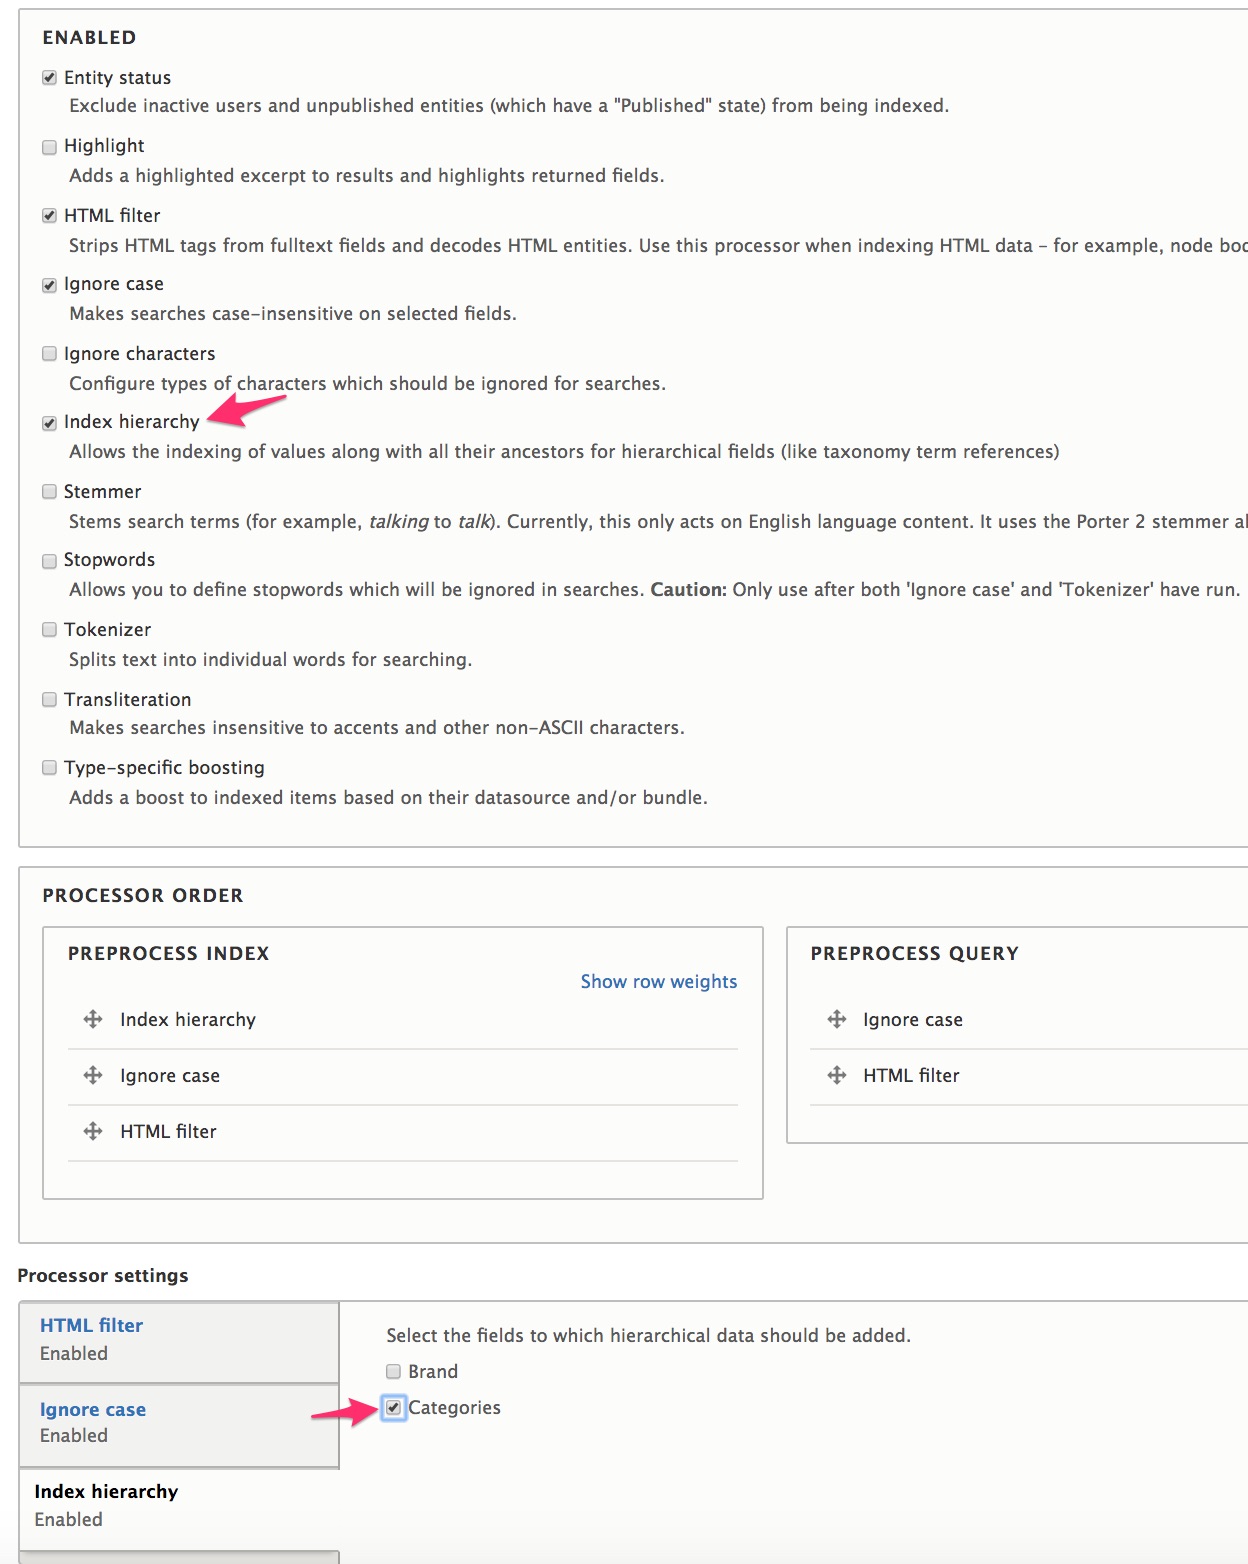
Since Categories is a hierarchical taxonomy, we'll enable the hierarchy processor.
7. Navigate to the Products search index processors administration page at /admin/config/search/search-api/index/products/processors.
8. Select Index hierarchy as an enabled processor.
9. In the Processor settings section, select Categories as the field to which hierarchical data should be added.
10. Click the Save button.
Configure the product catalog view
We're going to build upon the Product search view we created for the Basic product search documentation, to save a few steps here. The following steps assume that you have already created a view and will add an additional display. Alternatively, you could create the view and then make changes directly to the original Page view for your faceted product catalog page.
Add a Product catalog display to the product search view
- Navigate to the administration page for the Product search view at
/admin/structure/views/view/product_search. -
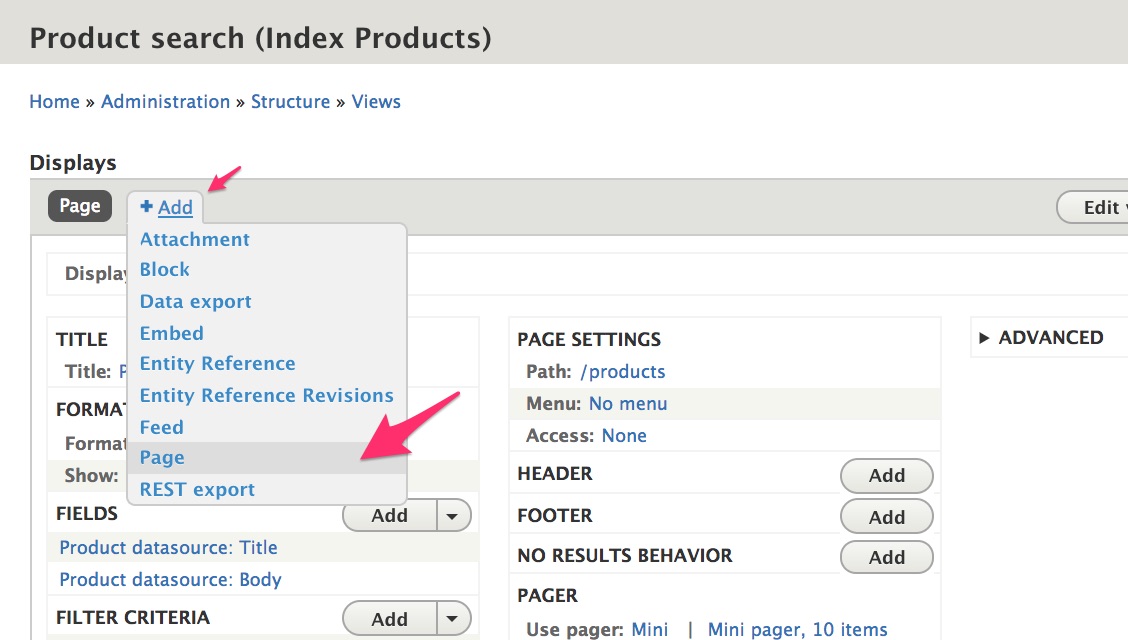
Click the Add button under Displays to add a new Page display.
-
Click the Page 2 link next to Display name to change the display name to "Product catalog".
- In the Page settings section, click the No path is set link next to Path to set the path to "product-catalog".
- In the Pager section, change the Items per page to "12".
-
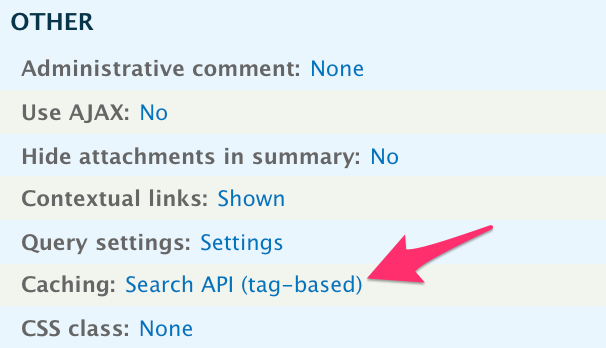
In the Advanced section, under Other, change the Caching setting to "Search API (tag-based)". Otherwise, facets break:
Customize the product catalog display
For these steps, make sure that you select This page (override) before applying changes. Also, see Configure the Product Brand View fields in the Multi-product displays documentation for a more detailed description, with screenshots, of the configuration options we're applying here.
-
In the Format section, click the Unformatted list link next to Format to select Grid for the view style. Then click the Settings link next to Grid to change the number of columns to 3.
- Remove the Product datasource: Body field.
- Add a Variations (Product datasource) field.
- Select Use entity field rendering.
- Select Rendered entity for the Formatter.
- Select Single image for the View mode.
- Enter "1" for the number of values to display.
- Add a second Variations (Product datasource) field.
- Select Use entity field rendering.
- Select Add to cart form for the Formatter.
- Enter an Administrative title to distinguish this variations field from the other.
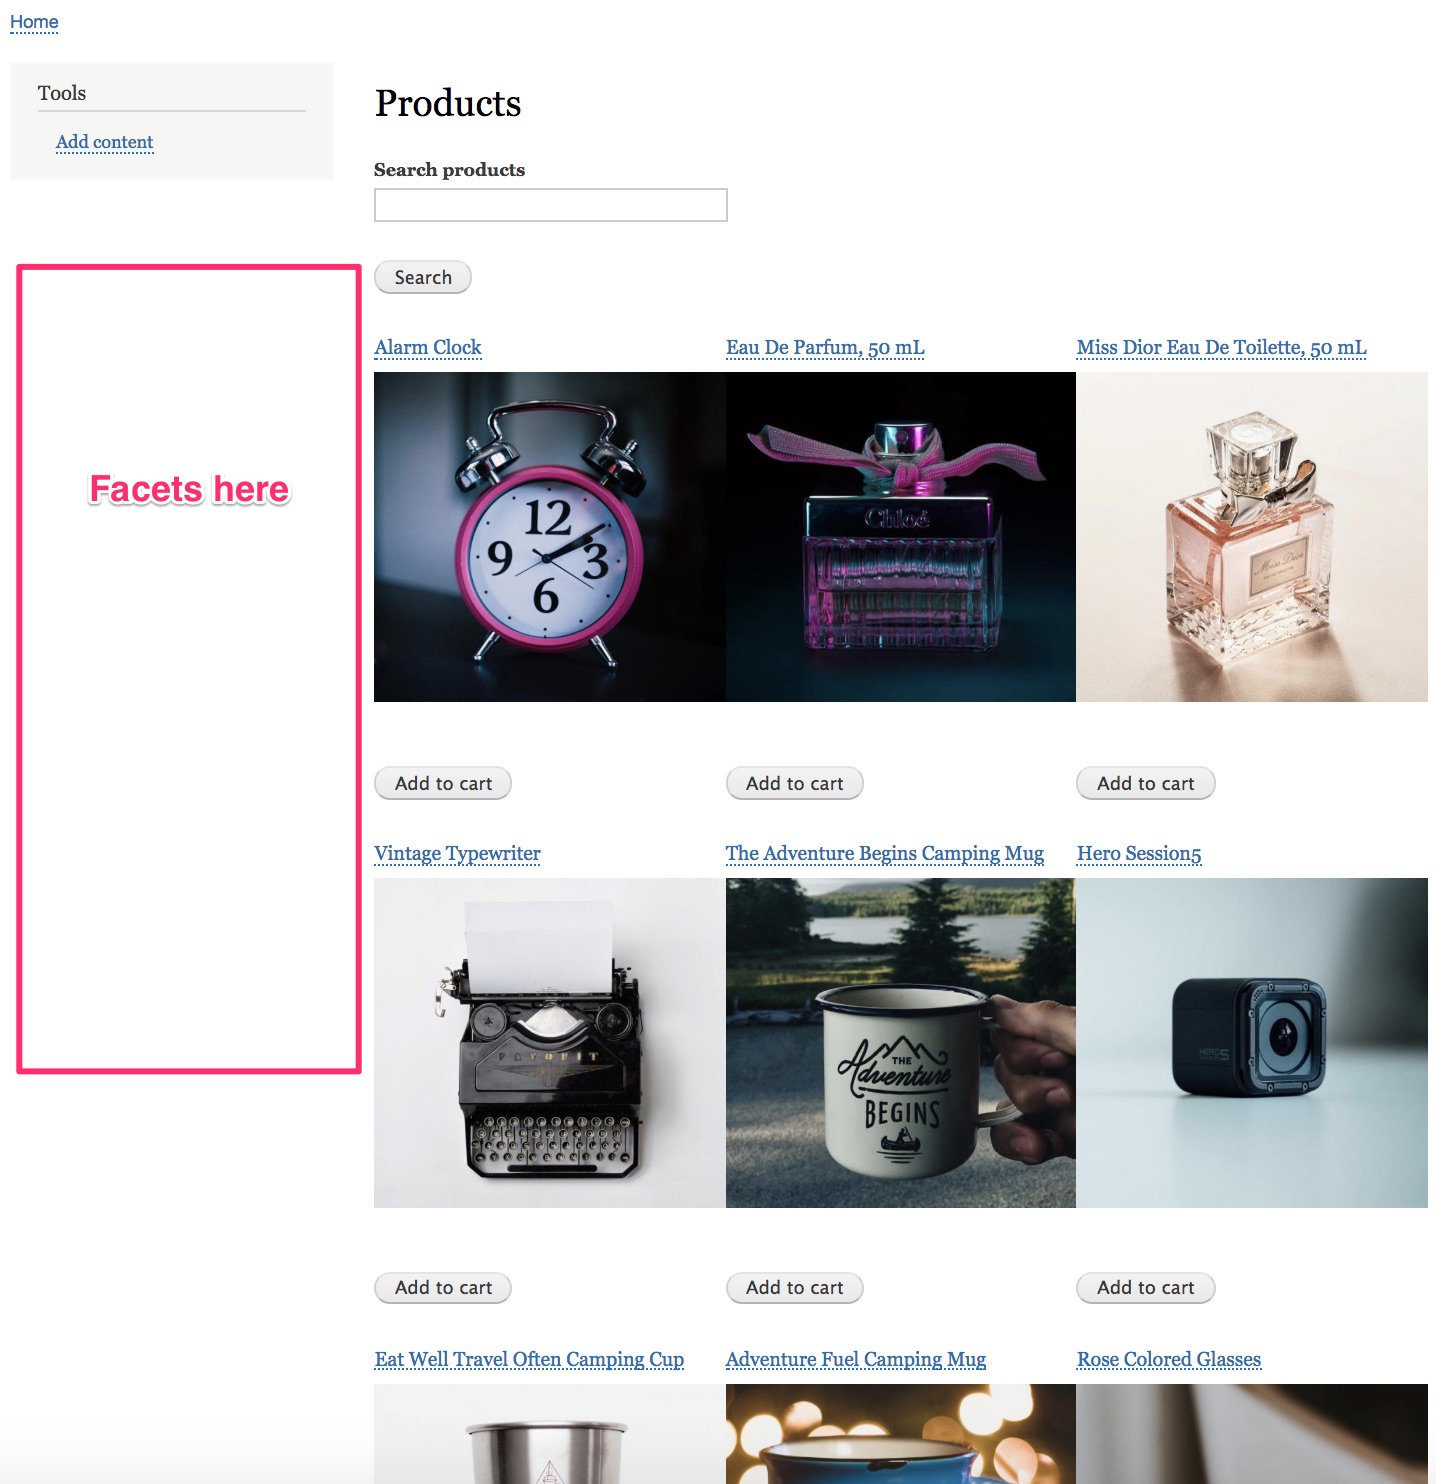
If you navigate to the product catalog page, at /product-catalog, we now have a searchable grid-style product catalog, with add-to-cart buttons. Only the facets are missing.
Adding facets to the view
Create facets
Install and administer facets
- Add and install the Facets module. (See the documentation on extending Drupal Commerce.)
- Navigate to the Facets administration page at
/admin/config/search/facets, where you will see all existing views of type DB index.

Add the Brand facet
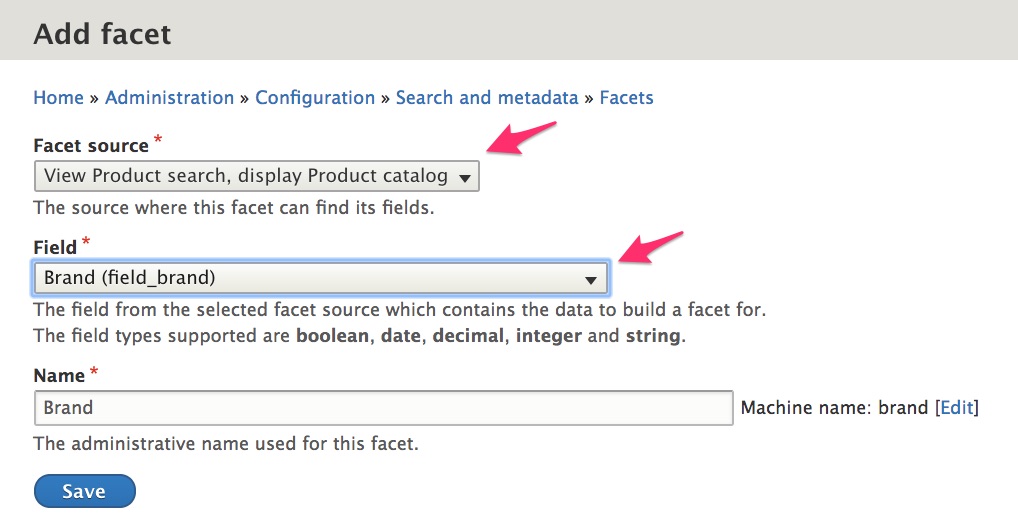
- Click the Add facet button on the Facets administration page.
- For the Facet source, select the view and display for which you want to create facets.
- Select the field to be used as the data source for the facet. In this case, we'll select the Brand field.
- Enter a name for the facet, like "Brand".
- Cick the Save button.
Configure the Brand facet
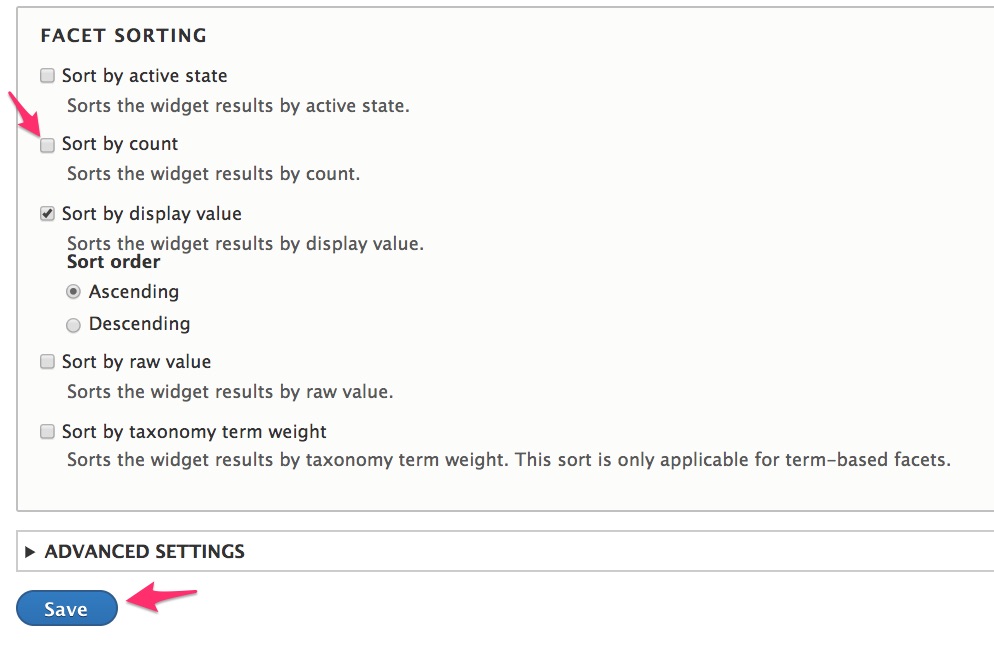
- In the Facet Settings section, select Transform entity ID to label so that the Brand names will be displayed instead of their numeric IDs.
- In the Facet Sorting section, de-select Sort by active state and Sort by count so that products will appear alphabetically.
- Click the Save button to apply the changes.

Add the Categories facet
- Return to the Facets administration page at
/admin/config/search/facets. - Repeat the Add the Brand facet steps to add a facet for the Categories field.
Configure the Categories facet
- In the Facet Settings section:
- Select Transform entity ID to label.
- Select Use hierarchy, since Categories is a hierarchical taxonomy.
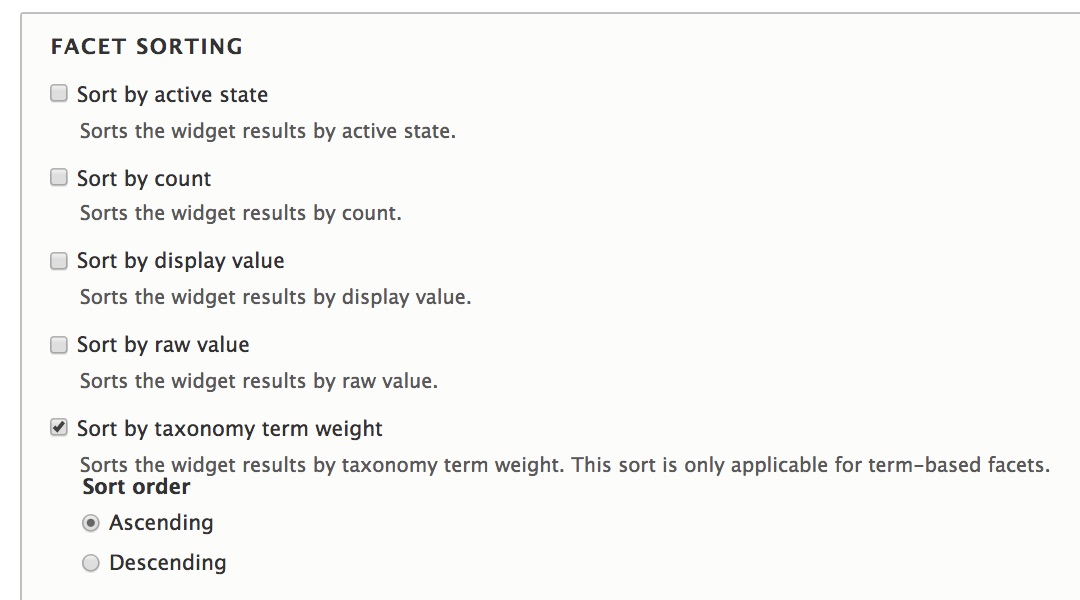
- In the Facet Sorting section, select only Sort by taxonomy term weight to use the ordering previously set for the Categories taxonomy.
- Click the Save button to apply the changes.


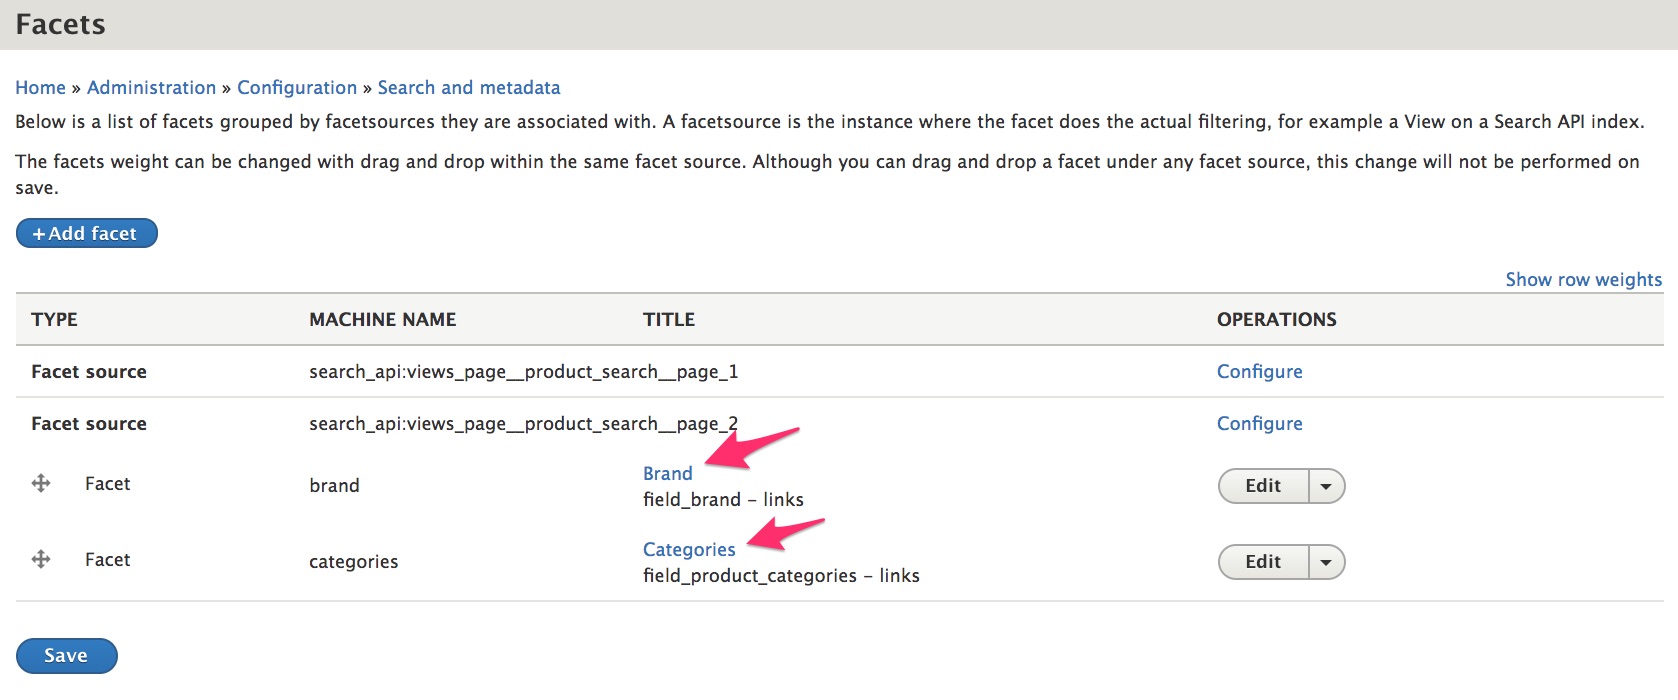
We have now created two facets, which can be viewed on the Facets administration page and are available as blocks.
Place facets block on the product catalog page
- Navigate to the Block layout administration page at
/admin/structure/block. - Click the Place block button for the Sidebar first region.
- Click the Place block button for the Facets Brand block.
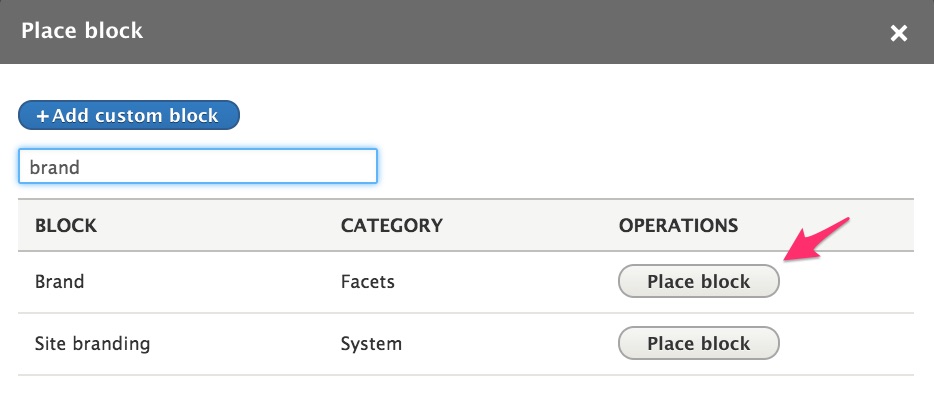
- For the Configure block settings, the default values are fine. Click Save block to add the Brand block.
- Repeat steps 2-4 for the Facet Categories block.
- Rebuild the cache and navigate to the Product catalog page at
/product-catalogto view the results.
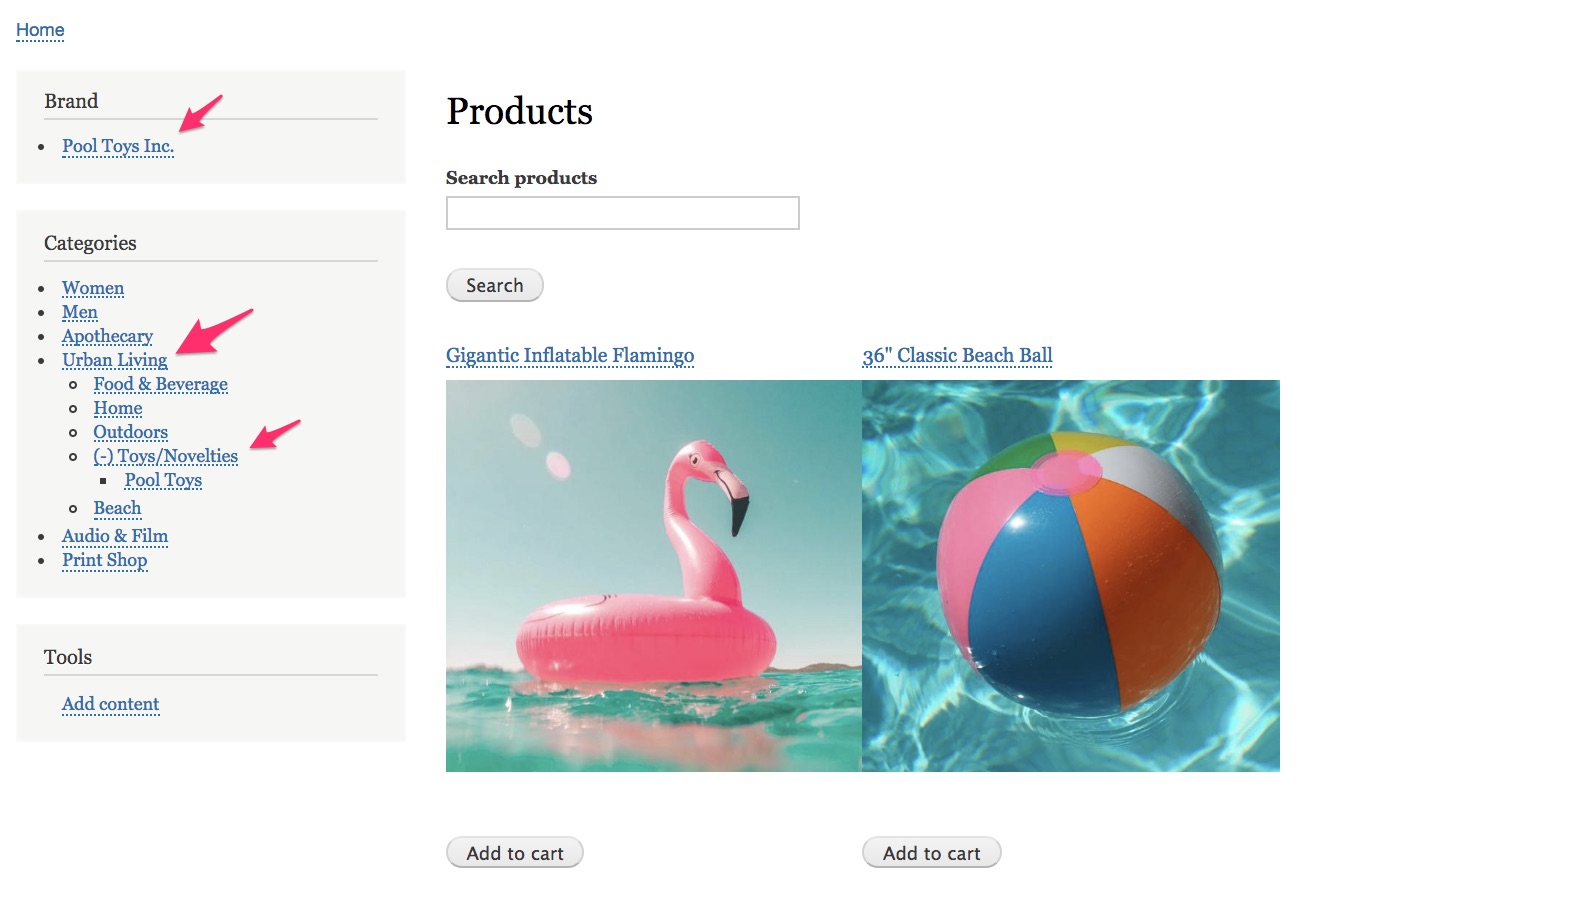
For the screenshot below, I selected the Urban Living Category. Then its five sub-categories appeared. Selecting Toys/Novelties reduced the number of matching products to just two. Notice that only the single Pool Toys Inc. Brand is listed, since that is the brand for both toys.
Links and resources
- Search API module documentation
- Drupal 8 User Guide documentation on Creating Listings with Views
- Drupal 8 User Guide documentation on Concept: Blocks