Installing and updating
Before you begin
Drupal Commerce is managed with Composer. If you are not familiar with it, read Using Composer with Drupal before continuing. We use Drush for site management operations throughout this documentation.
Requirements
-
Commerce 3.x requires Drupal 10.3 or newer, including Drupal 11. Generally we require the latest minor releases of Drupal core, as they contain improvements that we use.
-
PHP 8.1 or newer, with the bcmath extension. Your Drupal core version may require a newer PHP version (Drupal 11 requires PHP 8.3), see Drupal's system requirements. The recommended memory limit is 256MB or more.
-
To properly take advantage of Drupal's configuration management system, you should always develop locally. We recommend DDEV.
-
You will also need Composer. We recommend that you use the newest version of Composer.
Installation
Installing Commerce to contribute back? Check out our Contributing guide.
Be sure to review requirements before starting the installation process.
Commerce Kickstart is the fastest way to start building on Drupal Commerce. It installs Drupal 11, Commerce Core and the Centarro Certified Projects (a curated set of Centarro maintained modules and themes). Use it to develop and test in a feature-rich environment, or as the starting point for your store.
composer create-project centarro/commerce-kickstart-project kickstart
The installer includes an additional step where you can install a full demo store for evaluation purposes, or start building and launch your store right away. The demo is provided by the Commerce Kickstart Demo recipe and is not intended for existing sites. If you don't need it:
cd kickstart
composer remove drupal/commerce_kickstart_demo
See the Commerce Kickstart project template README for more details, and the quick start with DDEV to get it running locally.
If you already have a Drupal site, run these commands in its root. Starting from scratch? Create a site with the Drupal recommended project template first:
composer create-project drupal/recommended-project mystore
cd mystore
Download Commerce
This also downloads the required libraries and modules (Address, Entity, State Machine, Inline Entity Form, Profile, Token).
composer require drupal/commerce
Enable Commerce
drush en commerce_product commerce_checkout commerce_cart
Warning
Composer is the recommended way to install and maintain a site. Site administrators using Ludwig need to be careful when combining modules that depend on external libraries, since there are no safeguards against incompatible library versions or overlapping requirements. Updating and maintaining your site will also be more difficult.
The Ludwig module offers a manual alternative to Composer. These instructions assume you are working with an existing site. See the Drupal.org documentation on Installing Drupal if you do not have an existing site.
-
Download and install the Ludwig module.
-
Download Commerce and the following required modules. Do not install the modules yet.
-
Ludwig generates a listing of libraries required by those modules. The Packages page at
admin/reports/packagesprovides a download link for each missing library along with the paths where they should be placed.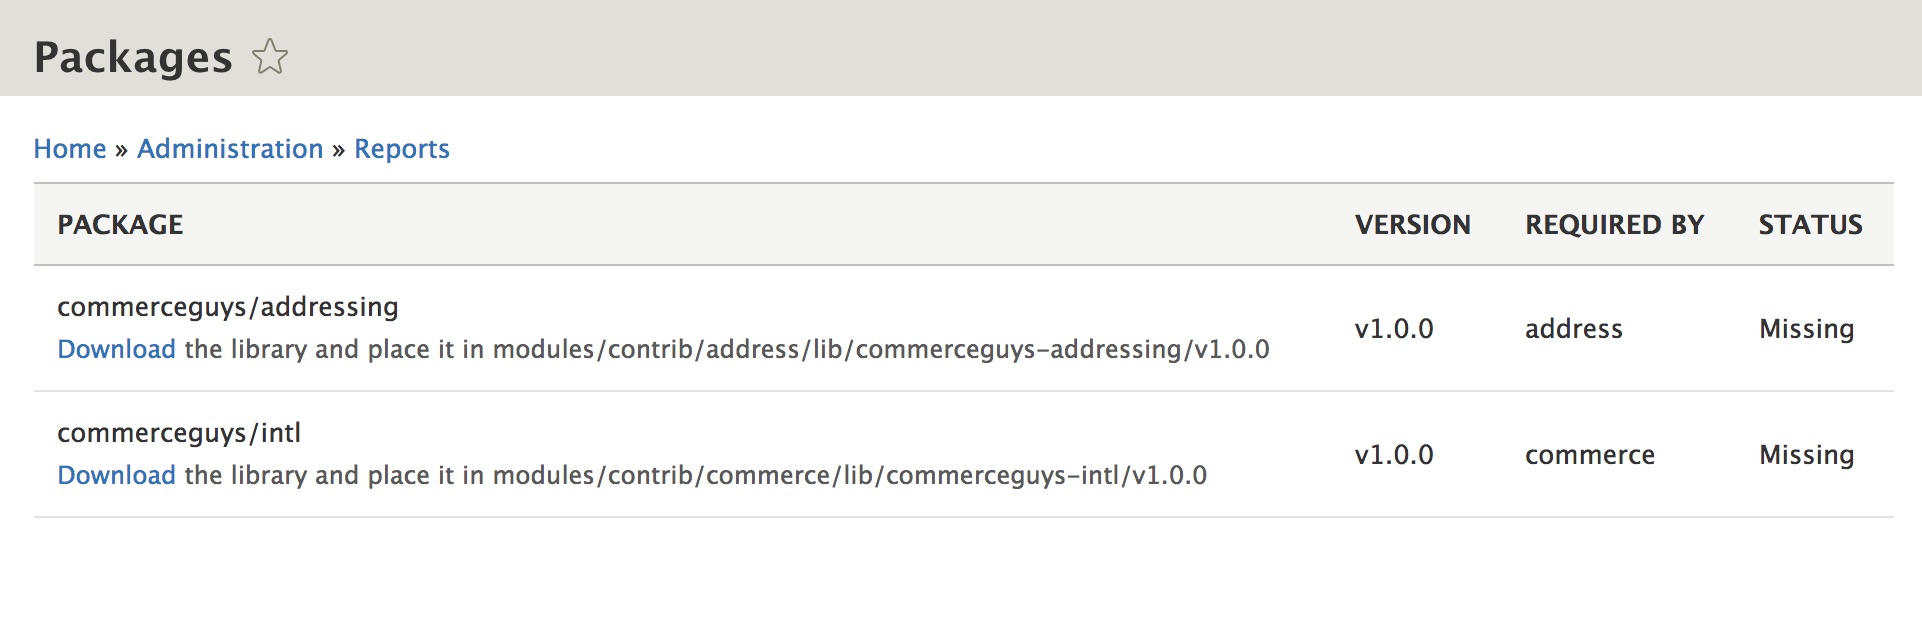
-
Download the libraries, then clear the cache to make them available. For example, download commerceguys/addressing and place it in the path listed for it under
modules/contrib/address/lib. You should see the STATUS for each required package change from "Missing" to "Installed". Alternatively, rundrush ludwig-downloadto download missing packages. -
Install Commerce and the required modules.
Whenever Commerce needs to be updated, all modules need to be downloaded again, and then all of their libraries need to be downloaded again as well.
In subsequent sections it is assumed that you are using Composer to manage your site.
Quick start with DDEV
Requirements
Create your project
composer create-project centarro/commerce-kickstart-project kickstart
cd kickstart
ddev config --project-type=drupal11 --docroot=web
ddev start
Tip
If your local PHP version doesn't match the DDEV container, append --ignore-platform-reqs to Composer commands run on your machine,
or run them inside the container instead (ddev composer ...).
Install Drupal
ddev launch
Follow the installer in your browser. DDEV configures the database connection for you.
Alternatively, install from the command line with ddev drush site:install.
Getting started
The very first thing you'll want to do to get started with Drupal
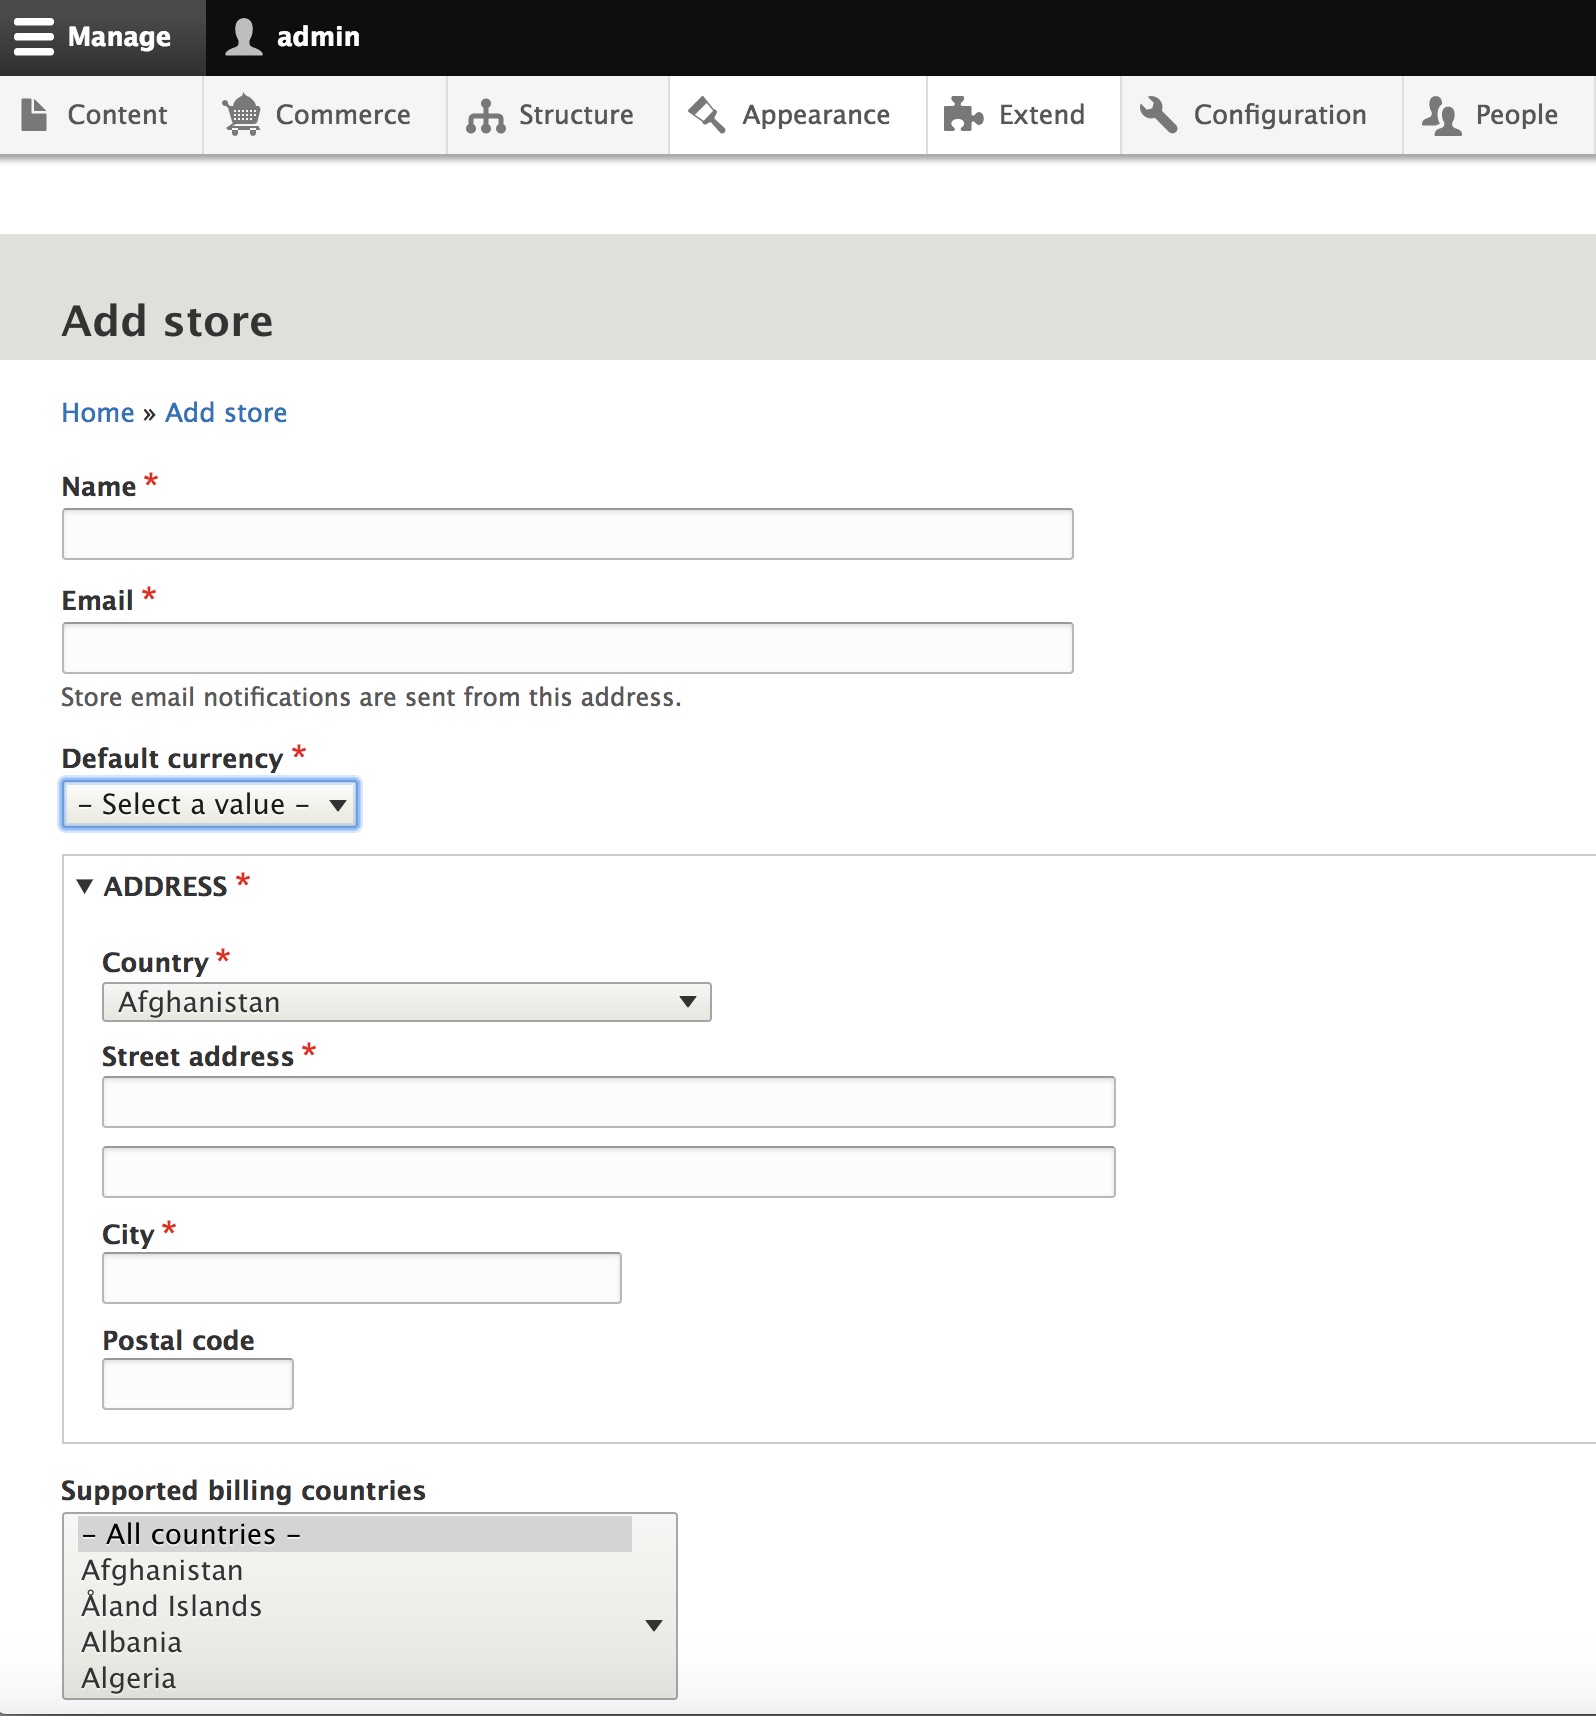
Commerce is to create a store (unless you installed the Kickstart demo, which creates one for you).
Under the Commerce menu in the toolbar, navigate to Configuration > Store > Stores and click the Add store button.
Once you've created a store, you'll be able to create products and start
developing the rest of your site.
Updating
Important: You must use Composer to update Drupal Core, Drupal Commerce, and all contributed modules. Otherwise, your site will break. Also, you should always back up your site before starting an update procedure. See Concept: Data Backups documentation in the Drupal User Guide for more information.
It is critically important that you keep up-to-date with Drupal security advisories. You can subscribe to the "Security announcements" newsletter in your Drupal.org user profile settings.
In order to keep Drupal Commerce and your other installed modules up-to-date,
you can use Composer to produce a list of outdated modules with the Composer
outdated command:
composer outdated --direct
Then for each outdated project, you can use the Composer update command:
composer update drupal/token --with-dependencies
To update to the newest version of Drupal Commerce:
composer update drupal/commerce --with-dependencies
Please note the --with-dependencies option. Without this option
specified, any needed, contributed projects and libraries will not
update. Only the Drupal Commerce module will be updated.
Run your Drupal updates once all the dependencies are updated. We
recommend running them on the command line rather than the
update.php script:
drush updatedb
Composer update tips
If your composer update command isn't working, you can try:
- Run
composer why-notto check dependency issues. - Run
composer removethencomposer requireto reinstall the project. - Delete the
composer.lockfile and entire /vendor directory from your project and then runcomposer install. - Run
composer clear-cache. - Run
composer self-update.
Drupal uses a patch system to provide solutions to issues in between version releases. If you are unfamiliar with the concept of patching, you can learn about Patches at drupal.org and check the Patching section below.
Extending
One of the primary strengths of both Commerce and Drupal is that they are open source projects. There is a large, active community of developers who contribute to these and related projects. As a result, you will find that it's easy to extend Commerce with freely available, "contributed" modules. And if you can't find something to meet your needs, you can always create your own modules as well. Contributed modules as well as extensive documentation about extending your Drupal site can be found on drupal.org. A good place to start is Extending Drupal.
For Commerce, you can find everything from modules that provide major types of functionality to smaller modules that provide unique, specialized functionality. For example:
- Commerce Shipping makes it possible to ship physical products to your customers.
- Commerce Recurring makes it possible to provide subscriptions and recurring billing.
Extending your composer-managed site with additional modules is a straightforward process. Each Drupal module has its own project page on drupal.org with information and instructions. To add a module using composer, the command is:
composer require drupal/commerce_shipping
Where commerce_shipping is the name of the module you want to add to your
project. Composer will add the module as well as all of its dependencies.
Then you can install the module using the Admin UI (/admin/modules) or Drush:
drush en commerce_shipping
Adding custom modules from GitHub
Many Drupal developers use GitHub for their initial module development work. So you may find that a module you'd like to use to extend your site is available on GitHub but not on Drupal.org. So how do you add that custom module to your composer-managed site? You can use Composer Installers, a multi-framework composer library installer. Please see How to download a module hosted on GitHub via composer.json? on Drupal Answers for a good example of how to do this.
If you are developing custom modules locally yourself, see Managing dependencies for a custom product for an explanation of using Composer to manage your dependencies.
Uninstalling
In order to completely remove Commerce from your Drupal site, you will first
need to delete all existing data. You can do this through the Admin UI using
the Extend toolbar item and then clicking on the Uninstall tab.
Type 'commerce' into the text box at the top of the page to filter the list by Commerce modules.
Scan through the list for items that say:
There is content for the entity type:
Click the provided link to permanently remove the content for each entity type.
For example, if you have created a Store for your site, you will see:

Click the Remove stores link.
Once all content has been removed, you can start uninstalling the commerce modules. You will only be able to uninstall a few at a time because of dependencies. For example, you will not be able to uninstall the base Commerce module until all other commerce modules are uninstalled. Note: if you have extended your Drupal Commerce site with any modules that are dependent upon Commerce, those modules will also need to be uninstalled before you are able to uninstall Commerce.
Here you can see boxes checked for 5 of the Commerce modules which can be
uninstalled. After clicking the Uninstall button, it will be possible to
uninstall additional modules.
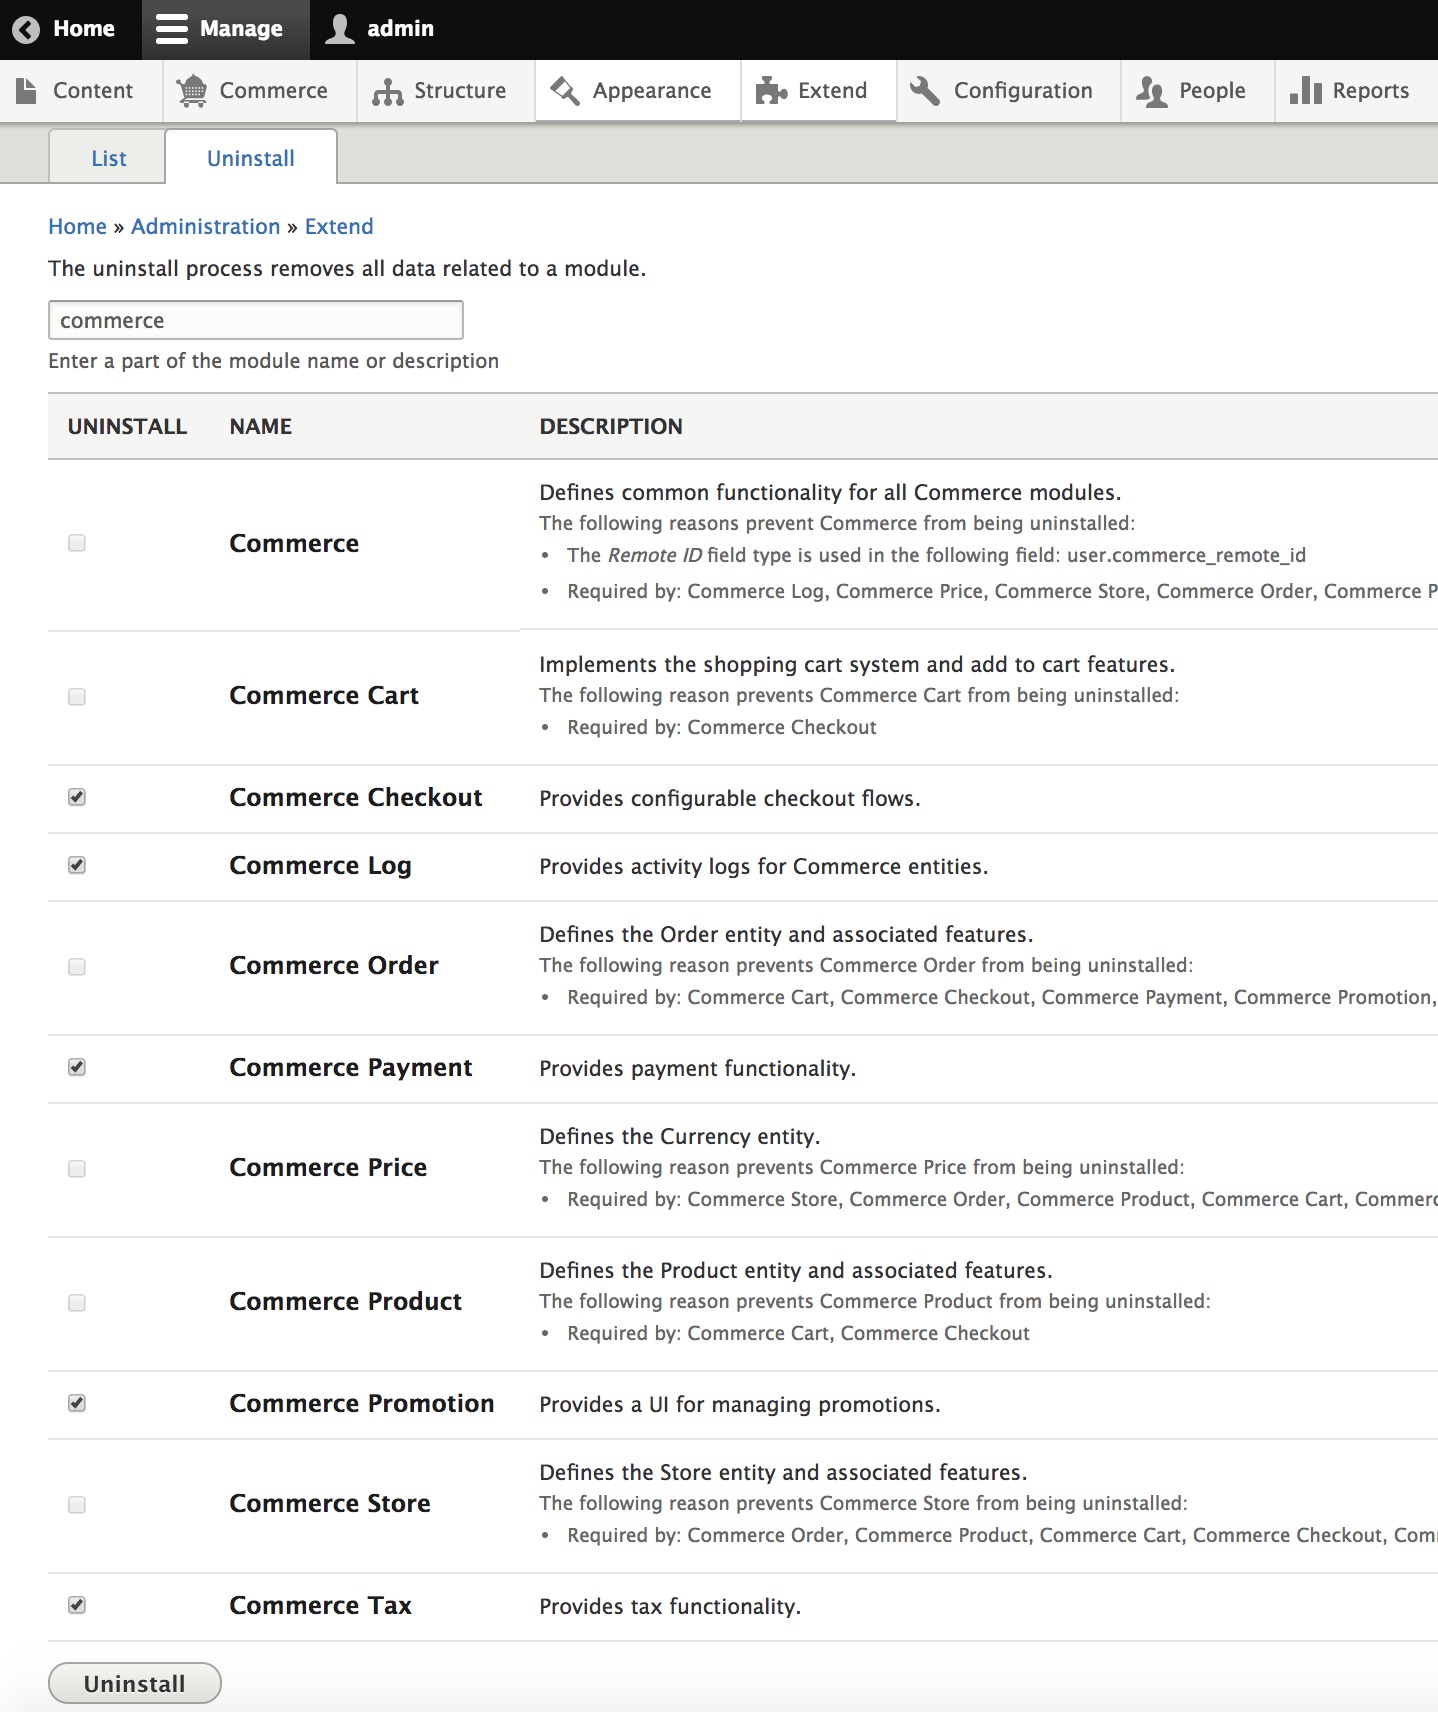
Since the Commerce base module provides a field type, it cannot be uninstalled together with the other modules. This is a known Drupal limitation. You will be blocked from uninstalling Commerce and see a "Fields pending deletion" message. You can delete the field in question by running Cron. You can run Cron through the Admin UI by navigating to Configuration > System > Cron.
Once all Commerce modules have been uninstalled, use Composer to remove the Commerce dependency from your project.
composer remove drupal/commerce
At this point, Commerce and all its data have been uninstalled from your Drupal site.
Patching
Drupal uses a patch system to provide solutions to issues in between version releases. If you are unfamiliar with the concept of patching, you can learn about Patches at drupal.org.
Composer-managed sites apply patches with the composer-patches plugin. Commerce Kickstart includes it; otherwise add it with:
composer require cweagans/composer-patches
Then suppose you want to apply a patch for a Drupal Commerce issue: Issue #2901939: Move variations form to its own tab
-
Copy the link address for the patch you want to apply. In this case, the link address for the patch is
https://www.drupal.org/files/issues/2018-05-18/commerce-product-variations-tab-2901939-40.patch -
Add a "patches" group to the "extra" section of your
composer.jsonfile:
"extra": {
    "patches": {
        "drupal/commerce": {
            "2901939: Move variations form to its own tab": "https://www.drupal.org/files/issues/2018-05-18/commerce-product-variations-tab-2901939-40.patch"
        }
    }
}
Note that "drupal/commerce" is the project name. Then for that project, you provide the specific patch information. Add one entry per patch, and one group per project.
Once you've made the changes to composer.json, you can apply the patch by running:
composer update drupal/commerce