Pricing
- Product Pricing Rules (with screencasts)
- Currency Conversion
- Discounts and Coupons
- Price Components
- Rules Overview
- Sell Price Calculation
Product Pricing Rules (with screencasts)
Discounts in Drupal Commerce
Overview
- Create a discount using a rule
- Create a weekend (date-based) sale discount using a rule
- Create a tag-based weekend sale discount using a rule
Simple Discount
An example of a simple discount: You want to take 10% off everything in your store until further notice.
- Go to Store -> Configuration -> Product Pricing Rules
- Click "Add a pricing rule"
- Give your rule a name
- Under "Actions" click "Add Action"
- Under "Commmerce Line Item" choose "Multiply the Unit Price by Some Amount"
- The data selector should be "line_item"
- The amount should be .9 (in other words, multiply the price by .9).
- Now all products have 10% taken off of them.
Adding a Date Window to the Discount
Now we need to take our simple discount and make it effective for just one period of time. We'll use the "Simple Discount" approach above, but now we'll make it only applicable during this upcoming weekend.
- Create a discount as in the "Simple Discount" above.
- This time we'll add two conditions to the product pricing rule:
- System Date is Greater than Midnight April 23
- System Date is Less than Midnight April 25.
That's it. To test in a Linux environment you can temporarily change the server date using
sudo date MMDDHHMM
for example
sudo date 04231237
Don't forget to change the time back. Changing it like this makes a big mess of things.sudo ntpdate pool.ntp.org
Drupal Commerce Date-Based Discounts from Randy Fay on Vimeo.
Adding a Taxonomy Term To Drive Discounts
Now we're going to go much farther. We'll add a taxonomy term to our product entity to determine which sale events it should be subject to, and also add a date range.
There is a rather major complexity in this one. Rules does not have the ability currently to follow references (like product references and term references) very well, so we have to jump through some hoops to get access to them. It is do-able, but a bit mind-bending. We hope to see the rules issue relating to this land soon, but for now we have to use the tools we have.
- Add a taxonomy vocabulary called "Sales Events"
- Add a term to the vocabulary called "April Weekend Madness Sale"
- Add a term reference field to the "Product" product type referencing "Sales Events"
- Set the "Sales Events" value in one or more products to "April Weekend Madness Sale". We're essentially marking them for this sale.
- Create a rules component that determines whether the weekend is here:
- Administer -> Configuration -> Workflow -> Rules -> Components -> Add new component.
- Component plugin is "Condition set (AND)"
- Name is "Weekend of April 23"
- Continue
- Add two conditions which do data comparison against system date to select the weekend timeframe just as we did in the earlier, simpler example.
- Create another rules component that accepts a product as a variable which will determine whether the product is marked to be part of the sale. Note that the first three conditions we're adding here are just to force Rules to understand how to traverse the data. They seem quite complex at first, but it's actually just cookbook stuff.
- Administer -> Configuration -> Workflow -> Rules -> Components -> Add new component.
- Condition set (AND)
- Name: "Product is on sale"
- Variables: Data type "Entity - Product", Label "Product", Machine name "product"
- Add a condition
- Entity has field
- Data selector: product
- Field: field_sales_event
- Add another condition
- Data value is empty
- Data selector: product:field-sales-event
- Click negate.
- Add another condition
- Data value is empty
- Data selector: product:field-sales-event:tid
- Click negate.
- Add a final condition
- Data comparison
- Data Selector: product:field-sales-event:tid
- Value equals (the tid of the taxonomy term we created)
Now we'll create a product pricing rule at Store -> Configuration -> Product Pricing Rules.
- Add a pricing rule with the name "April weekend sale"
- Under actions, add an action to multiply the price by 0.8 (we'll give them an even bigger discount than we did last time!)
- Under conditions:
- Add condition "Component: April Weekend Sale", which will add the date-based conditions to our rule.
- Add condition "Entity has field" (This is just to bring the product into scope due to the Rules issue mentioned above.)
- Data selector: line-item
- Field: commerce_product
- Add condition "Component: Product is on sale."
- Data selector: line-item:commerce-product
Now we have a product pricing rule that does two things. First it checks the conditions in the "Weekend of April 23" to see if the date is correct, and then it uses the "Product is on sale" component (to which we pass the line item's product) to determine whether the item is on this sale.
We can change the server date to experiment, and should see that the products we marked now have their sale prices.
Drupal Commerce Complex Pricing Rules from Randy Fay on Vimeo.
Currency Conversion
Let's face it, the internet doesn't just sell to our neighbors down the street, it can literally connect you to the whole world. Last we checked, there are hundreds of currencies and thousands of countries. It's hard to address them all. We've provided the framework for simplified currency conversion in Drupal Commerce core. But we've also built a framework that has already enabled lots of solutions to popup on drupal.org as free currency conversion solutions.
In the next section we outline how one might convert currencies using only Drupal Commerce, but we admit plainly that this has a very limited use-case. The exercise is intended to teach you how to deal with the pricing rules that every major ecommerce shop is going to use. Directly below, we've listed a few other options you have available to meet your currency conversion requirements:
Enable Multiple Currencies
Before you can make a single rule or product into a different currency, you will need to enable a few of the currencies on the backend. Below we show you how to do that.
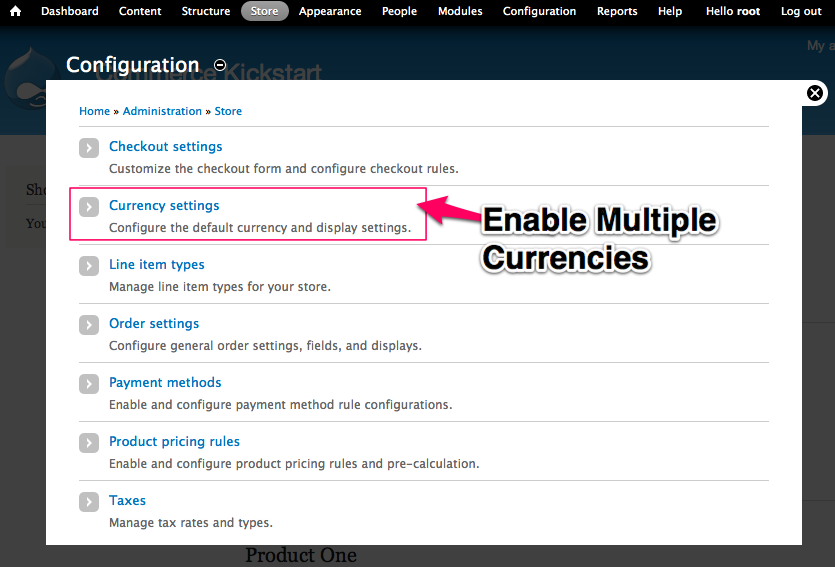
Multiple Currencies
Just like if you were translating content, you have to enable multiple currencies before you can convert them. To get started, you must navigate to the Store Configuration screen and click Currency Settings.
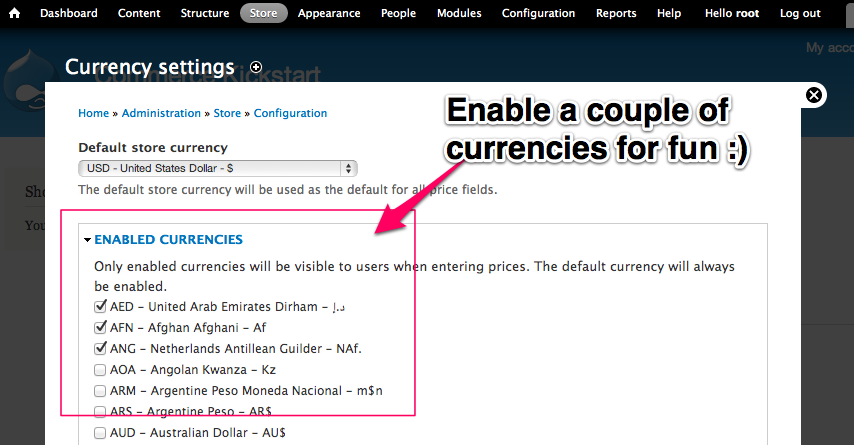
Currency Settings
Here on the currency settings page, all you can really do is enable currencies and set the default currency
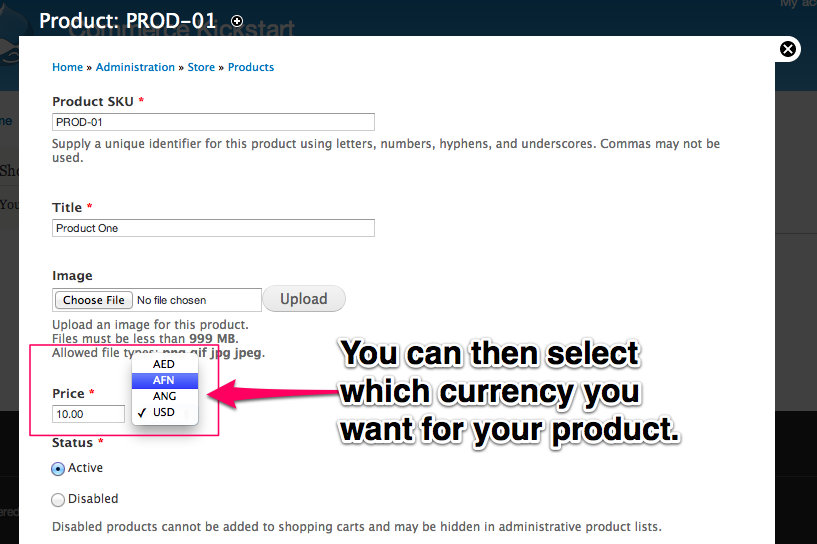
Edit Product
You can then select which currency you want for your product.

Multiple Currencies
When you've got currencies enabled you can do all sorts of interesting things with prices.
Static Currency Exchange Rate
Converting from one currency to another is possible through Rules. We recommend using only core for this if you want the conversion rate to be input as a static variable. For example, you simply want to say that 1 US dollar is equal to .76 Euros, that would be a fine and relatively easy thing to produce using rules.
Below we work through an entire exercise where we use Rules to create such a scenario as mentioned above.
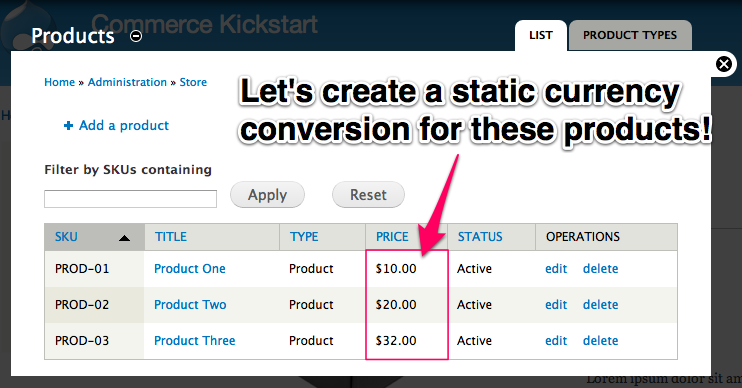
Original Pricing
The original pricing is shown here for three products. Our goal is to create a rule that affects the prices and changes the currency. Note that you need to enable a few other currencies to make this work.

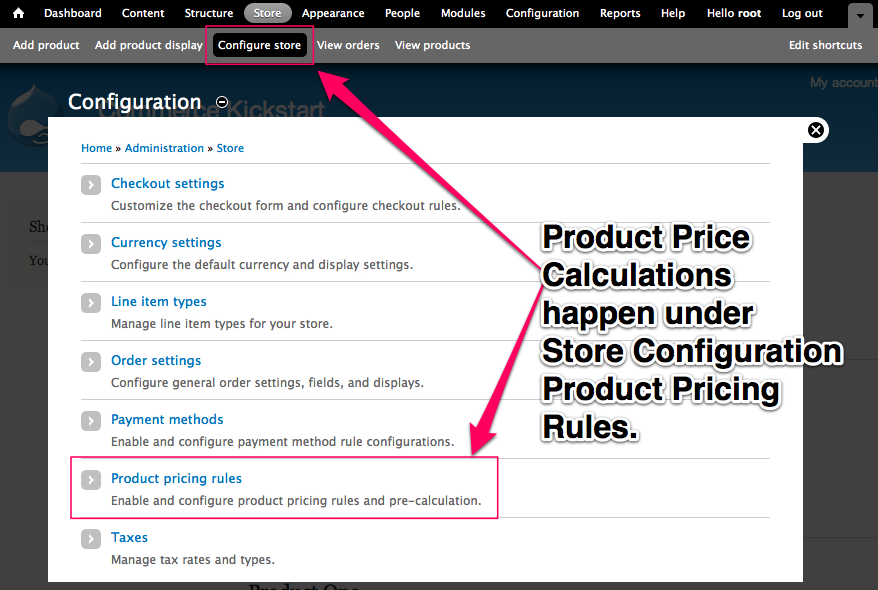
Product Pricing Rules
The first step is to click on Store and then "Configuration" and, finally, Product Pricing Rules. That is where the magic all happens when dealing with currency exchange.
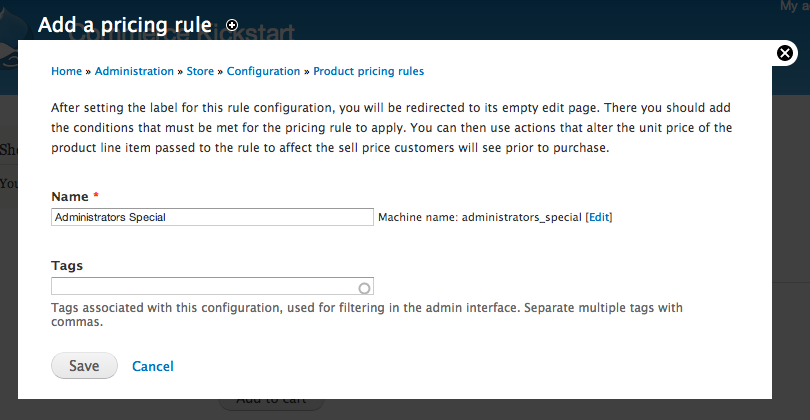
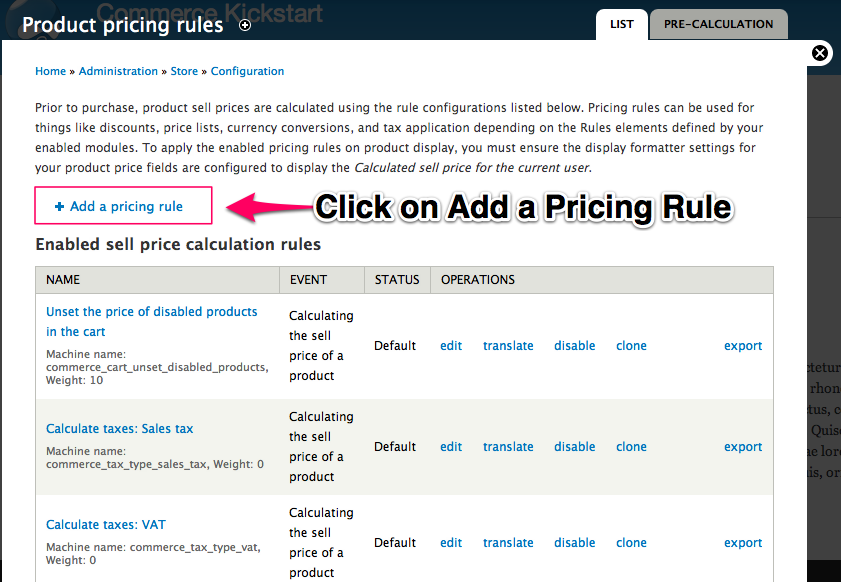 Pricing Rule
We need to click on add a pricing rule. If this is your first time on this screen, maybe navigate around and look at how some of these other rules are setup. If this is your first time dealing with Rules, we highly recommend additional tutorials.
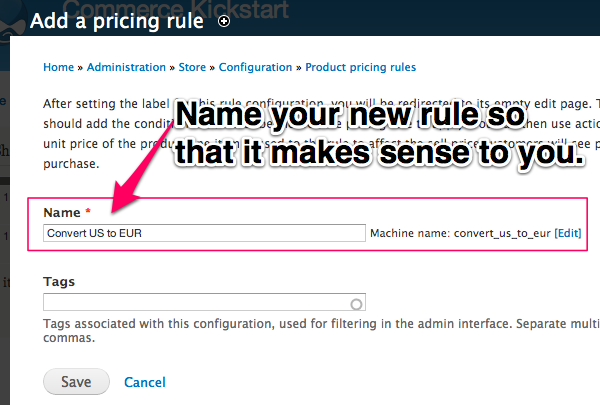
Name Rule
After you have created a name, click "Add Condition."
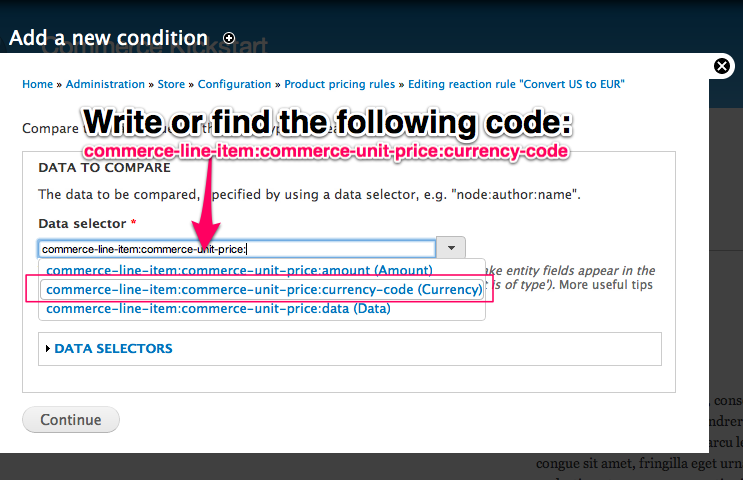
Data Comparison
After clicking "Add Condition…"
You will want to choose "Data Comparison" and then select "commerce-line-item:commerce-unit-price:currency-code" using the object navigator.
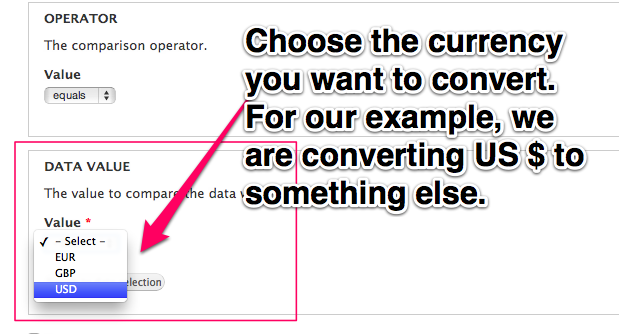
Currency to Filter
Note that we are creating a filter that will only allow US dollars into our actions. Without this filter, all line items would go through this rule.
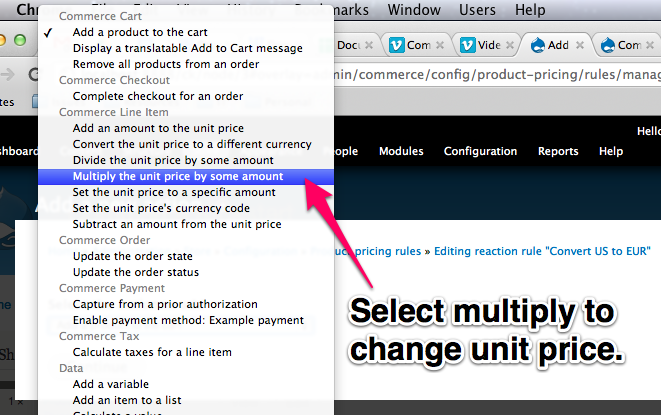
Convert Numbers
Click "Add Action"
In order to actually create a currency conversion we need to do a little math. This next step is where you add the currency exchange rate.
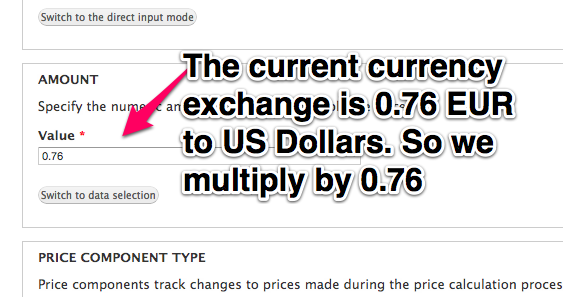
Doing the Exchange
If you had 1 US dollar, how much would that equal in your other currency? It changes, but for our exercise we're going to assume a static number works for us. (Dynamic currency conversion is possible with Commerce Multicurrency).
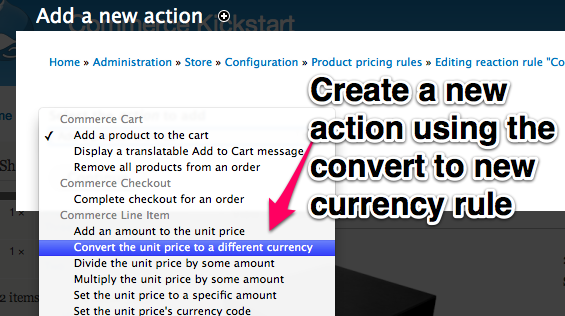
Convert Currency Symbol
Click Add Action. Select "Convert the unit price to a different currency" so that we can actually convert the currency from US dollars to a new currency. This exchange is only going to change the currency symbol, it will not actually tweak the numbers.
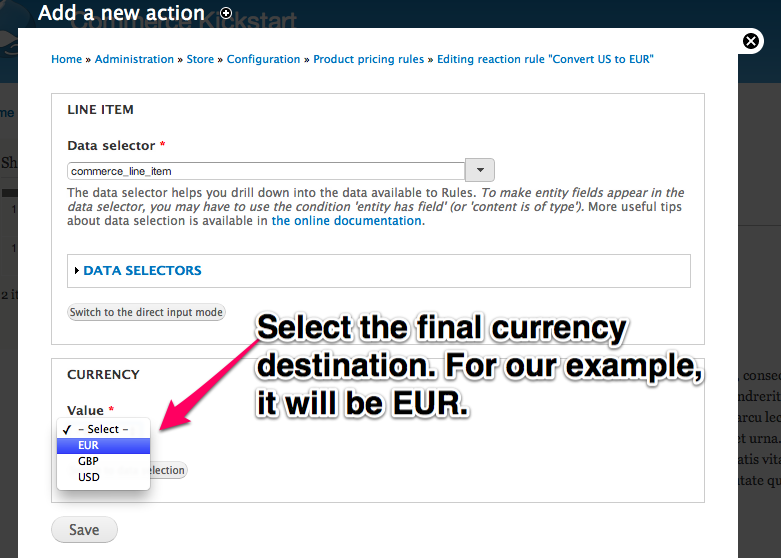
Final Currency
We are simply selecting the final currency symbol. You can safely ignore the data selector.
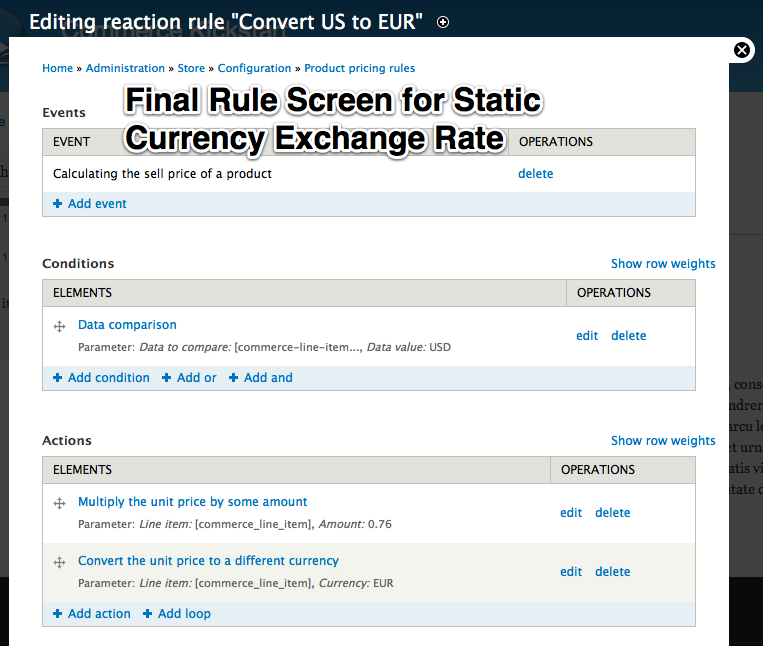
Final Screen
The final screen for the rule. If your screen doesn't look like this, go through the steps above carefully.
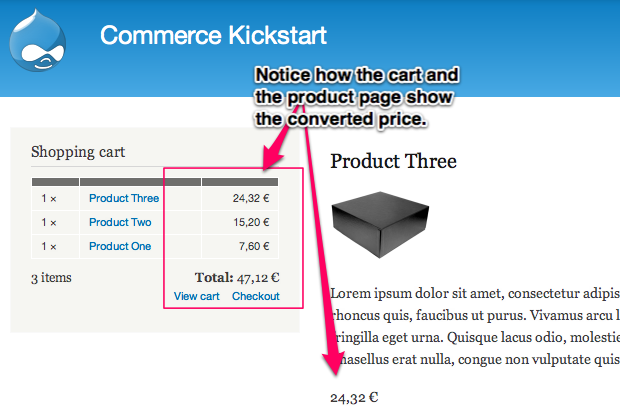
Example Cart
We have not modified any of the products prices, but we have successfully converted all of the currency to Euros and exchanged the prices. For example, Product Three is listed as $32 US dollars in the database, but is listed here as 7,60 Euros.
Discounts and Coupons
The core product pricing system is great for flat / percentage discounts of products on the site and for alternate price lists. Special offers, such as "Buy one get one free," are not supported in Drupal Commerce core. They depend on the creation and management of alternate line items (e.g. one line item for the paid product and another for the free product).
Drupal Commerce's sell price pre-calculation mechanism limits what types of data you can access in the conditions and actions of product pricing rules. Very few sites actually make use of this functionality, but the gist of it is your conditions cannot use data specific to the product (i.e. product type or SKU) and your actions can only use data specific to the product (i.e. not the day of the week or user roles).
Even with those limitations, it is still possible to create quite complex pricing scenarios. One Drupal Commerce site currently uses approximately 1500+ Rules!
Note about Coupons. Using Drupal Commerce Core, it is very possible to allow users to add coupons via line item (when someone clicks an add to cart link) or via Checkout. To do the checkout method, you can follow the same principles as outlined in our "Simple Coupon" exercise, however you will need to add the field to your Order type via code and expose it on the checkout pane using Commerce Fieldgroup Panes.
Administrator's Special
In the Price Calculations article, we went over how to create a conditional discount for a user role.
Simple Coupon Code per Line Item
Add a coupon code textfield to the product line item type. Create a Rule that looks for this value and applies a discount based on the code entered.

Store Configuration To start with, we will navigate to the Store Configuration Screen and click "Line Item Types." In order to add a discount to our line items, we need to add a field.
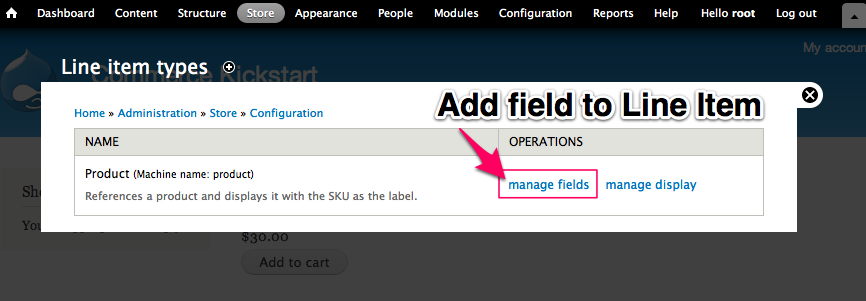
Line Item Types
Add field to Line Item
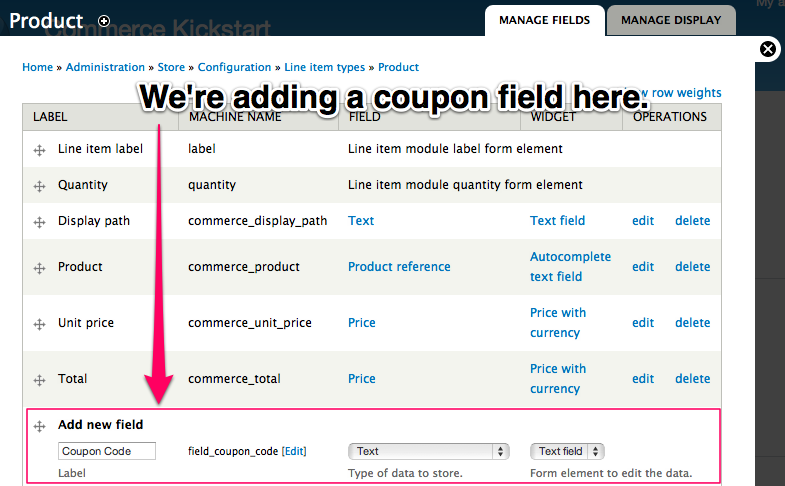
Add Field
We're adding a text field in the manage fields screen for our custom line type. If you want to be able to create unique line item types, there is a great contributed module for that called: Commerce Customizable Products.
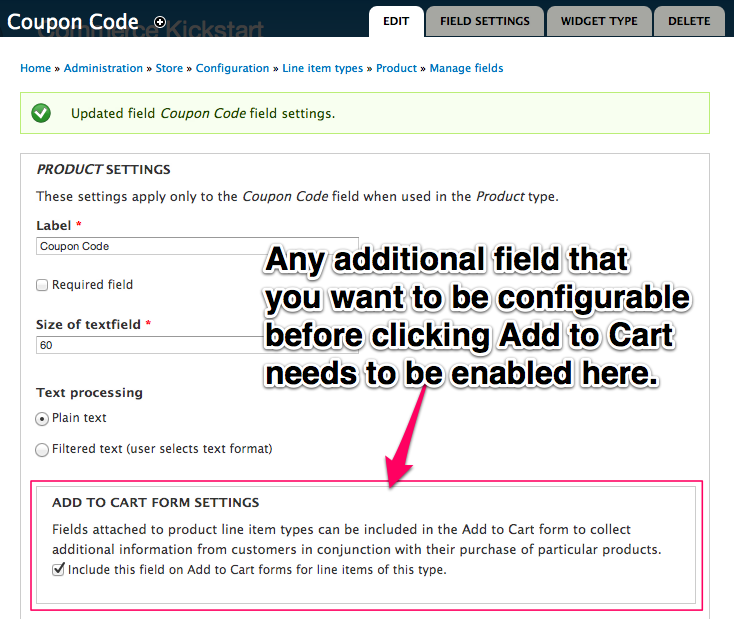
Field Configuration
This is the screen you will see after clicking "Continue" when you've "Added" a field. Make sure you configure the "Add to Cart" settings correctly, or you will not be able to edit this field before adding the product to cart. Any additional field that you want to be configurable before clicking Add to Cart needs to be enabled here. The idea is that the customer would add a coupon before checkout.
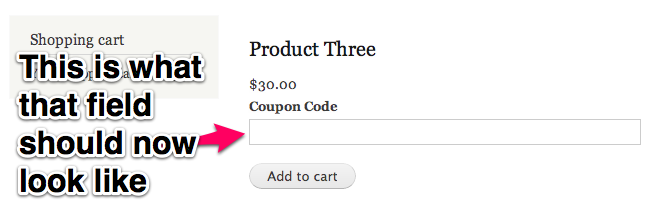
Add to Cart Preview
This is what the Coupon Code field should look like on an add to cart form.
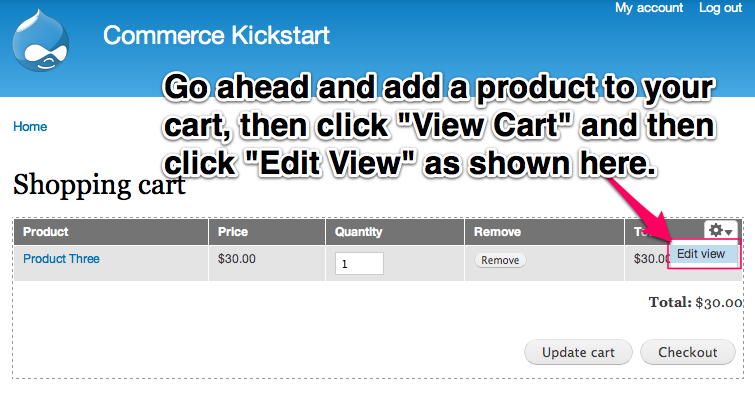
Edit View
Go ahead and add a product to your cart, then click View Cart and then click edit view as shown here.
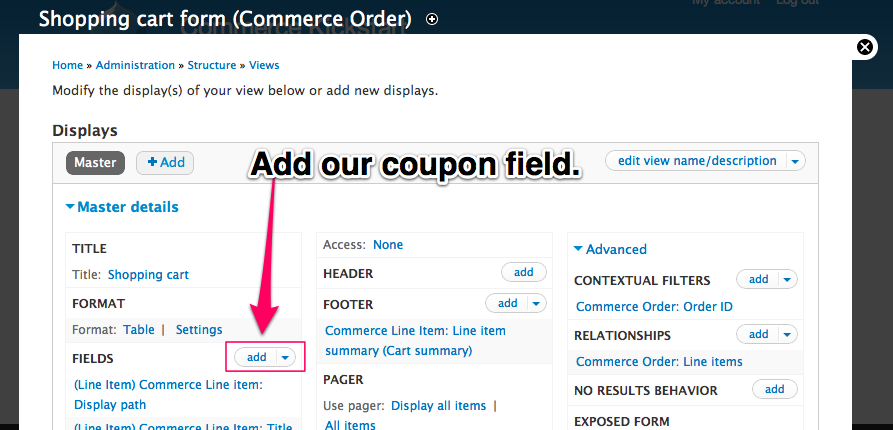
Add Field
In order to view our coupon on the shopping cart, we will add the field. Same could be done with the checkout views and/or Shopping Cart block.
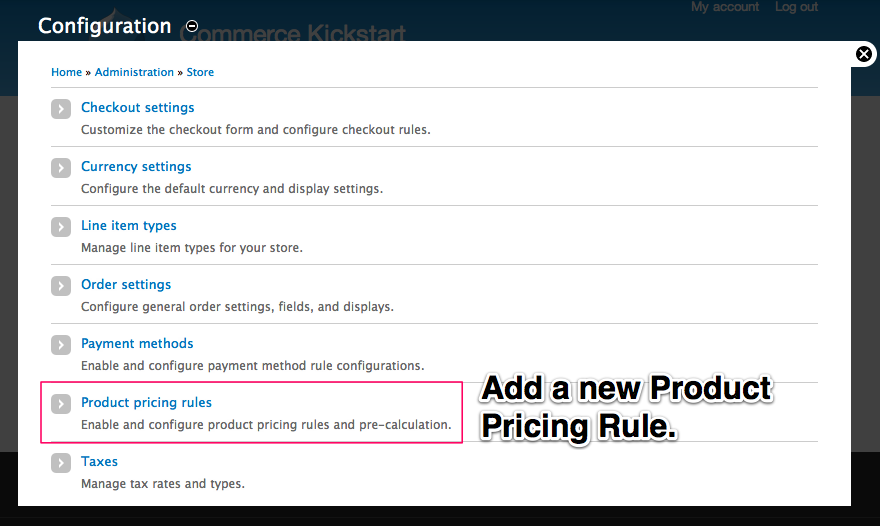
Product Price Rule
Adding a new Product Pricing Rule.
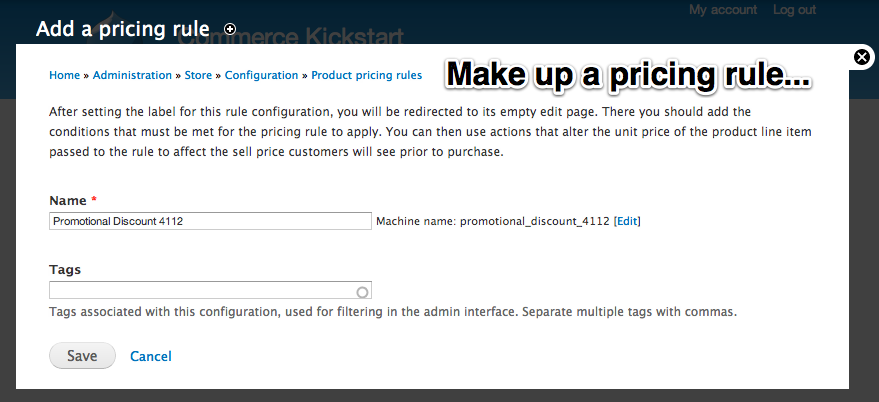
Add Price Rule
Make up a pricing rule name on this form. Mostly showing this screen so people don't get too confused with all of this jumping around.
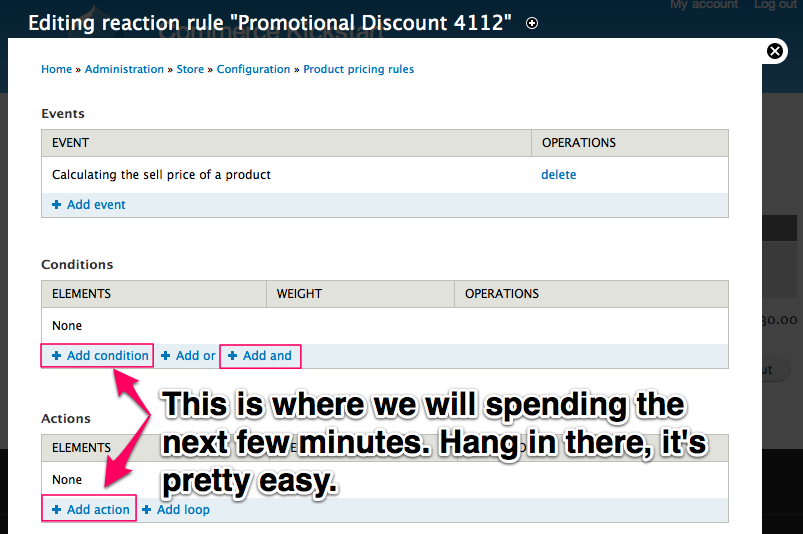
Editing Rule
This is where we will be spending the next few minutes. The plan is to add two conditions, separated by an "And" and finally add an action that applies the discount.
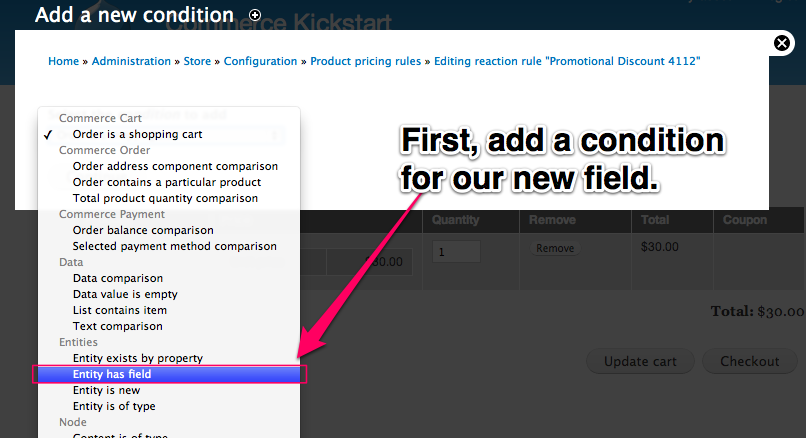
Add Condition
First, add a condition for our new field called "Entity has field." This is a critical step to making that field available in our next condition. Do not skip this step.
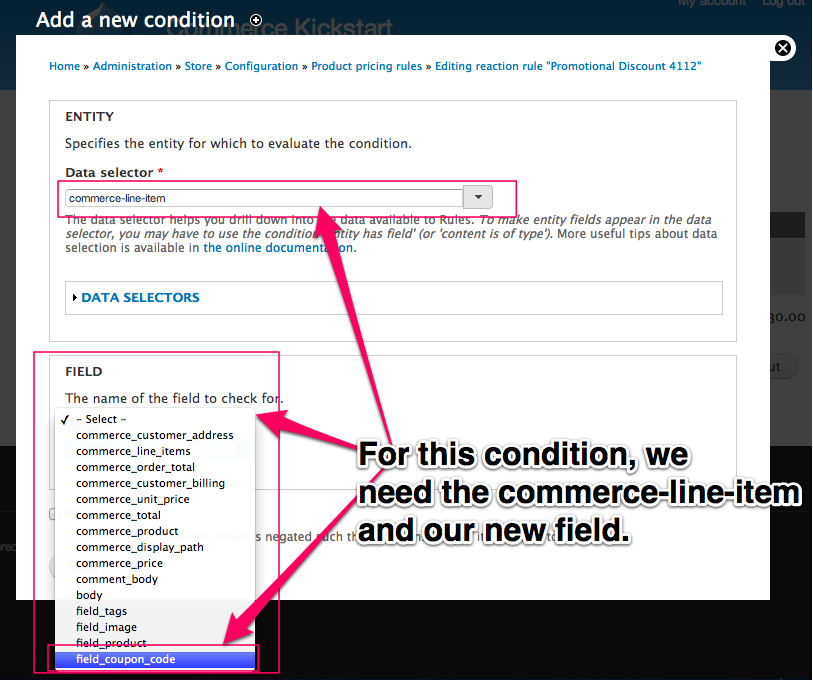
Configure Condition
For this condition, we need the commerce-line-item data selector and our new field.
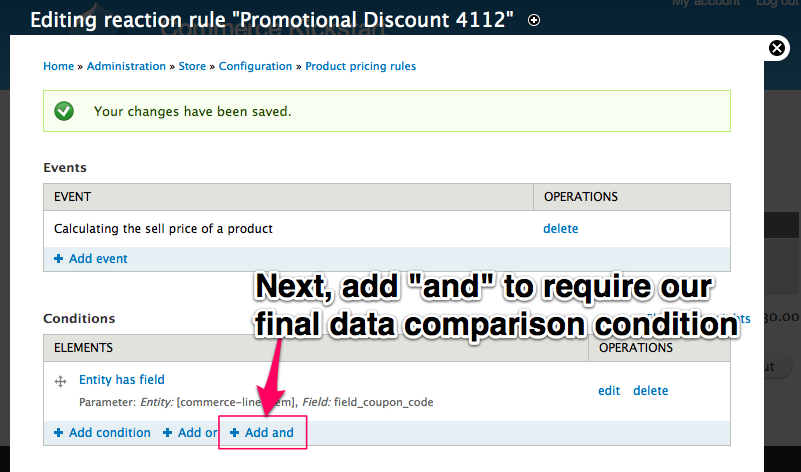
Add And Condition
Next, add and to require our final data comparison condition. This is required to force both conditions.
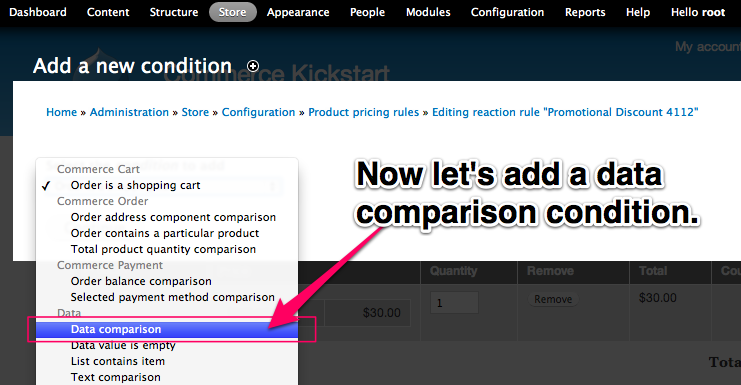 Add Data Comparison
For our final condition, click "Add condition" and select "Data comparison."
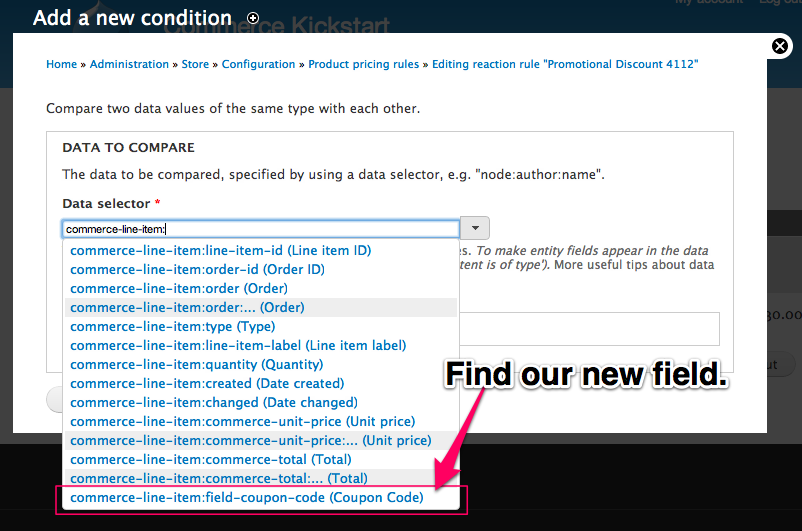
Configure Condition
Find our new field, called something like "commerce-line-item:field-**."
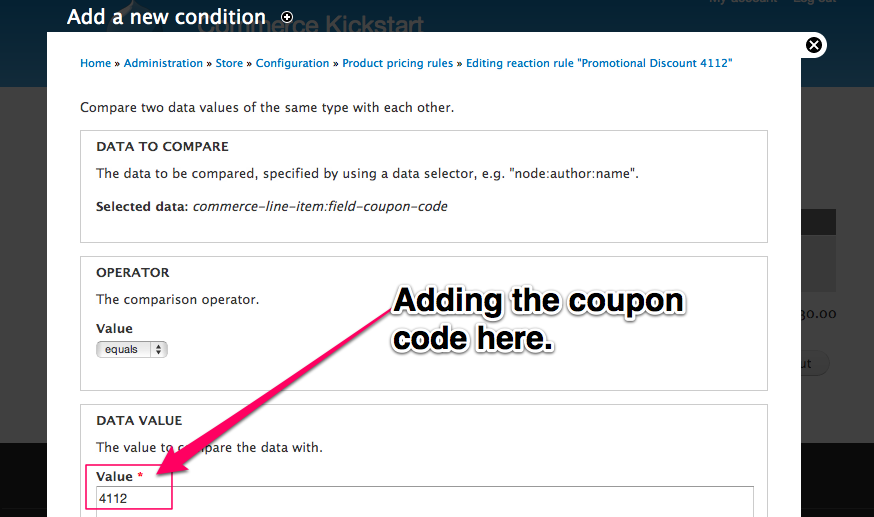
Configure Condition
This is part of the magic. I'm setting my coupon code to be an arbitrary four digit number, but you could set it to just about anything that a person could type into their field. You could even potentially be a bit more creative here. This could be a role that a user has or perhaps a previously visited page.
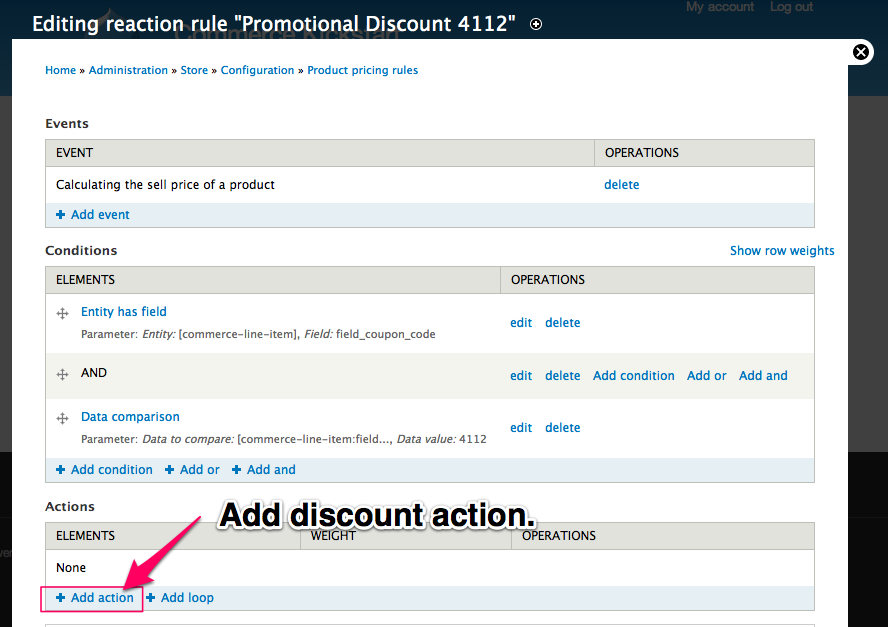
Add Action
Add discount action. For this action, we chose the "Multiply the unit price by some amount" underneath the "Commerce Line Item." Next screen is configuration settings.
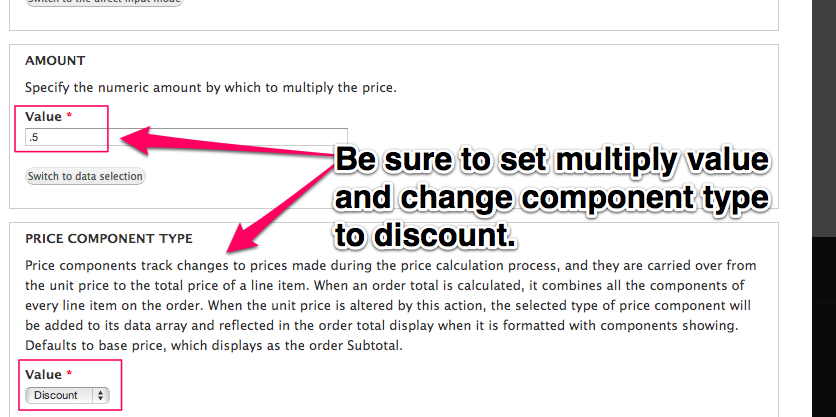
Configure Action
Be sure to set multiply value and change component type to discount. There is a lot to learn about Price Component Types if you are interested.
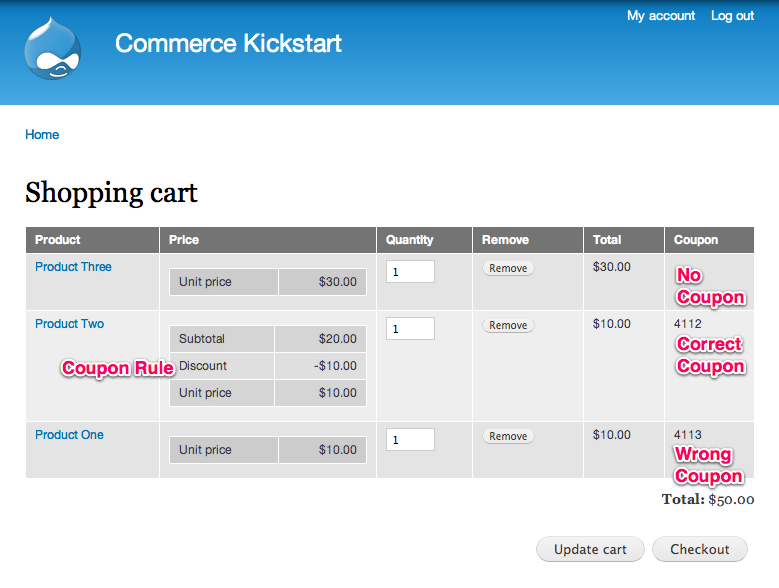
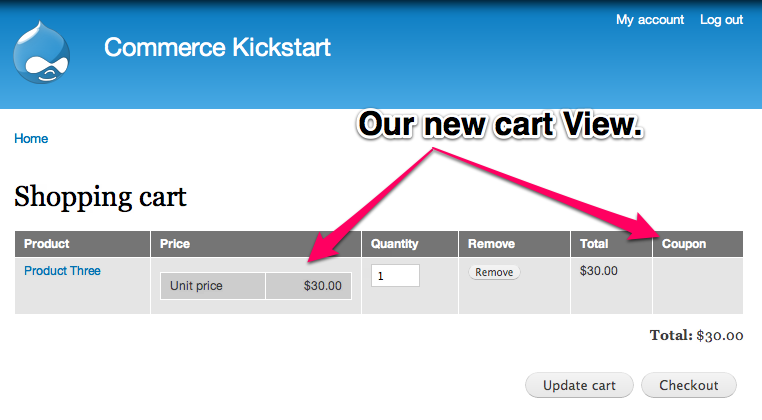
Final Cart
Final Shopping Cart using our new coupon rule.
Price Components
Price Components represent a change record of what happened during price calculation to give you the final price of a line item or order. When building your price calculation rules, you have the ability to choose what type of price component should be used to represent the price change on the order, which is why we provide a couple generic types (like discount / fee).
- Price components will keep track of the changes or additions to a price during price calculation
- You can specify which component to use in a price calculation rule
Ultimately customizing these further will result in the best customer experience, so instead of just "Discount" a user might have visual feedback that they've received their "Member discount" or "Wholesale discount." The ability to customize the price component label is possible in a custom module or there have been rumors of a contributed module that provides an interface for this to work.
The unit price of line items includes an array of price components that show the breakdown of how a particular price was calculated. These components will be multiplied by line item quantity into the line item's total price field and added together into an order's order total price field. Thus component data at the order level will show all the price components that went into the order total.
Price component types are defined by modules installed on the site using hook_commerce_price_component_type_info(). Core price component types include:
- Base price — typically the base price of a product prior to calculation
- Discount — a simple price component type useful for price reductions
- Fee — a simple price component type useful for price increases
- Tax rates — each tax rate gets its own component type so the total tax collected for an order can be found in its order total price field
Enable Price Components for Display
In order to show you what price components look like, we've picked up the Sell Price Calculations example towards the end. To see the whole exercise, check it out.
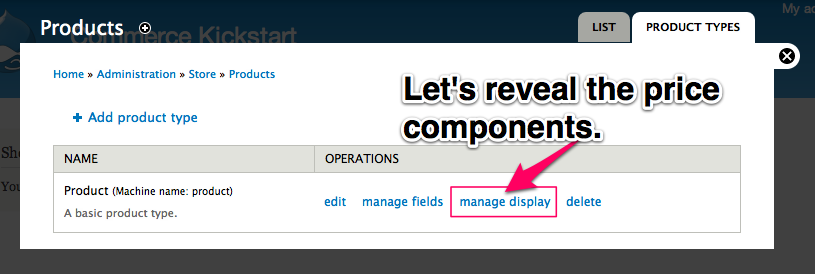
Reveal Price
To see the discount on your product, you must go to the manage display.
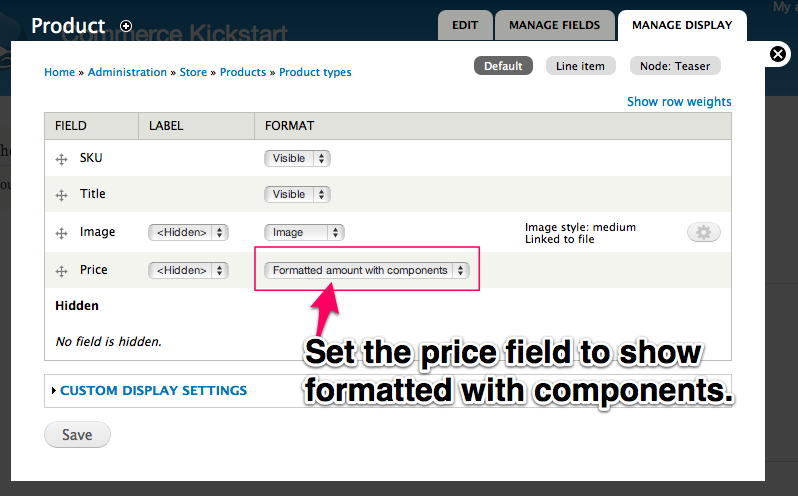
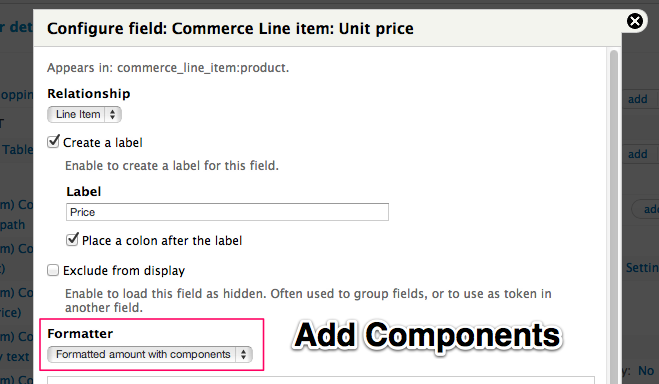
Price Field
Set the price field to show formatted with components.
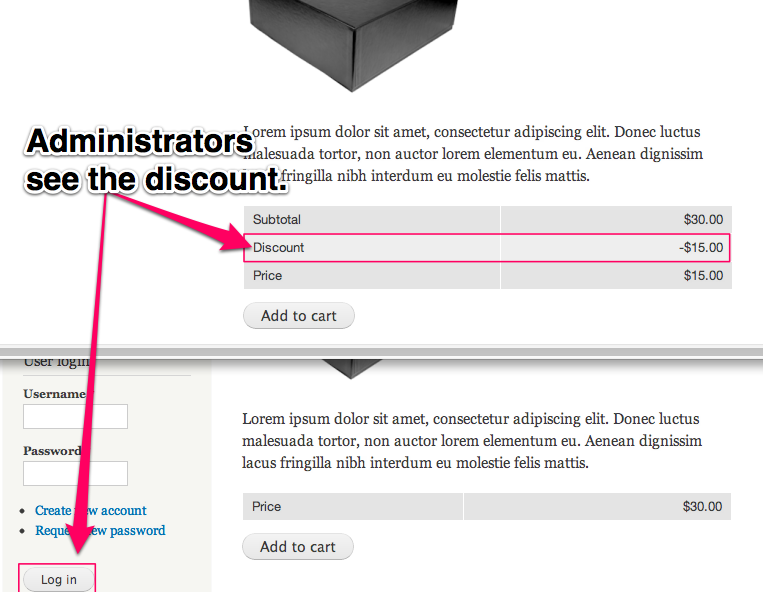
Final Discount
Simply changing the price to show with components, it displays all that is necessary for the discount to be obvious. Also in the screenshot is the same site, not logged in. This is an important step to make sure that your condition is actually working.
Enable Price Components via Rules
In order to show you what price components using rules look like, we've picked up the Sell Price Calculations example in the very middle. To see the whole exercise, check it out.
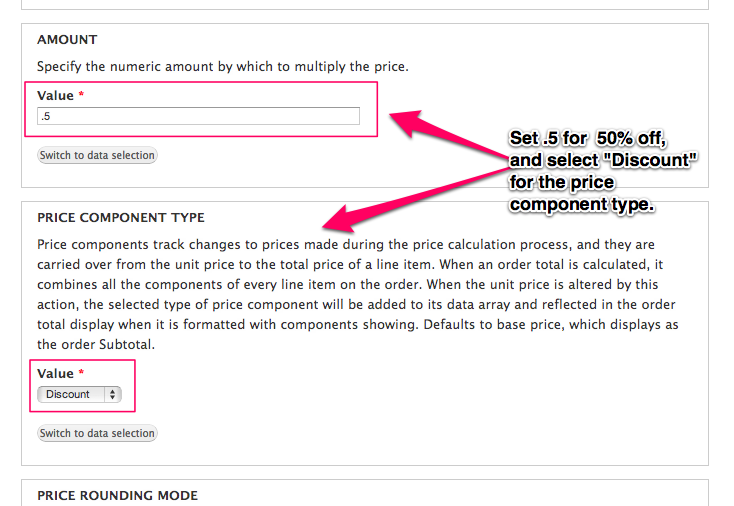
Configure Action
When you are setting the actual math part of the discount, we chose to simply multiply by 0.5 for a 50% discount. You could also divide by 2. Note also that we have changed the value of the price component type. The price component type will show up when you show the price with components. Note that if you want to add your own price component type it will likely need to be done in code.
Rules Overview
What is it about the amazing flexibility of Drupal that is so addictive? It's like being a Chef and having all the best ingredients at your finger tips. Or perhaps it's like being a lego-nerd and having an unlimited supply of any brick or any set that was ever made. For free.
Drupal has Views for listing content, Rules for reacting, Flags for collecting, ctools for abstracting, and just about anything else you can imagine built on top of those. But what we want to focus on is Rules and how they affect Pricing in Drupal Commerce.
Rules makes it possible to be an e-commerce site builder or even store manager and be able to dream up complex and cool discounts, sales, and many other things simply using Drupal Commerce Pricing Rules.
Drupal Commerce Documentation Examples using Rules
There are a number of topics we handle in the Drupal Commerce documentation that include some or all of the Rule interface to show off a certain aspect. Below we've listed a small accounting of the articles that are written to take advantage and teach you more about the Rules interface.
There are also a lot of videos regarding Rules and Drupal Commerce that the Commerce Guys have put out there.
- Drupal Commerce Complex Pricing Rules
- Removing Items From the Cart Using Rules
- Shipping Discount for Item in Cart using Calculation Rules
- The Power of Rules with Views Bulk Operations (and Commerce)
- Commerce, Rules, and Stock: Demonstrating the Power of Rules
- Drupal Commerce Complex Pricing Rules
Third-Party Tutorials about Rules
You know something can be pretty complicated (but totally worth the effort) when the whole community comes together to help spread the word on how to work with it. We have below a number of resources that should help you learn Rules better (the core of Drupal Commerce Pricing).
- Drupalize.me "Coding for Rules"
- The Tiny Book of Rules - a condensed introduction to Rules.
- Chapter 12 - the online version of Drupal 7 – The Essentials
Commerce Rules Contributions
Rules is a very extensible platform. There are a number of user contributed modules that can add additional functionality if needed.
- Commerce Extra Rules Conditions - lots of extra conditions in this one.
- Commerce Cart Expiration - manipulate your cart using rules
- Commerce Dispatch - shipping actions
- Commerce Price Components - use price components in conditions
Sell Price Calculation
For the novice, or perhaps a web developer who is only occasionally asked to create an e-commerce website, it might come as a surprise that the sale or sell price goes through a fair amount of tweaking before being represented on the site. Each step that our sell price goes through is designed to make discounts, taxes, currency conversion and many other possibilities have an impact.
Product sell prices are determined via a Rules based calculation process. If you are not up on your Rules module implementation tasks, you should check out the Rules tutorial to get up to speed.
The life of a Price Calculation
- A new line item is created representing the product as if it were in the user's current shopping cart order.
- The unit price of the line item is initialized to the product’s base price (commerce_price) value.
- The line item is then passed through Rules via the Calculating the sell price of a product event where its unit price may be manipulated as necessary.
- The final unit price of the line item becomes the sell price of the product displayed on product pages and Views.
See a Prezi slideshow visualizing the process.
Sell Price Calculation on Prezi
Sell price calculations can include discounts, taxes, currency conversion, and more. Each manipulation of the price is tracked as a price component in the price field’s data array, so you can see exactly what happened to result in a particular sell price at the end of the process. You can even set the Display of any price field to show all components. This is handy for showing a user that you are giving them a discount.
The actions for manipulating unit prices include:
- Add an amount to the unit price
- Convert the unit price to a different currency
- Divide the unit price by some amount
- Multiply the unit price by some amount
- Set the unit price to a specific amount
- Set the unit price's currency code
- Subtract an amount from the unit price
When configuring each action, you can specify the type of price component to use. If you need additional component types for the site (more than addition/subtract, divide/multiply, etc), you currently have to write them into a module. Not sure how to create your own price component? Look into Drupalize.me's Coding for Rules videos; they are a free and well-produced series of videos!
Administrator's Special
We are going to learn the sell price calculation process by setting up a conditional discount for our administrators. We will use a condition to apply a 50% discount for any user with the role "Administrator" and show the price with components.
Our base price: $30
What the sell price should be on checkout with 50% discount if I'm an administrator: $15
Pricing Rule
Create a Product pricing rule.
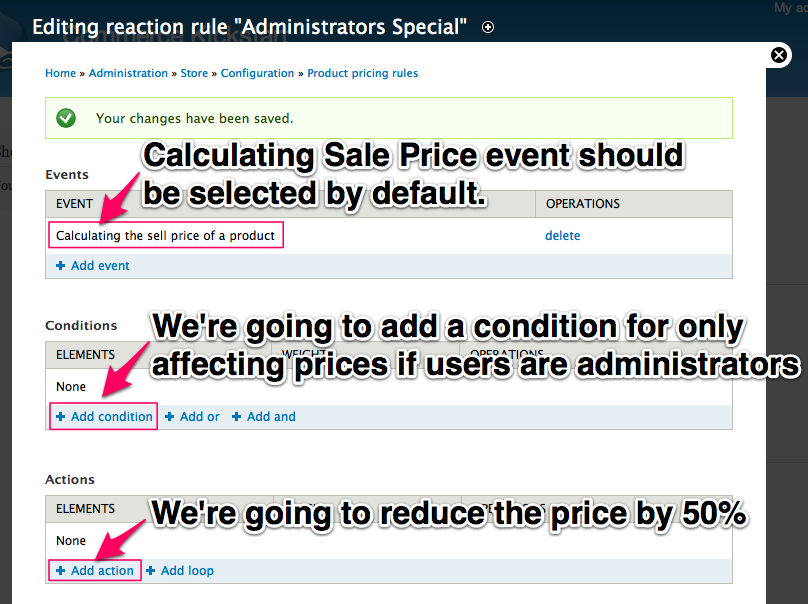
Rule Overview
Calculating sale price event should be selected by default. We're going to add a condition for only affecting prices if users are administrators. We're going to reduce the price the by 50%.
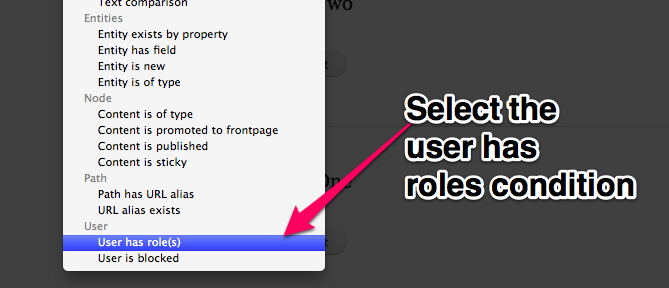
Add Condition
When creating a condition, it will ask you what you want to look at. For our discount, we want to look at user's roles.
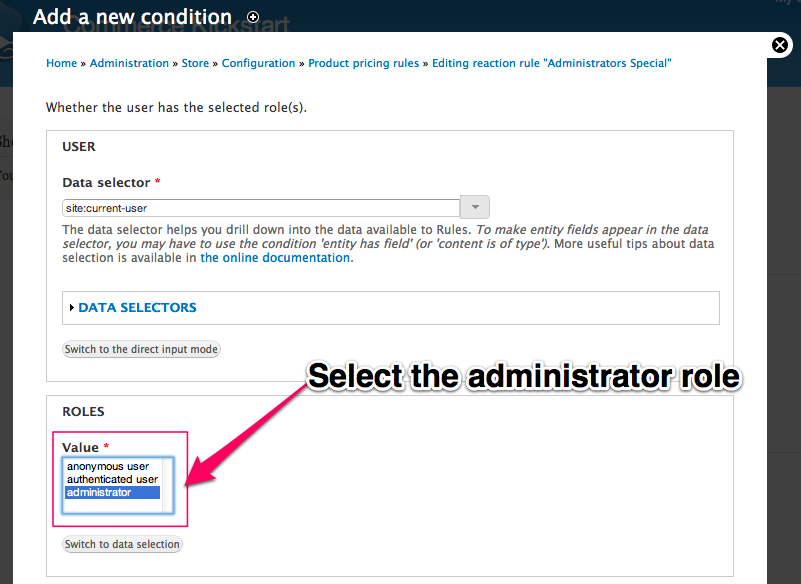
Administrator
Selecting the appropriate role is all you have to do for this screen.
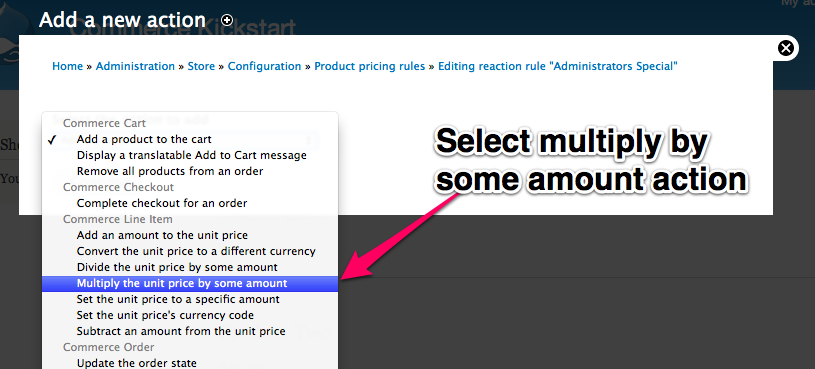
Add Action
Next, we've already clicked on Add Action and are now selecting the multiply unit price option.
Configure Action
When you are setting the actual math part of the discount, we chose to simply multiply by 0.5 for a 50% discount. You could also divide by 2. Note also that we have changed the value of the price component type. The price component type will show up when you show the price with components. Note that if you want to add your own price component type it will likely need to be done in code.
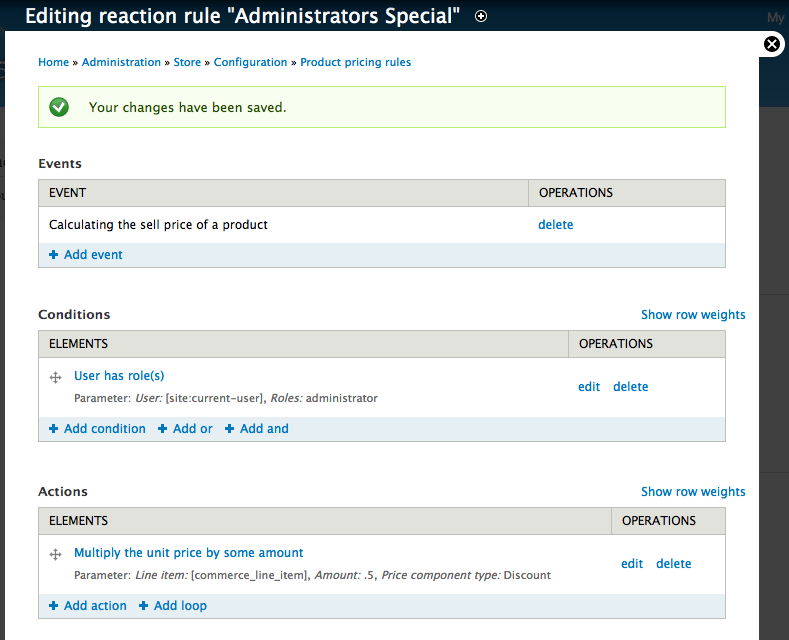
Rule Overview
The final screen for the rule that will set all prices to be 50% for administrators.
Reveal Price
We could show you a screenshot of the new product, but that would not show us that the rule is really working. To see the discount on your product, you must go to the manage display.
Price Field
Set the price field to show formatted with components.
Final Discount
Simply changing the price to show with components, it displays all that is necessary for the discount to be obvious. Also in the screenshot is the same site, not logged in. This is an important step to make sure that your condition is actually working.