Checkout
We need help filling out this section! Feel free to follow the edit this page link and contribute.
Code Recipes
Create custom checkout flow
We will learn how to create a custom checkout flow.
Lets create a custom flow and we are going to use it for new orders.
Lets create a module that will do this.
Example
If you are using Drupal Console, then you can execute this command from docroot:
drupal generate:module \
--module="My checkout flow" \
--machine-name="my_checkout_flow" \
--module-path="/modules/custom" \
--description="My checkout flow" \
--core="8.x" \
--package="Custom" \
--composer \
--dependencies="commerce:commerce_checkout"
Create the plugin using this command.
drupal generate:plugin:skeleton \
--module="my_checkout_flow" \
--plugin-id="commerce_checkout_flow" \
--class="CustomCheckoutFlow"
A new file CustomCheckoutFlow.php will be created inside src/Plugin/Commerce/CheckoutFlow.
Make sure that file looks like this:
<?php

namespace Drupal\my_checkout_flow\Plugin\Commerce\CheckoutFlow;

use Drupal\commerce_checkout\Plugin\Commerce\CheckoutFlow\CheckoutFlowWithPanesBase;
use Drupal\Core\Form\FormStateInterface;

/**
 * @CommerceCheckoutFlow(
 *  id = "custom_checkout_flow",
 *  label = @Translation("Custom checkout flow"),
 * )
 */
class CustomCheckoutFlow extends CheckoutFlowWithPanesBase {

/**
 * {@inheritdoc}
 */
public function getSteps() {
    return parent::getSteps();
}

}
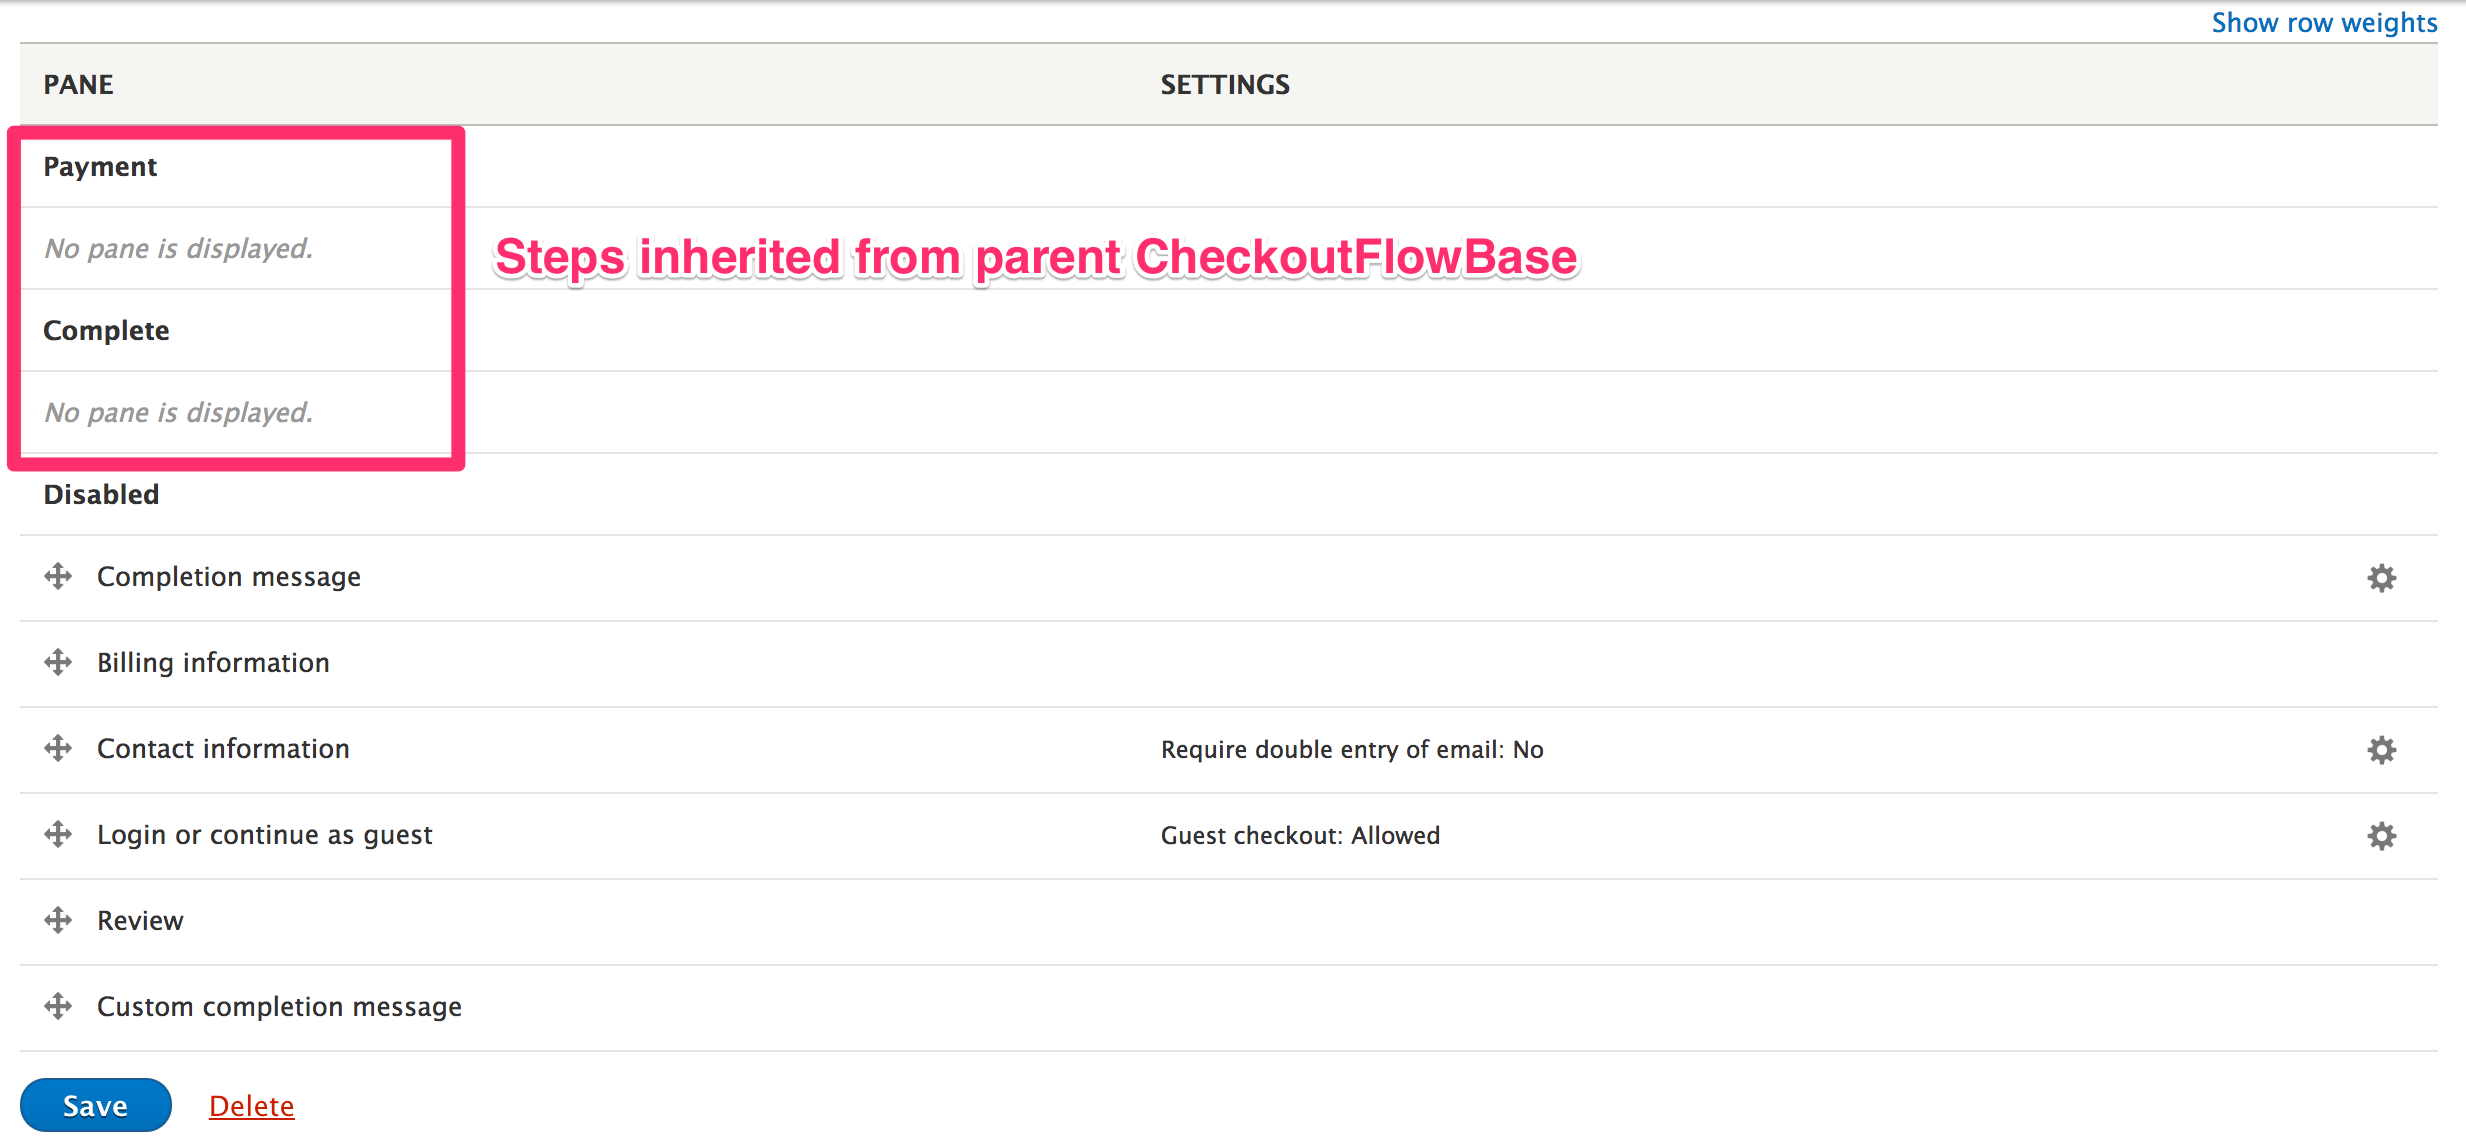
Here we are not adding any custom step. We are just inheriting the steps
from the parent.
The parent provides these steps.
    return [
    'payment' => [
        'label' => $this->t('Payment'),
        'next_label' => $this->t('Pay and complete purchase'),
        'has_order_summary' => FALSE,
    ],
    'complete' => [
        'label' => $this->t('Complete'),
        'next_label' => $this->t('Pay and complete purchase'),
        'has_order_summary' => FALSE,
    ],
    ];
You can see these steps here /path/to/drupal/modules/commerce/modules/checkout/src/Plugin/Commerce/CheckoutFlow/CheckoutFlowBase.php inside getSteps().
Enable the module my_checkout_flow.
drupal module:install my_checkout_flow
We are going to create a new checkout flow.
Go to /admin/commerce/config/checkout-flows/add
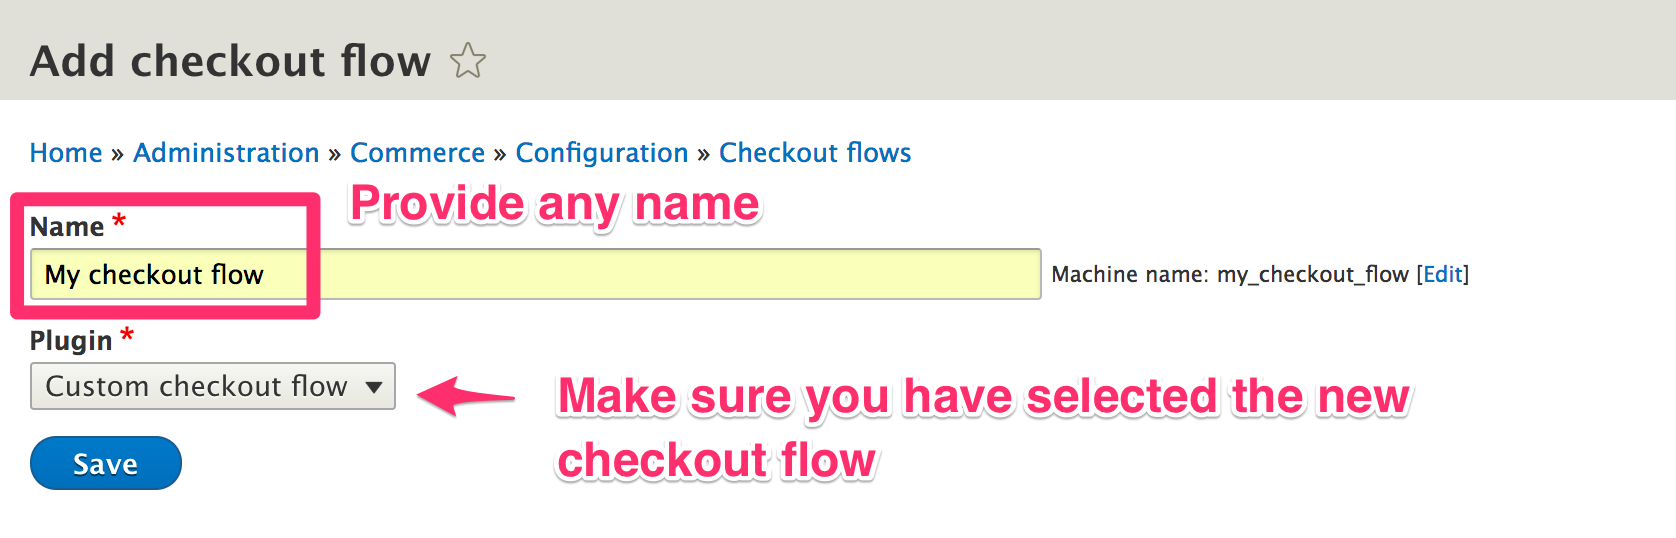
Click Save.
Now, it can be as simple as displaying only the completion message.
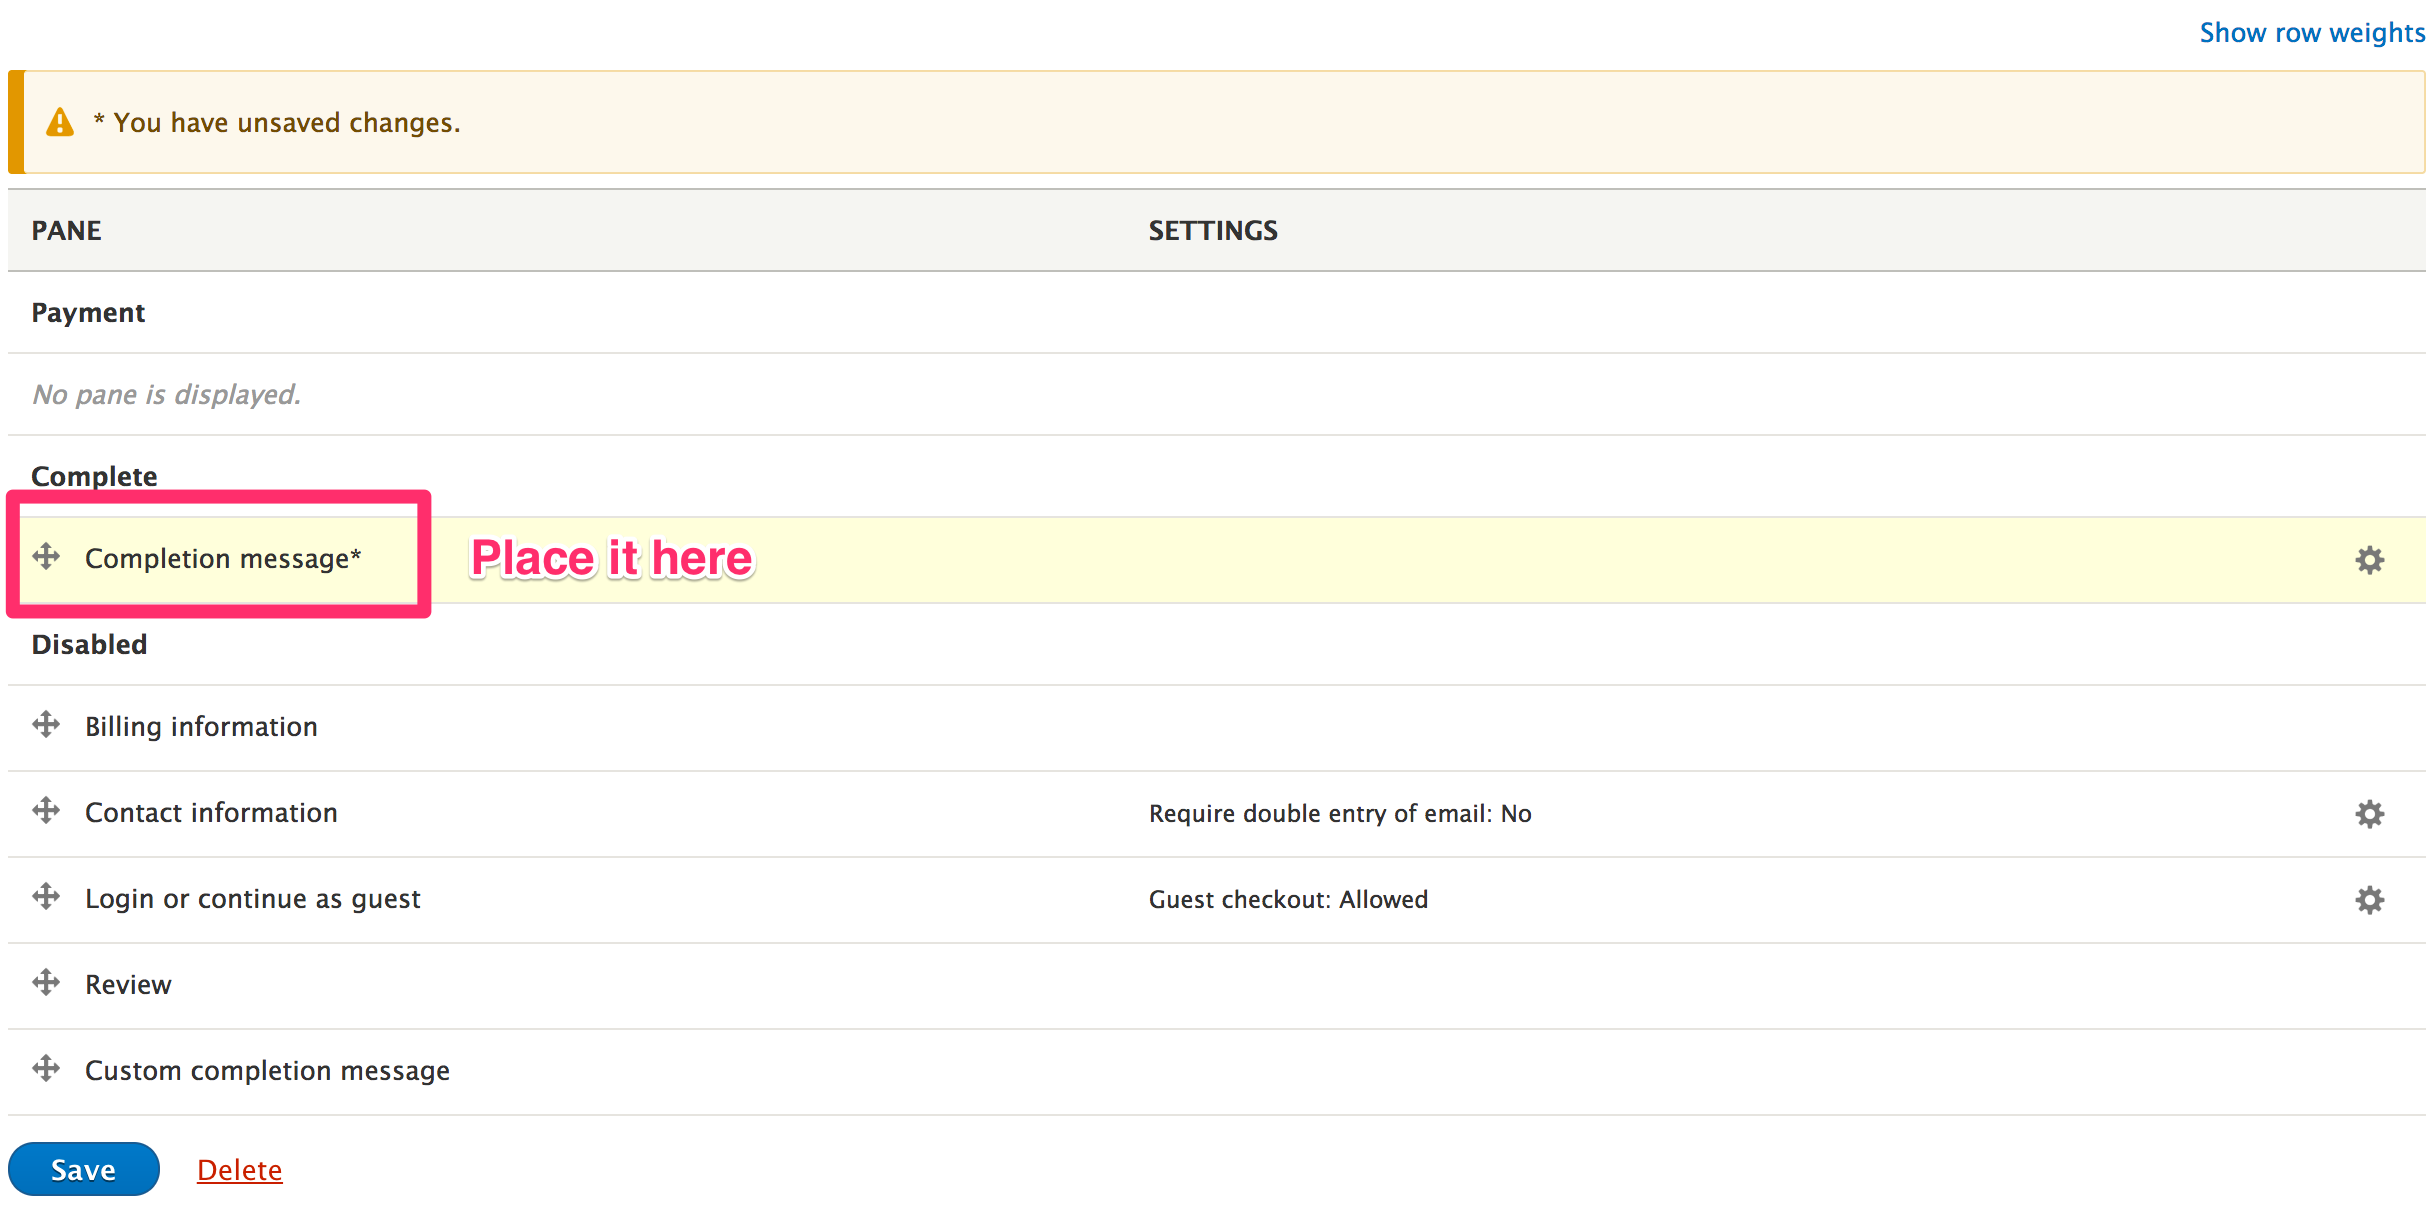
Click Save.
We are going to use this checkout flow for future orders. To do that, go to
admin/commerce/config/order-types/default/edit.
At the bottom you will see Checkout settings section. Select the checkout flow that you just created.
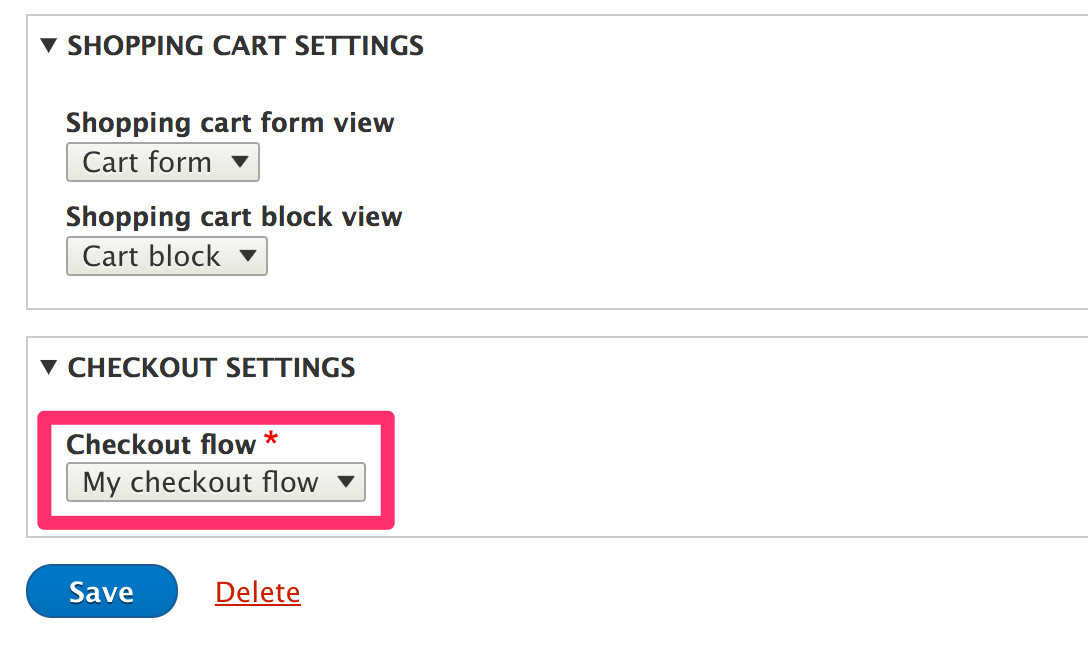
Click Save.
When the customers now place an order, they will just see the completion message, and they don't have to pay a dime. Funny isn't it?
Lets make it more sophisticated. We will add login and review steps.
Alter CustomCheckoutFlow.php so that it looks like this:
    <?php

    namespace Drupal\my_checkout_flow\Plugin\Commerce\CheckoutFlow;

    use Drupal\commerce_checkout\Plugin\Commerce\CheckoutFlow\CheckoutFlowWithPanesBase;
    use Drupal\Core\Form\FormStateInterface;

    /**
     * @CommerceCheckoutFlow(
     *  id = "custom_checkout_flow",
     *  label = @Translation("Custom checkout flow"),
     * )
     */
    class CustomCheckoutFlow extends CheckoutFlowWithPanesBase {

    /**
     * {@inheritdoc}
     */
    public function getSteps() {
        return [
        'login' => [
            'label' => $this->t('Login'),
            'previous_label' => $this->t('Return to login'),
            'has_order_summary' => FALSE,
        ],
        'review' => [
            'label' => $this->t('Review'),
            'has_order_summary' => TRUE,
        ],
        ] + parent::getSteps();
    }

    }
Go back to /admin/commerce/config/checkout-flows and edit the checkout flow
that you just created.
You will see the new steps.
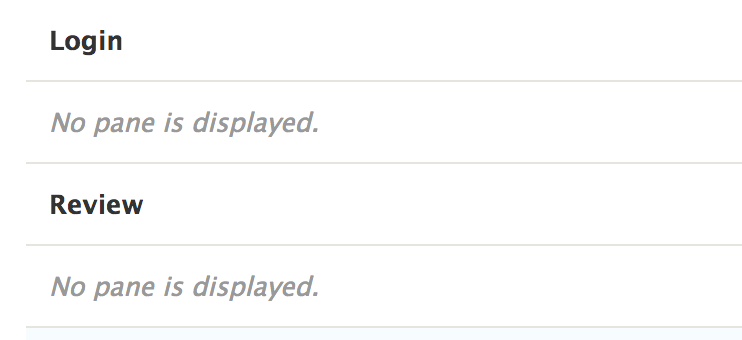
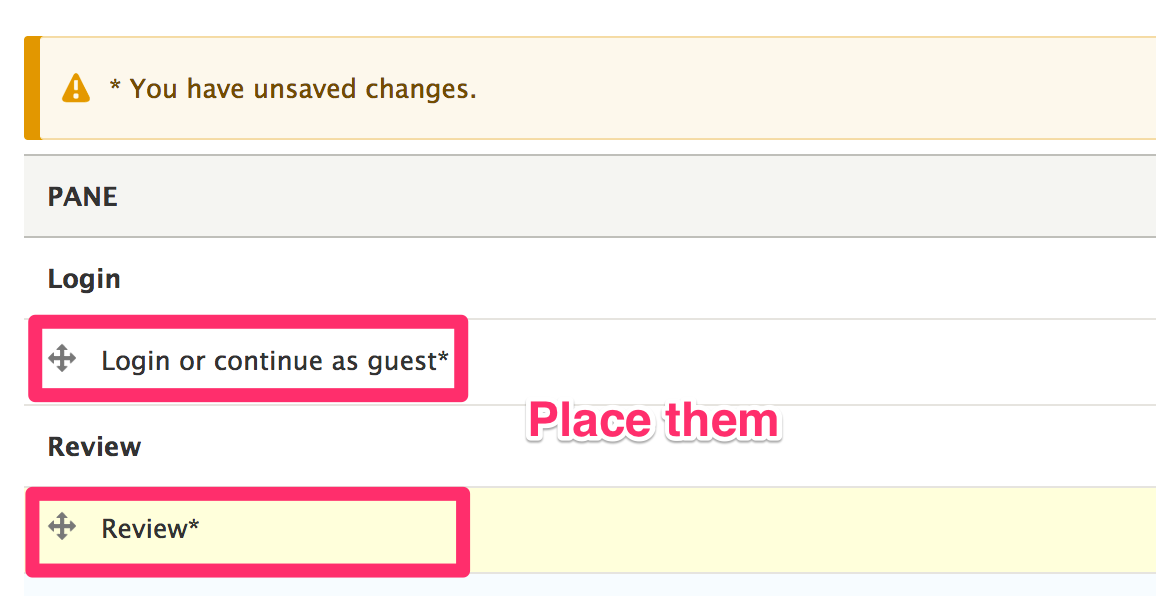
Click Save.
The customers will now have to login, and they will be able to review the order while placing them.
Create custom checkout pane
Custom checkout panes can be used to display information during checkout or collect additional data from the customer. To create a custom checkout pane you will need to write your own code, in a custom module. This page provides several examples of custom checkout panes.
Setup: Create a basic custom module
If you don't already have a custom module you can use for your new plugin, you can create a basic one with a few simple steps:
-
Create a new folder for your module within your project in the
/modules/customfolder. We'll name oursmy_checkout_panefor these examples. -
Within the
my_checkout_panefolder, create a new file namedmy_checkout_pane.info.ymlwith the following text:
name: My Checkout Pane
type: module
description: Defines custom checkout panes.
core: 8.x
package: Custom
- Don't forget to enable your custom module either through the admin UI, drush, or drupal console:
drush en my_checkout_pane
Example 1: Create a custom message checkout pane.
In this example, we create a simple checkout pane plugin that displays a custom message. We'll name our plugin CustomMessagePane and implement it in a file named CustomMessagePane.php, located in /modules/custom/my_checkout_pane/src/Plugin/Commerce/CheckoutPane.
Commerce checkout panes are annotation-based plugins, so we start by placing a @CommerceCheckoutPane annotation right before our class definition. Also, the buildPaneForm() method is required, so we'll add that in as well.
<?php

namespace Drupal\my_checkout_pane\Plugin\Commerce\CheckoutPane;

use Drupal\commerce_checkout\Plugin\Commerce\CheckoutPane\CheckoutPaneBase;
use Drupal\Core\Form\FormStateInterface;

/**
 * Provides a custom message pane.
 *
 * @CommerceCheckoutPane(
 *   id = "my_checkout_pane_custom_message",
 *   label = @Translation("Custom message"),
 * )
 */
class CustomMessagePane extends CheckoutPaneBase {

/**
 * {@inheritdoc}
 */
public function buildPaneForm(array $pane_form, FormStateInterface $form_state, array &$complete_form) {
}

}
The id and label keys are required. The id can be any unique, valid machine name, but it's considered a good practice to prefix it with the name of your module. The label identifies the pane on the Checkout flow edit page. If we rebuild the plugin cache, our new pane will appear in the "Disabled" section. To enable it, drag it into a checkout step like you would any other checkout pane.
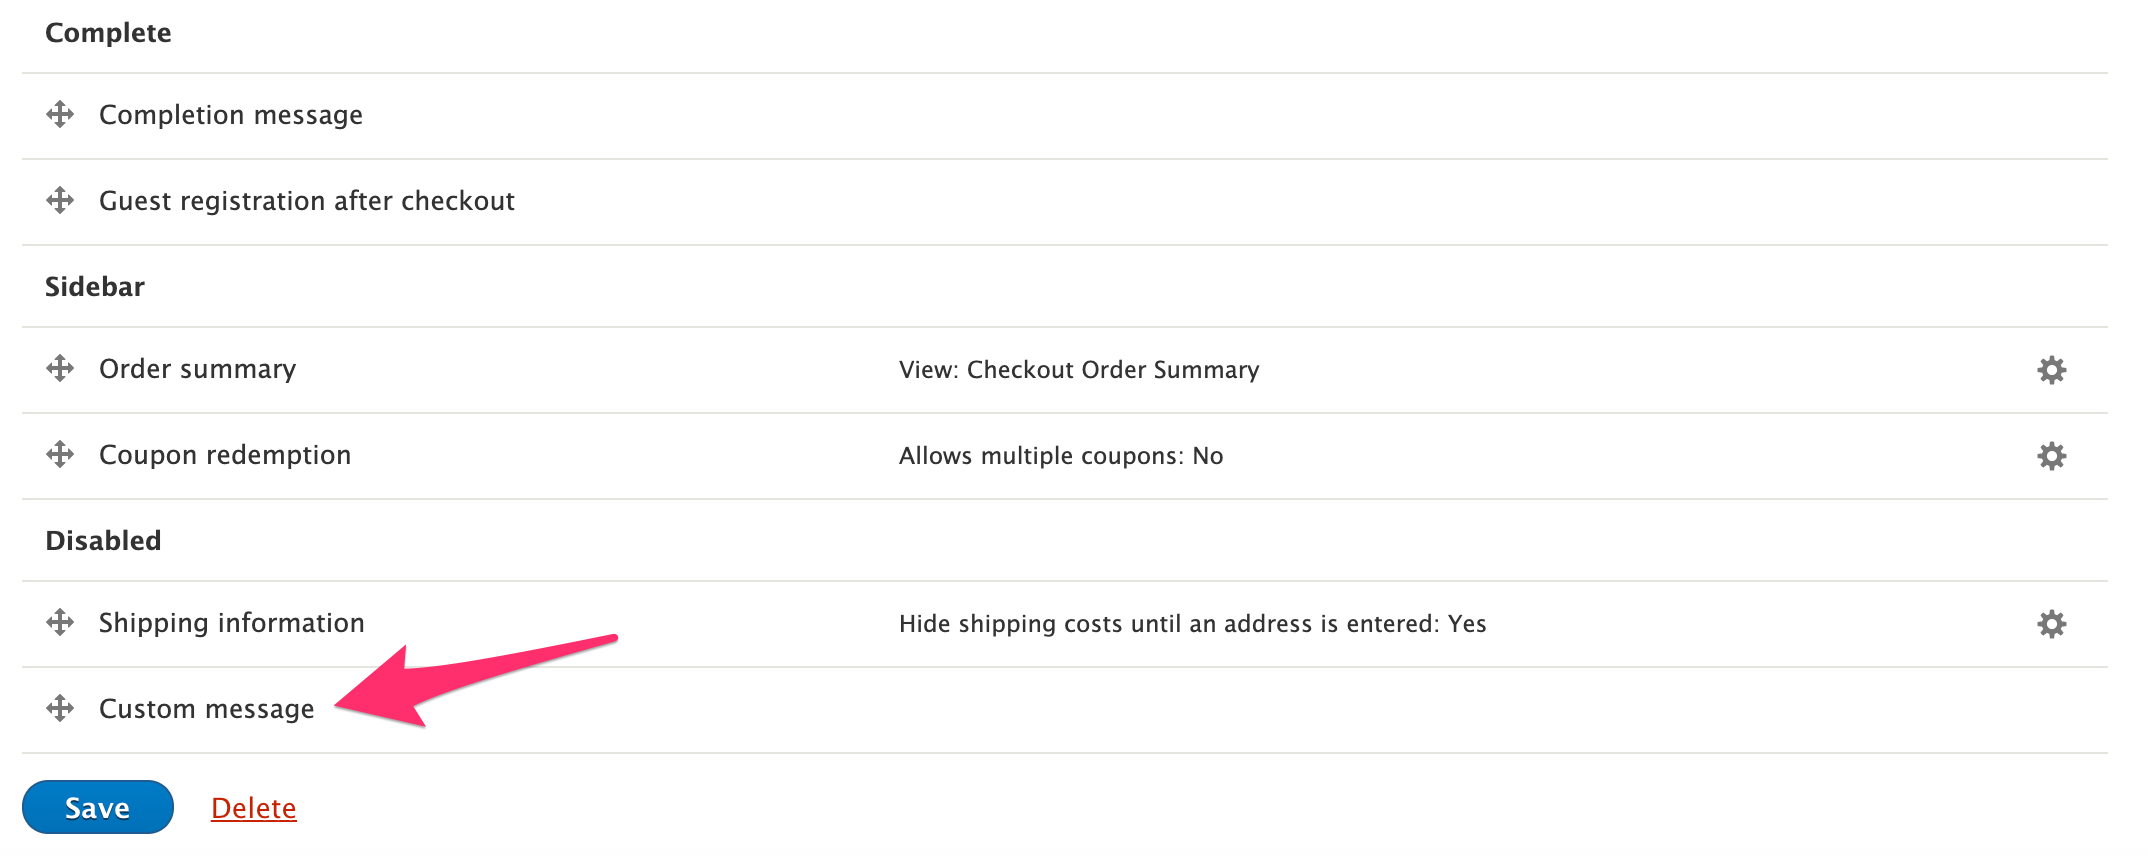
If you go to "Checkout" now, you will find that our custom checkout pane is not rendered, even if it's moved out of the "Disabled" section. This is because it does not have any visible markup. Let's add some markup to our pane form so that we can see it in Checkout.
public function buildPaneForm(array $pane_form, FormStateInterface $form_state, array &$complete_form) {
$pane_form['message'] = [
    '#markup' => $this->t('This is my custom message.'),
];
return $pane_form;
}
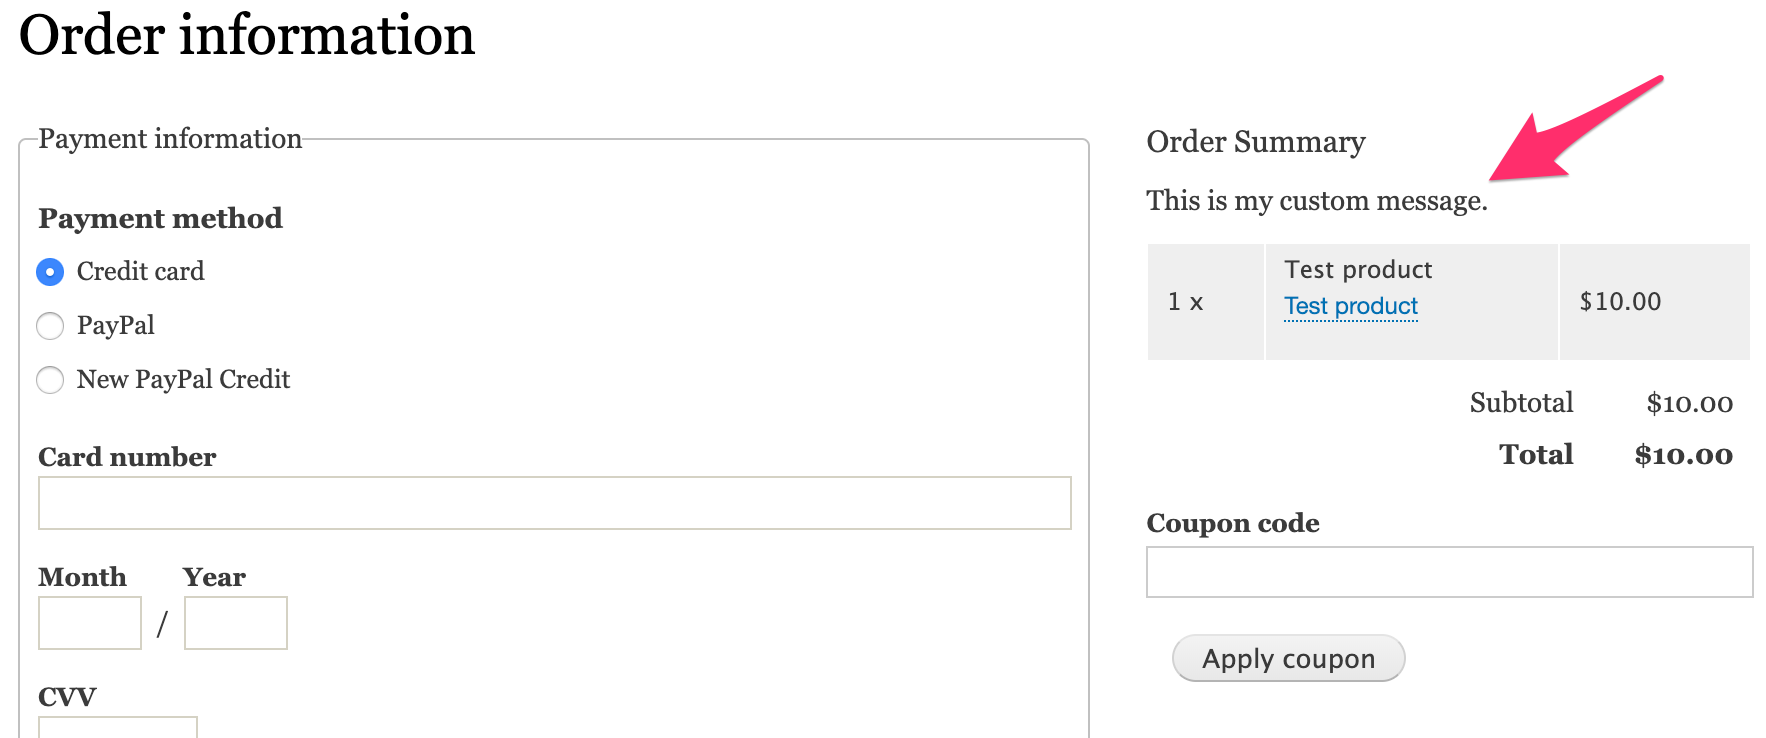
Here, the custom checkout pane has been added to the "Sidebar" step:
Checkout pane annotation
In addition to id and label, several other keys are defined for the CommerceCheckoutPane annotation.
| Key | Definition |
| ---------------- |
| display_label | The checkout pane display label, defaults to the main label. |
| default_step | The ID of the default step. If missing, defaults to disabled. The steps available for the default checkout flow are login, order_information, review, _sidebar and _disabled |
| wrapper_element | The wrapper element to use when rendering the pane, defaults to "container". |
Let's add in these additional elements to our CustomMessagePane annotation, like this:
/**
* Provides a custom message pane.
*
* @CommerceCheckoutPane(
* id = "my_checkout_pane_custom_message",
* label = @Translation("Custom message"),
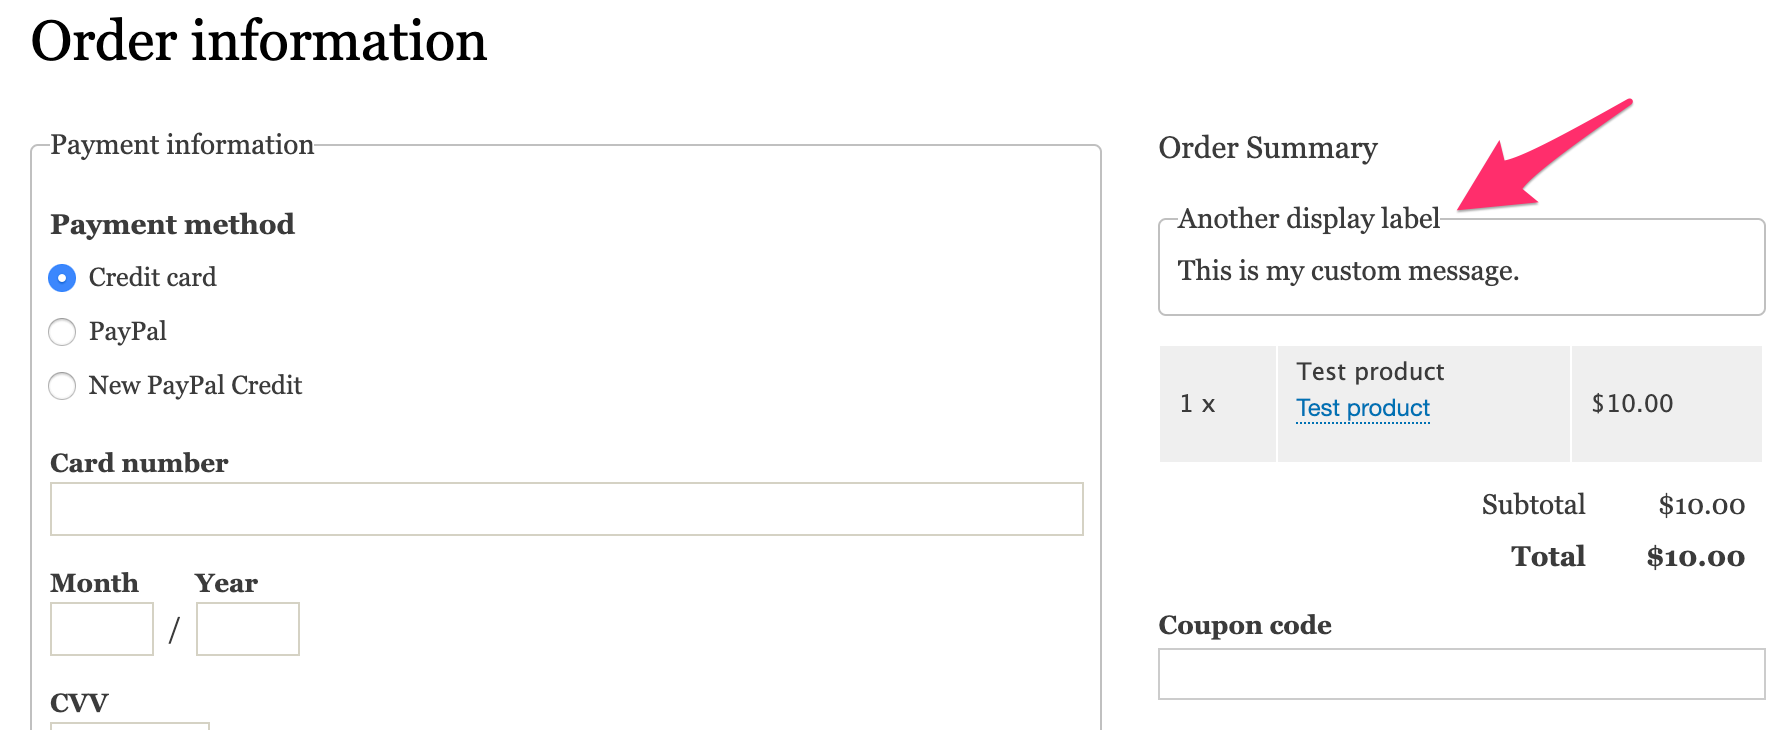
* display_label = @Translation("Another display label"),
* default_step = "_sidebar",
* wrapper_element = "fieldset",
* )
*/
Now if we rebuild caches and reload the Checkout page, our custom pane is rendered in a fieldset with its display label:
Example 2: Create a configurable custom message pane
You can make your checkout pane plugin configurable by implementing its defaultConfiguration(), buildConfigurationSummary(),buildConfigurationForm(), and submitConfigurationForm() methods. Here's an example implementation that makes our custom message configurable through the admin UI:
public function defaultConfiguration() {
return [
    'custom_message' => 'This is my custom message.',
] + parent::defaultConfiguration();
}

public function buildConfigurationSummary() {
return $this->t('Custom message: @custom_message', ['@custom_message' => $this->configuration['custom_message']]);
}

public function buildConfigurationForm(array $form, FormStateInterface $form_state) {
$form = parent::buildConfigurationForm($form, $form_state);
$form['custom_message'] = [
    '#type' => 'textfield',
    '#title' => $this->t('Custom message'),
    '#default_value' => $this->configuration['custom_message'],
];

return $form;
}

public function submitConfigurationForm(array &$form, FormStateInterface $form_state) {
parent::submitConfigurationForm($form, $form_state);

if (!$form_state->getErrors()) {
    $values = $form_state->getValue($form['#parents']);
    $this->configuration['custom_message'] = $values['custom_message'];
}
}
Note that you can use the validateConfigurationForm() method if your configuration form requires validation.
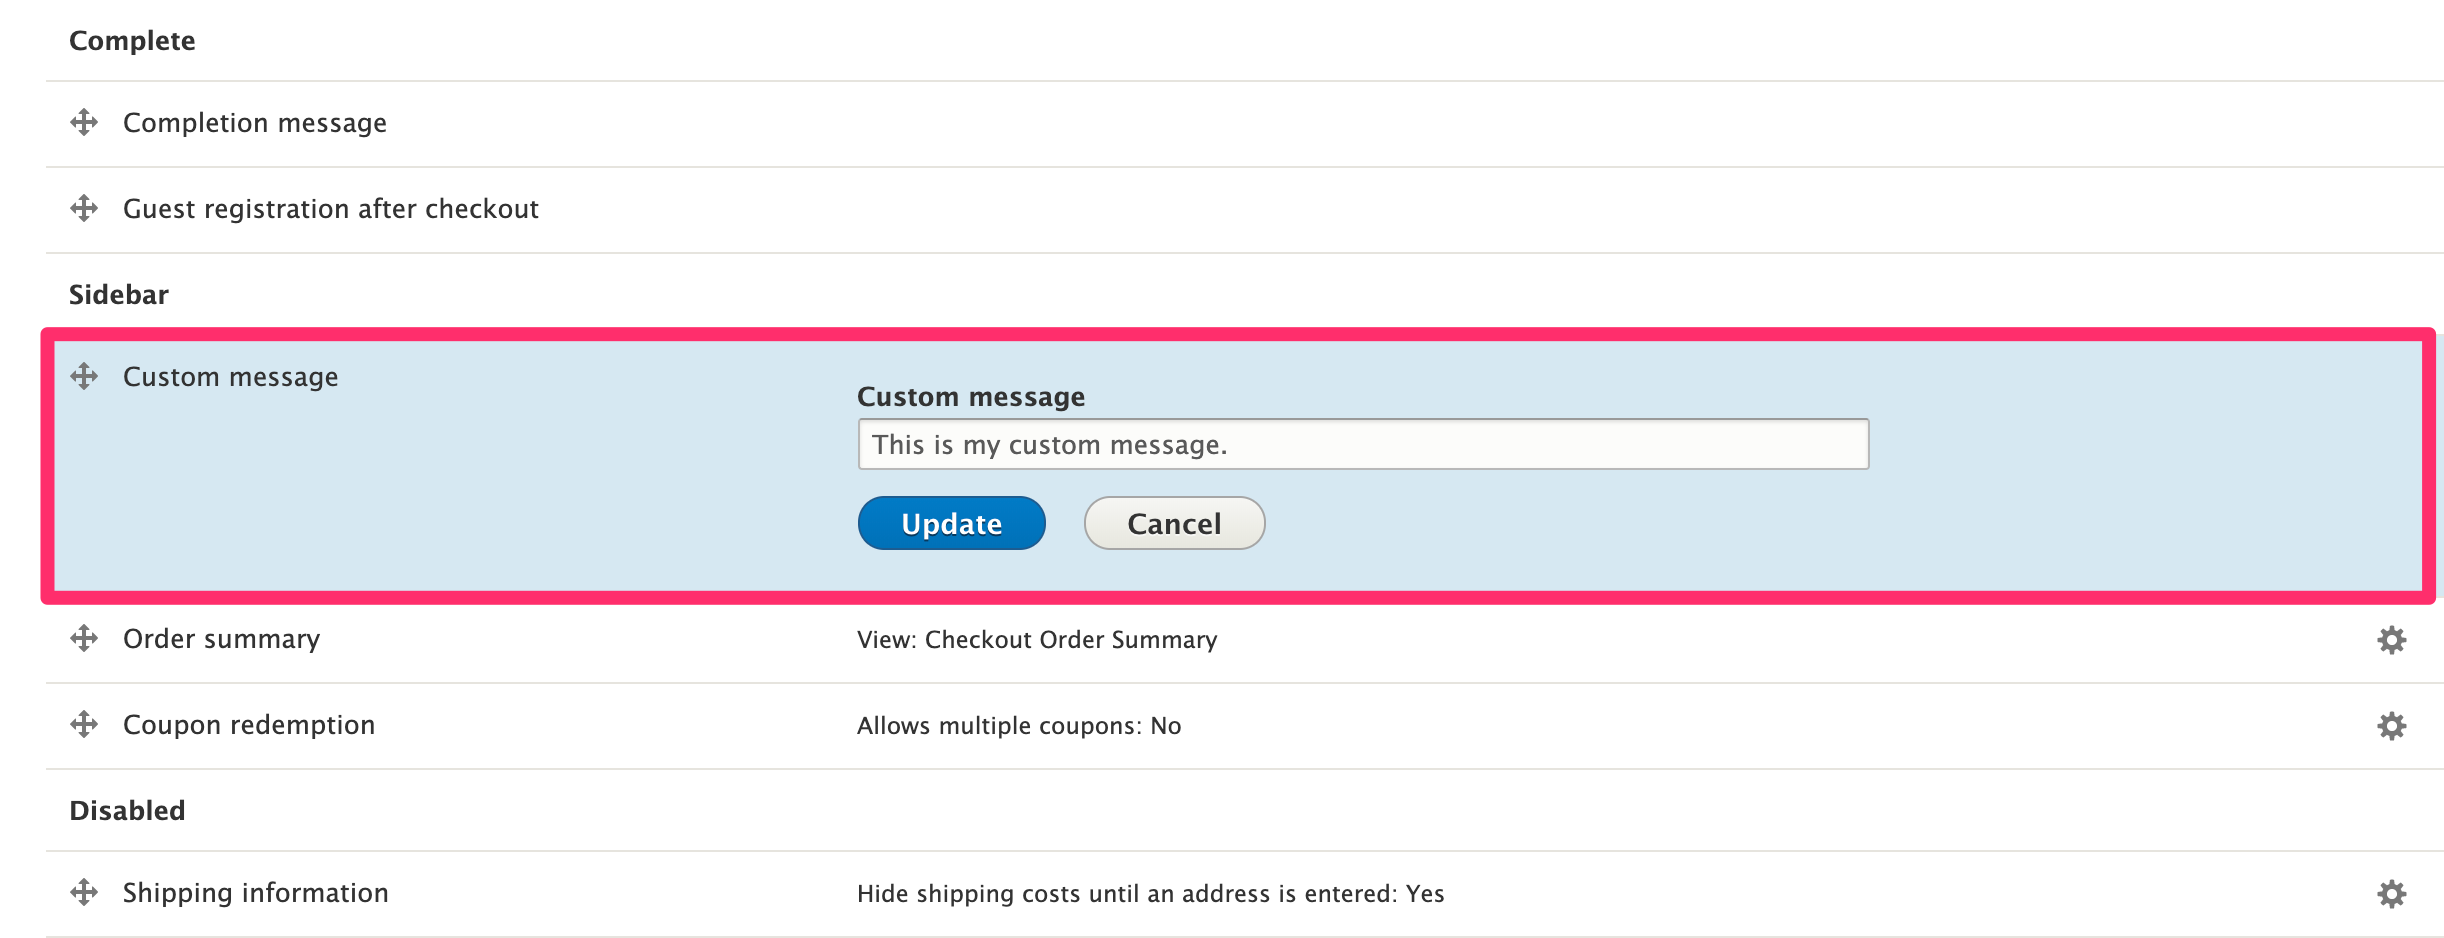
Now we can configure our custom message through the admin UI:
To display the custom message, we need to modify the buildPaneForm() method to use the text saved in configuration:
public function buildPaneForm(array $pane_form, FormStateInterface $form_state, array &$complete_form) {
$pane_form['message'] = [
    '#markup' => $this->t('@custom_message', ['@custom_message' => $this->configuration['custom_message']]),
];
return $pane_form;
}
Example 3: Control visibility of a custom checkout pane
There are many situations in which you may want to display a checkout pane for some orders but not others. For example, suppose some of the products you sell require a special disclaimer message. You could add a custom boolean field to your product variation type and then check for its existence on any of the products in the customer's cart, during checkout. The key to making this functionality work is the isVisible() method. Let's assume the ID for our disclaimer boolean field is field_needs_disclaimer. Here is an implementation of isVisible() we can add to our custom checkout pane:
public function isVisible() {
// Check whether the order has an item that requires the disclaimer message.
foreach ($this->order->getItems() as $order_item) {
    $purchased_entity = $order_item->getPurchasedEntity();
    if ($purchased_entity->get('field_needs_disclaimer')->value == 1) {
    return TRUE;
    }
}

return FALSE;
}
Notice that we used $this->order in the method. You can access the order and all its items like this in any of the custom checkout pane methods. The CheckoutPaneBase class additionally defines entityTypeManager and checkoutFlow (the parent checkout flow) as protected class properties.
Example 4: Allow customer to add a comment to the order.
In this example, we'll build an actual form in buildPaneForm() instead of just displaying information. See the Drupal.org documentation on Form and render elements for more information on building custom forms. Our simple pane form has a single textfield element:
public function buildPaneForm(array $pane_form, FormStateInterface $form_state, array &$complete_form) {
$pane_form['comment'] = [
    '#type' => 'textfield',
    '#title' => $this->t('Optional order comment'),
    '#size' => 60,
];
return $pane_form;
}
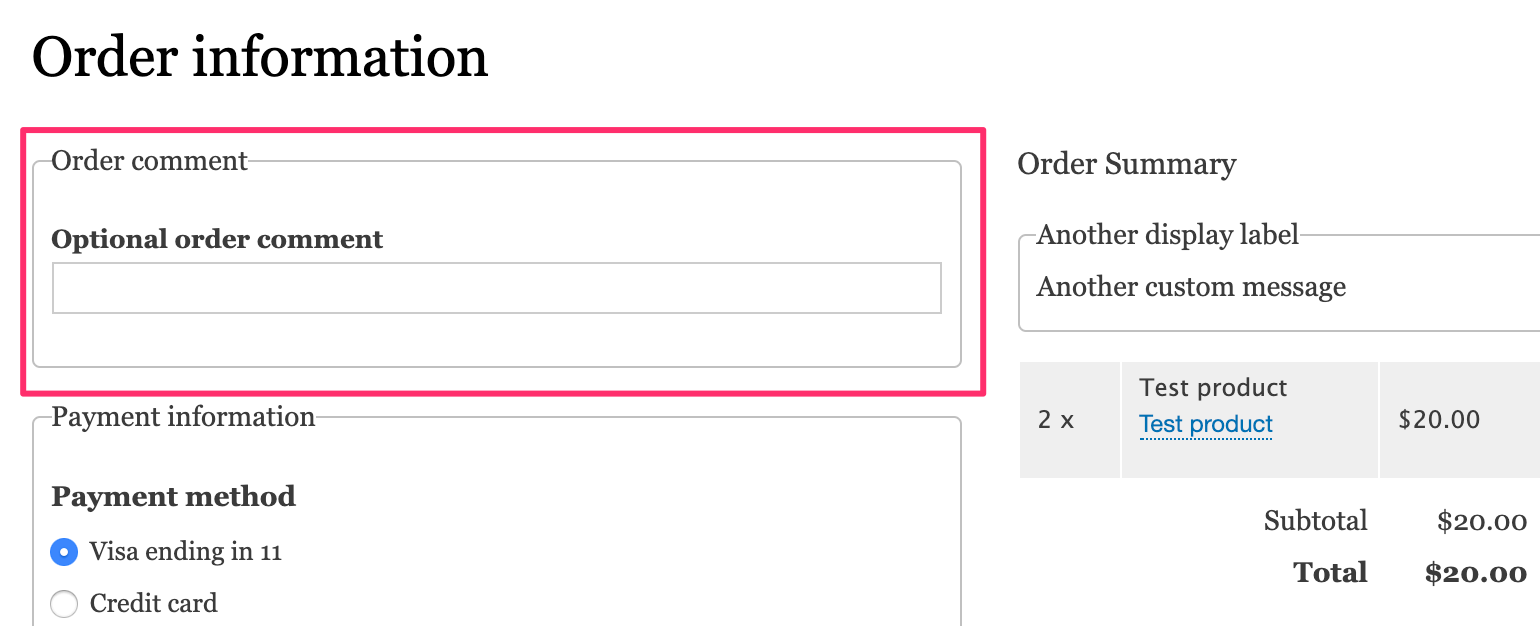
If we add our new custom checkout pane to the "Order information" step of our checkout flow, customers will be able to add comments to their orders:
To save the comment entered by the customer, we can use the Commerce Order entity's setData() method. For a more complex example, we could implement validatePaneForm(), but all we need here is submitPaneForm():
public function submitPaneForm(array &$pane_form, FormStateInterface $form_state, array &$complete_form) {
    $values = $form_state->getValue($pane_form['#parents']);
    $this->order->setData('order_comment', $values['comment']);
}
After saving the comment to the order, you can access the comment value using the Commerce order getData() method with the key value we used in submitPaneForm(), "order_comment":
$comment = $order->getData('order_comment');
We can use the getData() method to improve our implementation in two ways:
1. Set the default value for the comment in buildPaneForm() so that customers won't have to re-enter their comment if they go back to this checkout step after submitting the form.
- Implement the checkout pane method
buildPaneSummary()so that the comment text appears on the Review page.
Here is that updated code:
public function buildPaneForm(array $pane_form, FormStateInterface $form_state, array &$complete_form) {
    $comment = $this->order->getData('order_comment');
    $pane_form['comment'] = [
        '#type' => 'textfield',
        '#title' => $this->t('Optional order comment'),
        '#default_value' => $comment ? $comment : '',
        '#size' => 60,
    ];
    return $pane_form;
}

public function buildPaneSummary() {
    if ($order_comment = $this->order->getData('order_comment')) {
        return [
        '#plain_text' => $order_comment,
        ];
    }
    return [];
}
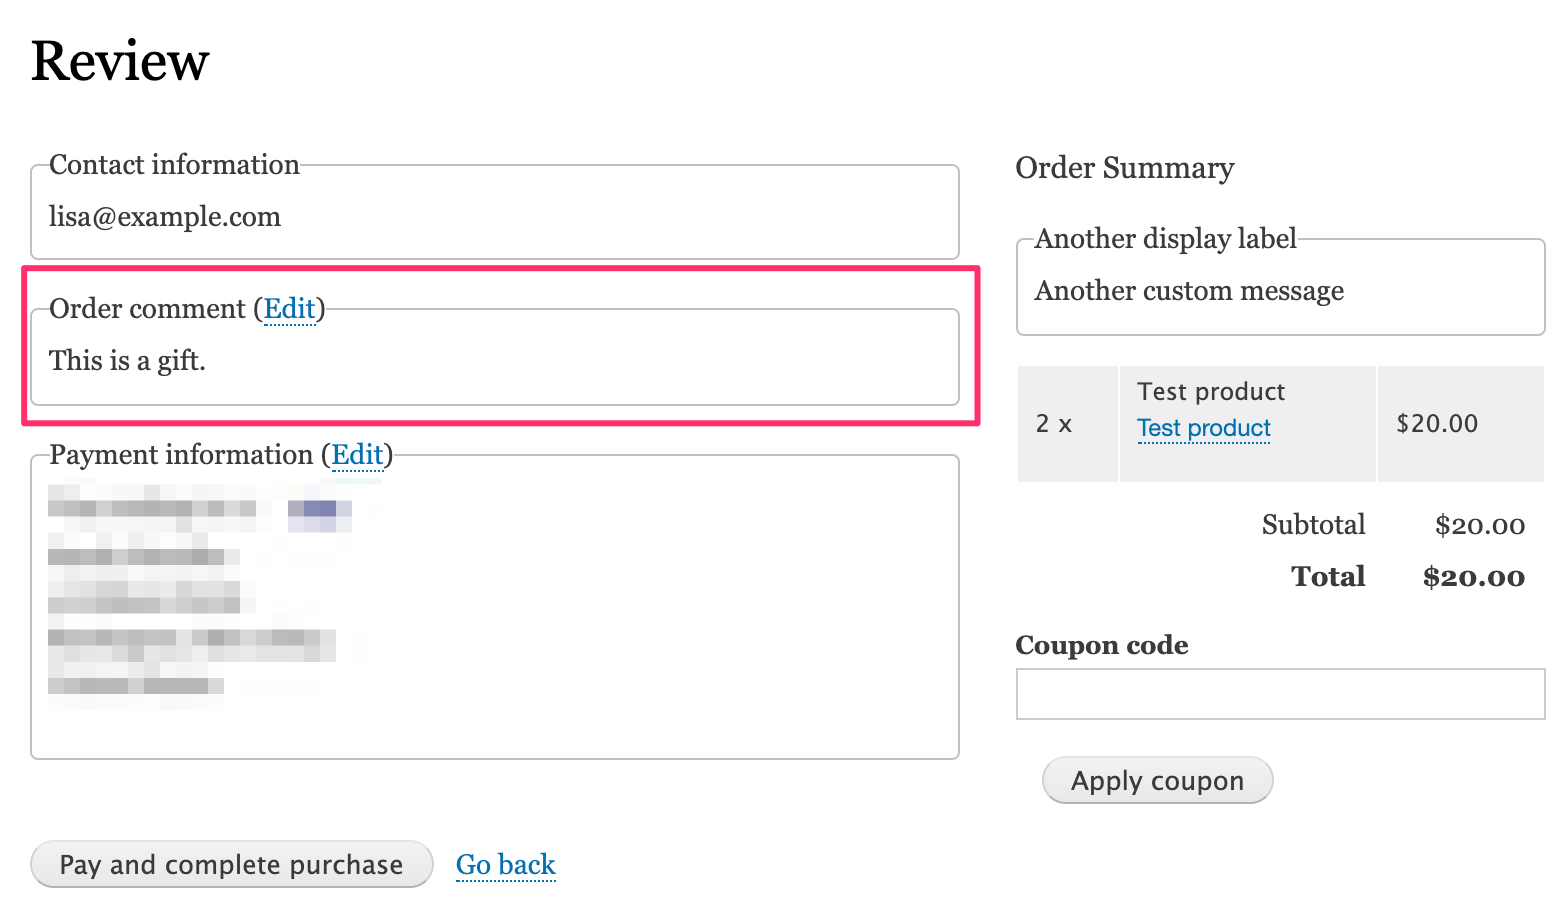
And here's how our "Order comment" appears in the "Review" step now:
Example 5: Use the EntityFormDisplay class for pane form build/validate/submit methods
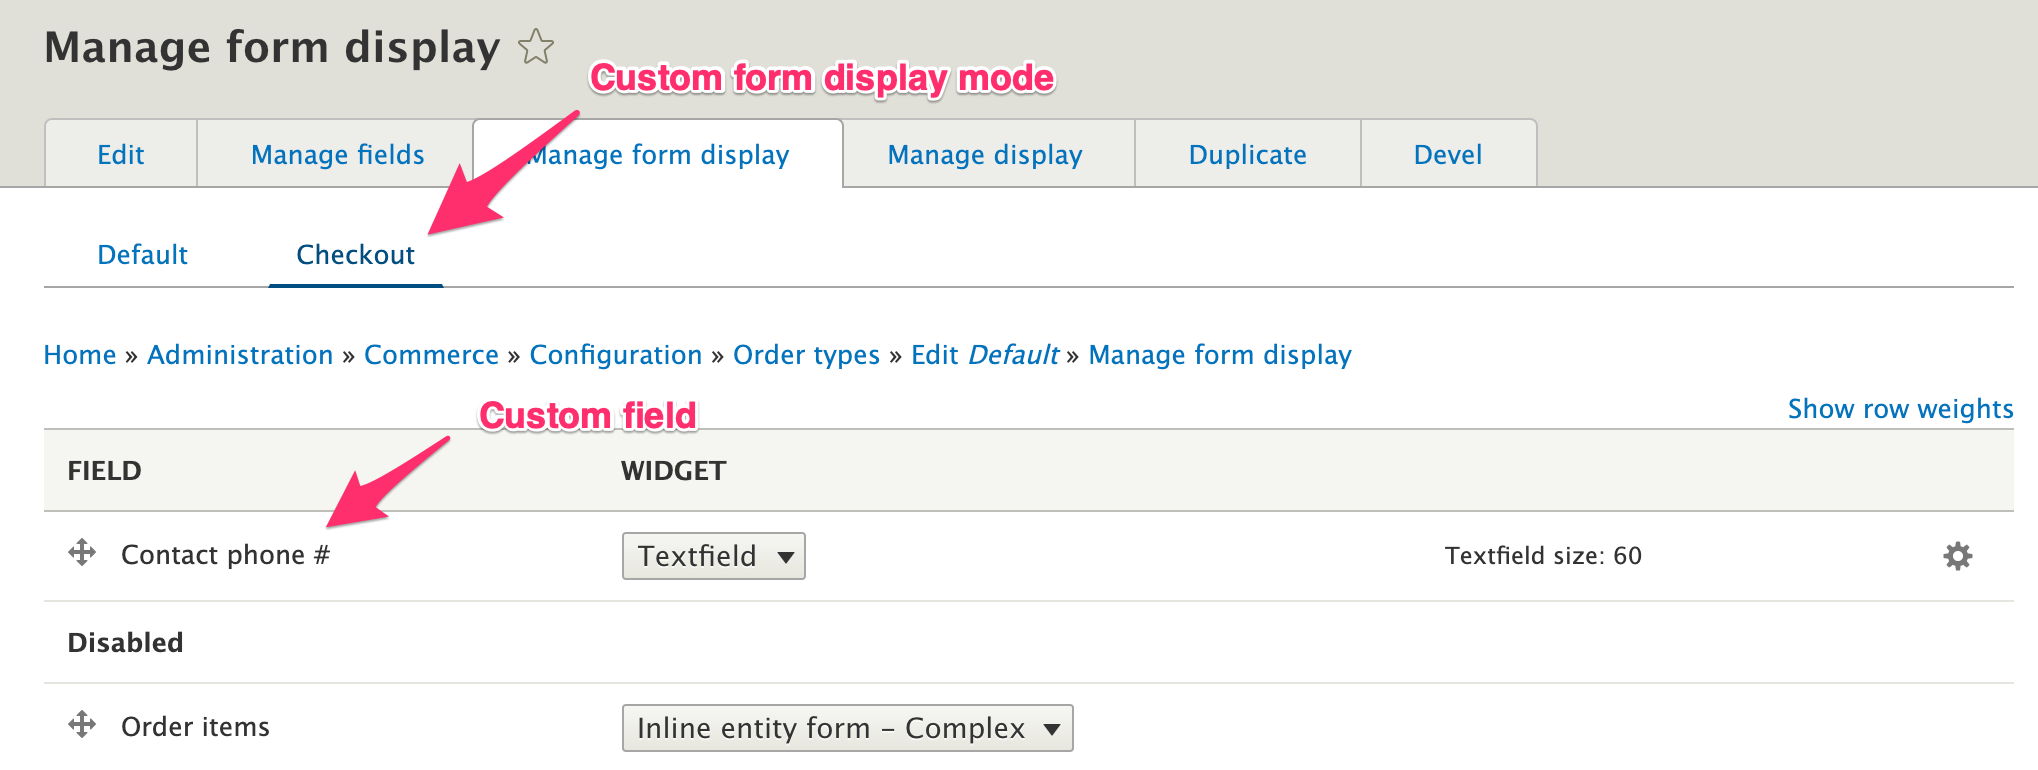
As an alternative to using the data field to store order information, you can add custom fields to your order type and create a custom form display mode. Configure your custom form display mode so that only your new custom fields are enabled. For example, suppose our custom form display mode is named, "Checkout" (with id checkout), and we've added a custom field for a "Contact phone #":
We can use the methods provided by the EntityFormDisplay class to provide the functionality for our custom checkout pane, like this:
public function buildPaneForm(array $pane_form, FormStateInterface $form_state, array &$complete_form) {
    $form_display = EntityFormDisplay::collectRenderDisplay($this->order, 'checkout');
    $form_display->buildForm($this->order, $pane_form, $form_state);
    return $pane_form;
}

public function validatePaneForm(array &$pane_form, FormStateInterface $form_state, array &$complete_form) {
    $form_display = EntityFormDisplay::collectRenderDisplay($this->order, 'checkout');
    $form_display->extractFormValues($this->order, $pane_form, $form_state);
    $form_display->validateFormValues($this->order, $pane_form, $form_state);
}

public function submitPaneForm(array &$pane_form, FormStateInterface $form_state, array &$complete_form) {
    $form_display = EntityFormDisplay::collectRenderDisplay($this->order, 'checkout');
    $form_display->extractFormValues($this->order, $pane_form, $form_state);
}
Don't forget the use statement: use Drupal\Core\Entity\Entity\EntityFormDisplay;
Replace Existing Checkout pane
The drag-and-drop UI for checkout flows makes it seem easy to simply disable existing checkout panes provided by core and replace them with your own custom panes. However, disabling certain checkout panes can cause problems. Specifically, because the "Payment process" pane is dependent on the "Payment information" pane, if you disable the "Payment information" pane, the "Payment process" pane is automatically disabled. Which is probably not what you want. This documentation page describes how you can safely replace the "Payment information" pane (or any other existing pane) with your own.
The process for creating the replacement checkout pane is essentially the same as for any other custom checkout pane. The one big exception is that you should not include a @CommerceCheckoutPane annotation for your new plugin. If other Commerce Core code is dependent on the pane you're replacing, it will reference the pane using the id set in the annotation. So if you create a new pane with a new id, references to the existing pane will still point to that existing pane.
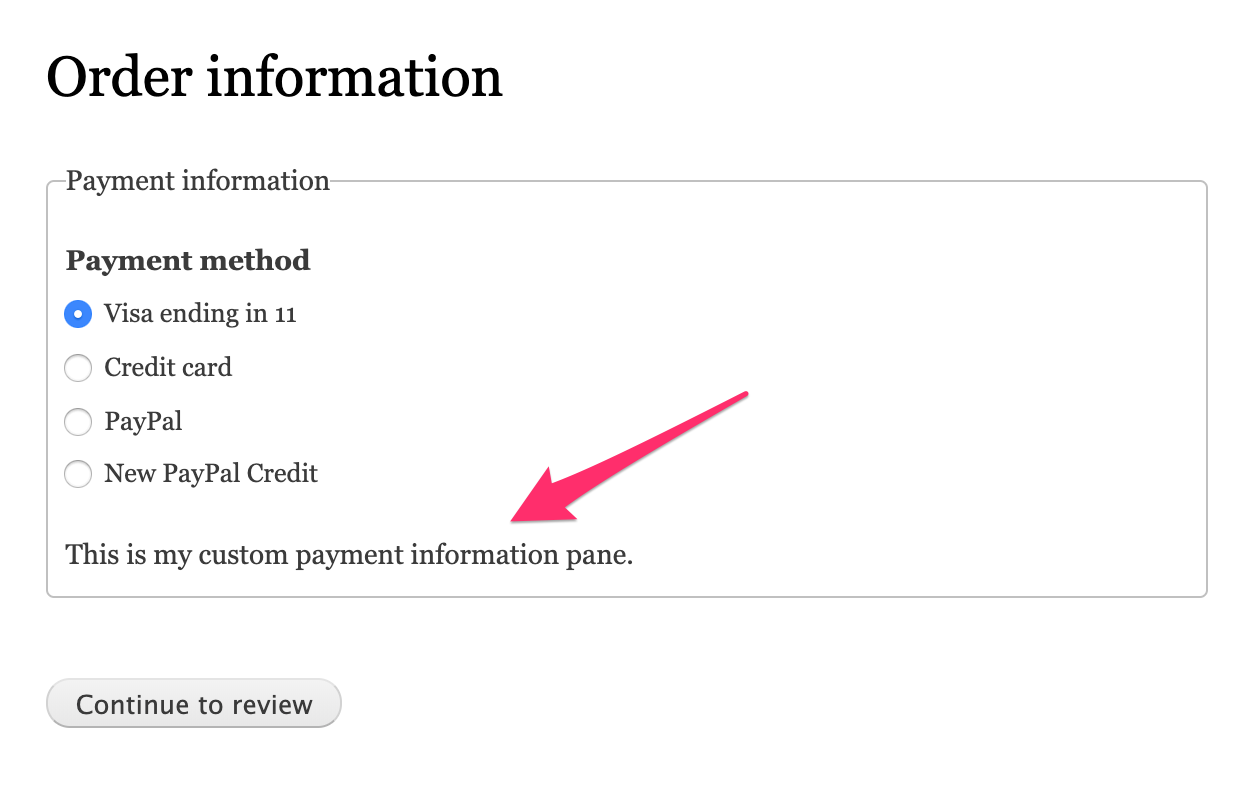
For example, let's suppose that we want to replace the Commerce Core "Payment information" pane with one of our own. We'll extend the existing pane class to avoid duplicating code unnecessarily, but if your custom pane is significantly different from the pane it's replacing, you could instead extend Drupal\commerce_checkout\Plugin\Commerce\CheckoutPane\CheckoutPaneBase. Here's our custom PaymentInformation pane:
<?php

namespace Drupal\my_checkout_pane\Plugin\Commerce\CheckoutPane;

use Drupal\commerce_payment\Plugin\Commerce\CheckoutPane\PaymentInformation as BasePaymentInformation;
use Drupal\Core\Form\FormStateInterface;

/**
 * Provides a custom payment information pane.
 */
class PaymentInformation extends BasePaymentInformation {

  /**
   * {@inheritdoc}
   */
  public function buildPaneForm(array $pane_form, FormStateInterface $form_state, array &$complete_form) {
    $pane_form = parent::buildPaneForm($pane_form, $form_state, $complete_form);
    // Do something custom with the pane form here.
    $pane_form['message'] = [
        '#markup' => $this->t('This is my custom payment information pane.'),
      ];
    return $pane_form;
  }

}
Note that this custom checkout pane won't show up on the Checkout Flow admin UI page since it doesn't have an annotation. And at this point, the "Payment information" pane is still generated by the Commerce Core code rather than your custom code.
Standard Payment information pane, in the Order information step:

To "fix" references to the existing pane so that they point to your custom checkout pane, you can use hook_commerce_checkout_pane_info_alter. For our "Payment information" checkout pane replacement example, that code looks like this:
/**
 * Implements hook_commerce_checkout_pane_info_alter().
 */
function my_checkout_pane_commerce_checkout_pane_info_alter(&$definitions) {
  if (isset($definitions['payment_information'])) {
    $definitions['payment_information']['class'] = \Drupal\my_checkout_pane\Plugin\Commerce\CheckoutPane\PaymentInformation::class;
    $definitions['payment_information']['provider'] = 'my_checkout_pane';
  }
}
Add that code to your custom modules's .module file, rebuild caches, and reload your checkout page. It now looks like this:
Changing the order summary
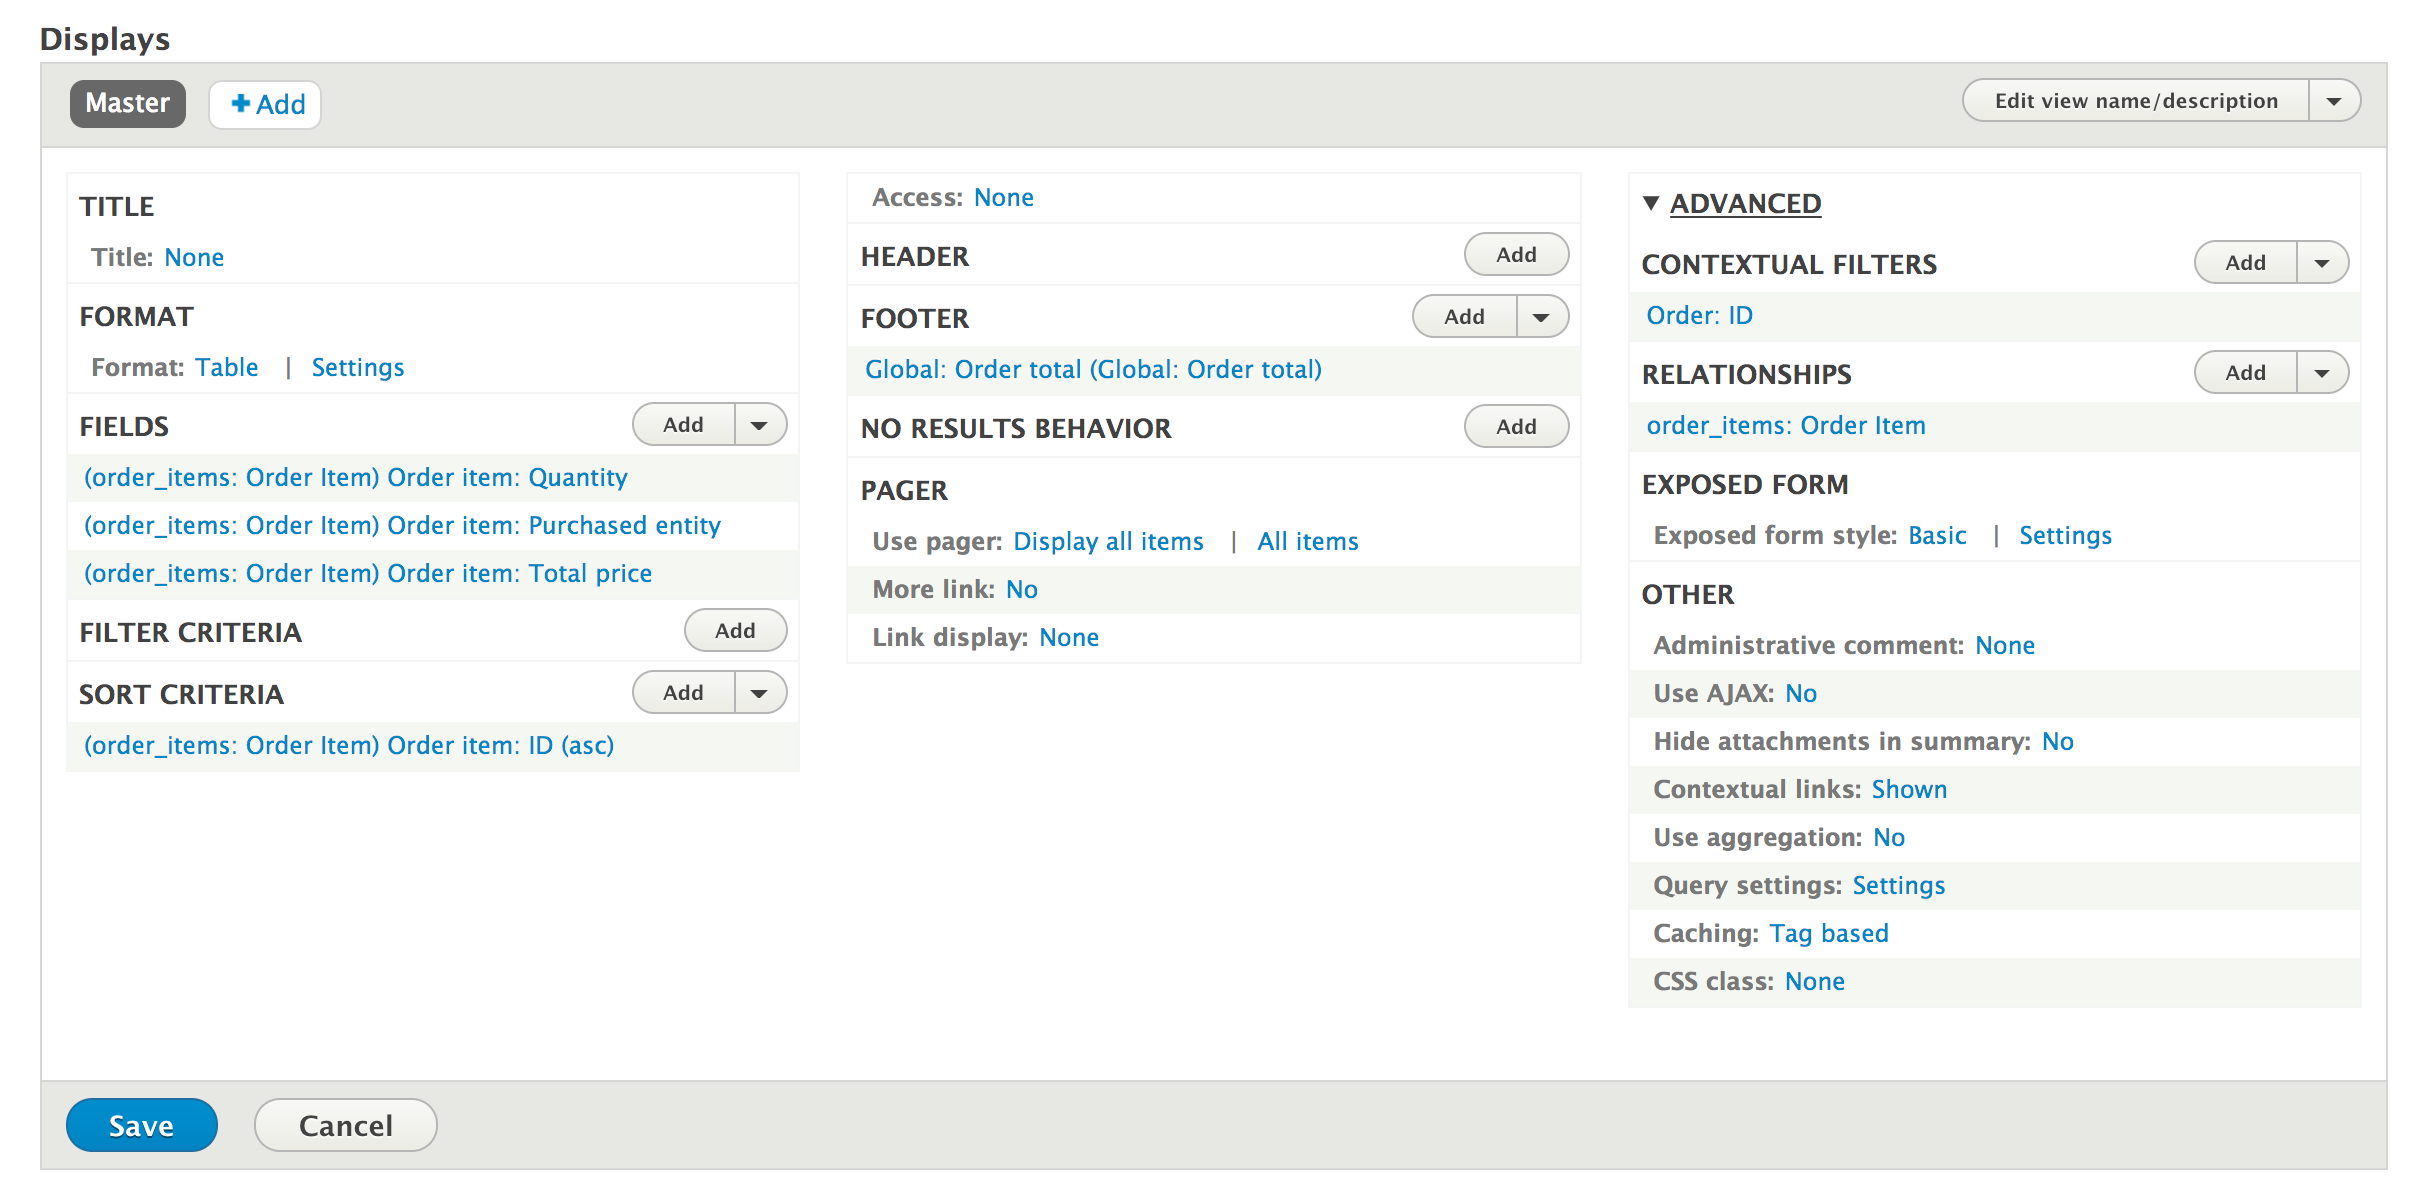
Checkouts, by default, display an order summary on specific steps. This summary is powered by a view which can be modified. This is the Checkout Order Summary (commerce_checkout_order_summary) view. Changing this view will change how the order is displayed in summary during checkout.
!!! note This is outdated, somewhat. As we now provide a Twig template by default.
Changing the view
There is no user interface for changing the view provided. The view is added by the CheckoutFlowBase class when building the checkout flow form:
    if ($this->hasSidebar($step_id)) {
      $form['sidebar']['order_summary'] = [
        '#type' => 'view',
        '#name' => 'commerce_checkout_order_summary',
        '#display_id' => 'default',
        '#arguments' => [$this->order->id()],
        '#embed' => TRUE,
      ];
    }
To use a completely different view, you will need to use hook_form_alter to change the view name, or a provide a custom checkout flow plugin.