Profiles
This section provides an overview of the Profile module and describes how profiles are used in Drupal Commerce.
- Familiarize yourself with the concepts of profiles and their relationship to user accounts.
- Learn about how profiles are organized in a customer's address book and how they are used in the checkout process.
- Learn how a custom profile type can be used for shipping addresses during checkout.
- Add a Contact phone field to the customer profile type.
- Create a new profile type to capture additional information about your customers.
- Learn about configuration options for profile types.
- Control access to profiles and their fields for your customers and administrative users.
- Manage profiles on behalf of customers.
- Learn options for importing and exporting profiles.
- Create and load profile types and profiles programmatically.
- Implement a profile label event subscriber to override the default label for profiles.
- Customize profile forms for checkout and administrative data entry.
Overview
The Profile module is a contributed Drupal module that is required by Drupal Commerce yet maintained separately from the core Drupal Commerce module. When you manage your Drupal Commerce site using Composer, the Profile module will be automatically added to your project.
Profiles are fieldable entities that represent a set of user information. The Drupal Commerce Order module provides one specific profile type, called the Customer profile. Customer profiles are used to collect customer information necessary for billing, payment, and shipping.
Relationship to user accounts
User accounts are also fieldable entities that can be used to capture customer information. However, only a single instance of this data will exist, and it is not revisionable. Therefore, user accounts are best used for information that is likely to stay fixed for customers, like gender or date of birth. This information isn't likely to change on a per-order basis. In contrast, users can have multiple profiles, each with a distinct set of information. Each Customer profile has a single address and can optionally include other information like phone number or contact name.
Every profile belongs to a single user account, and if a user account is deleted, then all of its profiles are also deleted. Within Drupal Commerce, copies of customer profiles are assigned to orders so that they cannot be deleted by customers. Customers cannot access these profiles, and they are only deleted if their parent orders are deleted.
Address book
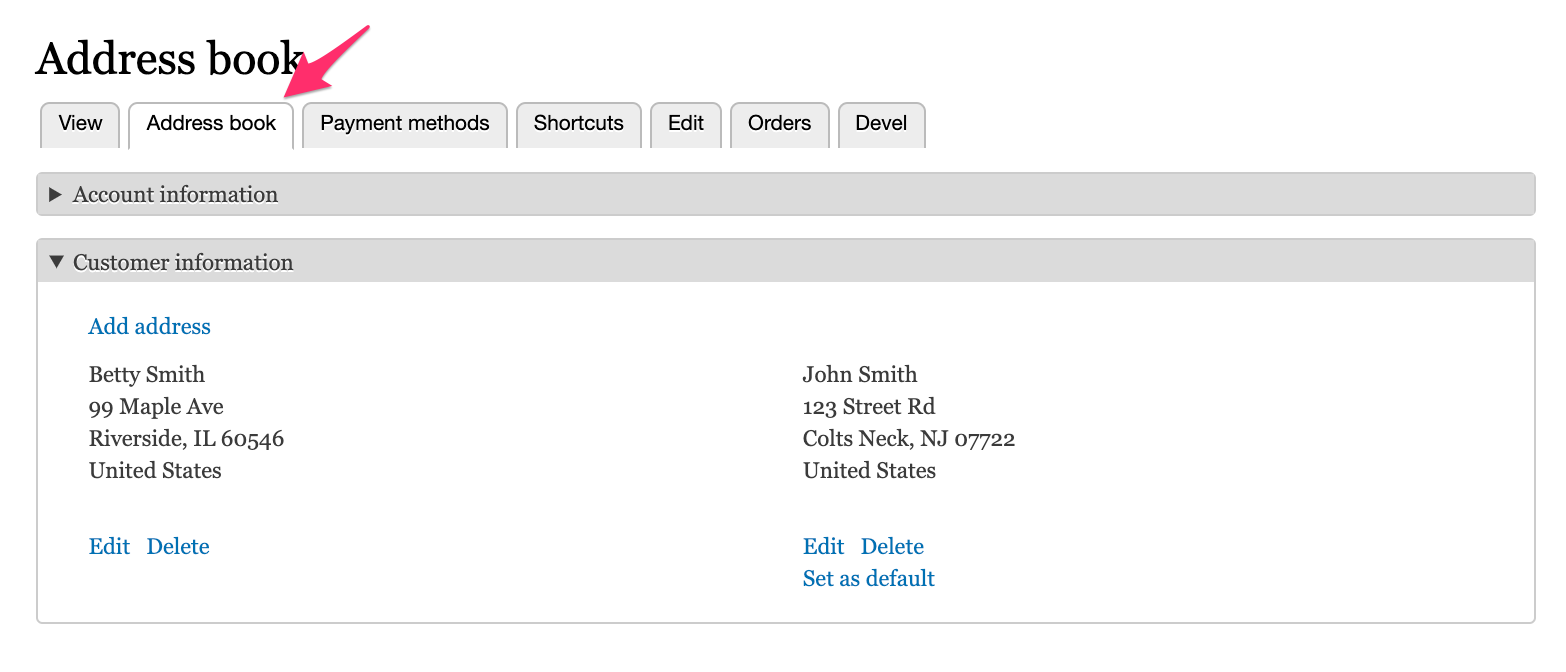
The collection of all Commerce customer profiles owned by a customer is called his Address book and can be managed as part of his User account information. If multiple Commerce customer profile types are created, then they will be organized into separate groups within the customer's address book. For each profile type, there is one default profile per user.
For example, this customer named Betty Smith has her home address as her default customer profile and a second address that can be optionally selected for her payment/billing/shipping information during checkout. An additional "Account information" profile type has been created which may serve some other purpose.
Profiles in the checkout process
In Drupal Commerce, each order has a Billing profile, which is set during the checkout process. By default, customers are asked for billing information right after they either log in or (optionally) choose to continue as a guest. The Billing information checkout pane appears as part of the Order information step.
If the Drupal Commerce Payment module is enabled, the Payment information checkout pane is used instead of the Billing information pane. These checkout panes allow the customer to set the Billing profile for the order. If the payment gateway for an available payment method allows checkout without billing information, then it is possible to allow customers to check out without setting a billing profile for the order.
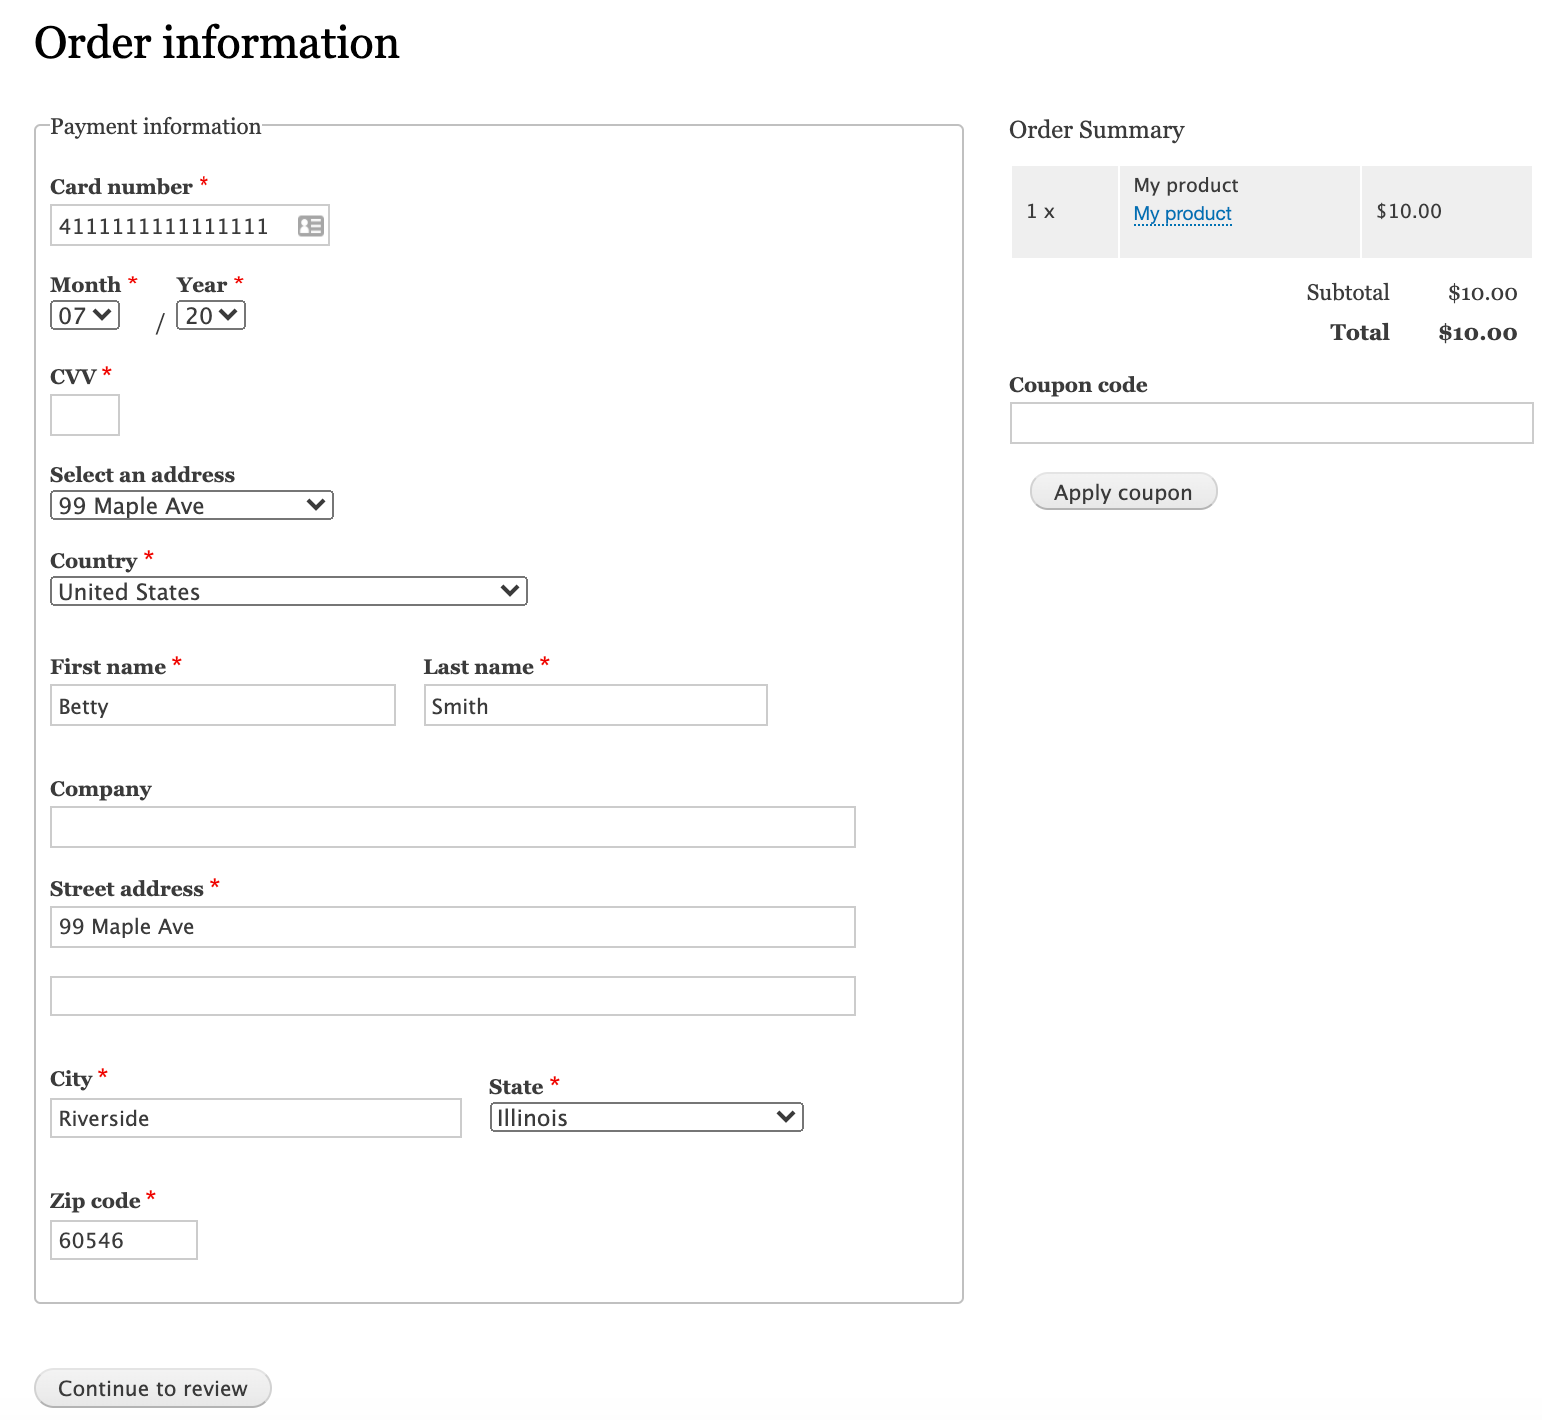
Here is an example of the Order Information step, in which the default Customer profile form is presented to the customer. When more than one customer profile is available, the "Select an address" element is provided. Since the Payment module is enabled for this example site, the profile is labeled as Payment information rather than Billing information.
Shipping profiles
If the Commerce Shipping module is installed, then a Shipping Information pane will also be available to collect the Shipping profile for the order. Any customer profile type can be used for both billing and shipping profiles. Using a single bundle for both billing and shipping information is generally a best practice for many sites and solutions. This includes Amazon, Shopify, BigCommerce, Spree, etc.
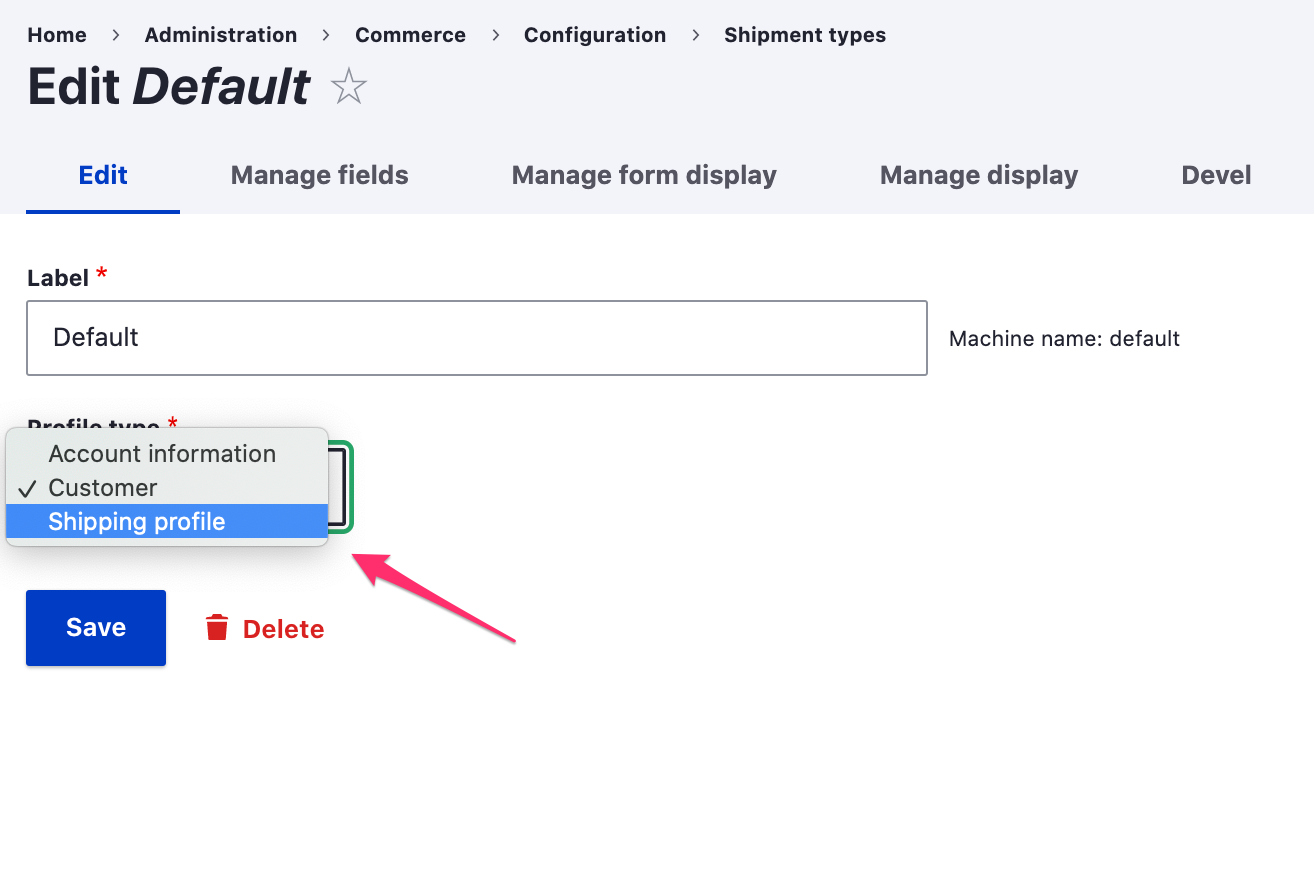
However, some merchants may require different fields for billing vs. shipping. For those merchants, shipment types can be configured to use a different customer profile type. For example, here a "Shipping profile" profile type has been created and assigned to the Default shipment type:
Profile Configuration
This section describes how you can use Profiles to capture and store information about your customers. In a default Drupal Commerce installation, the Customer profile type is provided for you. You can customize this Customer profile type to suit your needs and/or create additional profile types.
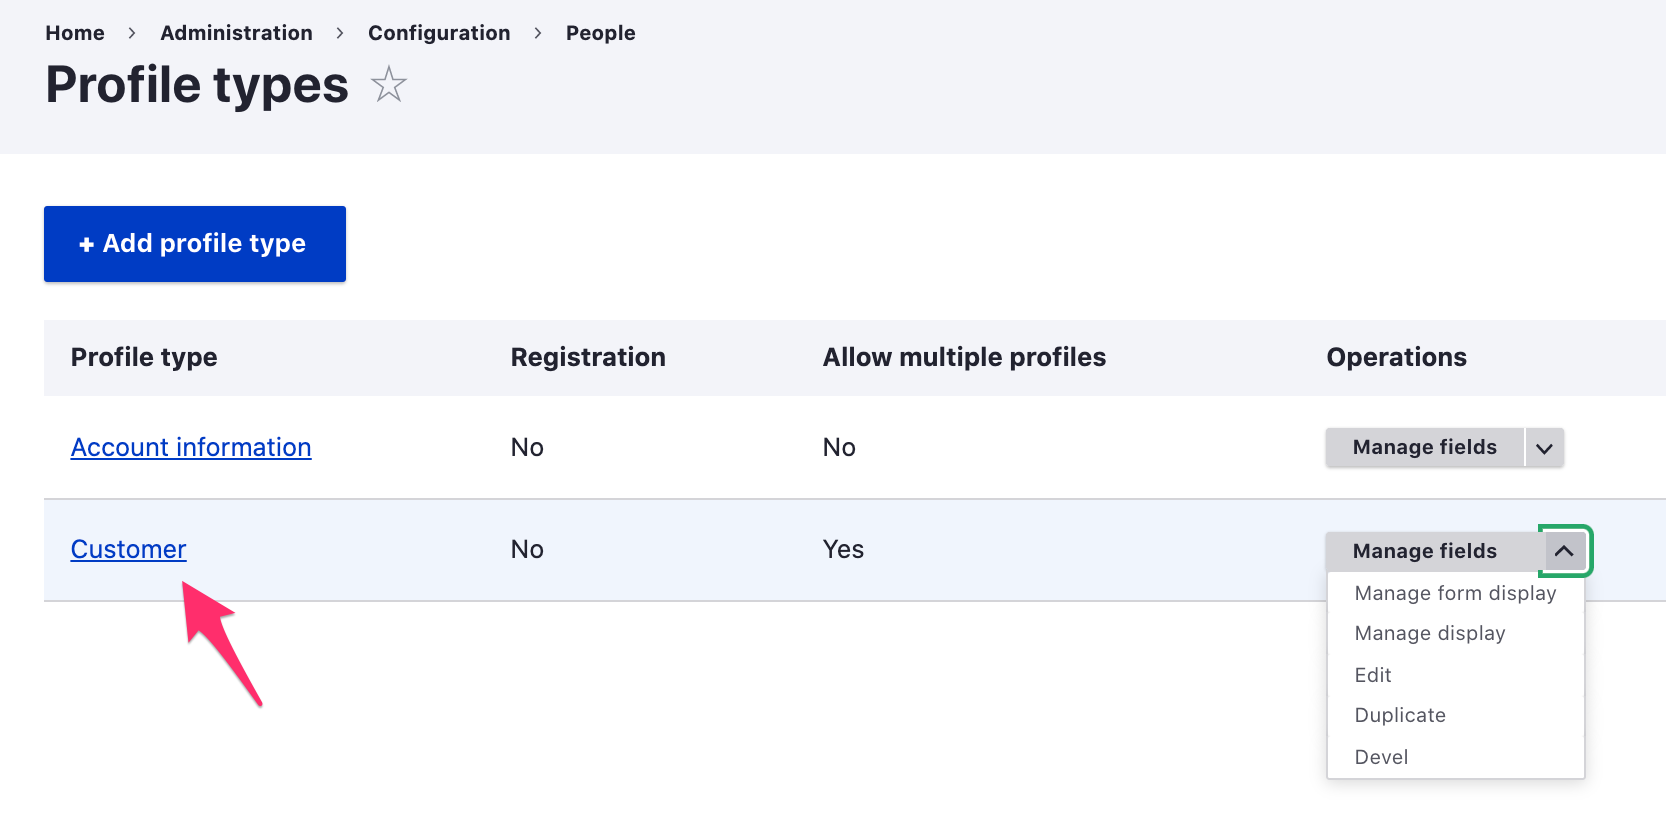
Access the administrative page for the Customer profile type and any others you create at /admin/config/people/profiles.
Customer profile fields
By default, profiles do not have any visible/editable fields; however, the Customer profile type includes an Address field. Each Customer profile has a single address. You can customize the Address field that's used by the Customer profile at /admin/config/people/profile-types/manage/customer/fields/profile.customer.address. If the Commerce Tax module is installed, a "Tax number" field will also be added to the Customer profile type.
You can add custom fields to a profile using its Manage fields administrative page. As an example, let's add a Contact phone field to our Customer profile type.
Contact phone field
Add the contact phone field
- If the Drupal core Telephone module is not already installed, navigate to the Extend administrative page and install it:
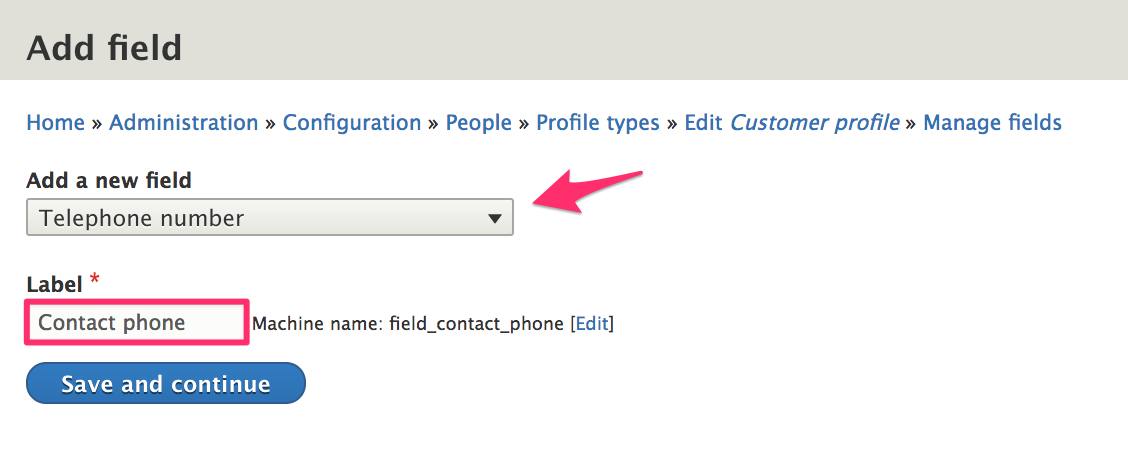
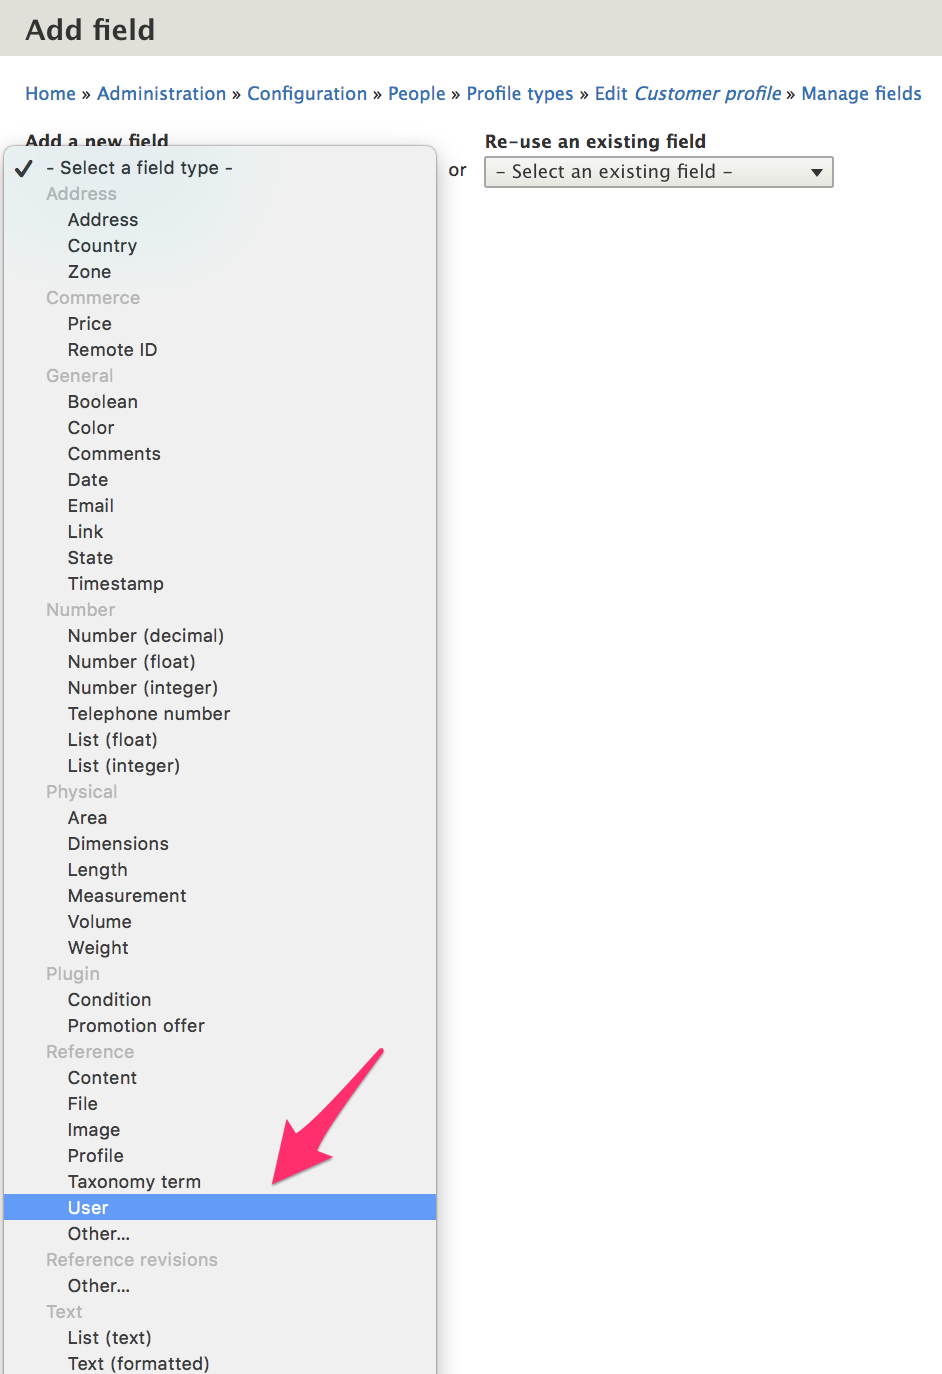
/admin/modules. (Alternatively, you could just use a text field.) - Navigate to the Manage fields administrative page for the Customer profile type and click the Add field button.
- Select Telephone number as the field type.
- Enter Contact phone for the field label.
- Click the Save and continue button.
Configure the contact phone field
- On the Field settings page, leave the Allowed number of values set to 1.
- Click the Save field settings button.
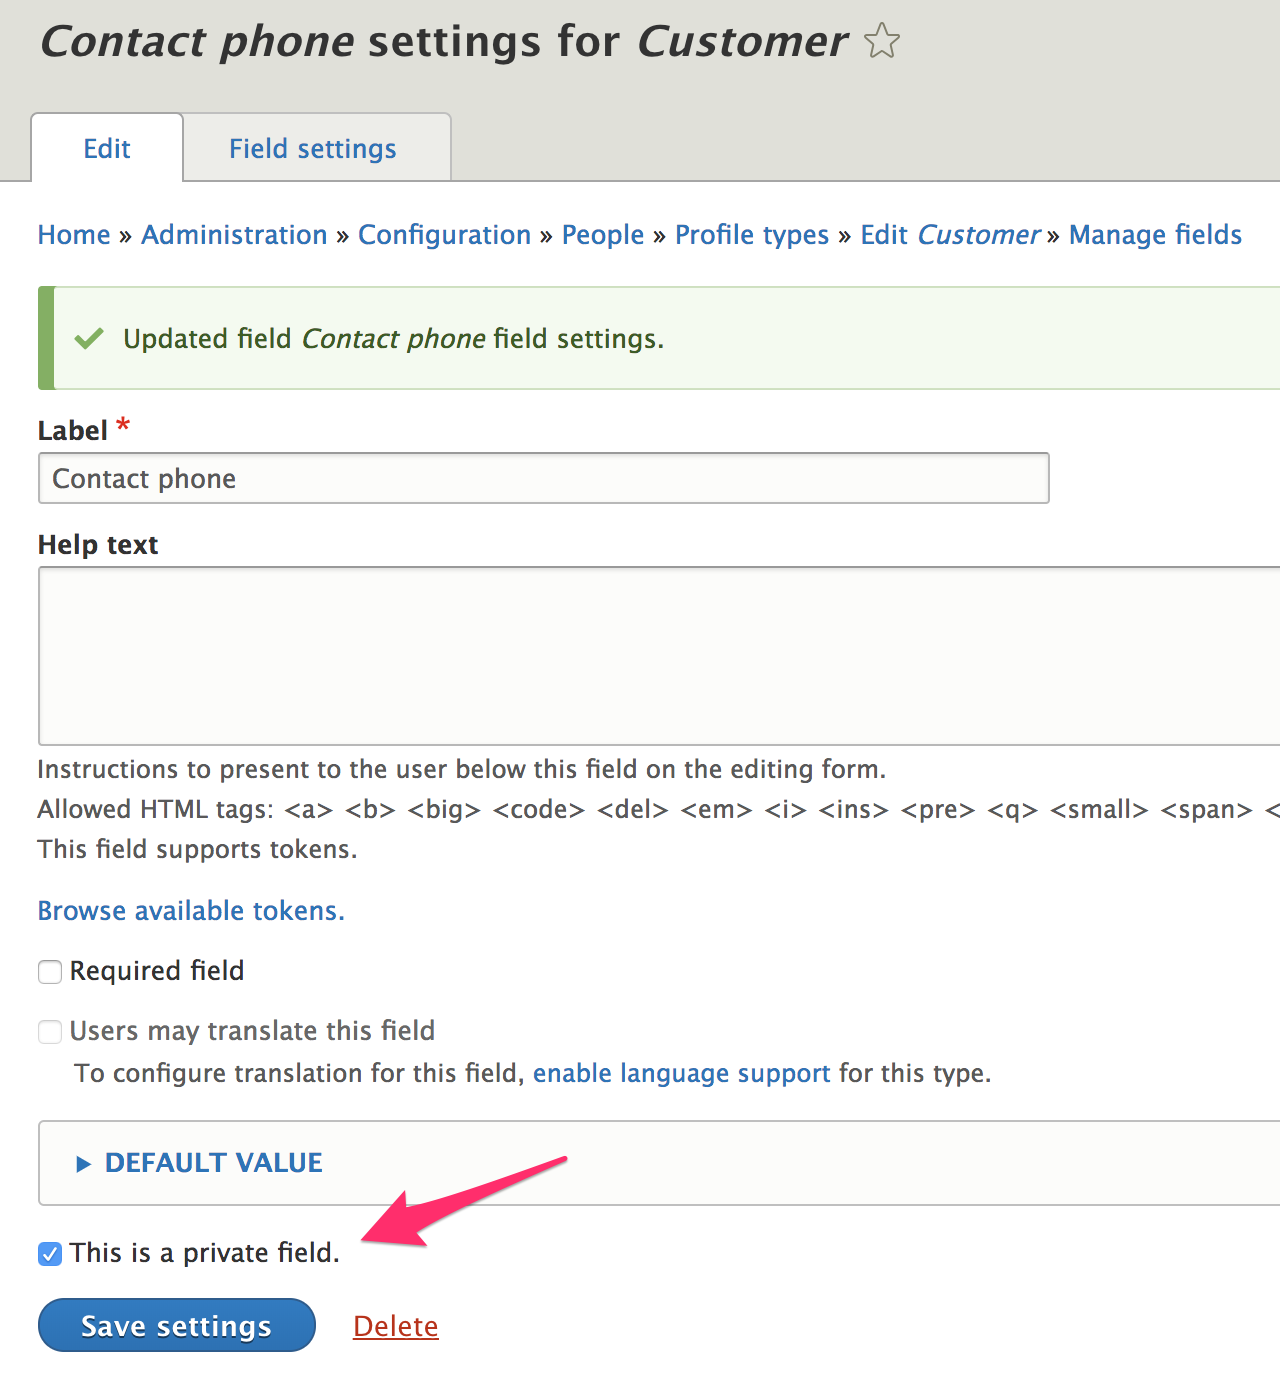
- On the settings administrative page for Contact phone, select the This is a private field setting. Private profile fields are visible only to the owner of the profile and administrative users.
- Click the Save settings button.
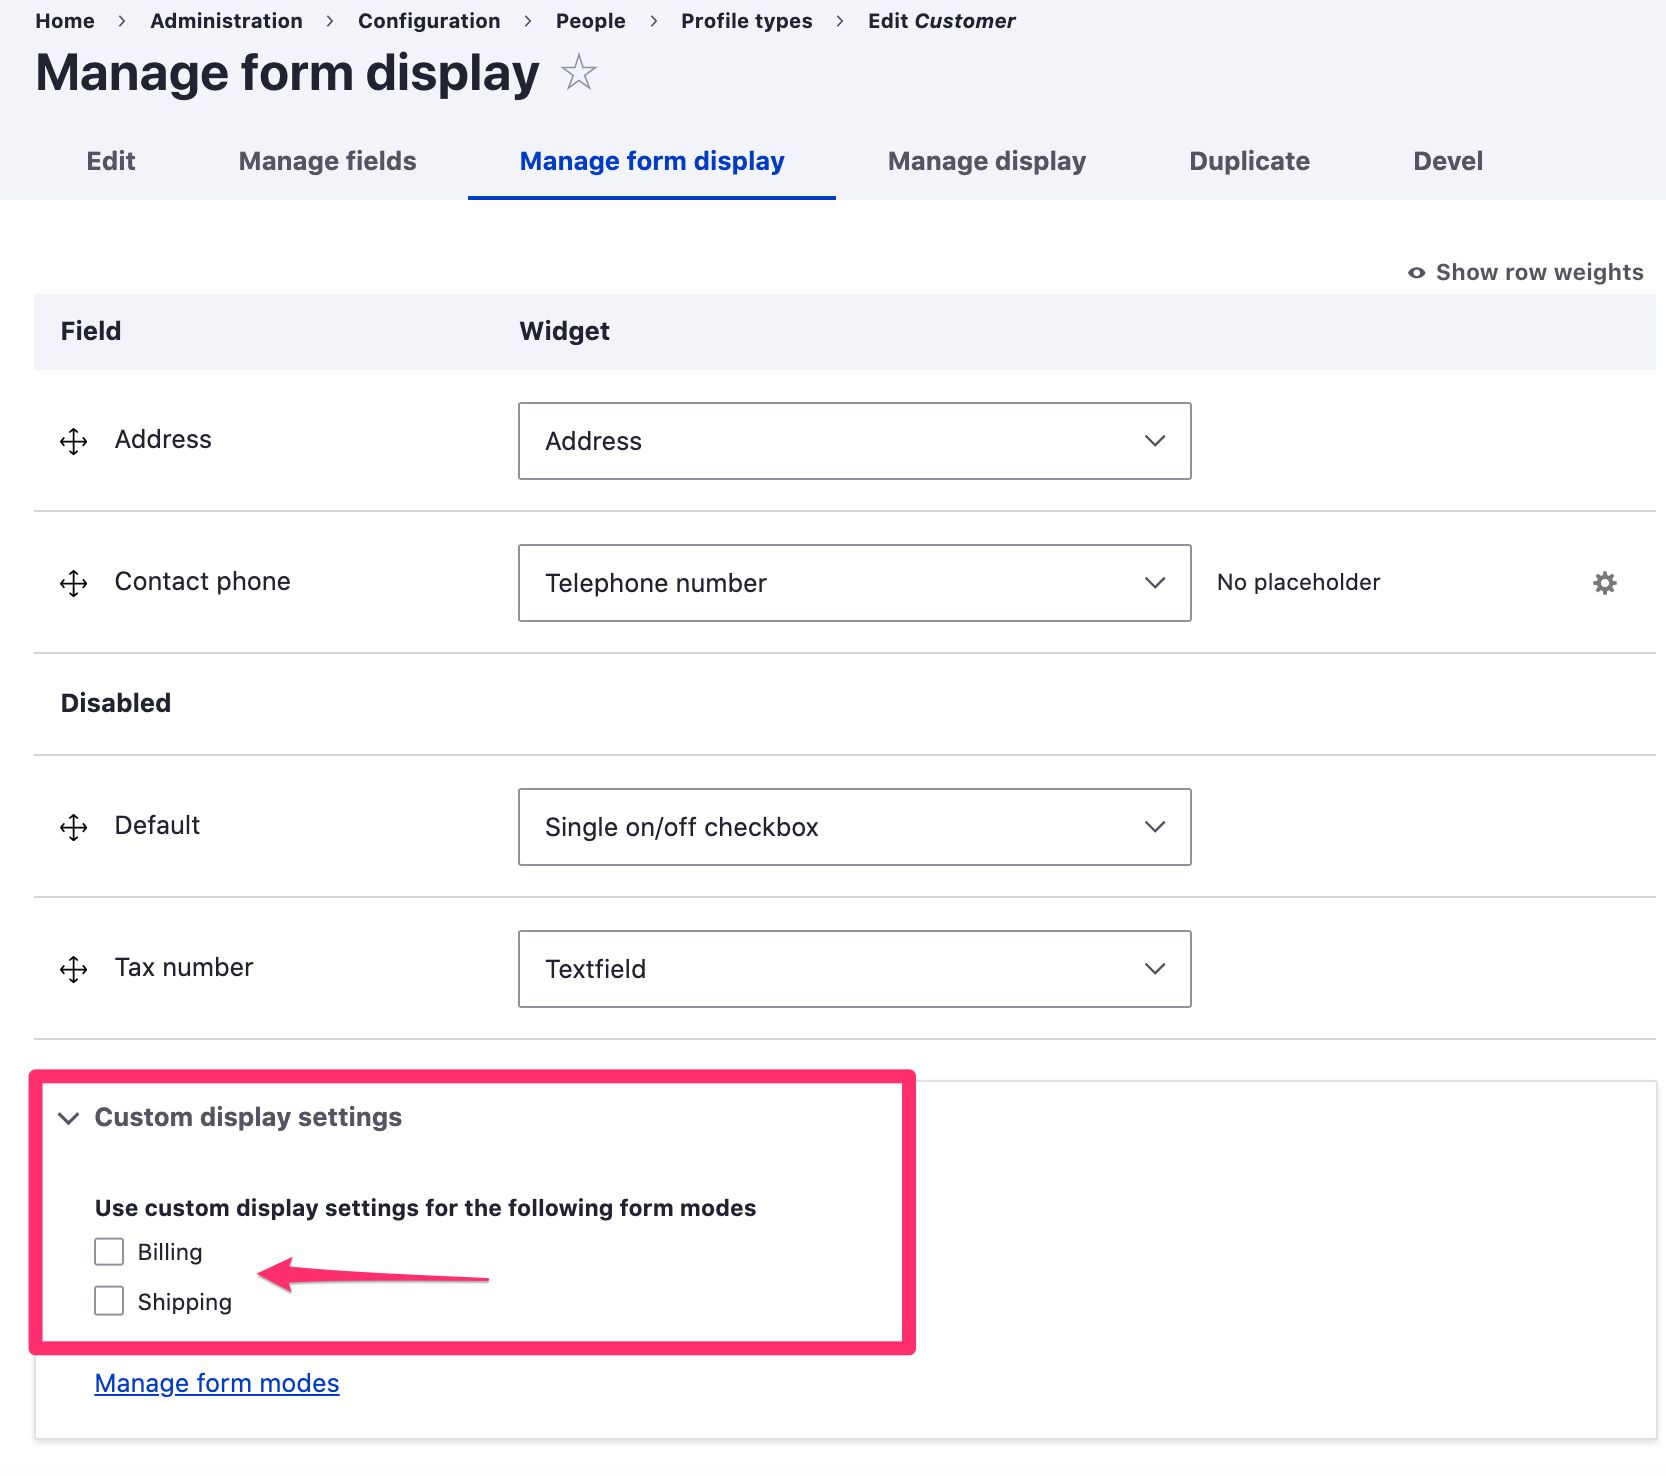
Next, you can use the Manage form display and Manage display administration pages for the profile to customize how the new field appears on data entry forms and in a customer's Address book. In the "Custom display settings", there are two additional form modes, Billing and Shipping, that can be enabled. If enabled, these form modes will be used whenever profile data entry forms are rendered during checkout and on the order admin edit page.
Adding fields to the customer profile vs. creating new profile types
The customer profile should contain all the billing information needed to process an order. If you have physical products and use the Commerce shipping module, then customer profiles can also be used for the shipping information associated with orders. For simpler commerce sites, especially those that are B2C, the address field may be all you need for the customer profile. For additional information, you could create a separate profile type to manage information about your customer like name and phone number. With this architecture, your customers would only enter need to enter their contact information once, for that separate profile type. In contrast, if you added the contact name and phone number fields to the customer profile, your customers would need to repeatedly enter that information for every billing and shipping address added.
For other commerce sites, your customers may actually be purchasing agents who order on behalf of a number of end users. In that case, you might need a set of additional fields associated with each billing and shipping address, such as contact email, contact name, contact phone, a note field, reference to a customer organization, reference to an assigned sales representative, etc. So, you would add each of these fields to your customer profile type. Your customers would have the flexiblity to enter completely different sets of data for each of their customer profiles. Ultimately, you'll need to decide what information needs to be captured on a per-order basis vs. what customer information you need apart from that billing- and shipping-specific data.
Create a profile type
To create a new profile type:
1. Navigate to the Profile types administrative page at /admin/config/people/profile-types.
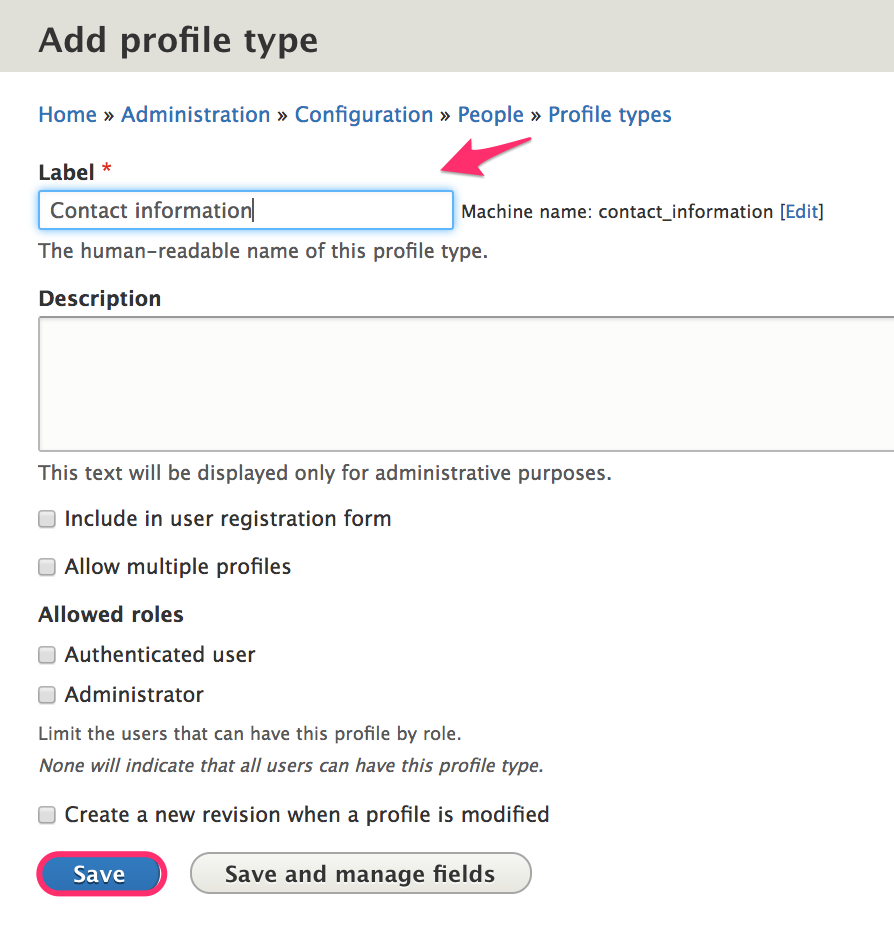
2. Click the Add profile type button.
3. Enter the name of the profile type for the Label. You can use the default settings for all other options, for now.
4. Click the Save button.
Profile type configuration options
Label
This is the name of the profile type. Change the label to change how it's displayed to customers.
Description
The description field is only used for administrative purposes. It is displayed in the Profile types listing at /admin/config/people/profiles. If your store will have many different profile types, entering a description for each can be helpful for profile management.
Include in user registration form
By default, the Customer profile type is included in the user registration form. If this option is enabled for a profile type, then its data entry form will be embedded at the end of the new user registration form. In this example, Contact phone has been added to the Customer profile profile type, so it also appears on the registration form.
Allow multiple profiles
This option is enabled for the Customer profile type, to allow customers to create and save multiple addresses in their Address book. If a user should only have a single set of data for a profile type, leave this option unselected. For example, if you create a Contact information profile type, you may want to have only one set of contact information per user.
Allowed roles
By default, there are no roles selected for the Customer profile type, which means that all users can have this profile type. If you allow customers to check out anonymously (i.e., "guest checkout"), then you need to allow all users to have customer profiles. Every order requires a customer profile for its billing information field. For other profile types, you may want to limit their usage to only certain, selected roles.
Create a new revision when a profile is modified
Profiles are revisionable. Select this option to force a profile entity to be saved as a new revision whenever the profile is updated. This setting is normally not necessary for profiles used by Drupal Commerce since copies of profiles are saved to individual orders.
Profile Management
In this section, we'll look at profile management topics, including permissions and access control, managing profiles on behalf of customers, and options for importing and exporting profiles.
Profile access and permissions
The private field setting
In the Contact phone example in the Profile configuration documentation, we specified that our custom contact phone field should be a private field. If a profile field is set as private, then only the owner of the profile and administrative users with the Administer profile entities (administer profile) permission will be able to access the field.
Profile permissions
The profile module provides some general administraive permissions as well as a set of permissions specific to each profile type. On the Permissions administrative page, at /admin/people/permissions, you'll find profile-related permissions in the Field UI and Profile sections.
Field UI permissions
- Profile: Administer display
- Profile: Administer fields
- Profile: Administer form display
These permissions should only be granted to users with administrative access to the site, typically users that are site builders or developers.
Profile permissions
- Access the profile entities overview page
- Administer profile types
- Administer profiles
- View any profiles
- View own profiles
- View own unpublished profiles
- And a set of permissions for each profile type:
- Create profile entities
- Delete any profile
- Delete own profile entities
- Update any profile
- Update own profile entities
- View any profile
- View own profile
Typically, you will want to allow your Authenticated Users (customers) to create profile entities and delete/update/view their own Customer profile entities. The rest of the permissions are more appropriate for administrative users.
Field permissions module
If you need to limit access to certain fields for the customer profile or any other type of profile, you may be able to utilize display and form view modes to display/hide specific profile fields. If you need more sophisticated access control, the Field permissions contrib module can provide that functionality. For example, suppose each of your customers is assigned to a specific regional sales representative. You would like customers to be able to view their sales representatives, but only administrative users should be allowed to make sales representative assignments. Also, you want to include the sales representative field with your order data so that it can be tracked in sales reports. So, we want this field to be part of the Customer profile.
Customization example: sales representative field
- Add and install the Field permissions module. (See the Extending documentation for instructions.)
- Add a Sales representative field to your customer profile type using the same approach we used above for the contact phone field.
- Select
Reference > Userfor the field type. We could create a new Taxonomy for our sales representative information, but for this example, let's just assume that we'll create a User account for each of our sales representatives.
- On the Field settings administrative page, the default settings are fine.
- On the settings administrative page for the Sales representative field, enable Custom permissions.
- For the Authenticated user role, enable only the View anyone's value for field field_sales_representative permission.
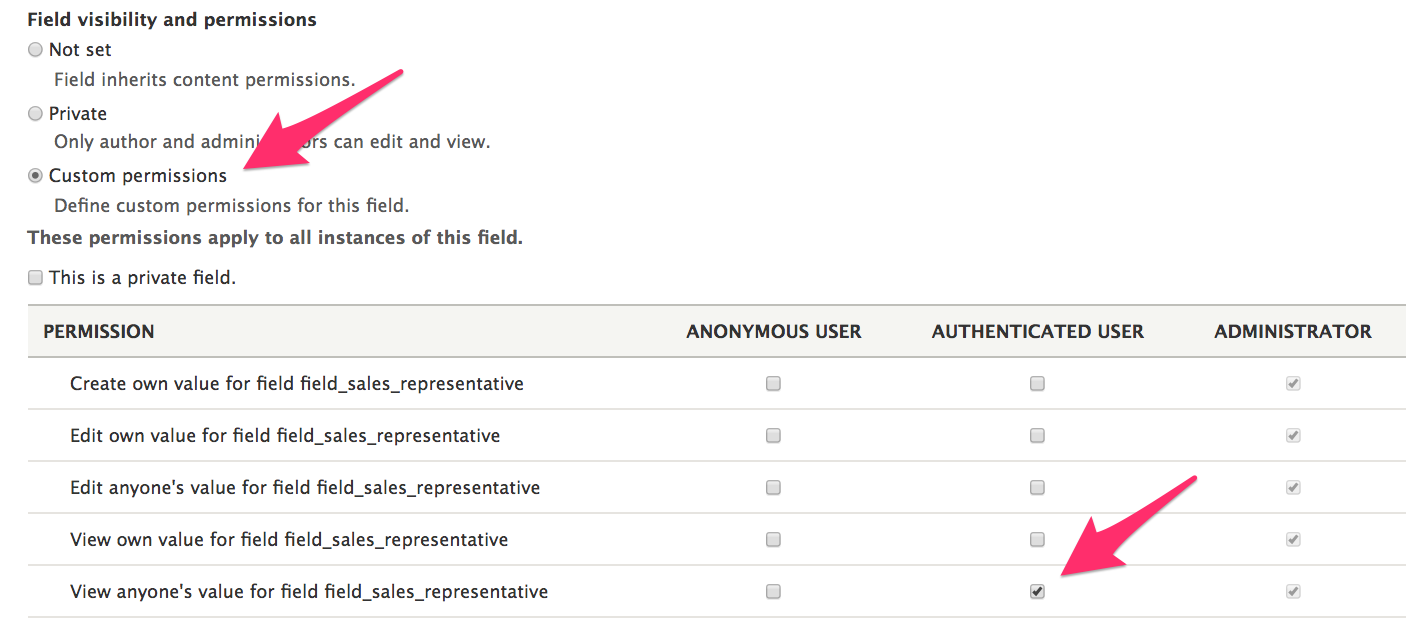
Now, customers will be able to view their sales representatives but not select their own.
Manage profiles on behalf of customers
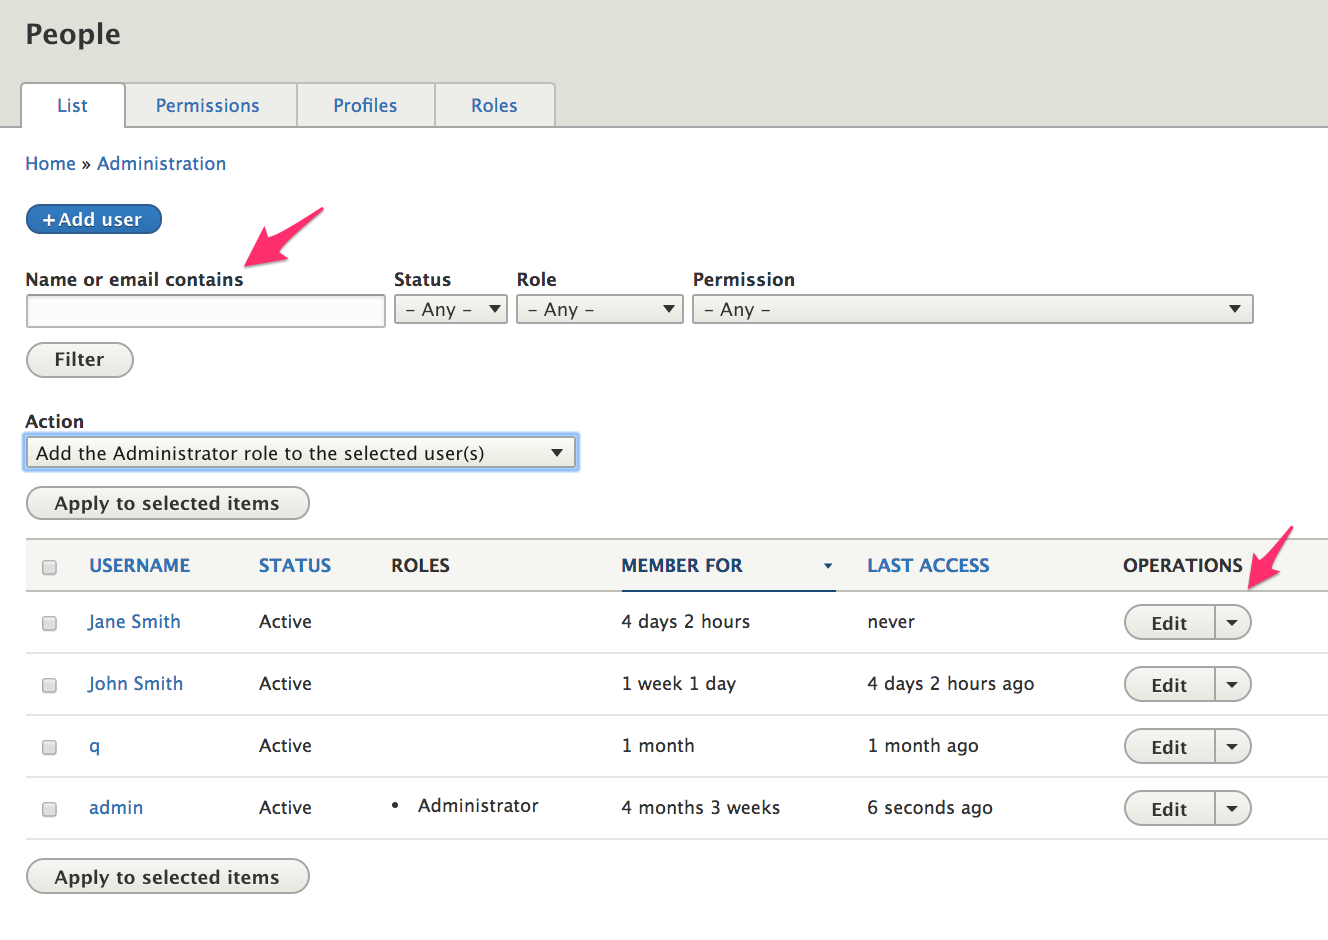
When you view the Profiles listing page at /admin/people/profiles, you'll see operations links that allow you to Edit and Delete profiles, but there's no way to add new profiles or efficiently search for existing profiles. Using out-of-the-box functionality, the best way to manage customer profiles is to access them via the main People listing page at /admin/people. Here, you can search by a variety of criteria, including name or email.
Once a customer account has been located, you can access his or her profiles from the Edit administrative page. You'll see a tab at the top of the page for each of your profile types. Here we see tabs for three profile types: Contact information, Address book (for Customer profiles), and My custom profile type. You can manage profiles on behalf of customers via these tabs.
Customize the labels for customer profile tabs
The label for the Customer profile tab is Address book. It has been customized by the Drupal Commerce Order module. You can customize labels for any profile type by implementing hook_local_tasks_alter() in a custom module, like this:
function mymodule_order_local_tasks_alter(&$definitions) {
  $id = 'entity.profile.user_profile_form:profile.type.my_profile_type';
  if (isset($definitions[$id])) {
    $definitions[$id]['title'] = t('My custom label');
  }
}
Use Views to customize the Profiles listing page
If your administrative users will frequently manage profiles on behalf of customers, you may want to use Drupal Views to customize the Profiles listing page, located at /admin/people/profiles. If you are unfamiliar with using Views in Drupal, you can read about Creating Listings with Views, in the Drupal 8 User Guide.
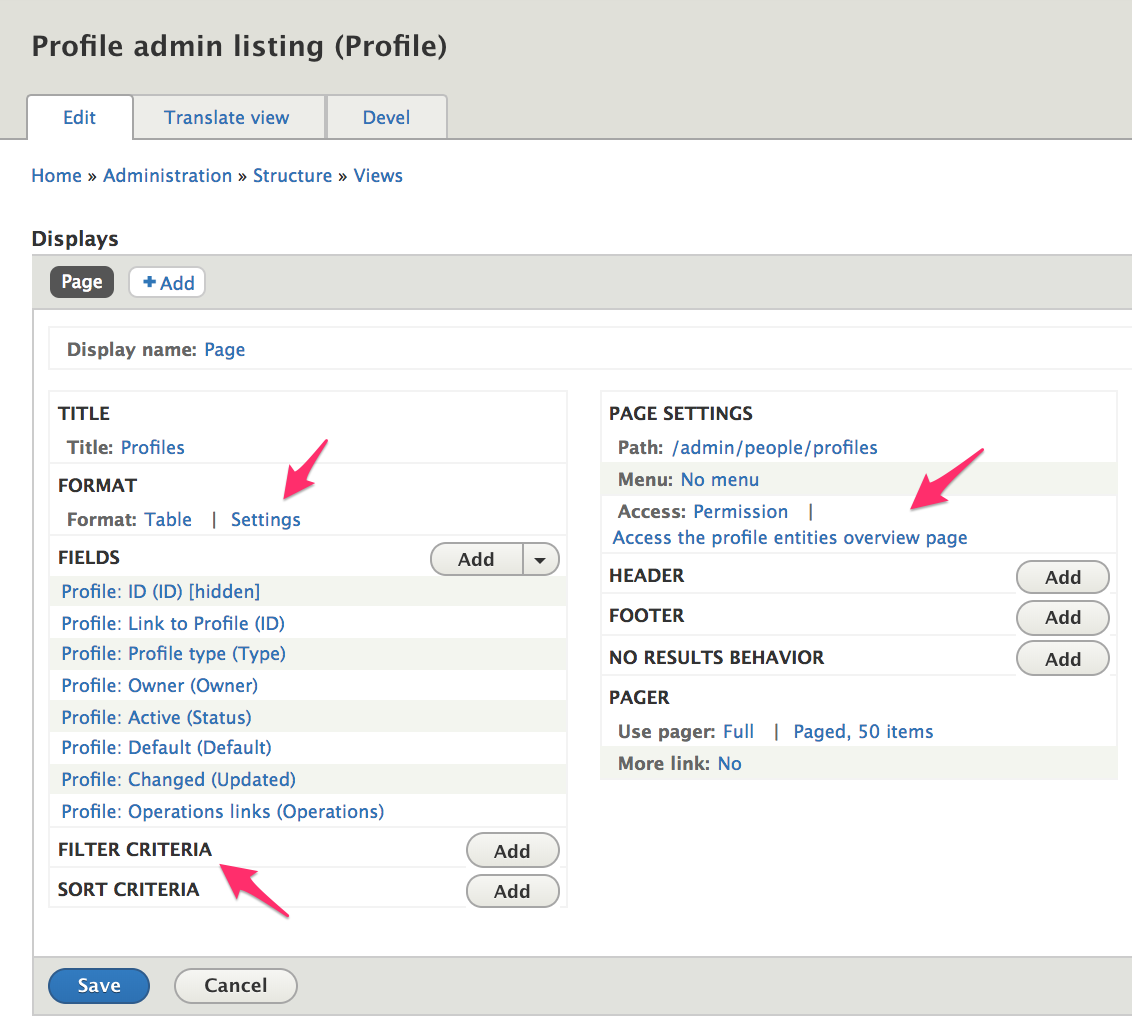
Example: View of profiles To start, we'll create a View with a page that has the same title and path as the existing Profiles administrative listing page:
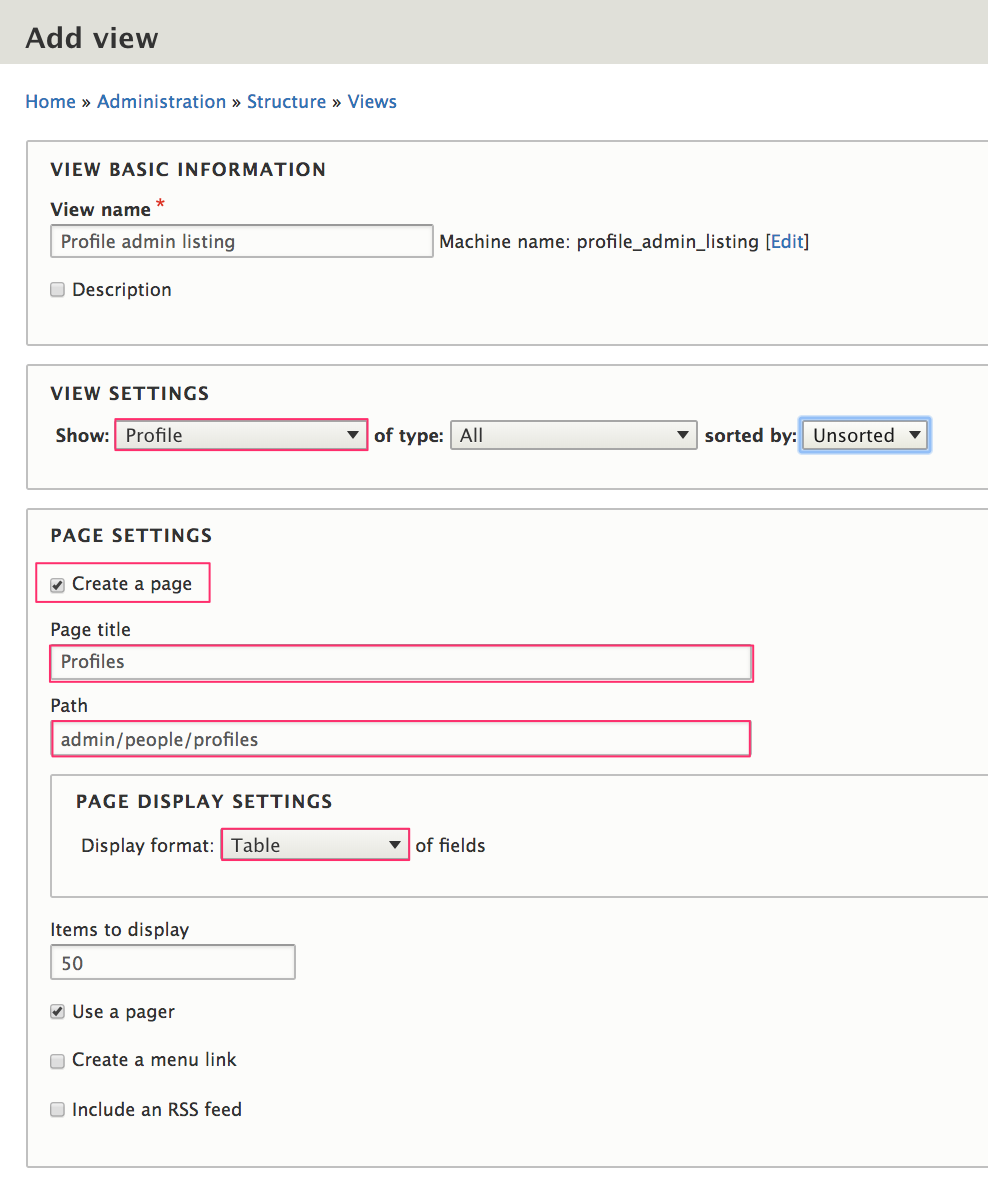
To configure, we'll add fields and for the Page Settings, and we'll set the Access to Permission: Access the profile entities overview page. Additionally, we'd want to set Sortable table fields and add exposed Filters to help administrative users search the list more easily.
Bulk update options To allow administrative users to perform bulk operations on profiles, add the Bulk update field. The Profile module provides three bulk update options: * Delete profile * Publish profile * Unpublish profile
If you are interested in creating additional Action plugins with custom code, the Create an action for custom mass updates with Drupal 8, article is a good introduction to the topic.
Importing profiles
For site builders, the Commerce Feeds module is a solution for importing profiles; unfortunately, it has not yet been fully ported into Drupal 8. If you are comfortable writing custom code for importing profiles, the Commerce Migrate module is a good place to start. There is a version for Drupal 8, documentation, and an explanation of the differences between using Feeds vs. using Migrate for importing profiles and other commerce data.
Exporting profiles
You can use the Views data export module to provide product export functionality. If you are unfamiliar with using Views in Drupal, start by reading about Creating Listings with Views, in the Drupal 8 User Guide. Also, the Importing and exporting documentation for Products includes an example of using Views data export for exporting products. The same approach can be used for exporting profiles.
Code recipes
If you want to write custom code to programatically create or manage profiles, you can use these code recipes as a starting point.
Create:
/**
 * id [String]
 *   The primary identifier of the profile type.
 *
 * label [String]
 *   The human-readable name of the profile type.
 *
 * status [Bool] - [OPTIONAL, DEFAULTS TO TRUE]
 *   [AVAILABLE = FALSE, TRUE]
 *   Whether or not it's enabled or disabled. 1 for enabled.
 *
 * description [String]
 *   The label for this profile type.
 *
 * registration [Bool] - [OPTIONAL, DEFAULTS TO FALSE]
 *   [AVAILABLE = FALSE, TRUE]
 *   Whether the profile type is shown during registration. 1 for enabled.
 *
 * multiple [Bool] - [OPTIONAL, DEFAULTS TO FALSE]
 *   [AVAILABLE = FALSE, TRUE]
 *   Whether the profile type allows multiple profiles. 1 for enabled.
 *
 * roles [Array(String)]
 *   Array of roles a user needs to have to attach profiles of this type.
 *
 * weight [Integer, DEFAULTS TO 0]
 *   The weight of the profile type compared to others.
 *
 * use_revisions [Bool] - [OPTIONAL, DEFAULTS TO FALSE]
 *   [AVAILABLE = FALSE, TRUE]
 *   Whether or not profiles of this type always generate revisions. 1 for enabled.
 */
$profile_type = \Drupal\profile\Entity\ProfileType::create([
'id' => 'my_custom_profile_type',
'label' => 'My custom profile type',
'description' => 'A brief, administrative description for my custom profile type',
'registration' => TRUE,
'multiple' => TRUE,
'roles' => ['authenticated', 'administrator'],
'weight' => 10,
'use_revisions' => TRUE,
]);
$profile_type->save();

// Add a custom field to a profile type.
$field_storage = \Drupal\field\Entity\FieldStorageConfig::create([
'field_name' => 'profile_fullname',
'entity_type' => 'profile',
'type' => 'text',
]);
$field_storage->save();

$custom_field = \Drupal\field\Entity\FieldConfig::create([
'field_storage' => $field_storage,
'bundle' => 'my_custom_profile_type',
'label' => 'Full name',
]);
$custom_field->save();

// Make the custom field private.
$custom_field->setThirdPartySetting('profile', 'profile_private', TRUE);
$custom_field->save();
Creating profiles
// Create a new, active profile for a user.
$user = user_load_by_mail('customer@example.com');
$profile = \Drupal\profile\Entity\Profile::create([
'type' => 'customer',
'uid' => $user->id(),
'status' => TRUE,
'address' => [
    'country_code' => 'US',
    'postal_code' => '53177',
    'locality' => 'Milwaukee',
    'address_line1' => 'Pabst Blue Ribbon Dr',
    'administrative_area' => 'WI',
    'given_name' => 'Frederick',
    'family_name' => 'Pabst',
],
]);
$profile->save();

// Create an anonymous customer profile.
$anonymous_profile = \Drupal\profile\Entity\Profile::create(['type' => 'customer']);
$anonymous_profile->save();
Load profiles
Loading profile types
// Loading is based off of the primary identifier [String] that was defined when creating it.
$profile_type = \Drupal\profile\Entity\ProfileType::load('my_custom_profile_type');
Loading profiles
$user = user_load_by_mail('customer@example.com');

// Get profile storage to use ProfileStorage methods.
$profile_storage = \Drupal::entityTypeManager()->getStorage('profile');

// Load an inactive customer profile for a user.
$customer_profile = $profile_storage->loadByUser($user, 'customer', FALSE);

// Load an active customer profile for a user.
$customer_profile = $profile_storage->loadByUser($user, 'customer');

// Load a specific profile.
$profile_id = $customer_profile->id();
$profile = $profile_storage->load($profile_id);

// Load all profiles for user.
$profiles = $profile_storage->loadByProperties(['uid' => $user->id()]);

// Load all active customer profiles for a user.
$customer_profiles = $profile_storage->loadMultipleByUser($user, 'customer');

// Load all inactive customer profiles for a user.
$customer_profiles = $profile_storage->loadMultipleByUser($user, 'customer', FALSE);

// Load default customer profile for a user.
$default_profile = $profile_storage->loadDefaultByUser($user, 'customer');
Implement:
ProfileLabelSubscriber
The default label for a profile is the name of the profile type followed by its unique id. For example: "Customer profile #10". In the Commerce Order module, Drupal Commerce uses the ProfileLabelSubscriber event subscriber to set the customer profile label to the first address line.
In this example, we assume that a Nickname field, field_nickname has been added to our Customer profile type and we want to use a profile's Nickname for the profile label whenever a Nickname has been entered. We give our event subscriber a lower priority -100 so that it will run after the the event subscriber in the Commerce Order module.
<?php

namespace Drupal\mymodule\EventSubscriber;

use Drupal\profile\Event\ProfileLabelEvent;
use Symfony\Component\EventDispatcher\EventSubscriberInterface;

class ProfileLabelSubscriber implements EventSubscriberInterface {

/**
 * {@inheritdoc}
 */
public static function getSubscribedEvents() {
    $events = [
    'profile.label' => ['onLabel', -100],
    ];
    return $events;
}

/**
 * Sets the customer profile label to the nickname if it exists, first address line otherwise.
 *
 * @param \Drupal\profile\Event\ProfileLabelEvent $event
 *   The profile label event.
 */
public function onLabel(ProfileLabelEvent $event) {
    /** @var \Drupal\profile\Entity\ProfileInterface $order */
    $profile = $event->getProfile();
    if ($profile->bundle() == 'customer' && !$profile->address->isEmpty()) {
    if (!empty($nickname = $profile->get('field_nickname')->value)) {
        $event->setLabel($nickname);
    }
    else {
        $event->setLabel($profile->address->address_line1);
    }
    }
}

}
Don't forget to add the event subscriber to your module's services.yml file and rebuild caches.
services:
mymodule.profile_label_subscriber:
    class: Drupal\mymodule\EventSubscriber\ProfileLabelSubscriber
    arguments: ['@entity_type.manager']
    tags:
    - { name: event_subscriber }
Altering profile inline forms
Checkout panes and billing and shipping profile widgets use inline forms to render profile forms using specific form displays. These forms can be altered using the hook_commerce_inline_form_alter and hook_commerce_inline_form_PLUGIN_ID_alter hooks. For example, the Commerce shipping module implements the plugin-id specific version of the hook to attach the "Billing same as shipping" element to the customer_profile inline form:
function commerce_shipping_commerce_inline_form_customer_profile_alter(array &$inline_form, FormStateInterface $form_state, array &$complete_form) {
    // Attach the "Billing same as shipping" element.
    $profile_field_copy = \Drupal::service('commerce_shipping.profile_field_copy');
    if ($profile_field_copy->supportsForm($inline_form, $form_state)) {
        $profile_field_copy->alterForm($inline_form, $form_state);
    }
}
When using the more generic form of the hook, you can use the #inline_form attribute of the inline form to identify a specific plugin and the #profile_scope attribute to identify the form mode, like this:
function hook_commerce_inline_form_alter(array &$inline_form, FormStateInterface $form_state, array &$complete_form) {
    /** @var \Drupal\commerce\Plugin\Commerce\InlineForm\InlineFormInterface $plugin */
    $plugin = $inline_form['#inline_form'];
    if ($plugin->getPluginId() == 'customer_profile') {
        if ($inline_form['#profile_scope'] == 'billing' && !isset($inline_form['rendered'])) {
        // Modify the billing profile when in "form" mode.
        $inline_form['address']['widget'][0]['#type'] = 'fieldset';
        // Individual address elements (e.g. "address_line1") can only
        // be accessed from an #after_build callback.
        $inline_form['address']['widget'][0]['address']['#after_build'][] = 'your_callback';
        }
    }
}