Workflows
The fulfillment process of an order depends on the type of store a site is running and its operational processes. A store that sells digital products might receive an order, capture the payment, and send the products electronically and close the order all automatically in one go. A drop-shipping store may receive an order, forward the order to an external fulfillment service, verify availability, capture payment, and ship the products, all as separate steps of the process, some programmatically performed and some manually.
Commerce 2 allows developers the flexibility to customise the steps that an order goes through, from creation to completion. By default, it makes available four different workflows: Default, Default with validation, Fulfillment, and Fulfillment with validation. Custom workflows can be defined by developers. An order type can be associated with a specific workflow, and that forces the order to follow that workflow's rules.
This functionality is provided by the State machine module, a core dependency for Drupal Commerce. See the State machine documentation to learn more about this module and its uses beyond Order workflows.
This documentation section covers the following topics:
- Administration of Order workflows.
- Comparison of the available States for the default Order workflows.
- A brief overview of Order workflow transitions.
How to Create a Custom Order Workflow
- Tutorial example for customizing the default Fulfillment Order workflow.
Subscribing to Transition Events
- Tutorial example for reacting to Order workflow Transition events.
Comparison to Commerce 1
Users of Commerce 1 might be wondering what are the differences in the architecture of Commerce 2. Commerce 1 defined order statuses grouped together in states.
For example, an order going through the checkout process would move through the Checkout:Checkout, Checkout:Review, Checkout:Payment, Checkout:Complete statuses, all part of the Checkout state group. That setup was a source of confusion and it was causing some technical issues as well because it was forcing workflows that were only loosely related (order workflow, checkout workflow, payment workflow, fulfillment workflow) to form one single workflow. That made defining clear paths between states unnecessarily complicated.
Commerce 2 decouples workflows making transitions between states straightforward.
Choosing a workflow
Associating an Order Type with a Workflow
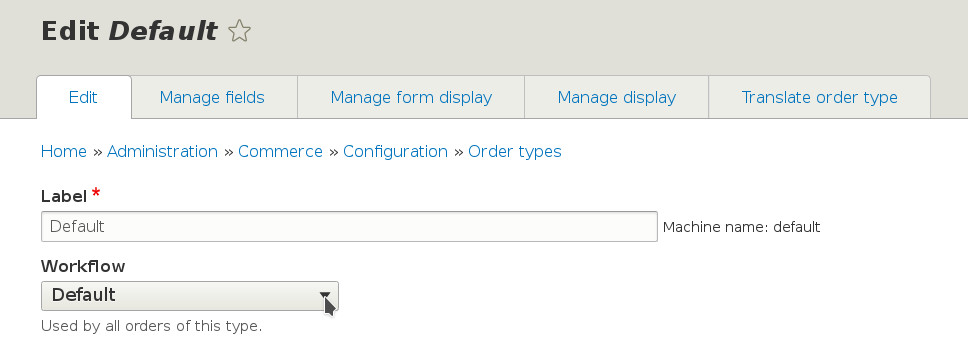
An order type can be associated with a specific workflow, and that forces the order to follow that workflow's rules such as to only move through the defined transitions. To associate an order type with an order workflow, go to /admin/commerce/config/order-types and select to Edit the desired order type. You can then choose the desired workflow from the Workflow dropdown field. Save the form.
Changing the Order Workflow
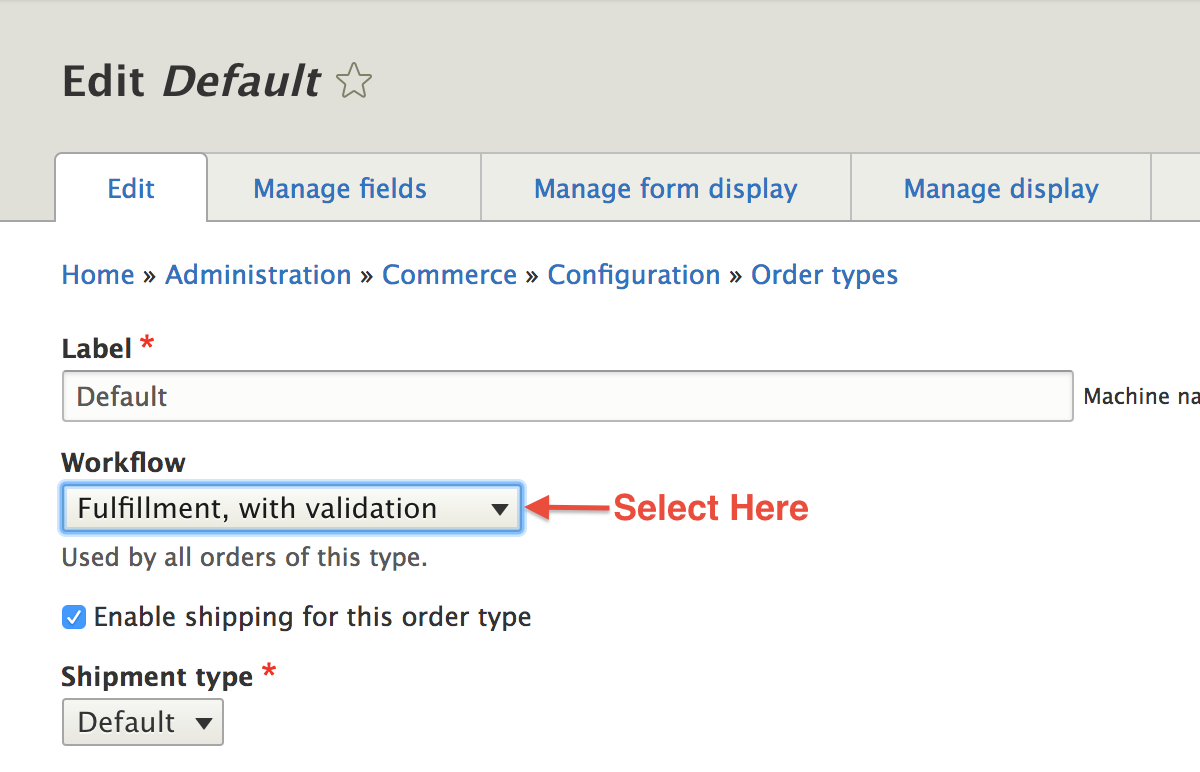
Order types can have different workflows depending on what type of products your store is selling and if the products are shippable etc. The default commerce order workflow just has two states, Draft and Completed. However, if you're running a big store with products that are shippable, the "Fulfillment, with Validation" workflow might be the best suited for your needs.
You can change the order type workflow by going to /admin/commerce/config/order-types. Then, select the order type you'd like to make the change to and click "Edit". You can now change the workflow by selecting the "Fulfillment, with validation" item fom the Workflow select list.
Now, let's take a look at how this new workflow works.
Order Fulfillment with Validation Workflow
The fulfillment, with validation, order process moves through the following cycle:
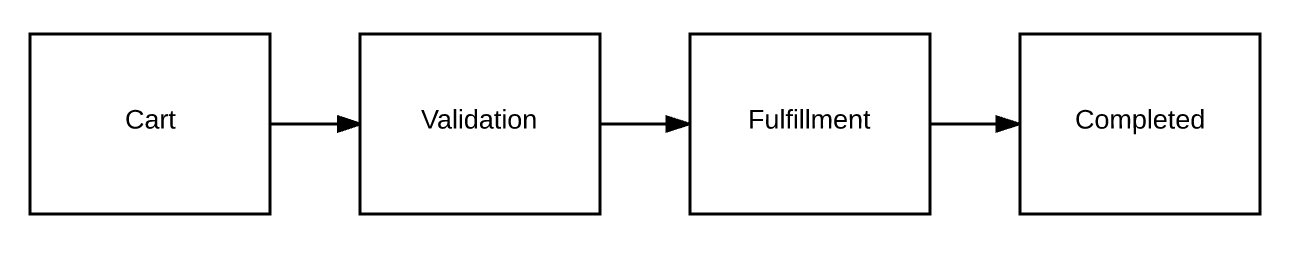
It starts with the order being in the shopping cart, which is the Draft/Cart state, then, once the order is placed, it is put in the Validation state. Once you're ready to ship the goods, the order is moved to the Fulfillment state. And finally, once it leaves our store, the order is officially Completed.
Order workflow states
Workflow States are the different states that an Order can exist at. For example, in the default Fulfillment workflow, the order is in the Draft state when a customer is adding products to the shopping cart, after it has been submitted it is in the Fulfillment state (awaiting for the store to fulfill the order), and after the products have been shipped the order is in the Completed State.
The default states for the default workflows are:
| Default | Default with validation | Fulfillment | Fulfillment with validation |
|---|---|---|---|
| Draft | Draft | Draft | Draft |
| Completed | Validation | Fulfillment | Validation |
| Canceled | Completed | Completed | Fulfillment |
| Canceled | Canceled | Completed | |
| Canceled |
Workflow States are defined as part of the workflow definition in a YAML configuration file.
Example
Here is an example of how states for the Fulfillment order workflow are defined by the Commerce Order module.
// commerce_order.workflows.yml

order_fulfillment:
states:
    draft:
    label: Draft
    fulfillment:
    label: Fulfillment
    completed:
    label: Completed
    canceled:
    label: Canceled
Order workflow transitions
Workflow Transitions are paths through which an order can move from one state to another. For example, in the default Fulfillment workflow, the order can move from the Draft state to the Fulfillment state, from the Fulfillment state to the Completed state, while it can move to the Canceled state either from the Draft or from the Fulfillment state.
Workflow Transitions are defined as part of the workflow definition in a YAML configuration file.
Example
Here is an example of how transitions for the Fulfillment order workflow are defined by the Commerce Order module.
// commerce_order.workflows.yml

order_fulfillment:
transitions:
    place:
    label: 'Place order'
    from: [draft]
    to:   fulfillment
    fulfill:
    label: 'Fulfill order'
    from: [fulfillment]
    to: completed
    cancel:
    label: 'Cancel order'
    from: [draft, fulfillment]
    to:   canceled
How to Create a Custom Order Workflow
In many cases, the default order workflows may not provide the states and transitions that match a store's operational processes. Commerce 2 allows developers to create custom workflows that fit custom requirements.
In this tutorial we show you how to create a custom workflow, building on top of the Fulfillment workflow provided by the Commerce Order module. Let's suppose that processing and fulfilling an order are two separate steps for our store. This could be because different staff process the order e.g. verify payment and check availability, and different staff packages and ships the products.
Defining a Workflow
An order workflow is defined in a YAML configuration file in a custom or contrib module, let's call it my_module. The file should be called my_module.workflows.yml and it should be created at the root folder of the module. Drupal Commerce will automatically detect the file and load the workflows defined in it, after you clear the caches.
Have a look at the original definition of the Fulfillment workflow in the commerce_order.workflows.yml file. We are going to add a Processing state and specify that the order should move from Draft, to Processing, to Fulfillment, and finally to Completed state.
The group key in the definition should always have "commerce_order" as its value.
    // my_module.workflows.yml

    my_module_fulfillment_processing:
      id: my_module_fulfillment_processing
      group: commerce_order
      label: 'Fulfillment, with processing'
      states:
        draft:
          label: Draft
        processing:
          label: Processing
        fulfillment:
          label: Fulfillment
        completed:
          label: Completed
        canceled:
          label: Canceled
      transitions:
        place:
          label: 'Place order'
          from: [draft]
          to: processing
        process:
          label: 'Process order'
          from: [processing]
          to: fulfillment
        fulfill:
          label: 'Fulfill order'
          from: [fulfillment]
          to: completed
        cancel:
          label: 'Cancel order'
          from: [draft, processing, fulfillment]
          to:   canceled
Associating the Order Type with the Workflow
Once the workflow is registered, we need to associate an order type with it. We will assume that we use the default order type for this example. Visit /admin/commerce/config/order-types and select to Edit the default workflow. Use the workflow dropdown to choose the "Fulfill, with processing" option.
On a production site you may want to export the Order Type as configuration and that would contain its workflow association as well - see Managing your site's configuration.
Testing the Result
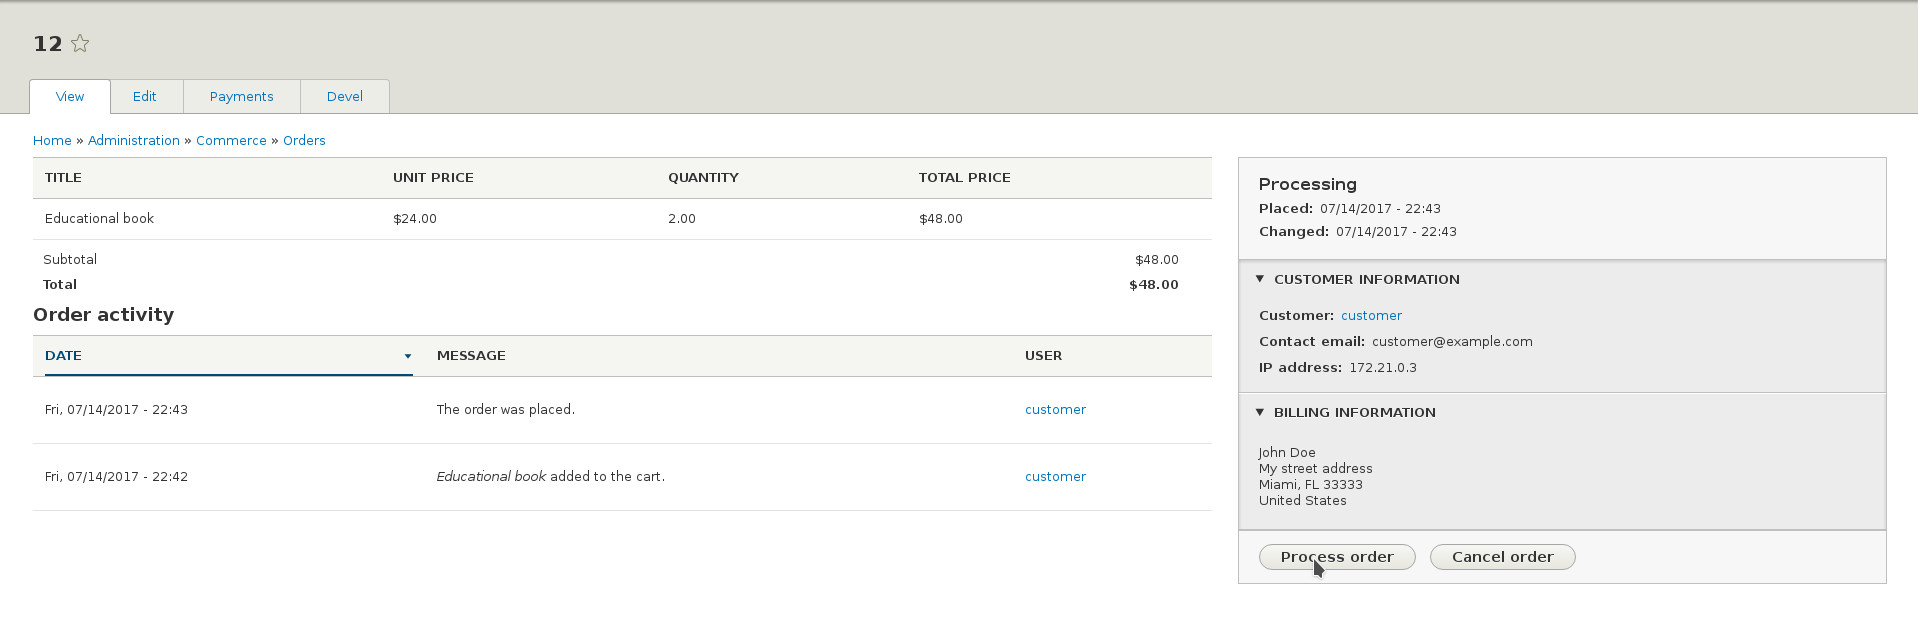
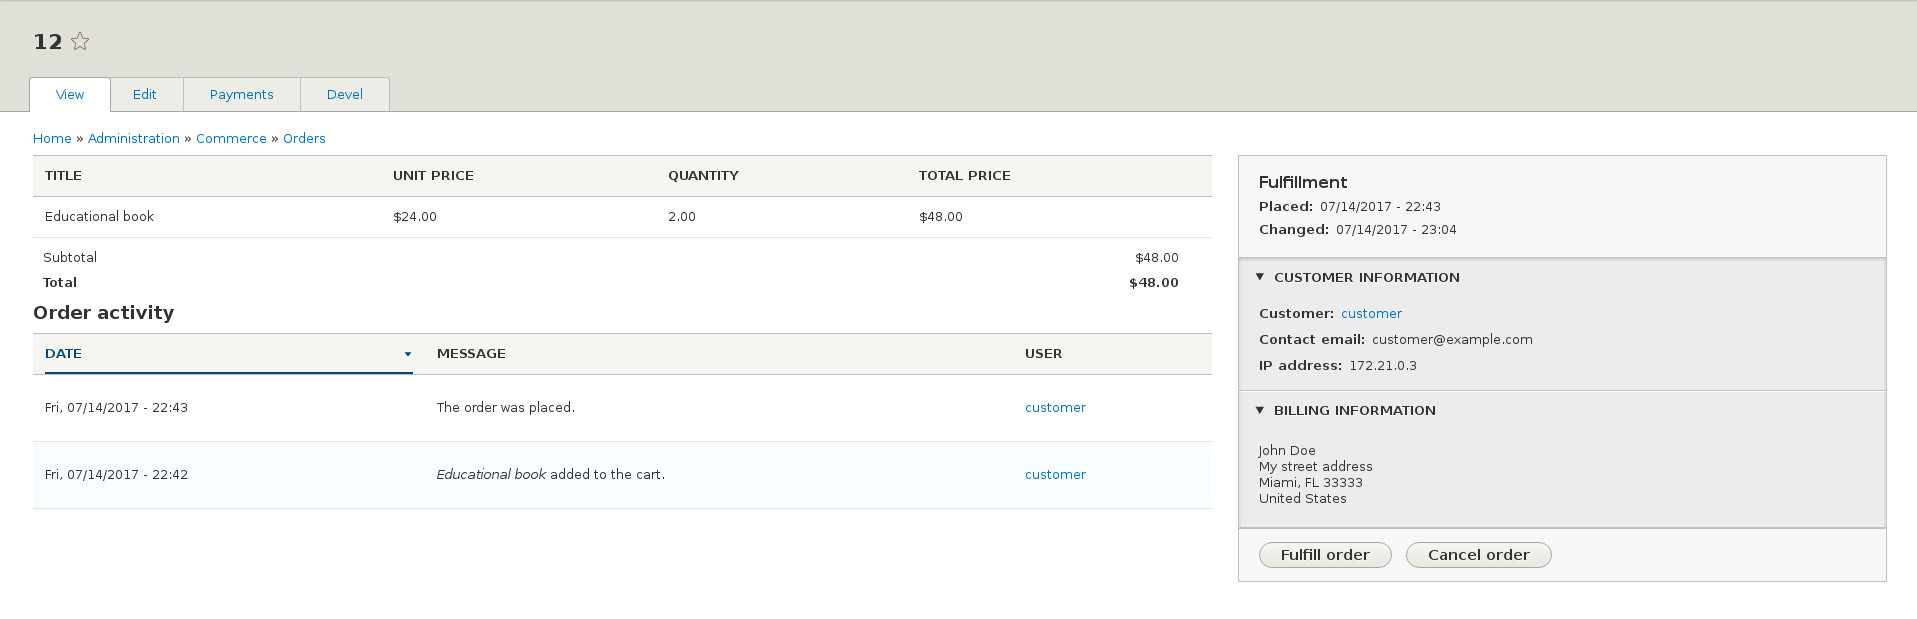
Once the workflow is registered and it is associated with an order type, store managers should be able to move the order through the define states via the defined transitions. Place a test order and go to its View admin page. The order should be automatically put in the Processing state and you should be able to move it to the Fulfillment state by clicking the "Process order" button (indicating that the order has been processed), and then to the Completed state by clicking the "Fulfill order" button.
You can also cancel the order at any step, as defined in the workflow's transitions.
Subscribing to Transition Events
In many cases we may want to do more when a transition occurs than simply moving the order to the next state. Let's say that we want to send an email to the customer when an order has been processed and is awaiting for fulfillment. That should happen when a store manager clicks on the "Process order" button for an Order.
The State machine module that provides the foundation for the workflows emits two events when a transition occurs. The events are named commerce_order.TRANSITION_ID.TRANSITION_PHASE, where TRANSITION_ID is the key of the transition's definition in the YAML file, and TRANSITION_PHASE is "pre_transition" for the first event that is emitted just before the transition has occurred, and "post_transition" for the second event that is emitted just after it.
In our case we want to send the email after the transition to the Fulfillment state has occurred. We therefore need to create an event subscriber that listens to the commerce_order.fulfill.post_transition event.
Here is an example that you can modify according to your requirements.
    namespace Drupal\my_module\EventSubscriber;

    use Drupal\state_machine\Event\WorkflowTransitionEvent;
    use Drupal\Core\Language\LanguageManagerInterface;
    use Drupal\Core\Mail\MailManagerInterface;
    use Drupal\Core\StringTranslation\StringTranslationTrait;
    use Symfony\Component\EventDispatcher\EventSubscriberInterface;

    /**
     * Sends an email when the order transitions to Fulfillment.
     */
    class OrderFulfillmentSubscriber implements EventSubscriberInterface {

    use StringTranslationTrait;

    /**
     * The language manager.
     *
     * @var \Drupal\Core\Language\LanguageManagerInterface
     */
    protected $languageManager;

    /**
     * The mail manager.
     *
     * @var \Drupal\Core\Mail\MailManagerInterface
     */
    protected $mailManager;

    /**
     * Constructs a new OrderFulfillmentSubscriber object.
     *
     * @param \Drupal\Core\Language\LanguageManagerInterface $language_manager
     *   The language manager.
     * @param \Drupal\Core\Mail\MailManagerInterface $mail_manager
     *   The mail manager.
     */
    public function __construct(
        LanguageManagerInterface $language_manager,
        MailManagerInterface $mail_manager
    ) {
        $this->languageManager = $language_manager;
        $this->mailManager = $mail_manager;
    }

    /**
     * {@inheritdoc}
     */
    public static function getSubscribedEvents() {
        $events = [
        'commerce_order.fulfill.post_transition' => ['sendEmail', -100],
        ];
        return $events;
    }

    /**
     * Sends the email.
     *
     * @param \Drupal\state_machine\Event\WorkflowTransitionEvent $event
     *   The transition event.
     */
    public function sendEmail(WorkflowTransitionEvent $event) {
        // Create the email.
        $order = $event->getEntity();
        $to = $order->getEmail();
        $params = [
        'from' => $order->getStore()->getEmail(),
        'subject' => $this->t(
            'Regarding your order [#@number]',
            ['@number' => $order->getOrderNumber()]
        ),
        'body' => ['#markup' => $this->t(
            'Your order with #@number that you have placed with us has been processed and is awaiting fulfillment.',
            ['@number' => $order->getOrderNumber()]
        )],
        ];

        // Set the language that will be used in translations.
        if ($customer = $order->getCustomer()) {
        $langcode = $customer->getPreferredLangcode();
        }
        else {
        $langcode = $this->languageManager->getDefaultLanguage()->getId();
        }

        // Send the email.
        $this->mailManager->mail('commerce', 'receipt', $to, $langcode, $params);
    }

    }
Note that the following functions are made available by the event, if you need to execute more advanced logic based on the state that you are coming from or the workflow that the transition is part of.
    $fromState = $event->getFromState();
    $toState = $event->getToState();
    $workflow = $event->getWorkflow();
At last, don't forget to register your event subscriber. Your event subscriber should be added to my_module.services.yml in the base directory of your module.
    services:
      my_module.order_fulfillment_subscriber:
        class: Drupal\my_module\EventSubscriber\OrderFulfillmentSubscriber
        arguments: ['@language_manager', '@plugin.manager.mail']
        tags:
          - { name: event_subscriber }
Finding Transitions
Transition information can be found in {module}.workflows.yml files. For example, commerce_order.workflows.yml defines the default Order transitions, and commerce_payment.workflows.yml defines the default Payment transitions.
Example from commerce_order
    # commerce_order.workflows.yml
    order_default:
    id: order_default
    group: commerce_order
    label: 'Default'
    states:
        draft:
        label: Draft
        completed:
        label: Completed
        canceled:
        label: Canceled
    transitions:
        place:
        label: 'Place order'
        from: [draft]
        to: completed
        cancel:
        label: 'Cancel order'
        from: [draft]
        to:   canceled
For an actual example being used in Drupal Commerce, check out the state machine transition event subscriber being used in commerce_order to set an order's placed timestamp: