Shopping cart
Most basic eCommerce stores use a "cart" to collect items/services and a "checkout" to collect payment and customer information. At the heart of Drupal Commerce is the ubiquitous Order. This Order is first created when a user adds a product to a cart. The Order is actually the "cart" when it has a status of "Shopping Cart." Since Drupal Commerce is an open eCommerce framework, these statuses can be added with additional modules (like shipping or customer profiles).
Below are some topics related to the add to cart form.
- Add to Cart Form
- Anonymous Carts and Logged In Users
- Cart Refresh
- Modifying the Shopping Cart using Views
- Shopping Cart and Multi-Currency
- Shopping Carts, Orders, and Line Items
- Working with Cart Rules events
Add to Cart Form
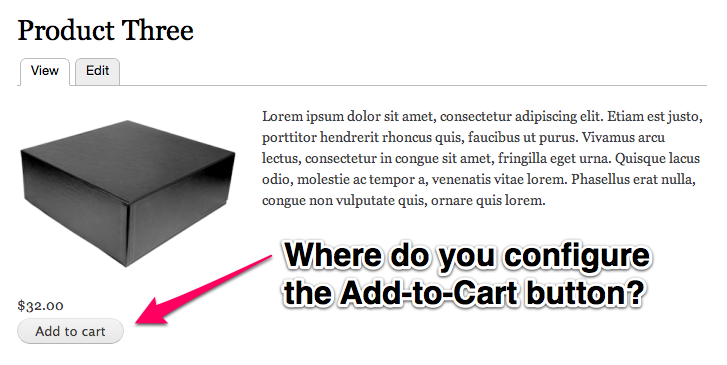
Almost everything in Drupal Commerce is put together using a common Drupal pattern: Content (entity and fields system), Views (listing things), and Rules (taking actions on events). The Add-to-Cart button and form are no different. We use the fields and entities to format product references into what is known as the "Add to Cart Form." There are really two topics we are discussing here.
- Add-to-Cart Button - The button that literally creates an order with a status of "Shopping Cart." (Sidenote—Commerce Guys has a blog post on creating an order using PHP and the API)
- Add-to-Cart Form - The form that is displayed along with the Add-to-Cart button. This is the area that gets ajaxified when you select different product attributes (like color or size of shirt) and updates the image and price.
Button & Form Configuration using Fields
Since Drupal Commerce 1.2, we've enhanced the Add-to-Cart magic with dependable configuration settings. By altering forms in the Field UI, we now embed options to help you create complex Add-to-Cart forms. Read on to learn how to access, alter, and create Add-to-Cart buttons.
- Product Reference Field - Configuring the Add-to-Cart button that shows up in a display node.
- Add-to-Cart Examples - Helping you understand the power of being able to configure these buttons on a product entity level.
- Line Item Field - An Add-to-Cart button that is configured on the Line Item level.
Product Reference Fields
Product Reference Screenshot
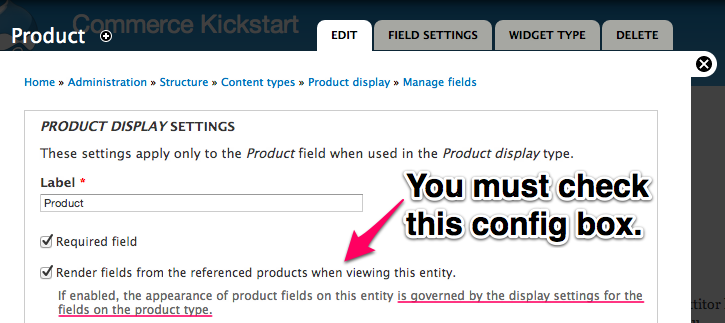
When you add a product reference field to an entity, you have the option of injecting fields from the referenced products into the display of the referencing entity.
Any field attached to a product may be rendered into the display of an entity (i.e. node). This feature must be enabled in the product reference field's settings form. We call this field injection, because the field is attached to the product itself but can be displayed in the referencing entities to make this extra product data visible to customers.
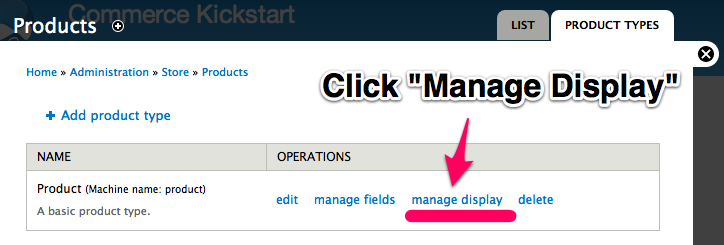
Product Display Formatter
Because these are fields attached to the product itself, you must update the field display settings on the product type to change the display formatter and/or the field's global visibility.
Then in the field display settings for each entity type that contains a product reference field, you will see all available product reference fields to reorder them relative to other fields on the entity or hide them.
A great example of a product reference field is the one found in the Product display node type that Commerce Kickstart creates. The product reference field enables prices, images, and other fields attached to your products to be displayed in the node along with an Add-to-Cart button.
Attribute Fields & Add-to-Cart Form Examples
The most obvious example is the basic price field attached to products. In most cases, you will need the price displayed along with the product description and Add to Cart form.
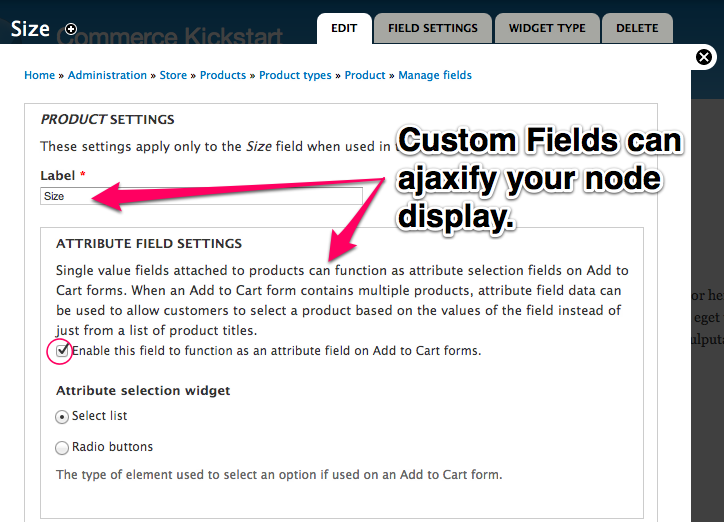
Custom Field
If you need to create a dropdown that will change the price, you can easily accomplish this by creating a custom field for your product entity and making sure to click the "Attribute Field Settings" on the field form. Be sure not to add this field to your Product Display content type, you want to add it to the Product Type.
Another use case is the product image field created during the Commerce Kickstart installation. This is especially the case for groups of products where each variation contains a unique image (e.g. for a different color of the product, such as a t-shirt color or t-shirt size). You will want this image rendered into the node display that groups these products together.
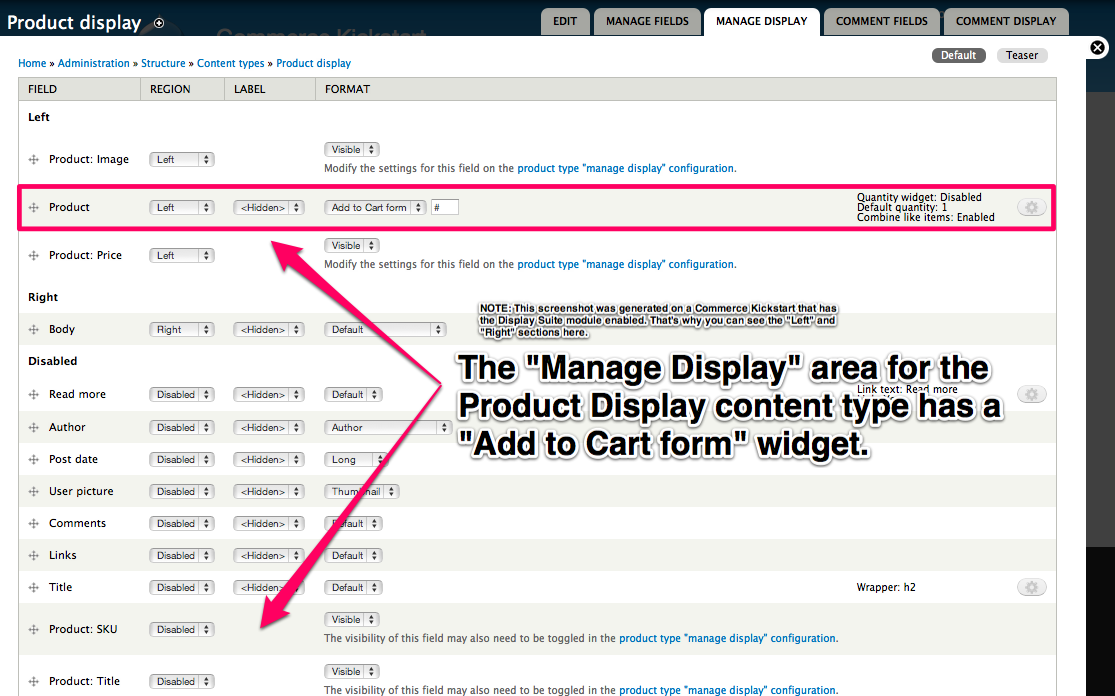
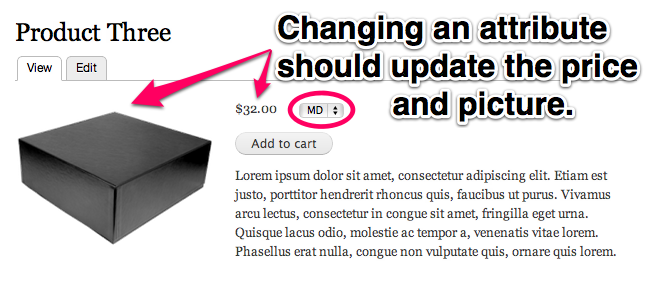
Manage Display Form
How does it know that I want my sizes to show up in the drop down? The Product Display node is setup to aggregate the various attribute fields into one "Add to Cart form" as pictured here.
When the customer updates the Add to Cart form for a group of products to select a different product from the group, the price, image, and other injected fields will be updated to represent the newly selected product.
Custom Line Items (AKA Customizable Products/Donations/Services)
Occasionally you may want to customize an attribute of the product for each order. For example, if you wanted someone to add their own name to your t-shirts or add an engraving for an additional charge.
There is also a video that goes through this idea of customizing the product.
Introduction to Line Items in Drupal Commerce from Randy Fay on Vimeo.
Anonymous Carts and Logged In Users
There are many topics covered in this Drupal Commerce Anonymous Carts article. The experience you want to give your customers can greatly depend on how well you handle the Anonymous to Authenticated conversion process. Much of this is automated, but there can be a few hang ups.
Cart Conversion
What happens when an anonymous customer finds a product and clicks "Add to Cart?" An order is created for that customer's anonymous session. Like most customers, they realize that logging in with their account can give them a certain advantage during the checkout process. Perhaps they don't have to fill out their customer profile information or perhaps they are a part of a "Free Shipping" user role. What happens to their cart?
When anonymous users login to the site, if they have a shopping cart, that order is moved to be a part of the authenticated session. Anonymous cart conversion is that simple! To borrow from a certain hardware manufacturer, it should just work.
Hiding the Cart
The methods described in this section show you how to hide the shopping carts in various ways, but we do not describe how to keep users from purchasing content if they are anonymous. That is a much more involved topic and possibly a feature request for the commerce_checkout_login module.
Hide Shopping Cart Block from Anonymous
In most cases, if you want the shopping cart to be hidden from anonymous users, hiding the block is the easiest way to pull this off. Below are two screenshots that will help you with this functionality. If you prefer the more robust method of hiding the shopping cart using the Views interface, skip down to that section below.
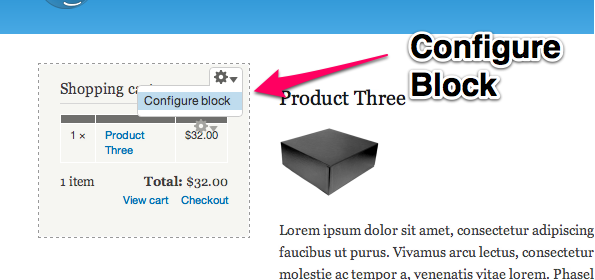
Shopping Cart Block
Like all blocks in Drupal 7 with the core "Contextual Links" module turned on, you can simply hover over the shopping cart block and click "Configure block."
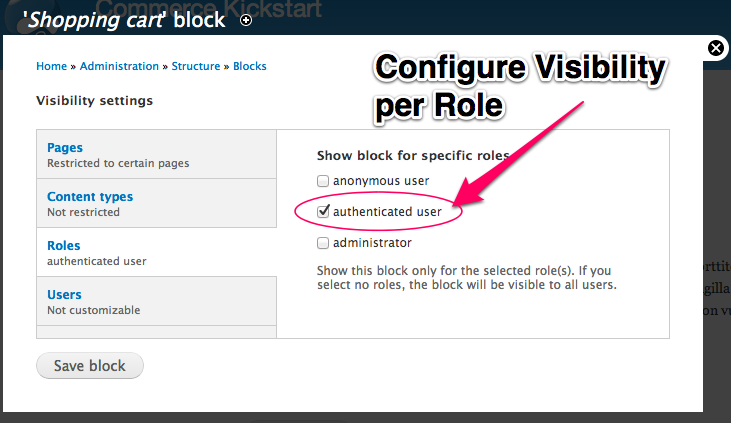
Configure Visibility
Once the block configure screen is up you can scroll down to the Visibility Settings in the Vertical Tabs, Click on "Roles" and select "authenticated user."
Hide Shopping Cart from Anonymous using Views Permissions
If you want to hide the /cart page, we have a very simple method that requires editing a core View. Relax, that's why we use Views instead of our own half-baked solutions. And think of it this way, if you edit your view and it doesn't work out, you can always click "Revert" and everything will go back to the fresh and shiny version that ships with Commerce.
Shopping Cart Config
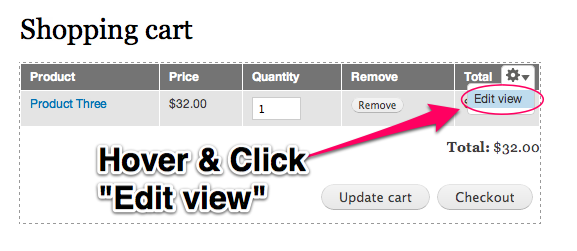
If you navigate to the Shopping cart page and hover over the table there, you will see in the upper right a link for "Edit view." Click that.
Access Controls
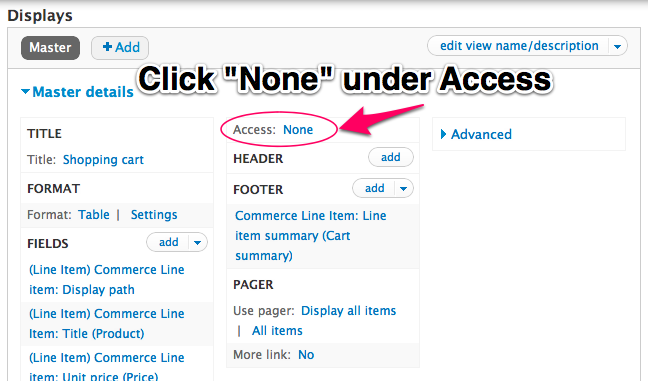
When the view pops up, click on "Access: None"
Access Options
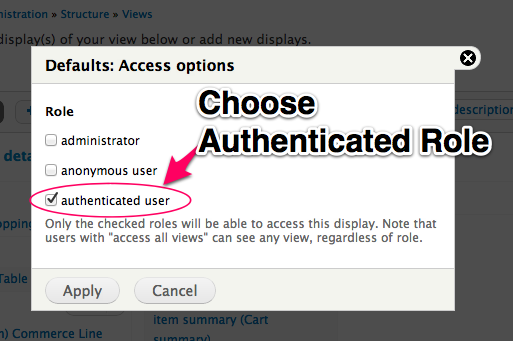
First, it will ask you what kind of access. We recommend User Roles. Then it will ask you which roles should be able to access this view, you can choose "Authenticated" to hide the shopping cart from anonymous users.
Be sure to click "Save" on the View and test your shopping cart for what an anonymous user would experience.
Hide Shopping Cart if nothing purchased
Let's say you don't like the default "empty" shopping cart that appears in the sidebar for Commerce Kickstart. There is a not-so-straightforward way to do this, so hang in there. The Shopping Cart Block that is enabled in the Commerce Kickstart project is actually setup in code. What we need to do is disable that block, create a new Views Block, and enable the Views block instead.
Shopping Cart Block
Like all blocks in Drupal 7 with the core "Contextual Links" module turned on, you can simply hover over the shopping cart block and click "Configure block."
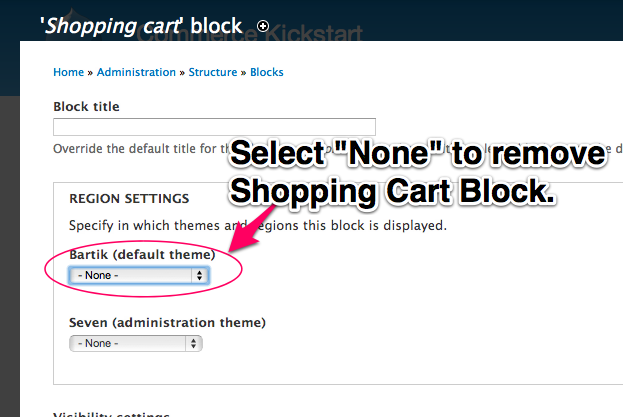
Removing From Theme
Select None to remove the Shopping Cart from your theme. We will enable a new block in just a second.
Shopping Cart Config
If you navigate to the Shopping cart page and hover over the table there, you will see in the upper right a link for "Edit view." Click that.
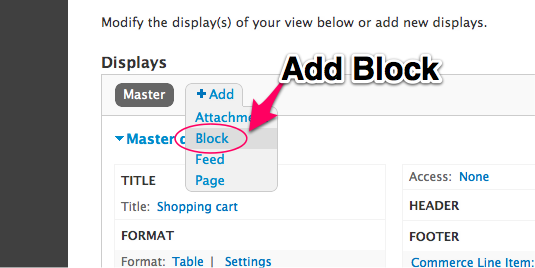
Adding Views Block
Instead of messing about with the View, we are simply going to create a block directly from Views. Don't forget to click "Save."
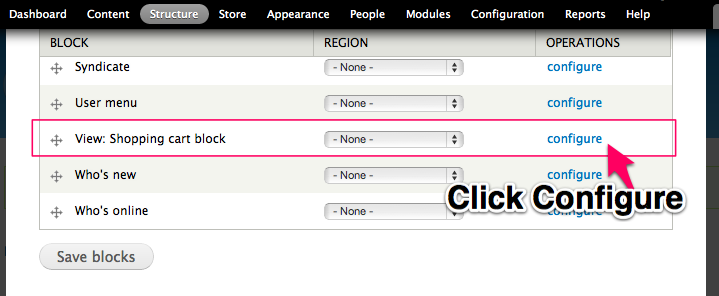
Enable new block
Navigate to the Blocks administration screen and click configure next to "View: Shopping Cart Block." Enable it for any section on your site (sidebar-first to mimic Commerce Kickstart). And you're done!
Carts Expiration
Old carts will remain indefinitely until they are checked out or manually removed by administrators. Old cart orders can contain valuable information that you may not want to erase before extracting the data for use particularly as marketing research or contact information for follow-up sales contacts.
This can cause some confusion given the following scenario:
- Authenticated user creates a cart, but logs out.
- Anonymous user re-creates their cart a few days later, and logs in.
- After checkout, the user is presented with their most recent cart which was the one they created in step 1.
- Worst case scenario is that the user thinks their checkout didn't happen and they go through it all again.
In this case, you may find some nicely handled features in a contributed module that can expire carts for you: commerce_cart_expiration.
And a screencast on how to implement:
Cart Refresh
Price Recalculation on Load
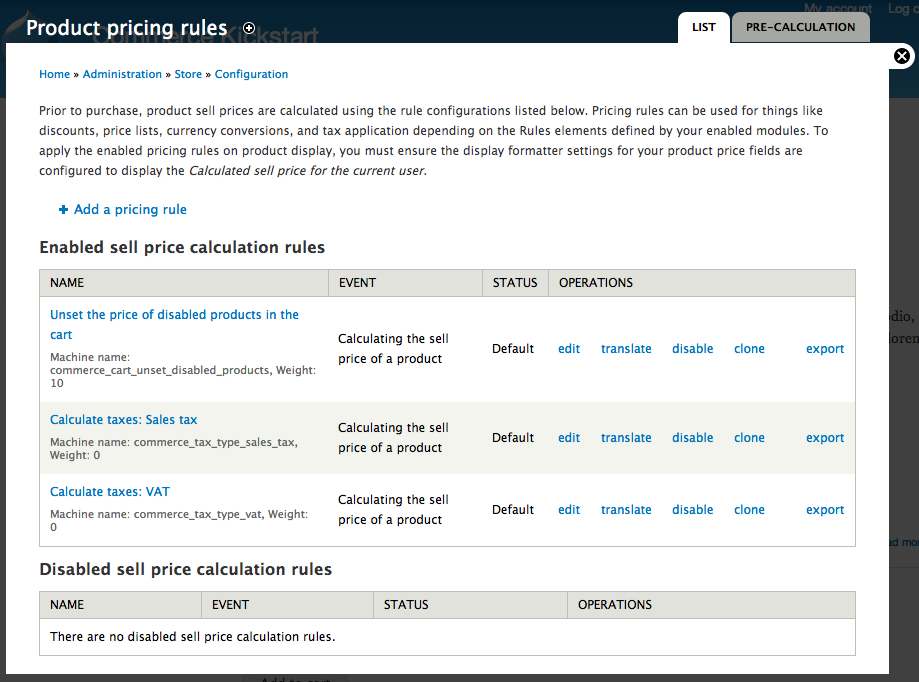
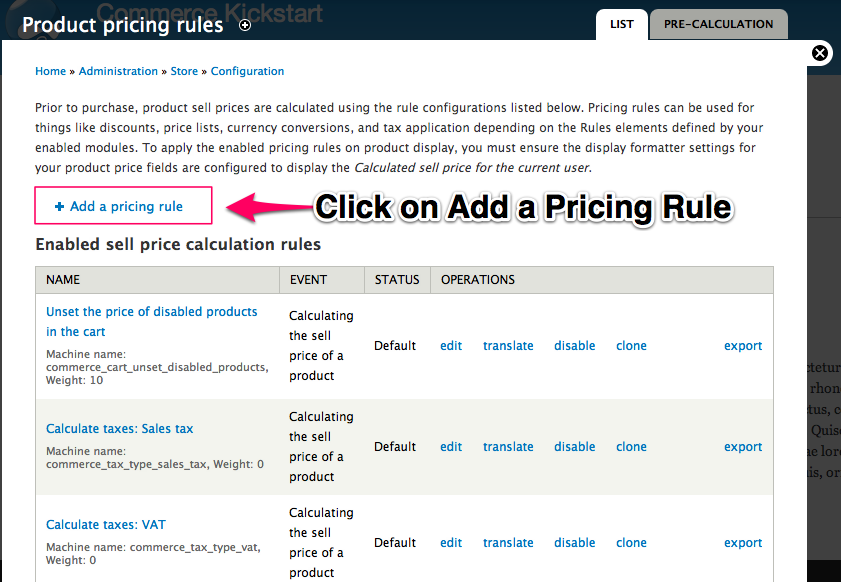
Price Rules Screen
Pictured here is the page that lists all of the price rules that calculate the sell price per user. This is where you can add discounts, taxes, and many other types of payment calculations.
There is a shopping cart refresh that happens when cart orders are loaded. This refresh involves at least the recalculation of all product prices in the cart. Other modules may hook into the process to perform additional refreshes as necessary. This process ensures that the cart will always reflect the most up to date pricing and availability for products a customer intends to purchase regardless of how long they’ve been in the customer’s cart.
Even though there is a Shopping cart order state and status, the designation of a cart order status is not dependent on these. In fact, any order status that includes the cart Boolean set to TRUE can function as a cart order status, triggering a refresh of all product prices on load. In core, the Checkout: Review order statuses also function as cart statuses, because you typically require product prices to be up to date until the time the customer submits payment.
Prior to purchase, product sell prices are calculated using rule configurations. Pricing rules can be used for things like discounts, price lists, currency conversions, and tax application depending on the Rules elements defined by your enabled modules. To apply the enabled pricing rules on product display, you must ensure the display formatter settings for your product price fields are configured to display the Calculated sell price for the current user.
Modifying the Shopping Cart using Views
Drupal's strength is that the modules work together. Imagine a world where you can build the most amazing content lister. It could give you as much or even more control than raw SQL. Now, imagine a world where an ecommerce platform completely worked with that amazing content lister. We each have our focus and leave the "annoying" stuff to the other guy. The end result is everything we can do is pluggable and has more use cases than we can possibly imagine.
That world exists. The content lister is called Views and here we document how you can use Views to do just about anything with your shopping cart or shopping basket.
Shopping Cart Block and Page
You would be tempted to think that the shopping cart block and the cart page are from the same view with different displays. After all, that is a very common pattern in Drupal. However for Drupal Commerce 1.x, Views 3.x was very much in beta and to avoid forgotten bugs, the decision was made to make both the block and the page separate views that only have a master display. This means, if you want to edit either the block or the page, know that you must edit both individually.
Editing the Shopping Cart Block

Shopping Cart Config
Navigate to any page and make sure to have an item in your shopping cart block. You can then hover over the table there, you will see in the upper right a link for "Edit view."
Editing the Shopping Cart Page
Shopping Cart Config
If you navigate to the Shopping cart page and hover over the table there, you will see in the upper right a link for "Edit view." Click that.
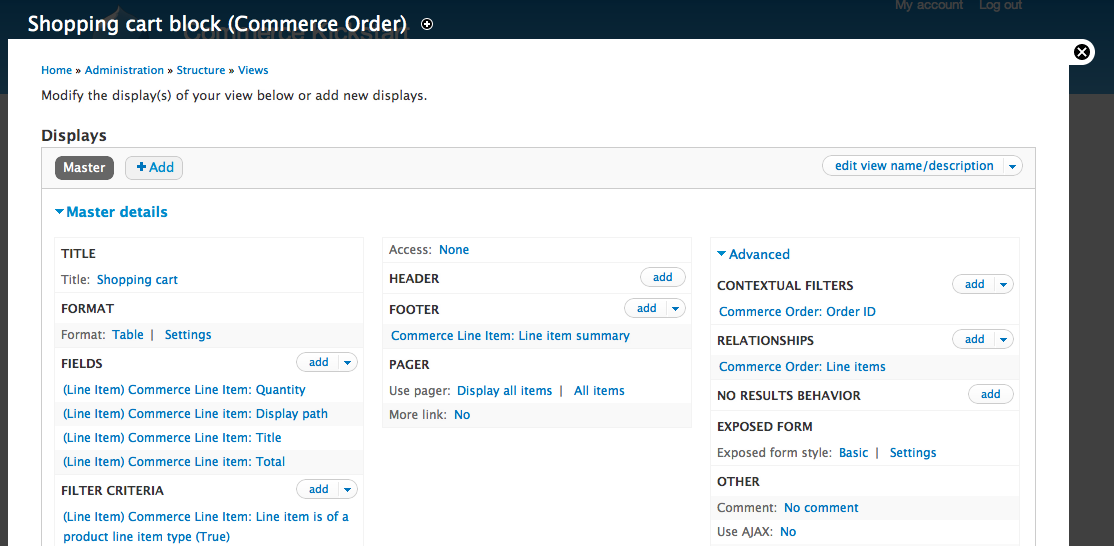
What views looks like when you click edit.
Creating a Shopping Cart from Scratch
"Sometimes the best way to learn is to rebuild it." I imagine Tony Stark would have said that at some point. Let's play the engineer and see how the Commerce Guys were able to build a shopping cart in Views.
Create a View
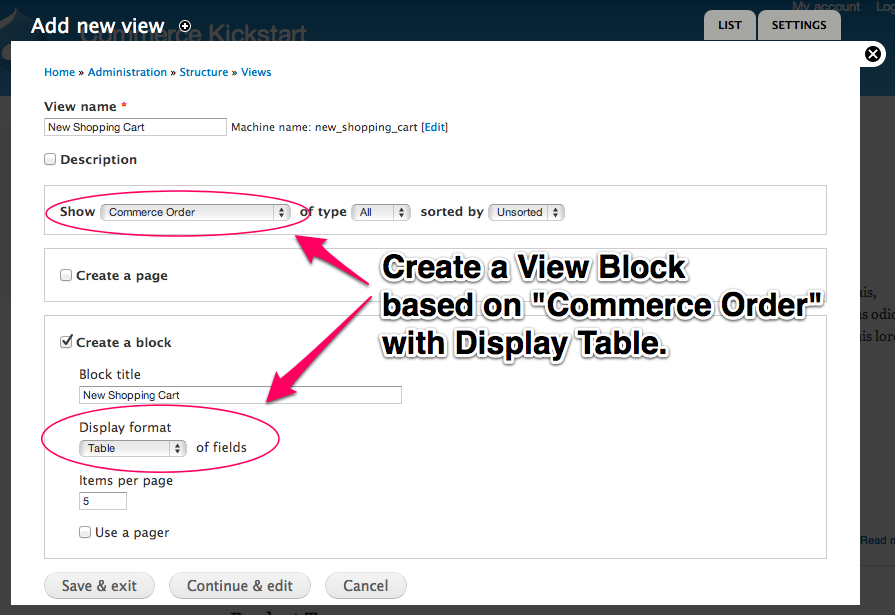
Create a View
Simply navigate to Structure, Views, Create a new View. Make your screen look like the one to the left and then click "Continue and Edit."
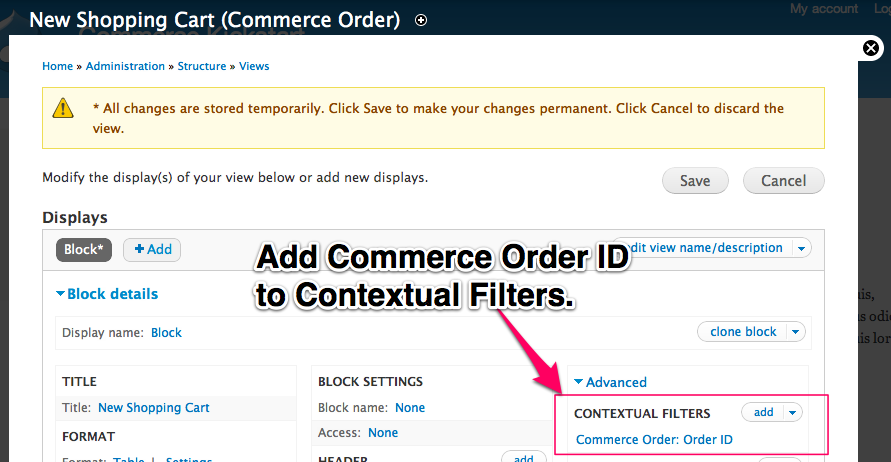
Contextual Filters
The first bit of magic includes add a contextual filter in the advanced column. Click add and then search for "Order ID" and add that filter.
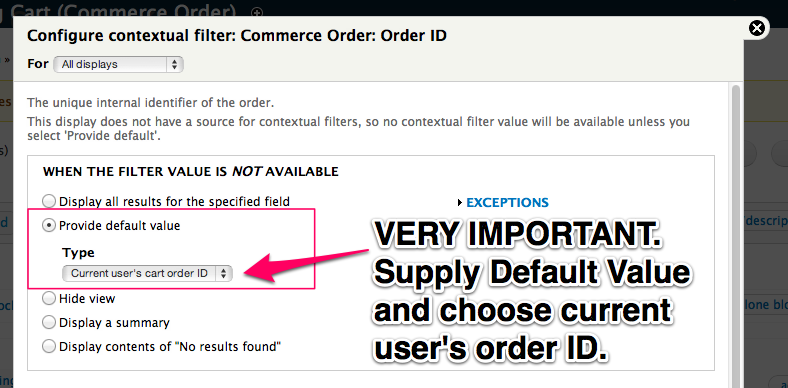
Contextual Filters Config
This is very important. When setting up the contextual filter, be sure to provide default value and select "Current user's cart order ID."
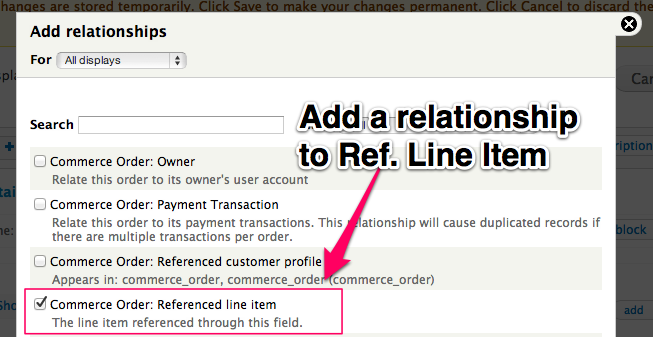
Relationship
Add a relationship. Choose Referenced Line Item. Also select "require this relationship."
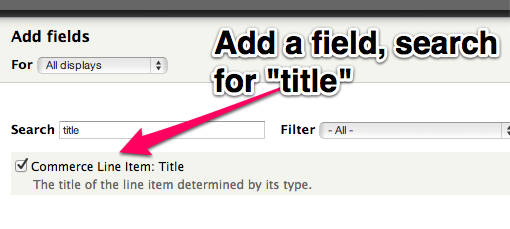
Fields
When you add a field, simply start with the title. You could also add a new relationship to the referenced product and add product details. For our example, we added a product photo.
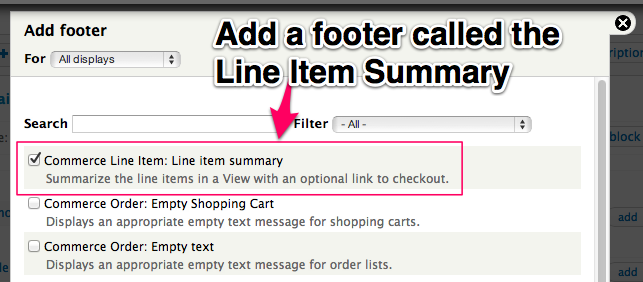
Footer
Views 3 has a feature called "Area Handlers" and this is what powers the footer. Add a footer and you will see a Line Item Summary near the top. Add that and configure to your liking. We chose to show the Total and Checkout links.
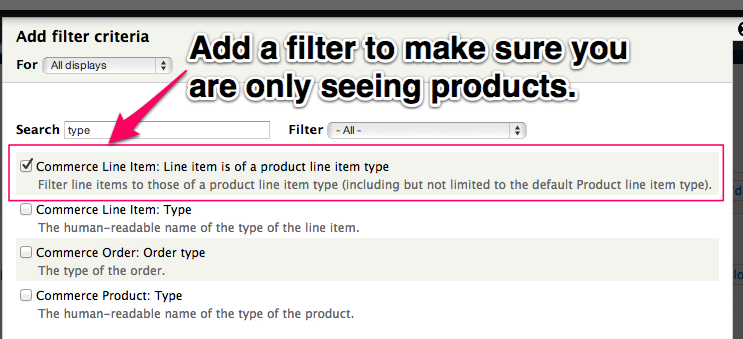
Filters
Since line items can be anything from products, to shipping, to discounts, we want to make sure we are only showing products. Though there is a case where you might want to include other kinds of line items.
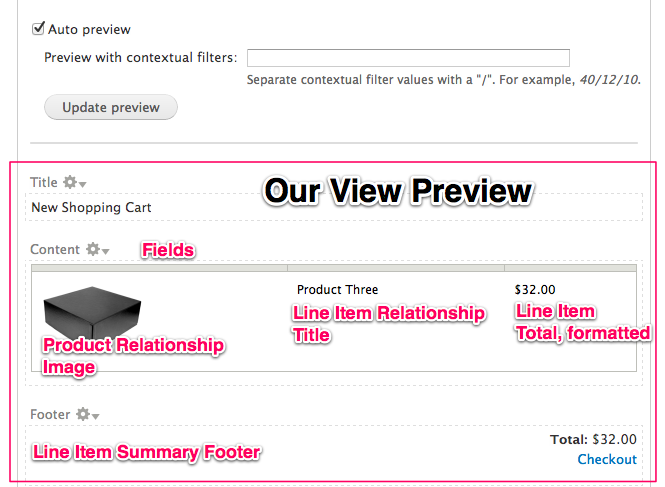
Views Preview
Note that we have one item in our shopping cart while making this view. If you didn't have anything the preview would show something different.
Blocks
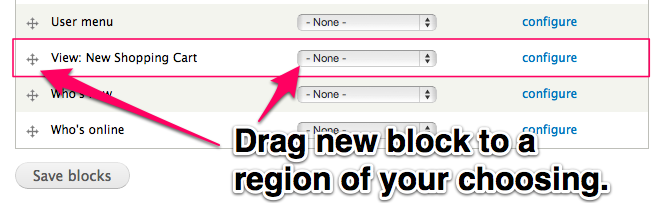
Save and Exit out of Views. Go to Structure > Blocks and drag your new block to a region of your choosing. For this example, it's going to Sidebar-First.
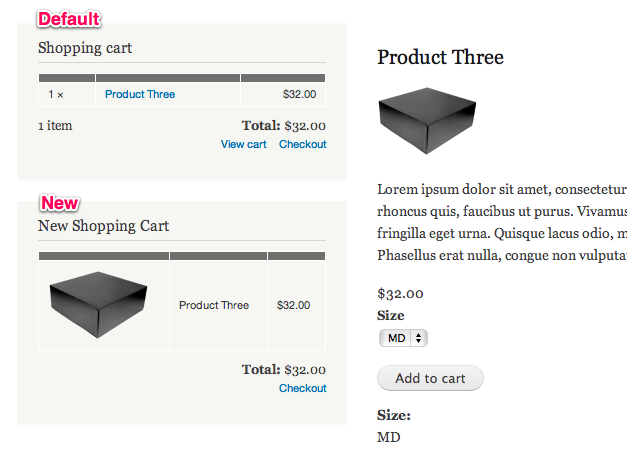
Final Result
The final result is definitely custom. And hopefully this exercise has inspired you to work through and explore other kinds of shopping cart scenarios. For example, it would be possible to do what Amazon does and attach a view to this to show related products, etc.
Shopping Cart and Multi-Currency
Converting from one currency to another is possible through Rules. We recommend using only core for this if you want the conversion rate to be input as a static variable. For example, you simply want to say that 1 US dollar is equal to .76 Euros, that would be a fine and relatively easy thing to produce using rules.
Additionally with being able to handle simple conversions, Drupal Commerce core will properly handle mixed currency orders by converting line items to the site's default currency if present on the order or using the currency of the first line item on the order if the default currency isn't represented.
For more complex situations, there is a great contributed module called Commerce Multi-currency that we have highlighted in a recent Commerce Module Tuesday Video (seen below).
Multi-Currency Support in Core
We have lots of use-cases for handling multiple currencies. As stated above, Drupal Commerce supports a small subset of currency support.
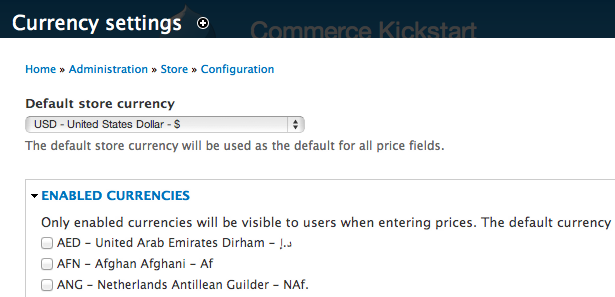
Currency Settings
The currency settings screen under Store > Configuration > Currency is where you can enable additional currencies. If you are going to do the "Static Currency Exchange Rate" exercise below, you should enable a few currencies here.
Static Currency Exchange Rate
Converting from one currency to another is possible through Rules. We recommend using only core for this if you want the conversion rate to be input as a static variable. For example, you simply want to say that 1 US dollar is equal to .76 Euros, that would be a fine and relatively easy thing to produce using rules.
Below we work through an entire exercise where we use Rules to create such a scenario as mentioned above.
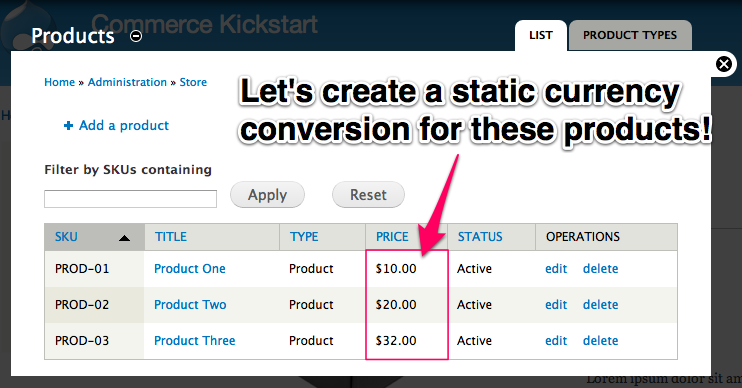
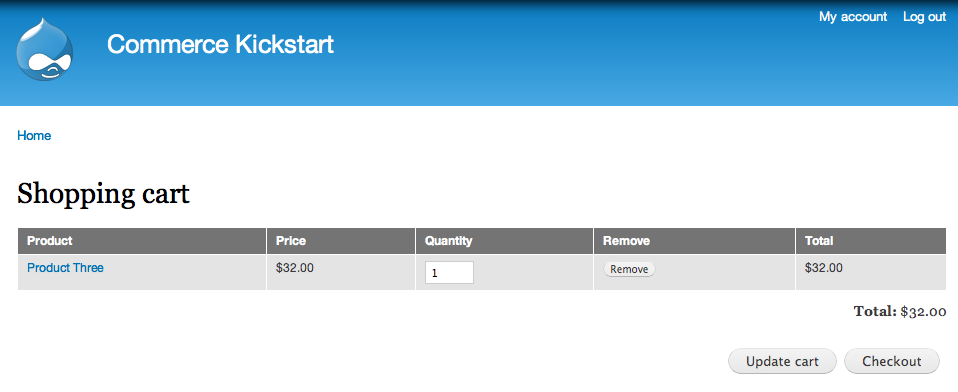
Original Pricing
The original pricing is shown here for three products. Our goal is to create a rule that affects the prices and changes the currency. Note that you need to enable a few other currencies to make this work.

Product Pricing Rules
The first step is to click on Store and then "Configuration" and, finally, Product Pricing Rules. That is where the magic all happens when dealing with currency exchange.
Pricing Rule
We need to click on add a pricing rule. If this is your first time on this screen, maybe navigate around and look at how some of these other rules are setup. If this is your first time dealing with Rules, we highly recommend additional tutorials.
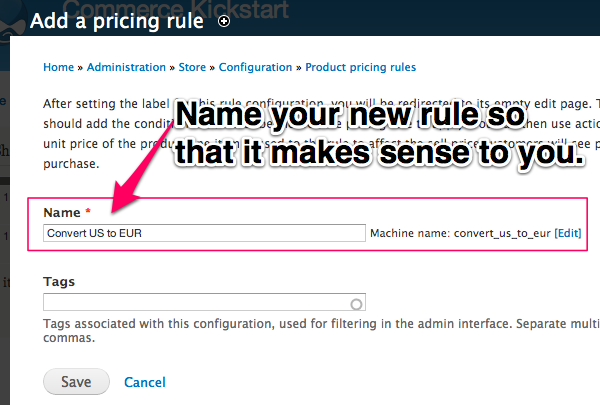
Name Rule
After you have created a name, click "Add Condition."
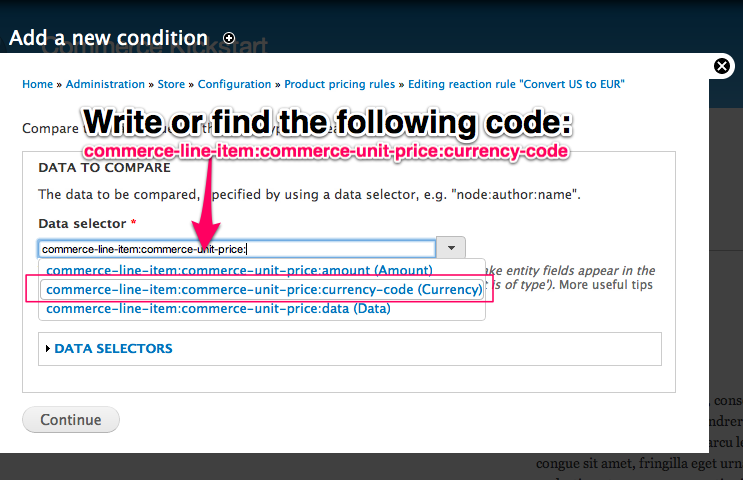
Data Comparison
After clicking "Add Condition…"
You will want to choose "Data Comparison" and then select "commerce-line-item:commerce-unit-price:currency-code" using the object navigator.
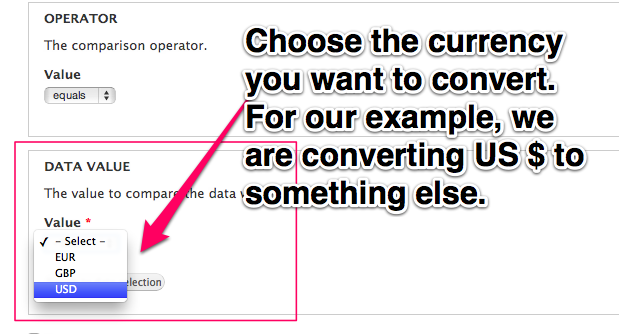
Currency to Filter
Note that we are creating a filter that will only allow US dollars into our actions. Without this filter, all line items would go through this rule.
Convert Numbers
Click "Add Action" In order to actually create a currency conversion we need to do alittle math. This next step is where you add the currency exchange rate.
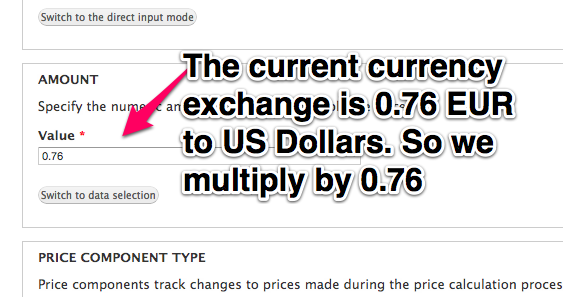
Doing the Exchange
If you had 1 US dollar, how much would that equal in your other currency? It changes, but for our exercise we're going to assume a static number works for us. (Dynamic currency conversion is possible with Commerce Multicurrency).
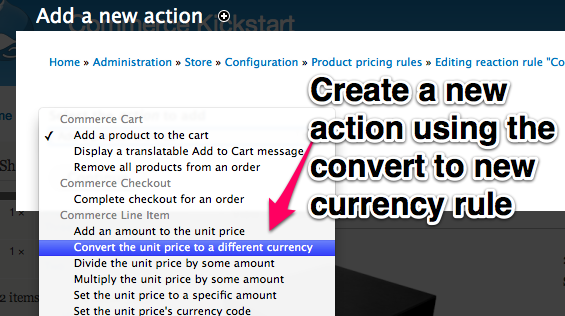
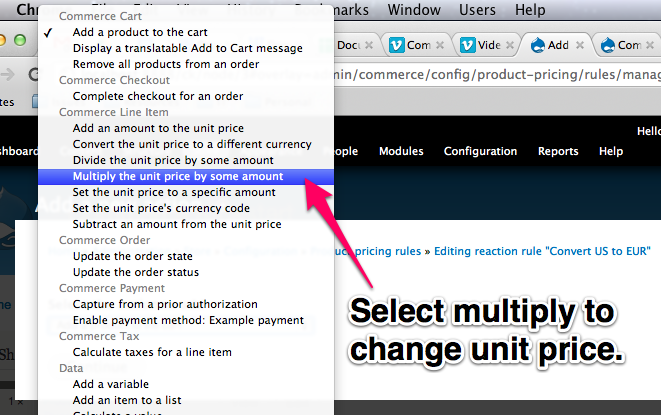
Convert Currency Symbol
Click Add Action. Select "Convert the unit price to a different currency" so that we can actually convert the currency from US dollars to a new currency. This exchange is only going to change the currency symbol, it will not actually tweak the numbers.
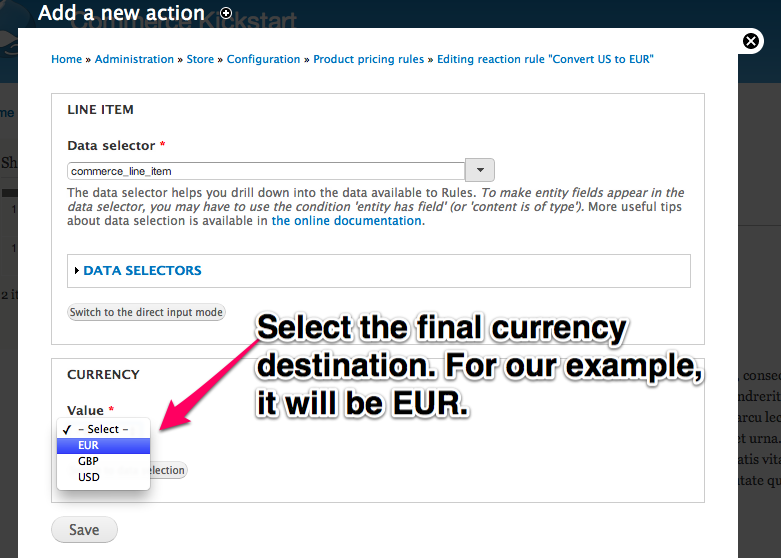
Final Currency
We are simply selecting the final currency symbol. You can safely ignore the data selector.
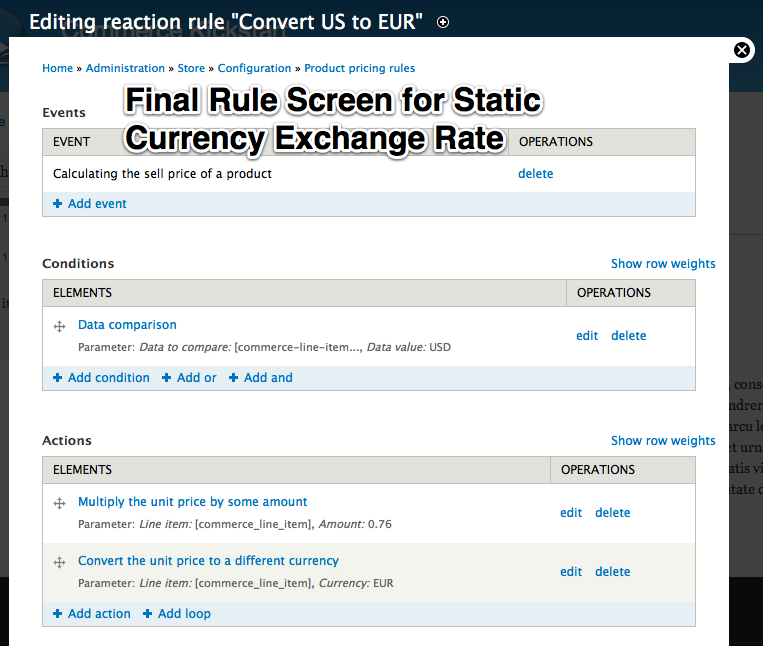
Final Screen
The final screen for the rule. If yours doesn't look like this, go through the steps above carefully.
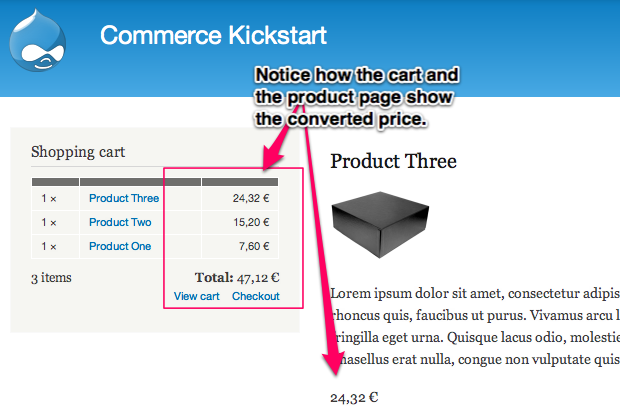
Example Cart
We have not modified any of the products prices, but we have successfully converted all of the currency to Euros and exchanged the prices. For example, Product Three is listed as $32.00 US dollars.
Shopping Carts, Orders, and Line Items
Quick! What's the difference between a shopping cart, an order, and a line item? The answer? Not much. A shopping cart is just a kind of an order and an order is just a revisioned group of line items. How about we try that again with less Commerce-jargon?
- Shopping Cart – Also sometimes called a basket, it's the listing of products your customers wants to buy at checkout.
- Order – An order is a list of products with a status. In our case, a shopping cart is simply an order with a status of "Shopping Cart."
- Line Item – Every product on the order is referenced by a record that includes quantity and a reference to which order it belongs. This record is known as a line item. There are other kinds of line items (like taxes, or discounts) but those don't really play that much of a role in a shopping cart.
Shopping Cart Overview
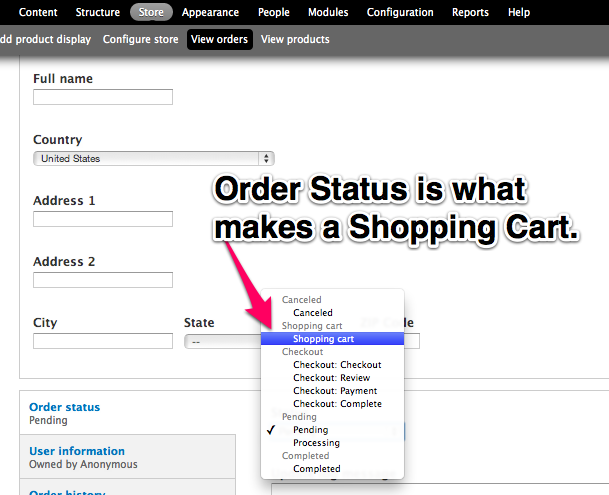
Order with Status
A shopping cart in Drupal Commerce is simply an order with a particular cart order status. In fact, almost everything in Drupal Commerce revolves around changing the order status.
As soon as a product is added to the cart, an order is created and associated with the customer either via user ID if logged in or via an array in the session if not (commerce_cart_orders).
The shopping cart is totally optional, meaning checkout is implemented in a separate module and will still function properly for orders created by the administrator. This allows for sites to do invoicing and payment collection where users shouldn't be allowed to create and manage their own orders via a cart.
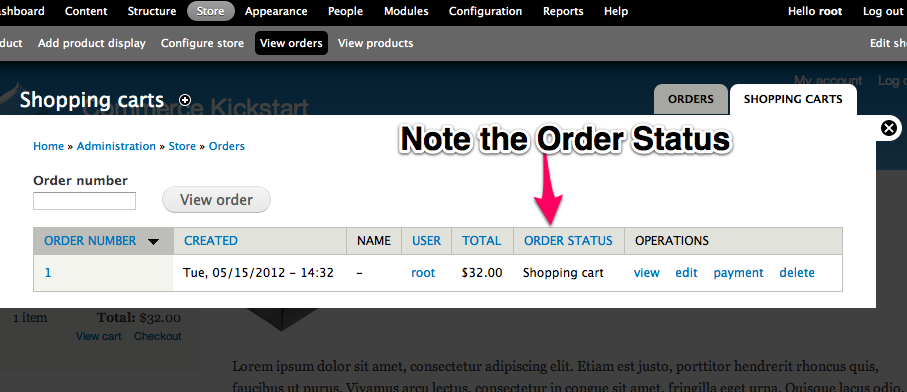
Administrative View
When you view all of the open shopping carts, it is possible that one customer has multiple open shopping carts.
Each change to a shopping cart order is saved as a revision. A user can also have more than one cart, though the default is to present the most recent shopping cart to the user. hook_commerce_cart_order_id() can be used to introduce alternate logic to the cart load process if necessary.
Note: As long as the order is still in the shopping cart state, its line items will be re-validated on load against the latest product prices / availability, etc.
Modifying a Line Item in Cart Using Rules
This is an advanced action that involves Rules and setting values, but we thought it was worth documenting seeing as how we've gotten lots of issues and requests regarding this kind of functionality. For example, lets say you can only buy Product A if Product B is not in the cart. You can make Drupal Commerce understand this using Rules. We describe the recommended rule below.
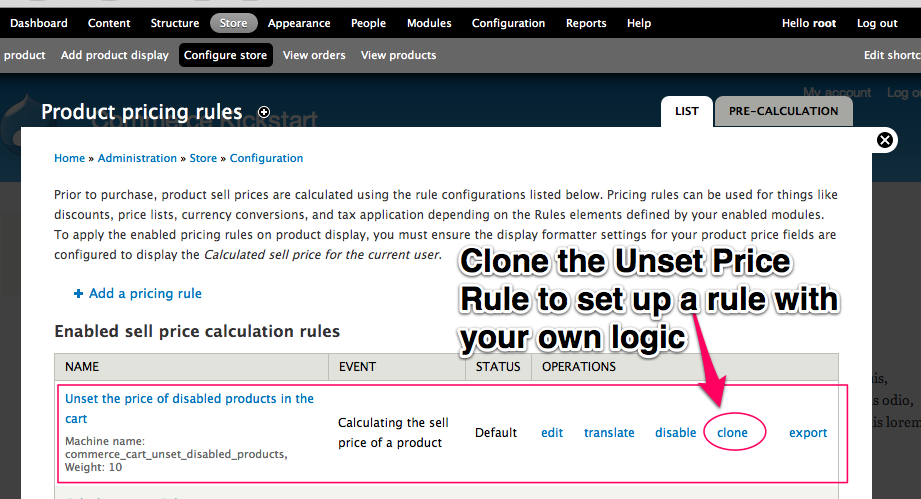
Unset Price Rule
To remove an item from the cart using rules, you must unset the price of the line item during "Calculating the sell price of a product." Deleting a line item just involves leaving the price amount empty.
To remove an item from the cart using rules, you must unset the price of the line item during "Calculating the sell price of a product." This is similar to the rule "Unset the price of disabled products in the cart" that is included with core. So you can refer to that as an example. Deleting a line item just involves setting the price to NULL (i.e. no value, not 0).
Thanks to ressa over at Drupal.org, we know we need to further clarify our advice: "For those trying to remove a line item by entering an empty field, and setting the price to NULL, you do it under 'Add action' -> 'Data' -> 'Set a data value'. Under Data Selector, enter 'commerce-line-item:commerce-unit-price:amount' ... and just leave the 'Value' field empty, don't actually type "NULL" :-)"
Related Assets
Are you looking for how to modify the cart block? Checkout our entire article on modifying the Shopping Cart block using views.
Working with Cart Rules events
The Cart modules defines Rules events and related hooks that let you react:
- Before adding a product to the cart
- After adding a product to the cart
- After removing a product from the cart
The events that are triggered after adding and removing products from the cart receive a line item parameter that contains the full product line item that is being added or removed from the cart. If you want to update this line item after it is added to the cart, such as to restrict its quantity to a maximum value via a custom Rule, then you are also responsible for saving the shopping order after making your changes so the order total can recalculate with the updated line item data.
The following exported Rule demonstrates restricting the quantity of all purchases on a site to 1 and using the Save entity action to ensure the order is saved with the updated line item data. This is important because initially the order total may be recalculated for a quantity greater than you want to allow if the customer has used the Add to Cart form multiple times for a restricted product.
 <?php
 {
   "rules_restrict_quantity_1" : {
     "LABEL" : "Restrict quantity to 1",
     "PLUGIN" : "reaction rule",
     "REQUIRES" : [ "rules", "commerce_cart" ],
     "ON" : [ "commerce_cart_product_add" ],
     "IF" : [
     { "data_is" : {
         "data" : [ "commerce-line-item:quantity" ],
         "op" : "\u003e",
         "value" : "1"
         }
     }
     ],
     "DO" : [
     { "data_set" : { "data" : [ "commerce-line-item:quantity" ], "value" : "1" } },
     { "entity_save" : { "data" : [ "commerce-line-item:order" ] } }
     ]
     }
 }
Note: the same workflow holds true for line item alterations based in modules implementing hook_commerce_cart_product_add().