Creating Payment Gateway
The Drupal Commerce Payment module provides a framework for implementing online payment gateways. Most of the code you will need to write is gateway specific. This documentation section includes examples for several types of payment gateways.
- Create a custom module, configuration schema, and a payment gateway plugin.
- Implement the configuration form for your custom payment gateway plugin.
On-site payment gateways
- Learn how to create payments and handle stored payment methods.
- Learn how to handle authorizations, voids, and refunds.
Off-site payment gateways
- Create the payment off-site form for either a Redirect or iFrame payment gateway
- Learn how to handle the return and/or asynchronous payment notifications (IPNs) from the payment provider.
- Make sure you understand security considerations that are particularly important for off-site payment gateways.
Manual payment gateways
- TBD
Getting started
For a developer interested in implementing a custom payment gateway module, this documentation outlines the initial steps that are common to all types of Drupal Commerce payment gateway modules.
Initial steps
- Create a new module.
- Create the configuration schema.
- Create a payment gateway plugin.
- Implement the plugin configuration form.
Step 1: Create a new module
The first thing you will need to do is create a new module with a YAML file that includes the commerce_payment dependency. For more information, see the Drupal documentation on creating custom modules.
Example
For example for the Commerce QuickPay module this file is named commerce_quickpay.info.yml and looks like this:
name: Commerce QuickPay
type: module
description: Provides Commerce integration for the QuickPay Gateway.
core: 8.x
package: Commerce (contrib)
dependencies:
- commerce:commerce_payment
If your payment gateway depends on a vendor-supplied library, you will also need to include a composer.json file with a pointer to its repository.
Example
Here is an example composer.json file from the Commerce Worldpay module, which includes the worldpay/worldpay-lib-php library:
{
    "name": "drupal/commerce_worldpay",
    "type": "drupal-module",
    "description": "Provides Commerce integration for Worldpay.com",
    "homepage": "http://drupal.org/project/commerce_worldpay",
    "license": "GPL-2.0+",
    "keywords": ["Drupal"],
    "minimum-stability": "dev",
    "support": {
        "issues": "https://www.drupal.org/project/issues/commerce_worldpay",
        "source": "http://cgit.drupalcode.org/commerce_worldpay"
    },
    "require": {
        "drupal/commerce": "~2.0",
        "worldpay/worldpay-lib-php": "^2.1"
    }
}
For more information, see the Add a composer.json file section of the Drupal documentation on creating custom modules.
Step 2: Create a configuration schema file
For your payment provider, you will probably need configuration data such as API key, Private key, etc. These will be your payment gateway settings that are stored by Drupal's configuration system. You will need to figure out which settings you need based on documentation provided by your specific payment provider. Once you've determined the necessary settings, create your configuration schema file:
- Create a new
configfolder in your custom module. - Create a
schemasubfolder within theconfigfolder. - Create a file within the
schemafolder namedmy_module.schema.yml, wheremy_moduleis replaced by the name of your custom module. For Commerce QuickPay, this would becommerce_quickpay.schema.yml. - In your schema configuration file, enter a mapping with key-value pairs for each of your payment gateway settings.
Example
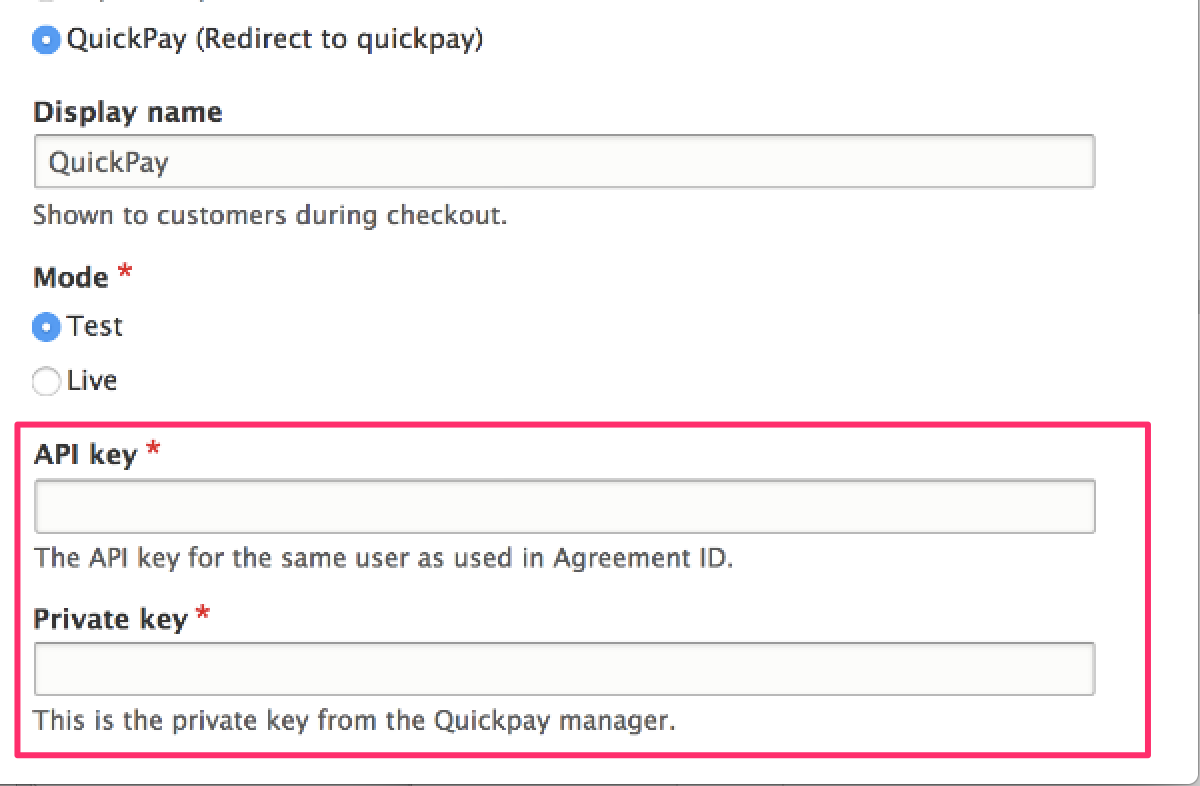
Here is a simplified example for the QuickPay module, showing only private_key and api_key settings. The actual QuickPay integration requires additional settings. The type should be commerce_payment_gateway_configuration. For the name of the configuration object, use commerce_payment.commerce_payment_gateway.plugin. as a prefix followed by a descriptive name, like quickpay_redirect_checkout.
# config/schema/commerce_quickpay.schema.yml
commerce_payment.commerce_payment_gateway.plugin.quickpay_redirect_checkout:
type: commerce_payment_gateway_configuration
mapping:
    private_key:
    type: string
    label: 'Private key'
    api_key:
    type: string
    label: 'API key'
For more information on creating schema files, see the Drupal documentation on configuration schema/metadata.
Step 3: Create a payment gateway plugin
If you are new to creating plugins, the Drupal Plugin API documentation provides a good overview. Your plugin class should be located within your custom module in the src/Plugin/Commerce/PaymentGateway folder. To create your payment gateway plugin, begin by subclassing one of the payment gateway base classes:
* For an on-site gateway, use: Drupal\commerce_payment\Plugin\Commerce\PaymentGateway\OnsitePaymentGatewayBase.
* For an off-site gateway, use: Drupal\commerce_payment\Plugin\Commerce\PaymentGateway\OffsitePaymentGatewayBase.
Example
Here is an example of a payment gateway plugin for Commerce QuickPay (an off-site gateway):
<?php

namespace Drupal\commerce_quickpay\Plugin\Commerce\PaymentGateway;

use Drupal\commerce_payment\Plugin\Commerce\PaymentGateway\OffsitePaymentGatewayBase;
use Drupal\Core\Form\FormStateInterface;

/**
 * Provides the QuickPay offsite Checkout payment gateway.
 *
 * @CommercePaymentGateway(
 *   id = "quickpay_redirect_checkout",
 *   label = @Translation("QuickPay (Redirect to quickpay)"),
 *   display_label = @Translation("QuickPay"),
 *    forms = {
 *     "offsite-payment" = "Drupal\commerce_quickpay\PluginForm\RedirectCheckoutForm",
 *   },
 *   payment_method_types = {"credit_card"},
 *   credit_card_types = {
 *     "mastercard", "visa",
 *   },
 * )
 */
class RedirectCheckout extends OffsitePaymentGatewayBase {

}
An important aspect of your plugin class is its annotation, identified by @CommercePaymentGateway. The annotation contains the information Drupal Commerce needs to discover your plugin. To learn more about annotations, see the Drupal documentation on Annotations-base plugins.
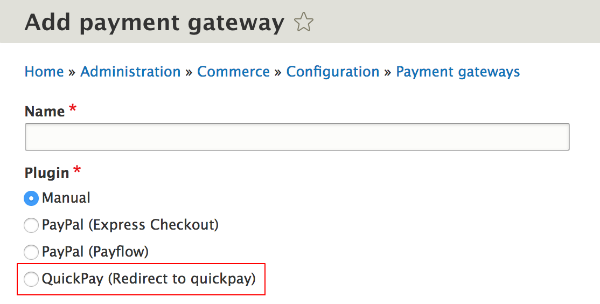
For example, if you enable the Commerce QuickPay module (or rebuild caches if the module is already enabled), you will then see QuickPay (Redirect to quickpay) as a payment gateway Plugin option:
Here is the full list of properties for Commerce Payment Gateway annotation properties:
| Property | Description |
|---|---|
| id | The plugin ID, a string. |
| label | The payment gateway label, a translatable string. |
| display_label | The display label, a translatable string. |
| modes | An array of supported modes, keyed by machine name. If no modes are provided, the default modes are Test and Live are provided. The mode labels are translatable strings. |
| forms | An array of form classes, keyed by operation. For example, the Manual payment gateway has as its forms property: forms = { |
| js_library | The JavaScript library ID. |
| payment_type | The payment type used by the payment gateway, a string. If no payment type is provided, the default value is payment_default. |
| payment_method_types | An array of the payment method types handled by the payment gateway. If no payment method types are provided, a credit_card default type is provided. Other types can be things like paypal, or paypal_credit. (This property is only used for on-site gateways.) |
| default_payment_method_type | The default payment method type, a string. If no default type is provided, the first payment method type is used as the default. (This property is only used for on-site gateways.) |
| credit_card_types | An array of credit card types handled by the payment gateway. If no credit card types are provided, the default list of credit card types is provided by the getTypes() method in the Drupal\commerce_payment\CreditCard class: visa, mastercard, maestro, amex, dinersclub, discover, jcb, and unionpay. |
Step 4: Implement the plugin configuration form
When a plugin is selected on the Payment gateway administrative page, its configuration form is automatically loaded. The base payment gateway class, PaymentGatewayBase builds a form for the Display name, Mode, and Payment method types settings. (Mode and Payment method types are hidden when only single options exist.) However, it's up to you to implement the configuration form methods for the settings that are specific to your Payment gateway. For our Commerce QuickPay example, we'll create a configuration form for the API Key and Private key settings we defined earlier in our configuration schema file.
We can do that by implementing the defaultConfiguration(), buildConfigurationForm(), and submitConfigurationForm() methods in our RedirectCheckout plugin class.
The defaultConfiguration() method
Use the defaultConfiguration() method to return default values, corresponding to the settings you defined in your module's configuration schema file. For our Commerce QuickPay module example, our defaultConfiguration() method looks like this:
  public function defaultConfiguration() {
    return [
        'private_key' => '',
        'api_key' => '',
      ] + parent::defaultConfiguration();
  }
The buildConfigurationForm() method
The buildConfigurationForm method is a standard Drupal form builder. To display the fields in the plugin configuration form, add them as Form API fields in your buildConfigurationForm method. For Commerce QuickPay, we can use simple textfield elements for each of the settings. If you are unfamiliar with building forms in Drupal, the Drupal Form API reference may be helpful.
  public function buildConfigurationForm(array $form, FormStateInterface $form_state) {
    $form = parent::buildConfigurationForm($form, $form_state);

    $form['private_key'] = [
      '#type' => 'textfield',
      '#title' => $this->t('Private key'),
      '#description' => $this->t('This is the private key from the Quickpay manager.'),
      '#default_value' => $this->configuration['private_key'],
      '#required' => TRUE,
    ];

    $form['api_key'] = [
      '#type' => 'textfield',
      '#title' => $this->t('API key'),
      '#description' => $this->t('The API key for the same user as used in Agreement ID.'),
      '#default_value' => $this->configuration['api_key'],
      '#required' => TRUE,
    ];

    return $form;
  }
The submitConfigurationForm() method
Finally, to save the settings values entered by administrative users, we need to implement the submitConfigurationForm method. The submitConfigurationForm saves the input into the configuration.
  public function submitConfigurationForm(array &$form, FormStateInterface $form_state) {
    parent::submitConfigurationForm($form, $form_state);
    $values = $form_state->getValue($form['#parents']);
    $this->configuration['private_key'] = $values['private_key'];
    $this->configuration['api_key'] = $values['api_key'];
  }
Additional considerations
Handling global API keys
Certain SDKs still require an API key to be set globally using a static method call. Gateways such as Stripe do this in __construct(). If your custom gateway needs to set a global API key value in its __construct() method, then you will also need to set the global API key value in a __wakeup() method.
Since Commerce 2.12 payment gateway plugins are serialized and stored in the form cache. When the gateway is unserialized, __construct() doesn't run, so the API key isn't set. However, the __wakeup() method is called when the gateway is unserialized, so the API key can be re-set here.
For example
/**
 * {@inheritdoc}
 */
public function __construct(array $configuration, $plugin_id, $plugin_definition, EntityTypeManagerInterface $entity_type_manager, PaymentTypeManager $payment_type_manager, PaymentMethodTypeManager $payment_method_type_manager, TimeInterface $time) {
    parent::__construct($configuration, $plugin_id, $plugin_definition, $entity_type_manager, $payment_type_manager, $payment_method_type_manager, $time);

    \Payjp\Payjp::setApiKey($this->configuration['secret_key']);
}

/**
    * Sets the API key after the plugin is unserialized.
    */
public function __wakeup() {
    \Payjp\Payjp::setApiKey($this->configuration['secret_key']);
}
On-site payment gateways
On-site payment gateways allow the customer to enter credit card details directly on the site. The details might be safely tokenized before they reach the server (Braintree, Stripe, etc) or they might be transmitted directly to the server (PayPal Payments Pro).
On-site payment gateway flow:
- The customer enters checkout.
- The PaymentInformation checkout pane shows the add-payment-method plugin form, allowing the customer to enter their payment details.
- On submit, a payment method is created via
createPaymentMethod()and attached to the customer and the order. - The customer continues checkout, hits the payment checkout step.
-
The PaymentProcess checkout pane calls
createPayment(), which charges the provided payment method and creates a payment. -
If the payment method could not be charged (for example, because the credit card's daily limit was breached), the customer is redirected back to the checkout step that contains the PaymentInformation checkout pane, to provide a different payment method.
Creating On-site payment gateways
To create an On-site payment gateway, you'll want to start by creating a custom module, configuration schema, payment plugin, and configuration form methods, as described in the Getting started documentation for creating payment gateways.
Next, implement your gateway's createPayment() method, as described in the Creating payments documentation.
Then continue with the Stored payment methods documentation to implement the required createPaymentMethod and deletePaymentMethod methods. If your payment gateway supports updating payment methods, you will also want to implement the SupportsUpdatingStoredPaymentMethodsInterface interface and its updatePaymentMethod.
If your payment gateway supports authorizations, voids, or refunds, read the Authorizations, voids, and refunds documentation for an overview and example code.
Finally, if your payment gateway supports IPNs, read the Handling an IPN documentation for an overview and examples of IPN handling by existing payment gateways.
Creating payments
On-site payment gateways implement the OnsitePaymentGatewayInterface, which defines the createPayment method:
public function createPayment(PaymentInterface $payment, $capture = TRUE);
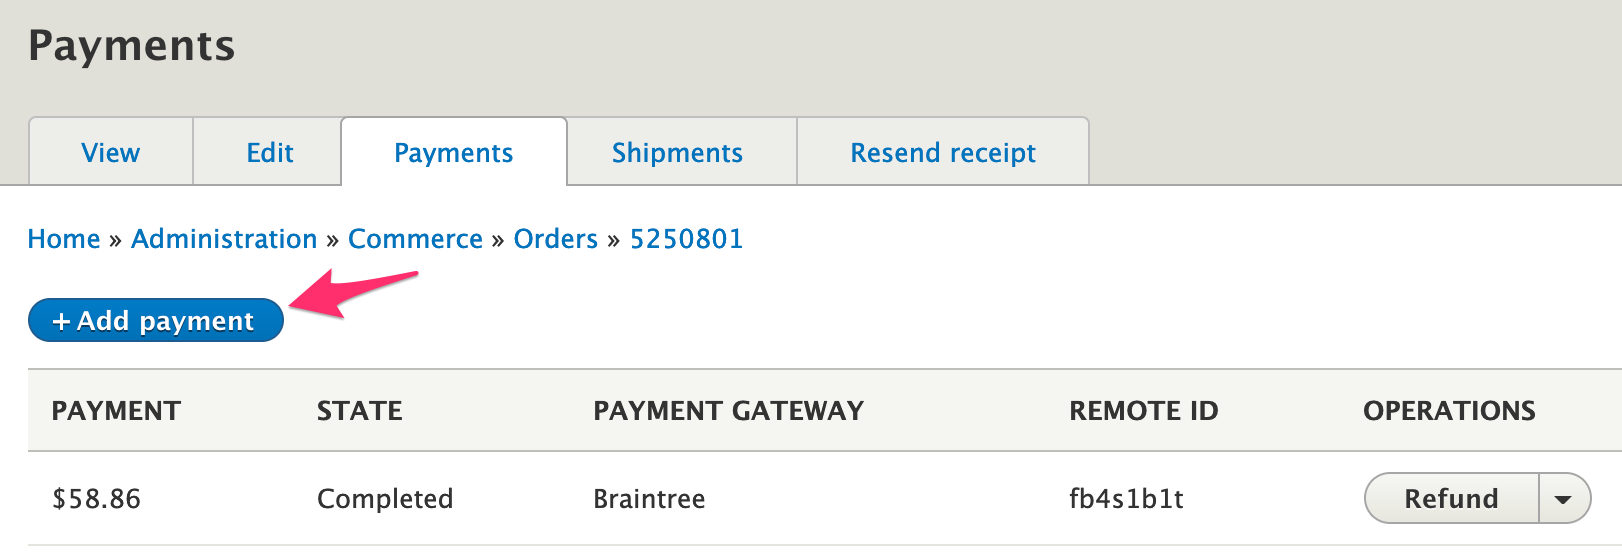
This method gets called during the checkout process, when the Payment Information form is submitted. It is also called when a payment is added to an order manually, through the administrative UI:
This method is responsible for: * gathering all necessary information from the payment, payment method, and order * performing verifications, throwing exceptions as needed * performing the API request(s), throwing exceptions as needed * creating and saving information to the Drupal Commerce payment entity
A payment entity should not be created if the payment is declined. Payment entities should be created only if the payment is successful or pending.
Gathering information
The payment entity that's passed in to this method should be a new payment, so you will generally want to start with an assertion:
$this->assertPaymentState($payment, ['new']);
This new payment entity will have a payment method, amount, and an order assigned to it. Here are some helpful methods for retrieving information from the payment:
$payment_method = $payment->getPaymentMethod();
$amount = $payment->getAmount()->getNumber();
$currency_code = $payment->getAmount()->getCurrencyCode();
$order = $payment->getOrder();
$order_id = $payment->getOrderId();
The payment method can provide you with the remote ID, whether the method is re-usable, the owner, and the billing address:
$remote_id = $payment_method->getRemoteId();
$is_reusable = $payment_method->isReusable();
$owner = $payment_method->getOwner();
$billing_address = $payment_method->getBillingProfile()->address->first();
See the Drupal\commerce_payment\Entity\PaymentInterface and Drupal\commerce_payment\Entity\PaymentMethodInterface interfaces for additional methods available for these entities.
Performing verifications
Depending the on the requirements of your payment provider, verifications may relate to billing address, payment currency, etc. For example:
if (empty($this->configuration['merchant_account_id'][$currency_code])) {
  throw new InvalidRequestException(sprintf('No merchant account ID configured for currency %s', $currency_code));
}
\Drupal\commerce_payment\Exception for the available exceptions.
Performing the API request
Remember to take into account the $capture value when performing the request. If $capture is TRUE, a sale transaction should be run; if FALSE, an authorize only transaction should be run. For example:
Example
$transaction_data = [
'merchantAccountId' => $this->configuration['merchant_account_id'][$currency_code],
// orderId must be unique.
'orderId' => $payment->getOrderId(),
'amount' => $payment->getAmount()->getNumber(),
'options' => [
    'submitForSettlement' => $capture,
],
'paymentMethodToken' => $payment_method->getRemoteId(),
];

try {
$response = $this->api->transaction()->sale($transaction_data);
}
catch (\PaymentGatewayAPI\Exception $e) {
throw new PaymentGatewayException('Payment gateway error');
}
Exception handling
If an exception thrown by createPayment is an instance of DeclineException or PaymentGatewayException (or of a class that extends one of them), the error message is hidden from the customer for security reasons. (These two exception classes are in the Drupal\commerce_payment\Exception namespace.) Note that any other exception thrown will not be handled at all and will likely result in a blank screen or other undesirable outcome.
Here is the code in Drupal\commerce_payment\Plugin\Commerce\CheckoutPane\PaymentProcess that handles the createPayment exceptions:
catch (DeclineException $e) {
  $message = $this->t('We encountered an error processing your payment method. Please verify your details and try again.');
  $this->messenger()->addError($message);
  $this->checkoutFlow->redirectToStep($error_step_id);
}
catch (PaymentGatewayException $e) {
  \Drupal::logger('commerce_payment')->error($e->getMessage());
  $message = $this->t('We encountered an unexpected error processing your payment method. Please try again later.');
  $this->messenger()->addError($message);
  $this->checkoutFlow->redirectToStep($error_step_id);
}
Saving the payment locally
After the payment transaction has been run on the gateway, the $payment entity should be updated and saved, using the information returned by the gateway. For example:
$next_state = $capture ? 'completed' : 'authorization';
$payment->setState($next_state);
$payment->setRemoteId($response->transaction->id);
$payment->setExpiresTime(strtotime('+5 days'));
$payment->save();
If the payment is declined, the payment gateway should not create a payment entity. The only time a declined payment should be created is if the payment gateway utilizes async payments – like ACH or authorizations which take 24 hours to clear.
Stored payment methods
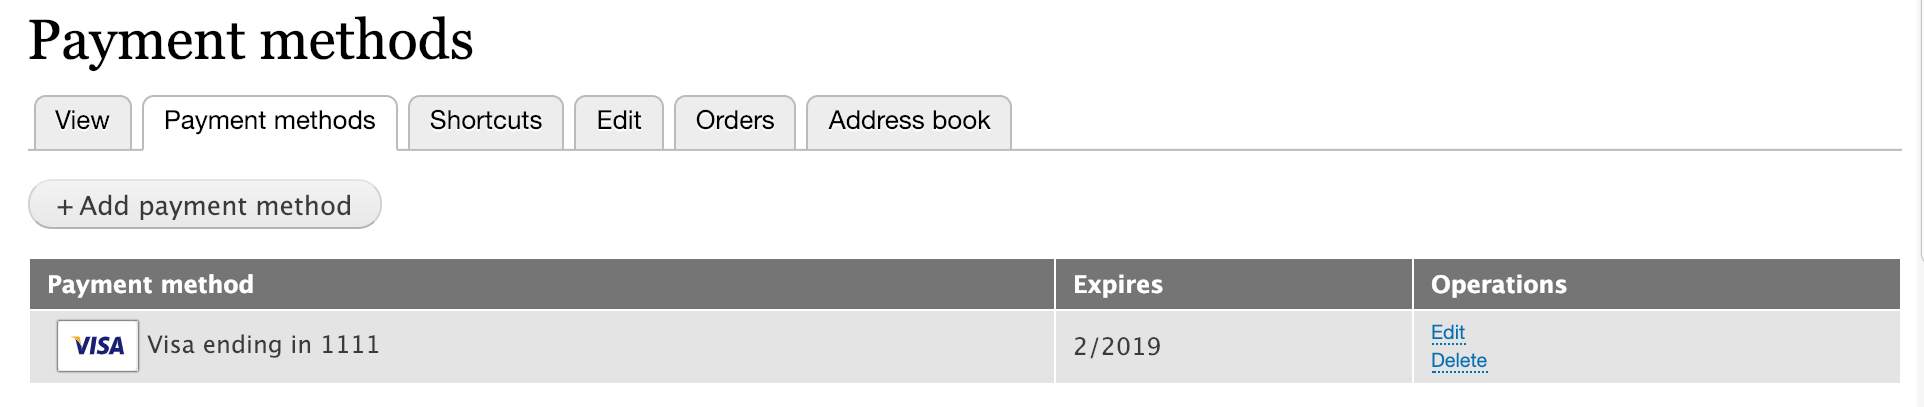
On-site payment gateways typically provide stored payment method functionality. This allows customers to save their credit card or other payment method details for future use. Customers can save payment methods during checkout and manage their stored payment methods on the Payment methods tab of their user account page:
The Drupal Commerce Payment module supports stored payment methods by defining two interfaces:
1. The SupportsStoredPaymentMethodsInterface defines methods for creating and deleting stored payment methods. The Drupal Commerce On-site payment gateway interface extends this interface.
2. The SupportsUpdatingStoredPaymentMethodsInterface defines a method for updating stored payment methods. By default, the payment gateway types provided by Drupal Commerce do not extend this interface
This documentation page describes the methods defined by these interfaces and provides example code based on the Commerce Payment Example, Commerce Authorize.Net, and Commerce Braintree modules.
Creating payment methods
The first method defined by SupportsStoredPaymentMethodsInterface is createPaymentMethod:
public function createPaymentMethod(PaymentMethodInterface $payment_method, array $payment_details);
This method is called during the checkout process, when the Payment Information form is submitted. It is responsible for validating payment details, updating information on the remote payment gateway as needed, and saving payment method details locally.
Customizing the payment method add form
When a payment gateway implements the SupportsStoredPaymentMethodsInterface interface, the PaymentMethodAddForm is used for collecting all information required for creating the payment method. You can create your own payment method add form by extending Drupal\commerce_payment\PluginForm\PaymentMethodAddForm with your own Drupal\my_custom_gateway\PluginForm\PaymentMethodAddForm class. In your payment gateway plugin annotation, you will need to include your custom form as the add-payment-method form.
Example
For example, the [Commerce Braintree module] has a custom payment method add form for its Hosted Fields payment gateway:
/**
 * Provides the HostedFields payment gateway.
 *
 * @CommercePaymentGateway(
 *   id = "braintree_hostedfields",
 *   label = "Braintree (Hosted Fields)",
 *   display_label = "Braintree",
 *   forms = {
 *     "add-payment-method" = "Drupal\commerce_braintree\PluginForm\HostedFields\PaymentMethodAddForm",
 *   },
 ...
Validating payment details
The $payment_details array that's passed into the method contains all credit card information collected from the Payment Information form. The expected keys are payment gateway specific and usually match the Drupal\commerce_payment\PluginForm\PaymentMethodAddForm form elements.
The payment details keys should be validated at the start of your createPaymentMethod implementation.
For example:
$required_keys = [
'type', 'number', 'expiration',
];
foreach ($required_keys as $required_key) {
if (empty($payment_details[$required_key])) {
    throw new \InvalidArgumentException(sprintf('$payment_details must contain the %s key.', $required_key));
}
}
Exception handling for createPaymentMethod
If an exception is thrown by createPaymentMethod, the actual error message is logged, but a more generic message is displayed to the customer, for security reasons. So, for example, if required payment details keys are missing, the logged error message might be:
$payment_details must contain the expiration key
Displaying such a message to the customer would represent a security risk. Instead, the customer would see:
We encountered an unexpected error processing your payment method. Please try again later.
Exceptions of type DeclineException are logged as warnings; all other PaymentGatewayException type exceptions are logged as errors.
Updating information on the remote payment gateway
Billing address and credit card information is typically stored or updated on the payment gateway inside of this method.
For some payment gateway APIs, you will need to create or update a remote customer:
$owner = $payment_method->getOwner();

// Build data array for submission to payment gateway.
if ($owner && $owner->isAuthenticated()) {
  $customer_id = $this->getRemoteCustomerId($owner);

  $address = $payment_method->getBillingProfile()->address->first();
  $customer_data = [
    'email' => $owner->getEmail(),
    'cardholderName' => $address->getGivenName() . ' ' . $address->getFamilyName(),
    'billingAddress' => [
      'firstName' => $address->getGivenName(),
      'lastName' => $address->getFamilyName(),
      'company' => $address->getOrganization(),
      'streetAddress' => $address->getAddressLine1(),
      'extendedAddress' => $address->getAddressLine2(),
      'locality' => $address->getLocality(),
      'region' => $address->getAdministrativeArea(),
      'postalCode' => $address->getPostalCode(),
      'countryCodeAlpha2' => $address->getCountryCode(),
    ],
  ];
}

// Create the customer remotely using API methods here.

if ($owner && $owner->isAuthenticated()) {
  $this->setRemoteCustomerId($owner, $result->customer->id);
  $owner->save();
}
For the request to create a payment method, you might need to do different API requests based on whether the payment method is reusable. Non-reusable payment methods usually have an expiration timestamp.
For example:
if (!$payment_method->isReusable()) {
$payment_method->card_number = $payment_details['last2'];

$remote_id = $payment_details['payment_method_nonce'];
// Nonces expire after 3h. We reduce that time by 5s to account for the
// time it took to do the server request after the JS tokenization.
$expires = $this->time->getRequestTime() + (3600 * 3) - 5;
}
When performing any requests, you should throw an exception if it fails. See \Drupal\commerce_payment\Exception for the available exceptions.
try {
$result = $this->api->paymentMethod()->create($data);
ErrorHelper::handleErrors($result);
}
catch (\Braintree\Exception $e) {
ErrorHelper::handleException($e);
}

$remote_payment_method = $result->paymentMethod;
Saving payment method details locally
After the information has been stored on the gateway, payment method details are saved locally in the $payment_method variable.
// The remote ID returned by the request.
$remote_id = $remote_payment_method->token;

$payment_method->setRemoteId($remote_id);
$payment_method->setExpiresTime($expires);
$payment_method->save();
Deleting payment methods
The second method defined by SupportsStoredPaymentMethodsInterface is deletePaymentMethod:
public function deletePaymentMethod(PaymentMethodInterface $payment_method);
This method is called from the Payment methods tab of a user's account. It is responsible for deleting a saved payment method both on the Commerce site and in the gateway customer records.
Example of a deletePaymentMethod implementation
public function deletePaymentMethod(PaymentMethodInterface $payment_method) {
// Delete the remote record.
try {
    $result = $this->api->paymentMethod()->delete($payment_method->getRemoteId());
    ErrorHelper::handleErrors($result);
}
catch (\Braintree\Exception $e) {
    ErrorHelper::handleException($e);
}

// Delete the local entity.
$payment_method->delete();
}
Updating payment methods
The SupportsUpdatingStoredPaymentMethodsInterface defines updatePaymentMethod:
public function updatePaymentMethod(PaymentMethodInterface $payment_method);
This method is called from the Payment methods tab of a user's account. It is responsible for updating a saved payment method both on the Drupal Commerce site and in the gateway customer records. The default payment method edit form only supports updating billing info and the card expiration date.
Customizing the payment method edit form
When a payment gateway implements the SupportsUpdatingStoredPaymentMethodsInterface interface, the PaymentMethodEditForm is used for collecting all information required for editing the payment method. You can create your own payment method add form by extending Drupal\commerce_payment\PluginForm\PaymentMethodEditForm with your own Drupal\my_custom_gateway\PluginForm\PaymentMethodEditForm class. In your payment gateway plugin annotation, you will need to include your custom form as the edit-payment-method form.
Example updatePaymentMethod implementation
public function updatePaymentMethod(PaymentMethodInterface $payment_method) {
// Build data for the request.
$address = $payment_method->getBillingProfile()->address->first();
$data = [
    'billingAddress' => [
    'firstName' => $address->getGivenName(),
    'lastName' => $address->getFamilyName(),
    'company' => $address->getOrganization(),
    'streetAddress' => $address->getAddressLine1(),
    'extendedAddress' => $address->getAddressLine2(),
    'locality' => $address->getLocality(),
    'region' => $address->getAdministrativeArea(),
    'postalCode' => $address->getPostalCode(),
    'countryCodeAlpha2' => $address->getCountryCode(),
    ],
    'expirationDate' => sprintf('%s-%s', $payment_method->get('card_exp_month')->value, $payment_method->get('card_exp_year')->value),
];

// Perform the update request; throw an exception if it fails.
try {
    $response = $this->api->paymentMethod()->create($data);
}
    throw new DeclineException('Unable to update the payment method.');
}
Exception handling for updatePaymentMethod
Just as in createPaymentMethod, if an exception is thrown by updatePaymentMethod, that error message is hidden from the customer, for security reasons. The actual error message is logged, but a more generic message is displayed to the customer. Here is the code in Drupal\commerce_payment\PluginForm\PaymentMethodEditForm that handles the updatePaymentMethod exceptions:
try {
  $payment_gateway_plugin->updatePaymentMethod($payment_method);
  $payment_method->save();
}
catch (DeclineException $e) {
  $this->logger->warning($e->getMessage());
  throw new DeclineException(t('We encountered an error processing your payment method. Please verify your details and try again.'));
}
catch (PaymentGatewayException $e) {
  $this->logger->error($e->getMessage());
  throw new PaymentGatewayException(t('We encountered an unexpected error processing your payment method. Please try again later.'));
}
Authorizations, voids, and refunds
Drupal Commerce provides separate interfaces for authorization, void, and refund functionality so that you can more easily customize your payment gateway module based on the requirements of your payment provider. Implementing these interfaces will affect the options available on the Payments tab for an order.

- Capture is displayed when
SupportsAuthorizationsInterfaceis implemented, and the current payment state isauthorization. - Void is displayed when
SupportsVoidsInterfaceis implemented, and the current payment state isauthorization. - Refund is displayed when
SupportsRefundsInterfaceis implemented, and the current payment state is eithercompletedorpartially_refunded.
This documentation page describes the methods defined by these interfaces and provides example code based on the Commerce Payment Example, Commerce Authorize.Net, and Commerce Braintree modules.
Capturing payments (authorizations)
The SupportsAuthorizationsInterface defines capturePayment:
public function capturePayment(PaymentInterface $payment, Price $amount = NULL);
This method is responsible for capturing the transaction for a previously authorized payment and moving it to the current batch for settlement. Only payments in the authorization state can be captured. An optional amount can be specified to capture only a portion of the entire payment amount.
Customizing the capture payment form
When a payment gateway implements the SupportsAuthorizationsInterface interface, the PaymentCaptureForm is used for collecting all information required for editing the payment method. You can create your own payment method add form by extending Drupal\commerce_payment\PluginForm\PaymentCaptureForm with your own Drupal\my_custom_gateway\PluginForm\PaymentCaptureForm class. In your payment gateway plugin annotation, you will need to include your custom form as the capture-payment form.
Example capturePayment method implementation
public function capturePayment(PaymentInterface $payment, Price $amount = NULL) {
$this->assertPaymentState($payment, ['authorization']);
// If not specified, capture the entire amount.
$amount = $amount ?: $payment->getAmount();

// Perform the capture request here, throw an exception if it fails.
try {
    $remote_id = $payment->getRemoteId();
    $decimal_amount = $amount->getNumber();
    $result = $this->api->transaction()->submitForSettlement($remote_id, $decimal_amount);
}
catch (\Exception $e) {
    $this->logger->log('error', 'Error message about the failure');
    throw new PaymentGatewayException('Error message about the failure');
}

$payment->setState('completed');
$payment->setAmount($amount);
$payment->save();
}
Voiding payments
The SupportsVoidsInterface defines voidPayment:
public function voidPayment(PaymentInterface $payment);
This method is responsible for voiding a transaction that was previously authorized but has not been settled. (Payments can usually only be voided before they are captured/received.)
Customizing the void payment form
When a payment gateway implements the SupportsVoidsInterface interface, the PaymentVoidForm is used for collecting all information required for editing the payment method. You can create your own payment method add form by extending Drupal\commerce_payment\PluginForm\PaymentVoidForm with your own Drupal\my_custom_gateway\PluginForm\PaymentVoidForm class. In your payment gateway plugin annotation, you will need to include your custom form as the void-payment form.
Example voidPayment method implementation
public function voidPayment(PaymentInterface $payment) {
$this->assertPaymentState($payment, ['authorization']);
// Perform the void request here, throw an exception if it fails.
try {
    $remote_id = $payment->getRemoteId();
    $result = $this->api->transaction()->void($remote_id);
}
catch (\Exception $e) {
    $this->logger->log('error', 'Error message about the failure');
    throw new PaymentGatewayException('Error message about the failure');
}

$payment->setState('authorization_voided');
$payment->save();
}
Refunding payments
The SupportsRefundsInterface defines refundPayment:
public function refundPayment(PaymentInterface $payment, Price $amount = NULL);
This method is responsible for refunding all or part of a payment. An optional amount can be specified to refund only a portion of the entire payment amount.
Customizing the refund payment form
When a payment gateway implements the SupportsRefundsInterface interface, the PaymentRefundForm is used for collecting all information required for editing the payment method. You can create your own payment method add form by extending Drupal\commerce_payment\PluginForm\PaymentRefundForm with your own Drupal\my_custom_gateway\PluginForm\PaymentRefundForm class. In your payment gateway plugin annotation, you will need to include your custom form as the refund-payment form.
Example refundPayment method implementation
public function refundPayment(PaymentInterface $payment, Price $amount = NULL) {
$this->assertPaymentState($payment, ['completed', 'partially_refunded']);
// If not specified, refund the entire amount.
$amount = $amount ?: $payment->getAmount();
$this->assertRefundAmount($payment, $amount);

// Perform the refund request here, throw an exception if it fails.
try {
    $remote_id = $payment->getRemoteId();
    $decimal_amount = $amount->getNumber();
    $result = $this->api->transaction()->refund($remote_id, $decimal_amount);
}
catch (\Exception $e) {
    $this->logger->log('error', 'Error message about the failure');
    throw new PaymentGatewayException('Error message about the failure');
}

// Determine whether payment has been fully or partially refunded.
$old_refunded_amount = $payment->getRefundedAmount();
$new_refunded_amount = $old_refunded_amount->add($amount);
if ($new_refunded_amount->lessThan($payment->getAmount())) {
    $payment->setState('partially_refunded');
}
else {
    $payment->setState('refunded');
}

$payment->setRefundedAmount($new_refunded_amount);
$payment->save();
}
Off-site payment gateways
This documentation page will explain how to set up an off-site payment gateway. Off-site payment is enabled through a redirect from the Payment checkout page to the payment service, with customers ideally being returned back to the Payment page upon success or failure so they can be moved forward or backward in the checkout process as the case may require.
Drupal Commerce supports two types of Off-site payment gateways: redirect and iframe. The difference between the two types is how the Checkout process is handled. In the redirect approach, the customer is taken to the third party payment gateway website. In the iframe approach, the "off-site" portion is handled within an embedded iFrame.
Off-site payment gateway flow:
In both types of off-site payment gateways, the overall payment flow is the same:
- Customer hits the payment checkout step.
- The PaymentProcess checkout pane shows the offsite-payment plugin form.
- The plugin form performs a redirect or shows an iFrame.
- The customer provides his payment details to the payment provider.
- The payment provider redirects the customer back to the return url.
-
A payment is created in either the
onReturn()oronNotify()payment gateway method. -
If the customer declines to provide their payment details, and cancels the payment at the payment provider, he will be redirected back to the cancel url.
Creating Off-site payment gateways
To create an Off-site payment gateway, you'll want to start by creating a custom module, configuration schema, payment plugin, and configuration form methods, as described in the Getting started documentation for creating payment gateways.
Then continue with either the Off-site Redirect or iFrame payment gateway documentation for creating the payment off-site form.
Next, implement your gateway's onReturn() method, as described in the Return from payment provider documentation.
If your payment gateway supports IPNs, read the Handling an IPN documentation for an overview and examples of IPN handling by existing payment gateways.
Finally, Off-site gateways must implement their gateway's documented CSRF protections. Read the Security considerations documentation to learn about the approaches used by several off-site payment gateways.
Off-site redirect payment gateways
In an off-site redirect payment gateway, the customer is taken to the third party payment provider's website during the checkout process. This happens when the customer clicks the Pay and complete purchase button:

To implement this functionality, you will need to create an Offsite payment plugin form. When a payment gateway implements the OffsitePaymentGatewayInterface interface, this plugin form is embedded into the Payment process checkout pane. To implement this form, you will need to:
- Extend the base off-site payment form.
- Add your payment form to your payment gateway plugin annotation.
- Implement the
buildConfigurationForm()method for your payment form: - Build the array of data for the request to the payment provider.
- Specify the request method (POST or GET).
- Use
buildRedirectForm()to submit the request to the payment provider.
1. Extend the base off-site payment form
Your plugin form should extend PaymentGatewayFormBase, like this:
<?php

namespace Drupal\my_custom_gateway\PluginForm;

use Drupal\commerce_payment\Exception\PaymentGatewayException;
use Drupal\commerce_payment\PluginForm\PaymentOffsiteForm as BasePaymentOffsiteForm;
use Drupal\Core\Form\FormStateInterface;

class MyCustomPaymentForm extends BasePaymentOffsiteForm {

  /**
   * {@inheritdoc}
   */
  public function buildConfigurationForm(array $form, FormStateInterface $form_state) {
    $form = parent::buildConfigurationForm($form, $form_state);

     ... your custom code here ...

    return $this->buildRedirectForm($form, $form_state, ...your parameters...);
  }

}
The base PaymentOffsiteForm class provides the buildRedirectForm() method that you'll use to invoke the request to the payment provider at the end of your buildConfigurationForm() method. In addition to the $form and $form_state, you will pass it the redirect url for your payment provider, an array of data to be submitted to the payment provider, and the redirect method (GET or POST).
The base form's buildConfigurationForm() method checks that the required $form['#return_url'] and $form['#cancel_url'] values are present. Also, if $form['#capture'] has not been set, it will provide TRUE as a default value, meaning that the payment should be authorized and captured rather than just authorized.
2. Add your payment form to the gateway plugin annotation
In the @CommercePaymentGateway annotation at the start of your off-site payment gateway plugin, you need to specify the class for your custom offsite-payment plugin form:
 *    forms = {
 *     "offsite-payment" = "Drupal\my_custom_gateway\PluginForm\MyCustomPaymentForm",
 *   },
3. Implement the `buildConfigurationForm()` method
We only need to implement one method, buildConfigurationForm(), for the payment form plugin class. This method is responsible for:
- building the array of data for the request to the payment provider
- specifying the request method (POST or GET)
- using
buildRedirectForm()to submit the request to the payment provider
Handling the actual response from the payment provider is covered in subsequent documentation pages: Return from payment provider and Handling an IPN.
Gathering data for the request to the payment provider:
Your payment gateway API documentation will provide you with the information you need to build an array of data to be submitted to the payment provider. This data may come from multiple sources such as: * your custom payment gateway configuration * the payment entity * the order and its billing profile * form data (the return and cancel url values)
For example:
/** @var \Drupal\commerce_payment\Entity\PaymentInterface $payment */
$payment = $this->entity;

/** @var \Drupal\commerce_payment\Plugin\Commerce\PaymentGateway\OffsitePaymentGatewayInterface $payment_gateway_plugin */
$payment_gateway_plugin = $payment->getPaymentGateway()->getPlugin();
$configuration = $payment_gateway_plugin->getConfiguration();

// Payment gateway configuration data.
$data['version'] = 'v10';
$data['merchant_id'] = $configuration['merchant_id'];
$data['agreement_id'] = $configuration['agreement_id'];
$data['language'] = $configuration['language'];

// Payment data.
$data['currency'] = $payment->getAmount()->getCurrencyCode();
$data['total'] = $payment->getAmount()->getNumber();
$data['variables[payment_gateway]'] = $payment->getPaymentGatewayId();
$data['variables[order]'] = $payment->getOrderId();

// Order and billing address.
$order = $payment->getOrder();
$billing_address = $order->getBillingProfile()->get('address');
$data['name'] = $billing_address->getGivenName() . ' ' . $billing_address->getFamilyName();
$data['city'] = $billing_address->getLocality();
$data['state'] = $billing_address->getAdministrativeArea()

// Form url values.
$data['continueurl'] = $form['#return_url'];
$data['cancelurl'] = $form['#cancel_url'];
POST vs GET request methods
For the API request submission, you need to specify either POST or GET for the request method. You do so by setting the last parameter of the buildRedirectForm() call to one of:
* PaymentOffsiteForm::REDIRECT_POST
* PaymentOffsiteForm::REDIRECT_GET
If the request method is GET, then buildRedirectForm() attaches the $data array as the query string for the $redirect_url. It then throws a NeedsRedirectException, an exception that represents the need for an HTTP redirect. If no request method is specified, GET is used as the default value.
If the request method is POST, then buildRedirectForm() attaches javascript that auto-clicks the form submit button. The form will display this message and a button to allow the customer to re-submit the form to the $redirect_url:
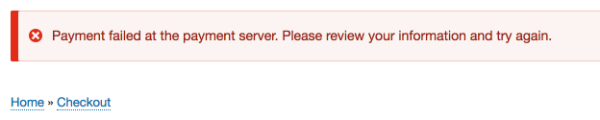
Please wait while you are redirected to the payment server. If nothing happens within 10 seconds, please click on the button below.
In addition to the submit button, the customer is also presented with a Go back cancel button, which will invoke the payment gateway's onCancel() method.
Submit the API request to the payment provider
The last parameter we need to pass into buildRedirectForm() is the actual $redirect_url. So the final statement of your buildConfigurationForm() method should look something like this:
<?php

    return $this->buildRedirectForm(
      $form,
      $form_state,
      'https://payment.my_payment_provider.net',
      $data,
      self::REDIRECT_POST
    );
  }
}
Off-site (iFrame) payment gateways
This documentation page will explain how to set up the iFrame portion of an off-site (iFrame) payment gateway. If you have not already read the Off-site payment gateways documentation, start there for an overview and initial steps. Also, for an introduction to the Drupal Javascript API, see: * Drupal 8 documentation on JavaScript API overview * Acquia tutorial topic: Add a custom variable to Drupal.Settings
Off-site payments in iFrames work similarly to off-site payments by redirect. The difference is that in the Checkout process, the "off-site" portion is handled within an embedded iFrame and does not take the customer to the third party payment gateway's website. This happens when the customer clicks the Pay and complete purchase button during checkout:
To build this functionality, you will need to implement JavaScript for your iFrame, create an Offsite payment plugin form, and attach your iFrame JavaScript to that form. The Offsite payment plugin form will be responsible for providing the iFrame with all necessary data about the payment, order, customer, and gateway configuration, according to your payment provider's API specifications.
Creating an Offsite payment plugin form
Just as in an Off-site redirect payment gateway, you will need to create an Offsite payment plugin form. When a payment gateway implements the OffsitePaymentGatewayInterface interface, this plugin form is embedded into the Payment process checkout pane. To implement this form, you will need to:
- Extend the base off-site payment form.
- Add your payment form to your payment gateway plugin annotation.
- Implement the
buildConfigurationForm()method for your payment form.
1. Extend the base off-site payment form
Your plugin form should extend PaymentGatewayFormBase, like this:
<?php

namespace Drupal\my_custom_gateway\PluginForm;

use Drupal\commerce_payment\Exception\PaymentGatewayException;
use Drupal\commerce_payment\PluginForm\PaymentOffsiteForm as BasePaymentOffsiteForm;
use Drupal\Core\Form\FormStateInterface;

class MyCustomPaymentForm extends BasePaymentOffsiteForm {

  /**
   * {@inheritdoc}
   */
  public function buildConfigurationForm(array $form, FormStateInterface $form_state) {
    $form = parent::buildConfigurationForm($form, $form_state);

     ... your custom code here ...

  }

}
The base form's buildConfigurationForm() method checks that the required $form['#return_url'] and $form['#cancel_url'] values are present, which you may need to include in the data passed to your iFrame JavaScript.
2. Add your payment form to the gateway plugin annotation
In the @CommercePaymentGateway annotation at the start of your off-site payment gateway plugin, you need to specify the class for your custom offsite-payment plugin form:
 *    forms = {
 *     "offsite-payment" = "Drupal\my_custom_gateway\PluginForm\MyCustomPaymentForm",
 *   },
3. Implement the `buildConfigurationForm()` method
We only need to implement one method, buildConfigurationForm(), for the payment form plugin class. This method is responsible for building the array of data needed for the embedded iFrame. This data may come from multiple sources such as:
- your custom payment gateway configuration
- the payment entity
- the order and its billing profile
- form data (the return and cancel url values)
For example:
/** @var \Drupal\commerce_payment\Entity\PaymentInterface $payment */
$payment = $this->entity;

/** @var \Drupal\commerce_payment\Plugin\Commerce\PaymentGateway\OffsitePaymentGatewayInterface $payment_gateway_plugin */
$payment_gateway_plugin = $payment->getPaymentGateway()->getPlugin();
$configuration = $payment_gateway_plugin->getConfiguration();

// Payment gateway configuration data.
$data['version'] = 'v10';
$data['merchant_id'] = $configuration['merchant_id'];
$data['agreement_id'] = $configuration['agreement_id'];
$data['language'] = $configuration['language'];

// Payment data.
$data['currency'] = $payment->getAmount()->getCurrencyCode();
$data['total'] = $payment->getAmount()->getNumber();
$data['variables[payment_gateway]'] = $payment->getPaymentGatewayId();
$data['variables[order]'] = $payment->getOrderId();

// Order and billing address.
$order = $payment->getOrder();
$billing_address = $order->getBillingProfile()->get('address');
$data['name'] = $billing_address->getGivenName() . ' ' . $billing_address->getFamilyName();
$data['city'] = $billing_address->getLocality();
$data['state'] = $billing_address->getAdministrativeArea();

// Form url values.
$data['continueurl'] = $form['#return_url'];
$data['cancelurl'] = $form['#cancel_url'];
Once we've computed all the necessary data items, we'll attach them to the form using drupalSettings. Then, using drupalSettings, we will retrieve the data in our JavaScript file and use it to initialize the iFrame.
// Optionally use serialization and/or hashing for your data,
// if specified by your payment provider's API. For example:
$data = json_encode($data);

$form['#attached']['library'][] = 'my_payment_gateway/iframe_file_name';
$form['#attached']['drupalSettings']['my_custom_module'] = $data;
Your buildConfigurationForm() method should also build whatever form you want your customers to see. This may include form elements such as a message, submit button, and cancel button. If you are unfamiliar with building forms in Drupal 8, the Drupal 8 Form API reference may be helpful.
Implementing the iFrame JavaScript
Your custom JavaScript file should be created within the js directory of your custom module. You'll also need to create a libraries YAML file named my_custom_gateway.libraries.yml to include your JavaScript and its dependencies. For example, if your JavaScript file name is my_custom_gateway.checkout.js, then include it in your module's libraries like this:
checkout:
  version: VERSION
  js:
    js/my_custom_gateway.checkout.js: {}
  dependencies:
    - core/jquery
    - core/jquery.once
    - core/drupal
    - core/drupalSettings
If your payment provider provides additional required libraries, you should also include those here.
Next, we'll create our JavaScript file, my_custom_gateway.checkout.js and add the necessary code for iFrame initialization.
First, using drupalSettings we retrieve the data that was attached to the form in buildConfigurationForm(), as described above. After that, your implementation will vary based on your payment provider's API specifications. For example implementations, you might want to look at the Cashpresso or Rave Drupal Commerce payment gateway modules, both of which use the Off-site (iFrame) method.
(function ($, Drupal, drupalSettings) {
  'use strict';

  Drupal.behaviors.offsiteForm = {
            attach: function (context) {
            var data = drupalSettings.my_custom_module;
            // Your custom JavaScript code
        }


  };

}(jQuery, Drupal, drupalSettings));
Return from payment provider
After a customer provides his payment details to the payment provider for your off-site gateway, the payment provider redirects the customer back to your site. If the customer declines to provide his payment details and cancels the payment at the payment provider, he will be redirected back to the cancel url. Otherwise, he will be redirected back to the return url so that you can validate that the payment actually succeeded and create the Drupal Commerce payment for the customer's order.
Off-site payment gateways implement the OffsitePaymentGatewayInterface, which defines the methods used to handle the return from the payment provider: onCancel(), and onReturn(). This documentation page describes how to implement these methods, which is just one aspect of creating an off-site payment gateway. See the Off-site payment gateways documentation for a full overview.
Note that if your payment provider supports asynchronous notifications (IPNs), then creating the payment in onNotify() is preferred, since it is guaranteed to be called even if the customer does not return to the site. Also, some off-site payment gateways do not need to implement the onReturn() method at all. Instead, they just handle payment creation and processing in the onNotify() method. See the Handling an IPN documentation for more information.
Handling payment cancellation
The onCancel method allows the payment gateway to clean up any data added to the order and set a message for the customer. It can be invoked during checkout if the customer chooses the Go back link instead of the Proceed to payment gateway link. For payments cancelled at the payment provider, you will need to provide the url for the checkout endpoint. Typically, this information is provided in the api request. For example, the Ingenico payment gateway includes this statement while building the api request in the buildConfigurationForm method of its off-site plugin form:
$ecommercePaymentRequest->setCancelurl($form['#cancel_url']);
$ecommercePaymentRequest->setBackurl($form['#cancel_url']);
For many payment gateways, the default implementation of the onCancel method that's provided by the off-site payment gateway base class is sufficient. It simply displays a message to the customer:
public function onCancel(OrderInterface $order, Request $request) {
  $this->messenger()->addMessage($this->t('You have canceled checkout at @gateway but may resume the checkout process here when you are ready.', [
    '@gateway' => $this->getDisplayLabel(),
  ]));
}
Payment gateways should not create payment entities for canceled payments.
Handling payment submission
When the user returns from the payment provider, we need to validate that the payment actually succeeded. Just as in payment cancellation processing, you will typically provide the url for the return request in the buildConfigurationForm method of the off-site plugin form. Actual implementations will vary based on the payment gateway api.
Example
This is example code from the Ingenico payment gateway module:
$ecommercePaymentRequest->setAccepturl($form['#return_url']);
$ecommercePaymentRequest->setDeclineurl($form['#return_url']);
$ecommercePaymentRequest->setExceptionurl($form['#return_url']);
This return url endpoint will be routed to the onReturn() method in the off-site payment gateway plugin class:
public function onReturn(OrderInterface $order, Request $request);
This method is responsible for: * performing verifications, throwing exceptions as needed * creating and saving information to the Drupal Commerce payment for the order
Typically, you will also want to log the information returned by the provider. See How to Log Messages in Drupal 8 for more information.
This method should only be concerned with creating/completing payments. The parent order does not need to be touched. It is only provided as a parameter so that information from the order can be used and so that the newly created payment can be added to the order. The order state is updated automatically when the order is paid in full, or manually by the merchant (via the admin UI).
Performing verifications
If the payment fails for any reason, the method should throw a PaymentGatewayException. This will reset the payment.
Before you even begin processing the request, you should first verify that it is actually a legitmate request from the payment provider. For an overview and examples of how this is handled by several actual payment gateway modules, read the Security considerations documentation.
Next, you can perform additional verification steps, specific to your payment gateway api. For example, the Rave payment gateway requires verification that the order amount matches the charged amount:
$logger = \Drupal::logger('commerce_rave');
$chargedAmount = $transactionData['charged_amount'];
$orderAmount = $order->getTotalPrice()->getNumber();
if ($orderAmount != $chargedAmount) {
  $logger->warning('Charged Amount is: ' . $chargedAmount . ' while Order Amount: ' . $orderAmount);
  throw new PaymentGatewayException('Charged amount not equal to order amount.');
}
Creating and saving the payment
Example
If the payment was successful, the method should create a payment and store it. Here is an example from the Rave payment gateway:
$payment_storage = $this->entityTypeManager->getStorage('commerce_payment');
$payment = $payment_storage->create([
'state' => 'authorization',
'amount' => $order->getTotalPrice(),
'payment_gateway' => $this->parentEntity->id(),
'order_id' => $order->id(),
'remote_id' => $transactionData['flw_ref'],
'remote_state' => $transactionData['status'],
]);

$logger->info('Saving Payment information. Transaction reference: ' . $merchantTransactionReference);

$payment->save();
drupal_set_message('Payment was processed');

$logger->info('Payment information saved successfully. Transaction reference: ' . $merchantTransactionReference);
The payment provider you are integrating with might have different ways to complete a payment. For example, in the example above, the payment state was set to authorization. For other payment gateways, you may want to set the state to completed.
If the payment is declined, the payment gateway should not create a payment entity. The only time a declined payment should be created is if the payment gateway utilizes async payments – like ACH or authorizations which take 24 hours to clear. Payment entities should be created only if the payment is successful or pending.
Handling an IPN
Many payment providers use notifications, generally described as "IPNs", "endpoints", or "webhooks", to submit information asynchronously to the payment gateways that support them. Payment providers may inform a Drupal Commerce site that a new pending/complete payment should be created (if the payment happened off-site), or they may provide information about an existing payment (refunds, disputes, etc).
The Drupal Commerce Payment module handles these notifications by:
1. Providing a URL that can be used by the payment provider to send the information.
2. Providing a route and controller, the PaymentNotificationController, that will pass the received information on to a payment gateway that can process it.
If your payment gateway module needs to handle IPNs, it can do so by implementing the SupportsNotificationsInterface. This interface defines the onNotify() method, which is the method called by the PaymentNotificationController:
/**
 * Processes the notification request.
 *
 * @param \Symfony\Component\HttpFoundation\Request $request
 *   The request.
 *
 * @return \Symfony\Component\HttpFoundation\Response|null
 *   The response, or NULL to return an empty HTTP 200 response.
 */
public function onNotify(Request $request);
What does the onNotify() method do?
The onNotify() method processes the notification request. It can create new payments or update existing payments. Typically, it will update the state of a payment based on the information in the request. If the state is set to completed, the amount of the payment will be included in the "total paid amount" for the order. The onNotify() method does not need to (and should not) touch the parent order. When the payment is saved in the onNotify() method, the total paid amount for the order will be automatically updated, based on all payments associated with the order.
If the payment is declined, the payment gateway should not create a payment entity. The only time a declined payment should be created is if the payment gateway utilizes async payments – like ACH or authorizations which take 24 hours to clear. Payment entities should be created only if the payment is successful or pending.
You may also want to log the request or other message, especially if the request was invalid.
The onNotify() method should return a Symfony Response or NULL to return an empty HTTP 200 response.
Off-site payment gateways and IPNs
All off-site payment gateways implement the SupportsNotificationsInterface interface. Generally, off-site payment gateways will create payments in the onReturn() method. However, if the payment provider supports IPNs, then creating the payment in onNotify() rather than in onReturn() is preferred, since it is guaranteed to be called even if the customer does not return to the site.
Examples of IPN handling by actual off-site payment gateways
[PayPlug payment gateway]
The PayPlug payment gateway module has a straightforward implementation of the onNotify() method, which is used to create the payment. First, the Request is validated, using a library provided by PayPlug:
$notification = $request->getContent();
Payplug::setSecretKey($this->api_key);
$resource = \Payplug\Notification::treat($notification, $authentication = null);
If validation fails, it returns a JsonResponse with the exception thrown by the PayPlug Notification::treat() method:
return new JsonResponse($exception->getMessage(), $exception->getCode());
Otherwise, it uses the returned PayPlug resource value to create a new payment for the order and returns an empty (success) Response:
$metadata = $resource->metadata;
$payment_storage = $this->entityTypeManager->getStorage('commerce_payment');
$payment = $payment_storage->create([
  'state' => 'authorization',
  'amount' => new Price($resource->amount / 100, $resource->currency),
  'payment_gateway' => $this->entityId,
  'order_id' => $metadata['order_id'],
  'test' => $this->getMode() == 'test',
  'remote_id' => $resource->id,
  'remote_state' => empty($resource->failure) ? 'paid' : $resource->failure->code,
  'authorized' => $this->time->getRequestTime(),
]);
$payment->save();

return new JsonResponse();
[Ingenico payment gateway]
The Ingenico payment gateway is an example of an off-site payment gateway that creates the payment before the plugin form performs the redirect. So the payment is created in neither onReturn() nor onNotify(). The Drupal Commerce payment ID is provided to the payment provider so that the existing payment can be loaded in onReturn() and onNotify():
$payment = $this->entityTypeManager->getStorage('commerce_payment')->load($request->query->get('PAYMENT_ID'));
In both methods, every request is logged before any processing happens:
// Log the response message if request logging is enabled.
if (!empty($this->configuration['api_logging']['response'])) {
  \Drupal::logger('commerce_ingenico')
    ->debug('e-Commerce notification: <pre>@body</pre>', [
      '@body' => var_export($request->query->all(), TRUE),
    ]);
}
Next, the response is verified using SHA signature/passphrase validation, as described in the Security considerations documentation. If the response received from the payment provider is invalid or unsuccessful, the payment state is set to failed and an exception is thrown.
$payment->set('state', 'failed');
$payment->save();
throw new InvalidResponseException($this->t('The gateway response looks suspicious.'));
Finally, if the request is valid, the onNotify() method updates the payment state:
// Let's also update payment state here - it's safer doing it from received
// asynchronous notification rather than from the redirect back from the
// off-site redirect.
$state = $request->query->get('STATUS') == PaymentResponse::STATUS_AUTHORISED ? 'authorization' : 'completed';
$payment->set('state', $state);
$payment->save();
onNotify() method; the onReturn() method does not change a payment's state.
[PayPal: Express checkout payment gateway]
The PayPal: Express payment gateway creates payments in its onReturn() method with a remote_id value that can be used by onNotify() (and other methods) to load the payment, using the loadByRemoteId() Payment storage method. Its onNotify() method handles updates to the payment amount and state as well as refunds. Here is the portion of its onNotify() method that handles refunds using the IPN data:
elseif ($ipn_data['payment_status'] == 'Refunded') {
  // Get the corresponding parent transaction and refund it.
  $payment = $payment_storage->loadByRemoteId($ipn_data['txn_id']);
  if (!$payment) {
    $this->logger->warning('IPN for Order @order_number ignored: the transaction to be refunded does not exist.', ['@order_number' => $ipn_data['invoice']]);
    return FALSE;
  }
  elseif ($payment->getState() == 'refunded') {
    $this->logger->warning('IPN for Order @order_number ignored: the transaction is already refunded.', ['@order_number' => $ipn_data['invoice']]);
    return FALSE;
  }
  $amount = new Price((string) $ipn_data['mc_gross'], $ipn_data['mc_currency']);
  // Check if the Refund is partial or full.
  $old_refunded_amount = $payment->getRefundedAmount();
  $new_refunded_amount = $old_refunded_amount->add($amount);
  if ($new_refunded_amount->lessThan($payment->getAmount())) {
    $payment->setState('partially_refunded');
  }
  else {
    $payment->setState('refunded');
  }
  $payment->setRefundedAmount($new_refunded_amount);
}
onNotify() method is to extract that URL from the request and use it to send a request back to PayPal to validate the IPN. In the Commerce PayPal module, this functionality is included in an IPNHandler service:
// Make PayPal request for IPN validation.
$url = $this->getIpnValidationUrl($ipn_data);
$validate_ipn = 'cmd=_notify-validate&' . $request->getContent();
$request = $this->httpClient->post($url, [
  'body' => $validate_ipn,
])->getBody();
$paypal_response = $this->getRequestDataArray($request->getContents());

// If the IPN was invalid, log a message and exit.
if (isset($paypal_response['INVALID'])) {
  $this->logger->alert('Invalid IPN received and ignored.');
  throw new BadRequestHttpException('Invalid IPN received and ignored.');
}

return $ipn_data;
See the Security considerations documentation for additional information on how PayPal uses token-based validation for requests sent to the payment gateway.
Configuring the notification URL for your payment gateway
By default, your Drupal Commerce site can accept payment gateway requests at /payment/notify/PAYMENT_GATEWAY_ID, where PAYMENT_GATEWAY_ID is the id defined by the payment gateway unique machine name defined when configuring the Payment Gateway. For example, PayPal: Express checkout accepts notifications at /payment/notify/paypal_express_checkout. You will need to read the documentation for your specific payment gateway to figure how to enable IPN/notification messages and how to configure the URL.
If you would like to alter the URL for notifications, you can implement a Route Subscriber for the commerce_payment.notify route.
Security considerations
Off-site payment gateways are potentially vulnerable to malicious attacks because they accept requests from external sources. The onReturn(), onNotify() andonCancel() methods all accept a [Request] which should come from the payment gateway. Unfortunately, it's not possible for Drupal Commerce to automatically apply CSRF protections that will work for all types of Off-site payment gateways. So as an Off-site payment gateway developer, it's your responsibility to read and understand the integration documentation and implement protections specific to your gateway. By properly implementing the gateway's CSRF protections, you ensure that the Request actually does come from the gateway and not some malicious source.
In this document, we've included a few examples of Request validation implementations used by actual Drupal Commerce Off-site payment gateways.
PayPal: Express checkout payment gateway (an example of token-based validation)
PayPal: Express Checkout is an Off-site redirect payment gateway. Its API documentation describes how the [GetExpressCheckoutDetails] method can be used to validate the token for an order. Let's look at how that implemented within the Commerce PayPal module.
When the checkout redirect form is built and a request is sent to PayPal, a timestamped TOKEN value is returned by PayPal and stored with the order data:
$paypal_response = $payment_gateway_plugin->setExpressCheckout($payment, $extra);

// If we didn't get a TOKEN back from PayPal, then the
// $paypal_response['ACK'] == 'Failure', we need to exit checkout.
if (empty($paypal_response['TOKEN'])) {
  throw new PaymentGatewayException(sprintf('[PayPal error #%s]: %s', $paypal_response['L_ERRORCODE0'], $paypal_response['L_LONGMESSAGE0']));
}

$order = $payment->getOrder();
$order->setData('paypal_express_checkout', [
  'flow' => 'ec',
  'token' => $paypal_response['TOKEN'],
  'payerid' => FALSE,
  'capture' => $extra['capture'],
]);
$order->save();
Then in the onReturn() method, the TOKEN is retrieved from the order and sent with the GetExpressCheckoutDetails()request. PayPal validates the TOKEN. The Request that was received is never actually used; instead, the request from PayPal simply serves to notify the Express checkout payment gateway that it should request updated information about the payment using PayPal's GetExpressCheckoutDetails API operation. So if the Request that was received came from some other source, its contents are safely ignored.
$order_express_checkout_data = $order->getData('paypal_express_checkout');
if (empty($order_express_checkout_data['token'])) {
  throw new PaymentGatewayException('Token data missing for this PayPal Express Checkout transaction.');
}

// GetExpressCheckoutDetails API Operation (NVP).
// Shows information about an Express Checkout transaction.
$paypal_response = $this->getExpressCheckoutDetails($order);

// If the request failed, exit now with a failure message.
if ($paypal_response['ACK'] == 'Failure') {
  throw new PaymentGatewayException($paypal_response['PAYMENTREQUESTINFO_0_LONGMESSAGE'], $paypal_response['PAYMENTREQUESTINFO_n_ERRORCODE']);
}
The validation procedure used by the onNotify() method is slightly different in that the Request from PayPal (or some other source) is processed. Essentially, though, the concept is the same: when a Request is received by the onNotify() method, the Express checkout payment gateway responds back to PayPal with information to be used by PayPal for IPN validation. Once verified, PayPal will respond with the actual IPN request data which can then be safely processed by the onNotify() method. For more information, see the Handling an IPN documentation.
Ingenico payment gateway (an example of SHA signature/passphrase validation)
Ingenico uses a "SHA-IN" to validate incoming requests POSTed to their offsite. And then a "SHA-OUT" to validate the final redirect. In the Redirection with database update section of the Ingenico Integration Guide, they describe the security requirements for verifying the contents of requests:
The redirection is done via the customer’s browser, which makes it visible. Therefore, you must use an SHA-OUT signature to verify the contents of the request and prevent customers tampering with the data in the URL field, which could result in fraudulent database updates.
If you don't configure a SHA-OUT signature, we won't send any parameters on your redirection URLs.
The string to hash is constructed by concatenating the values of the fields sent with the order (sorted alphabetically, in the format ‘parameter=value’), followed by a passphrase. The passphrase is defined in the Transaction feedback tab of your Technical information page, “All transaction Submission modes” section.
In the commerce_ingencio module, this validation is implemented in a processFeedback() method that's used by both the onReturn() and onNotify() methods to process the Request:
$ecommercePaymentResponse = new EcommercePaymentResponse($request->query->all());

// Validate response's SHASign.
$passphrase = new Passphrase($this->configuration['sha_out']);
$sha_algorithm = new HashAlgorithm($this->configuration['sha_algorithm']);
$shaComposer = new AllParametersShaComposer($passphrase, $sha_algorithm);
if (!$ecommercePaymentResponse->isValid($shaComposer)) {
  $payment->set('state', 'failed');
  $payment->save();
  throw new InvalidResponseException($this->t('The gateway response looks suspicious.'));
}
CCAvenue payment gateway (an example of encryption/decryption validation)
When a request is sent to CCAvenue, it is encrypted using a Working Key. The working key is an API key generated by CCAvenue that is set as part of the payment gateway configuration.
When the checkout redirect form is built, that working key is encrypted and sent to CCAvenue along with the rest of the data from the merchant.
That same Working Key is used in the onRedirect() method to decrypt the response received from CCAvenue:
    $encResponse = $request->get('encResp');
    $decrypt = new CCAvenueEncryption();
    $rcvdString = $decrypt->decrypt($encResponse, $this->configuration['working_key']);
    $decryptValues = explode('&', $rcvdString);
    $dataSize = sizeof($decryptValues);

    for ($i = 0; $i < $dataSize; $i++) {
      $information = explode('=', $decryptValues[$i]);
      if ($i == 3)
        $order_status = $information[1];
    }
If the request received by the onReturn() method is successfully decrypted, the order_status value should be one of Success, Aborted, or Failure. Otherwise, the request is invalid and should not be processed.
    switch ($order_status) {
....
      default:
        drupal_set_message($this->t('Security Error. Illegal access detected.'), 'error');
        break;
    }
Links and Resources
Manual payment gateways
We need help filling out this section! Feel free to follow the edit this page link and contribute.