Product Management
Learn techniques for designing and customizing the product management experience for your administrative users.
Access control
In Drupal Commerce, access control for product management is based on Drupal's permissions system. If you are unfamiliar with the concept of Permissions in Drupal, you can read about Users, Roles, and Permissions in the Drupal 8 User Guide. Managing user roles & permission in Drupal 8 is also a good introductory article on the topic.
Administrative users with product management responsibilities will need the Use the commerce administration pages permission as well as any relevant Commerce Product permissions. Here is a list of Commerce Product permissions, as displayed on the User Permissions page (/admin/people/permissions).
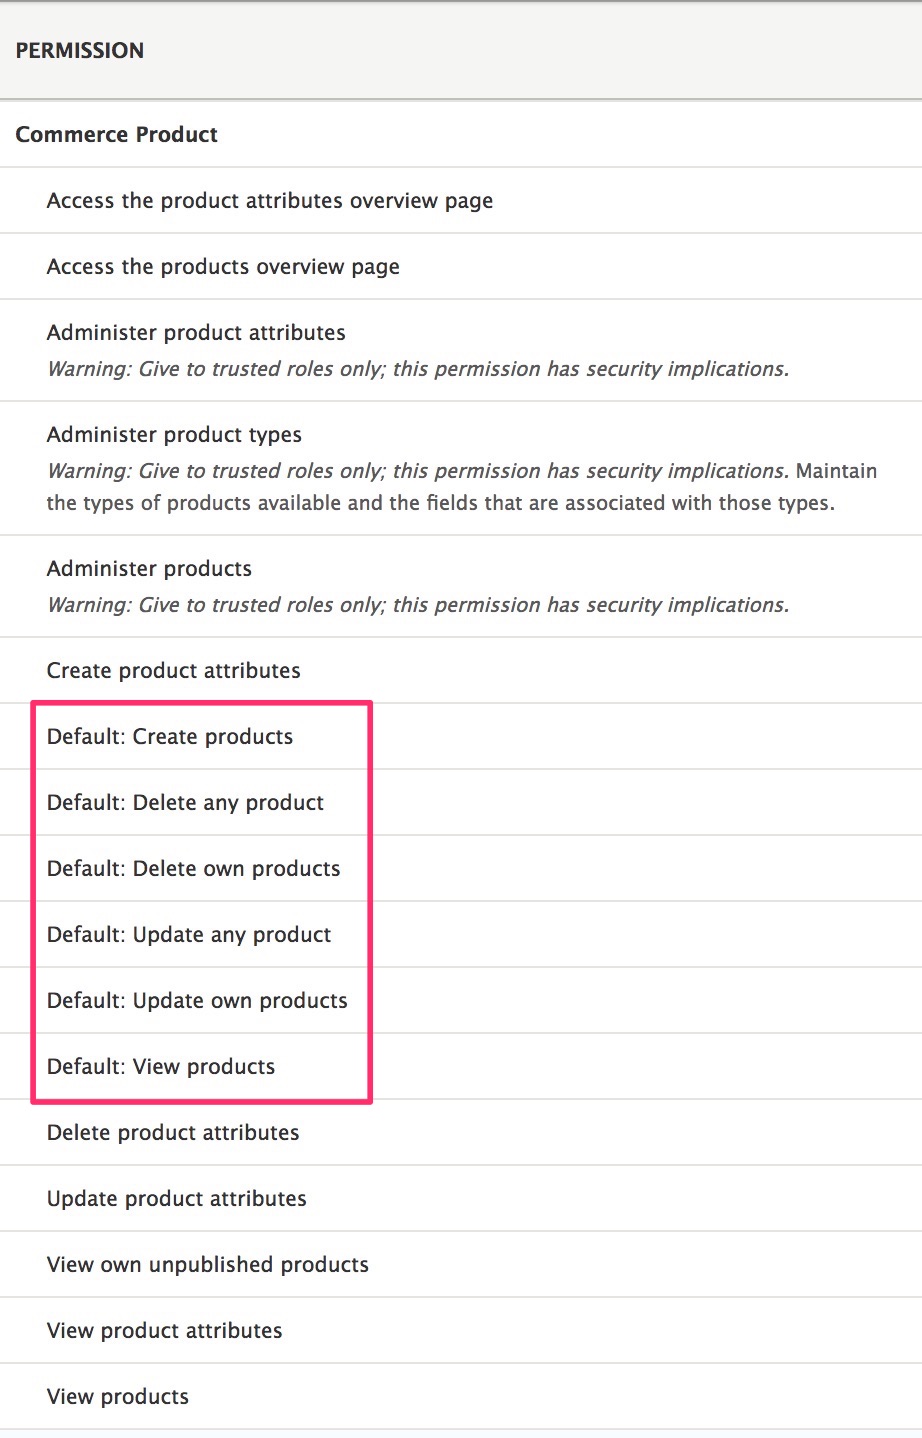
In the above image, six permissions prefixed with Default: have been highlighted. Drupal Commerce provides bundle-level granularity for its Product permissions. In other words, each product type has its own set of create / delete / update / view permissions. So it's possible to have different product managers for different product types.
All users with product management responsibilties will also need the Access the product overview page permission so that they can access the Products page at /admin/commerce/products.
Additionally, since every product must be assigned to one or more stores, users will not be able to create products unless they have the View stores permission. Granting this permission will not give users access to the store admin pages.
In the next section, we'll look at how you can customize the forms used for creating and editing product-related data.
Editing products
This section describes how you can customize the forms used to enter product data in Drupal Commerce. The forms that are used to edit product and product variation types can be configured uniquely for each of your product and variation types.
Single vs. multi-variation product types
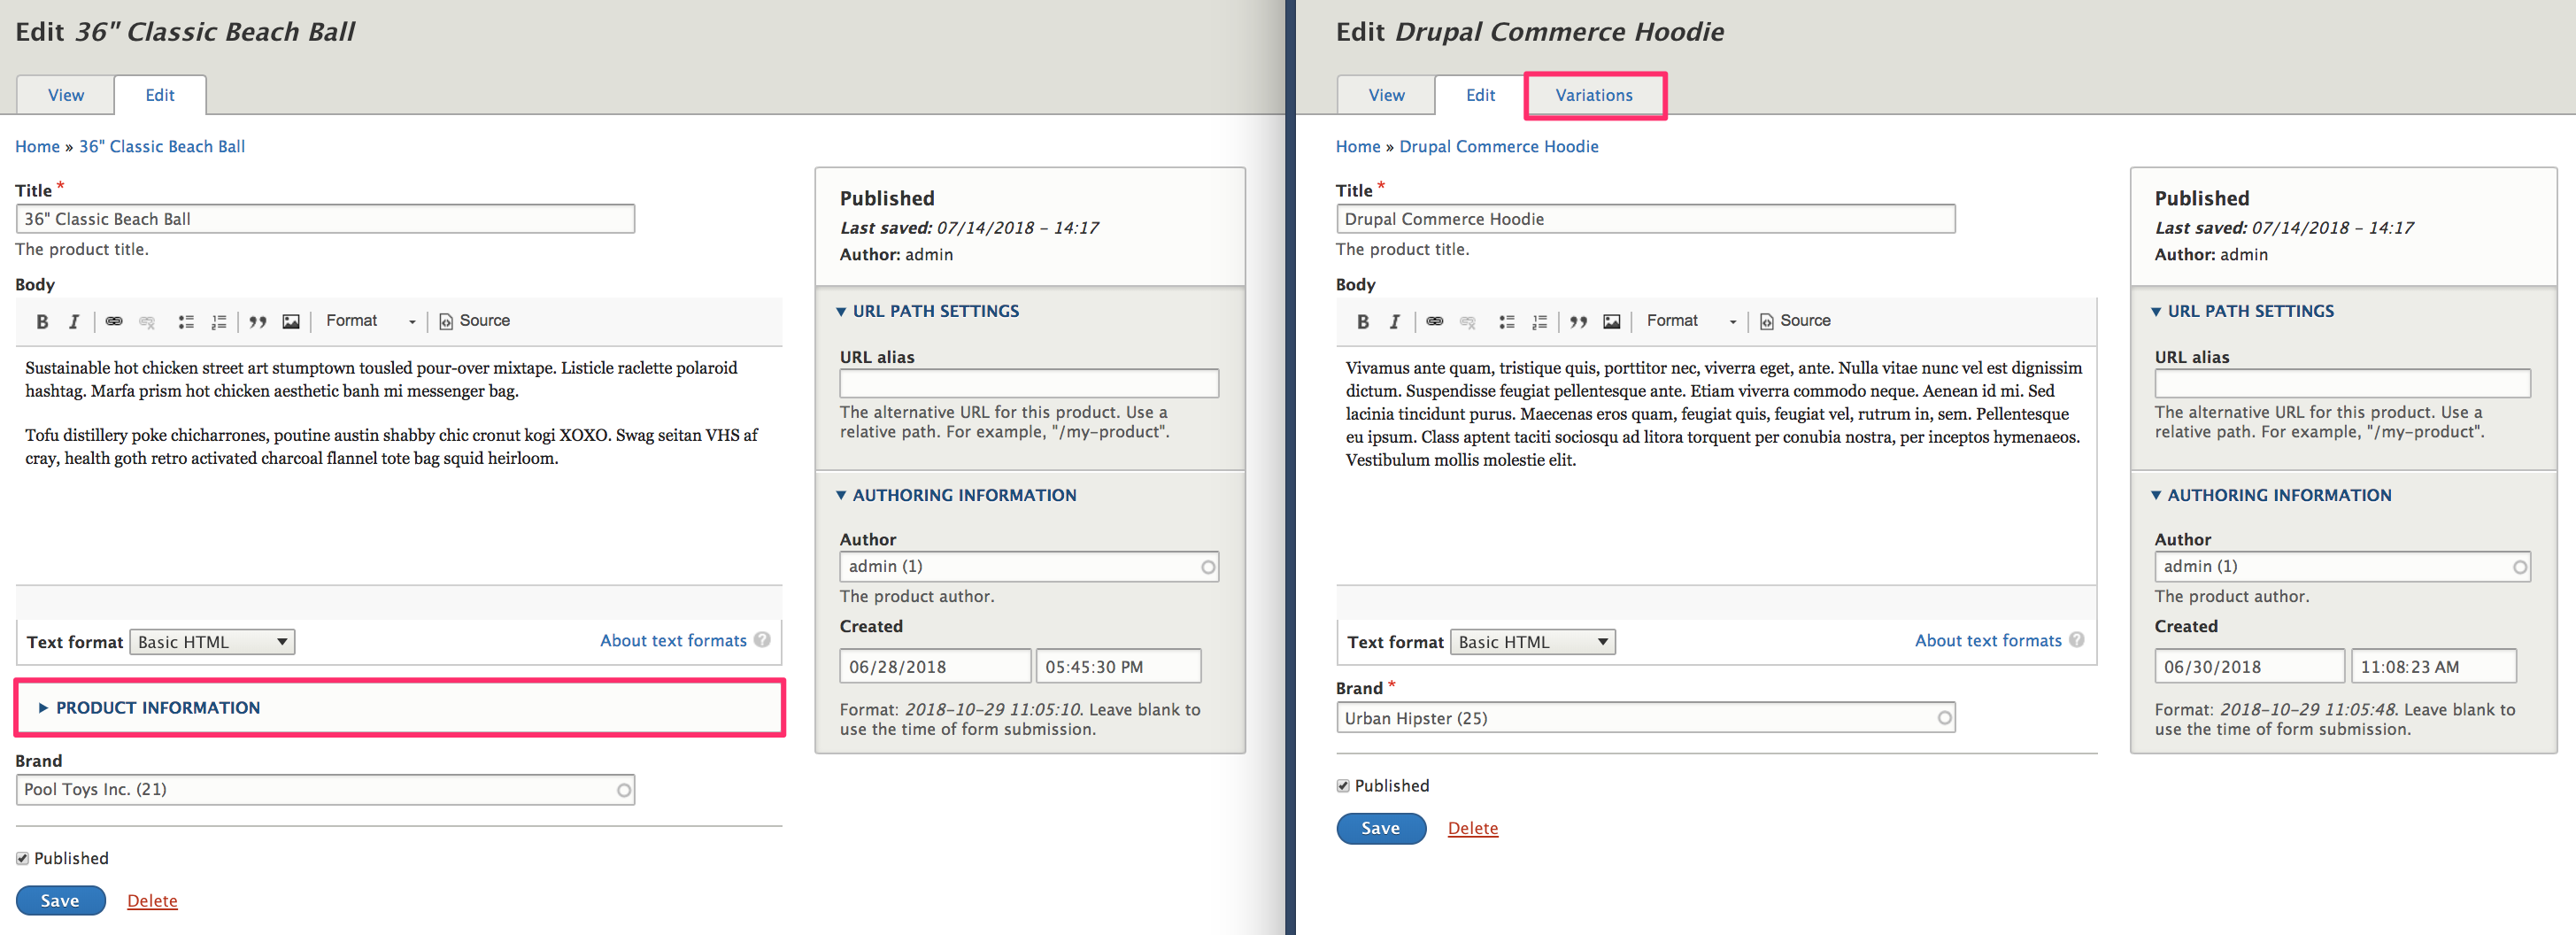
In the Product architecture documentation, we created a Simple product type that had only a single variation per product and a Clothing product type with multiple variations per product. Let's start by comparing the forms for these two product types. On the left, we have the form for the Simple product type, with a Product Information section that includes data entry fields for the single product variation. On the right, we have the form for the Clothing product type, with a Variations tab that links to a separate page for managing the product's variations. The rest of the forms is identical.
Manage the product form display
To customize the product data entry form, start by navigating to the Manage form display configuration page for your product type. For the Simple product type, that page is located at /admin/commerce/config/product-types/simple/edit/form-display. Let's look at the configuration form (on the left) alongside the product form (on the right) to better understand how they're related.
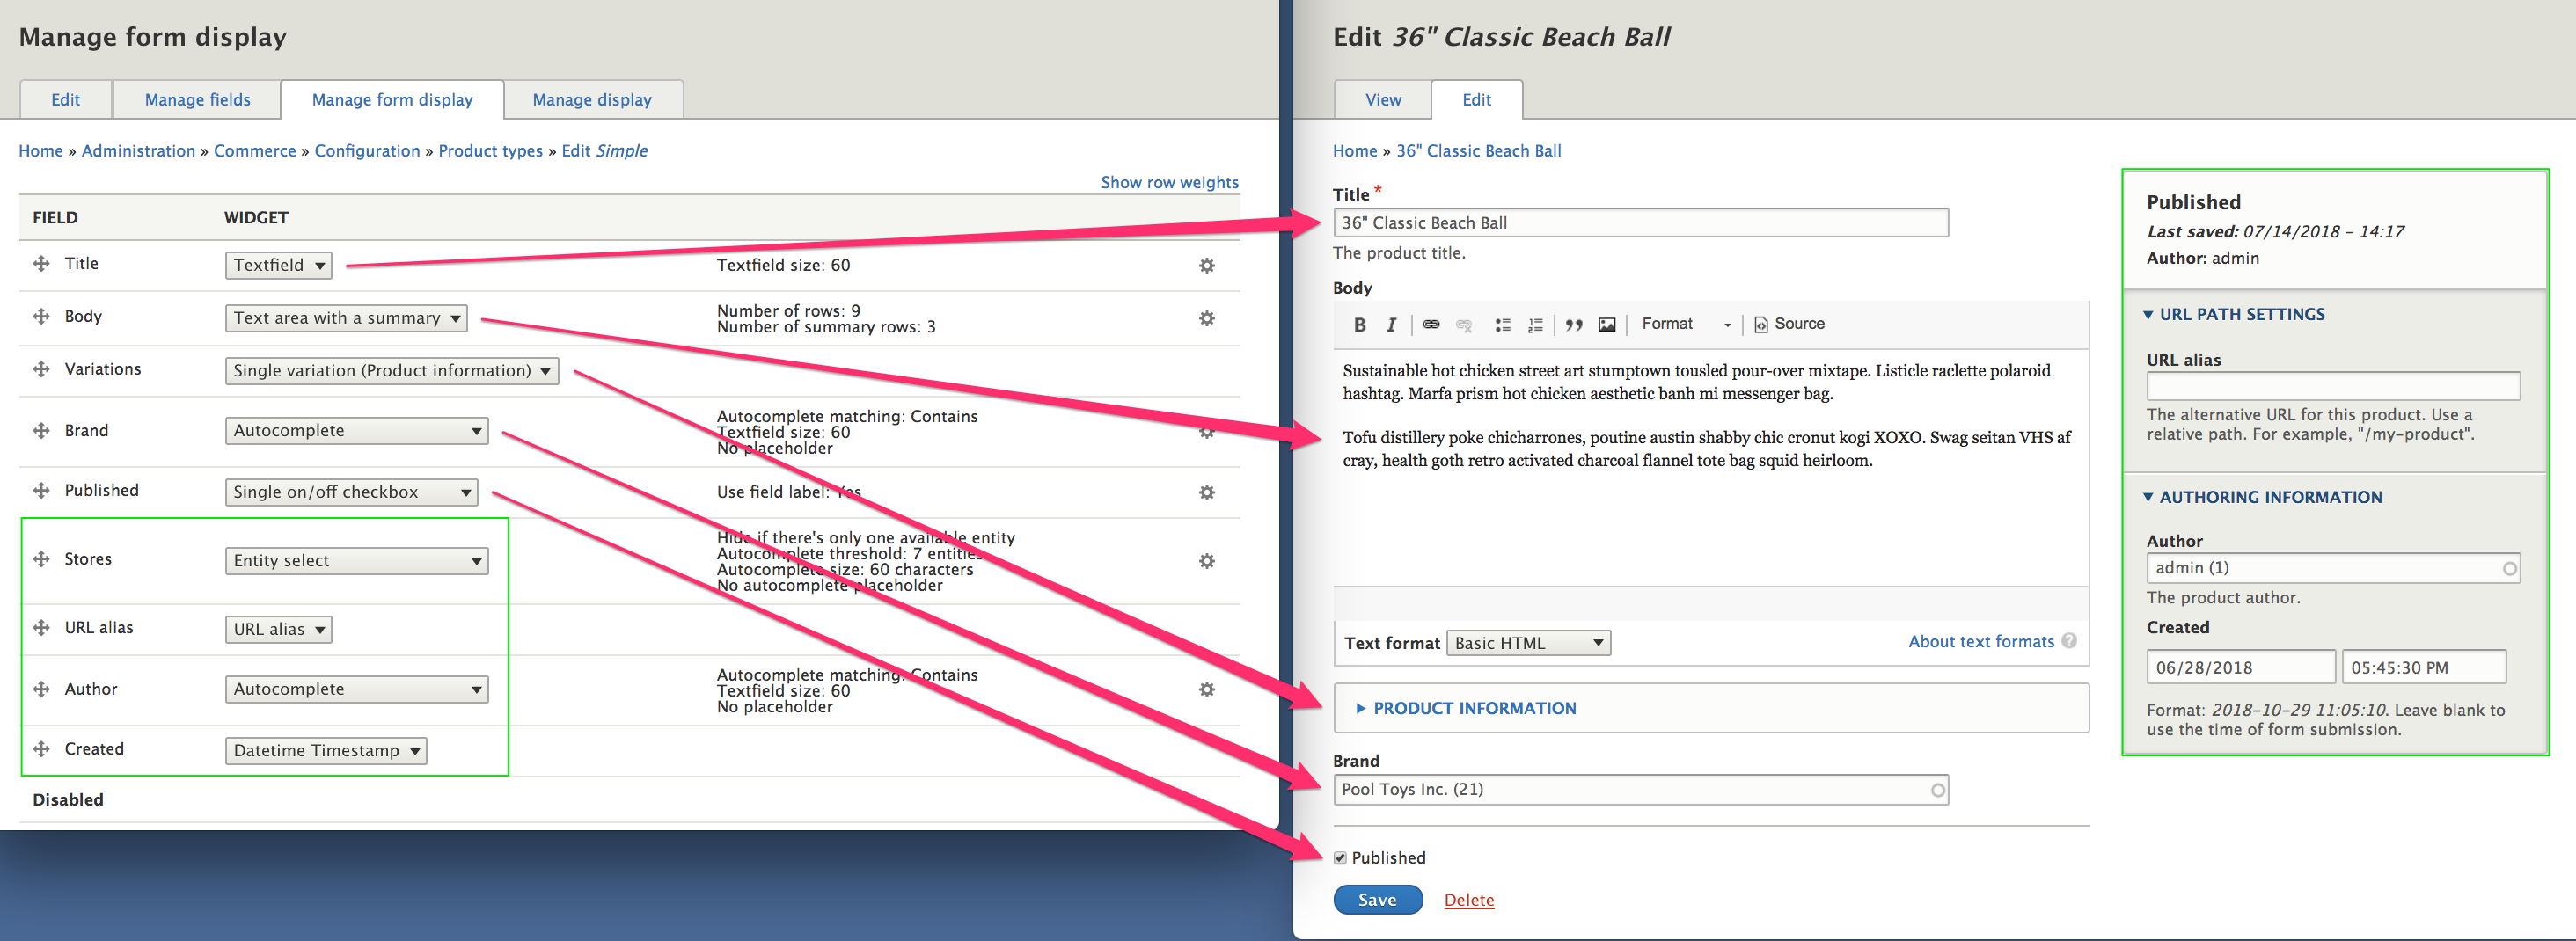
The first thing to notice is that there are four fields that do not appear in the main section of the form; the Stores, URL alias, Author, and Created fields are separated into a Sidebar section of the product field. We will look at the Sidebar section next, but for now, let's focus on the main section of the product form.
For the non-sidebar product fields, you can use a product type's Manage form display configuration page to control: - The ordering of the fields, by using the drag icon in the leftmost column or clicking the Show row weights link to manually set the order. - Whether fields are enabled (included on the form) or disabled, by dragging disabled fields to the Disabled section at the bottom of the form. - The selected widget for each field, from a list of available widgets for the field type. (For some field types, only a single widget type will be available.) - The configuration options for each widget, using the gear icon link that appears in the rightmost column.
Customizing the sidebar section of the product form
The Sidebar section of the product form, highlighted in green in the image above, is a custom administrative section that separates a set of specific product fields from the rest of the form.
Structure of the sidebar section
- Meta information (read-only)
- If the product already exists, its Published status is displayed as either Published or Not published.
- Last saved date or Not saved yet, if the product is new.
- Author (the product author)
- Visibility settings
- If you have more than one store, you can select the stores through which the product can be sold.
- URL path settings
- URL alias (link to doc page on SEO, in marketing section)
- Authoring information
- Author
- Created date and time
Stores field and the Entity select widget
The Stores field appears in the Visibility settings of the Sidebar section of the product data entry form. If you have only a single store for your site and want to hide the Visibility settings from users, use the Entity select field widget with its Hide if there's only one available entity setting enabled. Make sure you do not Disable the Stores field; it is required, and if a product isn't assigned to any store, your customers will get ugly error messages when they attempt to add the product to their cart.
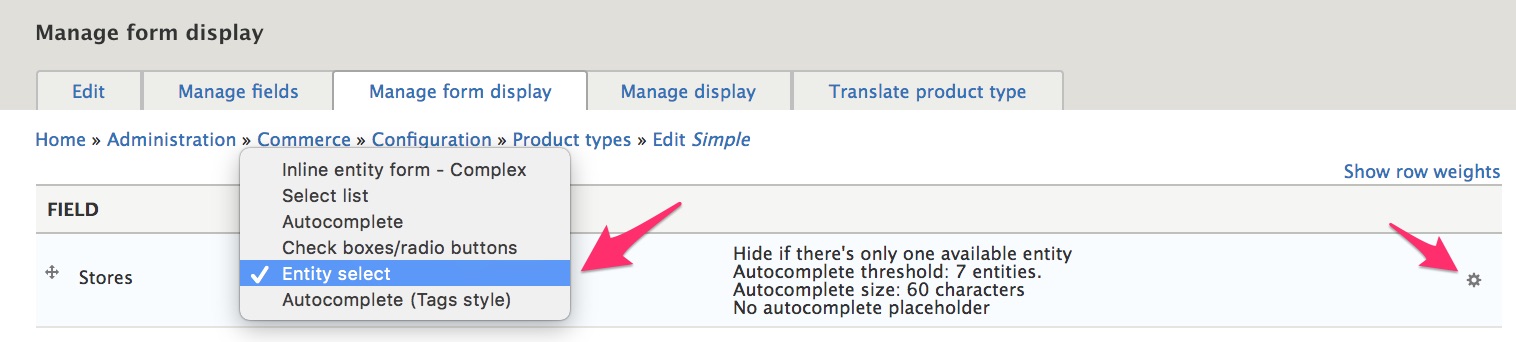
By default, Entity select is set as the widget for the Stores field. This is a custom Drupal Commerce widget that can be used by entity reference fields, like Stores. The entity select widget is an adaptive field widget that changes its form element based on the number of available options for the field. If there is only one available entity (i.e., only one available store in this case), you can enable a setting to hide the field completely. If shown, the single option will be displayed with either a checkbox or radio button. Checkboxes are used whenever multiple items can be selected; radio buttons are used when only a single item can be selected. Since products can belong to multiple stores, checkboxes will be used for the Stores field. You can also set an autocomplete threshold for the Entity select widget. If the number of option values exceeds the autocomplete threshold, then an autocomplete field will be presented to the user instead of checkboxes/radio buttons. Users can use the autocomplete field to enter text to search for the Store by name.
If you do not want to use the Entity select widget, you can select one of the other available options. However, you should avoid using the Inline entity form - Complex widget, since you will generally not want users to edit Store data when they're editing products.
To set the configuration options for your selected widget, use the gear icon link that appears in the rightmost column of the Manage form display fields table.
URL alias field
The URL alias field appears in the URL path settings of the Sidebar section of the product data entry form. If you move the URL alias to the Disabled section of the Manage form display configuration form, URL path settings will not appear on your product data entry forms. In a standard Drupal Commerce installation, there are no alternative widgets or configuration options available for this field.
Author and Created fields
The Author and Created fields appear in the Authoring information of the Sidebar section of the product data entry form. If both fields are Disabled, Authoring information will not appear on your product data entry forms.
The Author field can reference any User, including any that are customers rather than administrative users, so the list of options for Author may be quite long. As a result, you will probably want to use the Autocomplete field widget for the Author field.
In a standard Drupal Commerce installation, there are no alternative widgets or configuration options available for the Created field.
Editing the variation for single-variation product types
The Single variation (Product information) widget is used for the Variations field. Unless you've developed a custom field widget for your product variations field, you should not change the widget type for the Variations field. This widget embeds a data entry form for a product variation, as configured for the specific product variation type. In this case, we are looking at a Simple product with a Simple product variation type. To customize the data entry form for the Simple product variation, navigate to its Manage form display configuration form at /admin/commerce/config/product-variation-types/simple/edit/form-display.
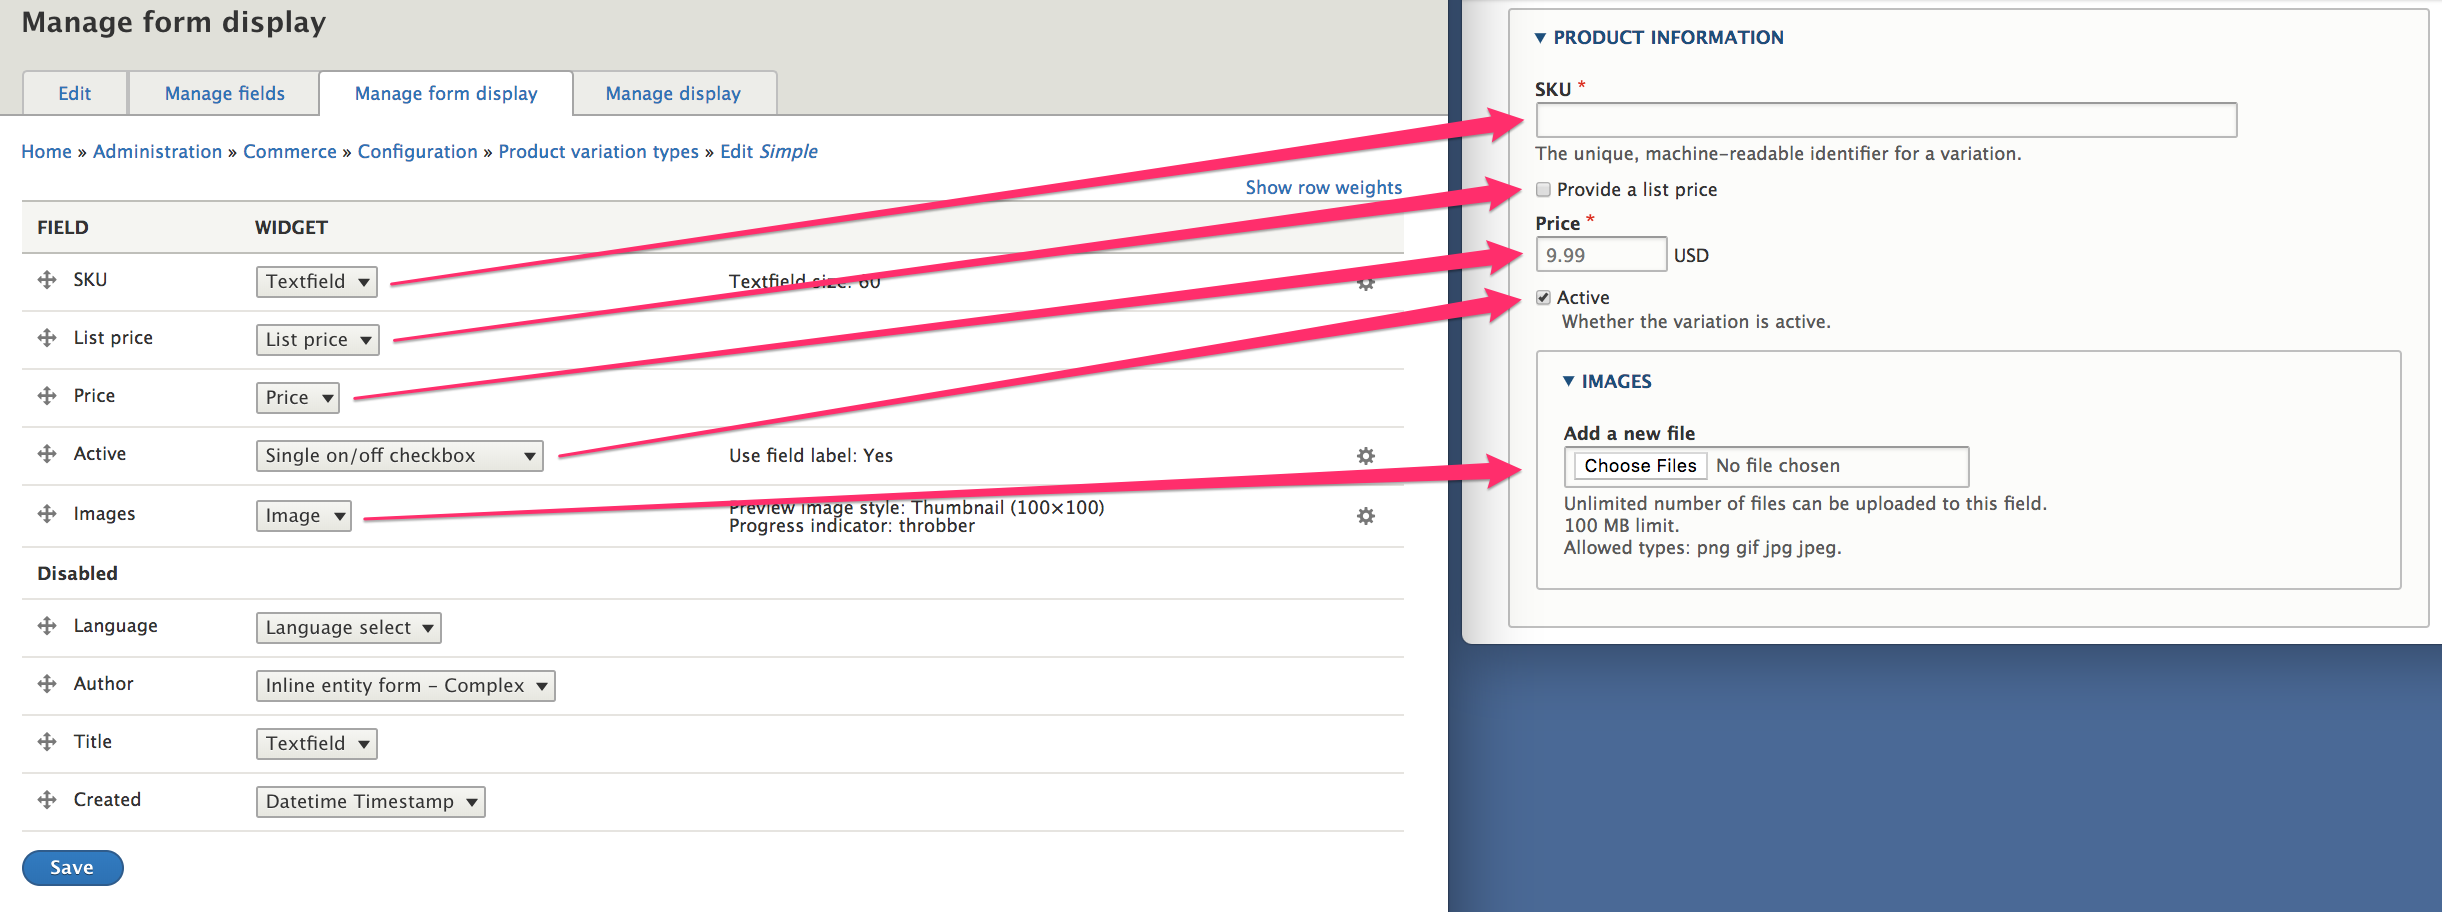
In the above image, you can see how the settings for the form display of the Simple product variation type (on the left) correspond to the Variations form that's embedded into the data entry form for the Simple product (on the right).
You can use a product variation type's Manage form display configuration form to control:
- The ordering of the product variation fields
- Whether fields are enabled (included on the form) or disabled
- The selected widget for each field
- The configuration options for each widget
Editing variations for multi-variation product types
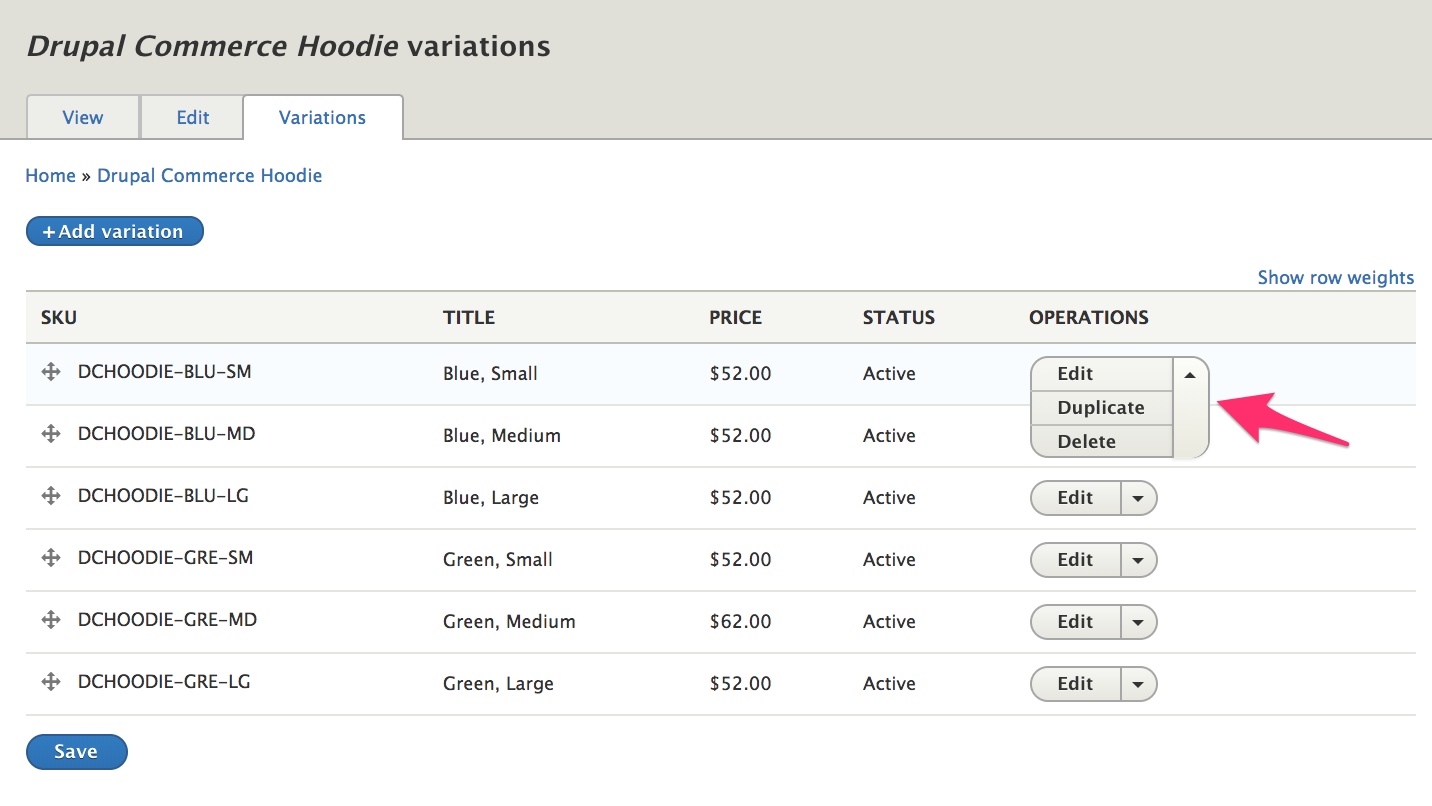
For product types that allow multiple variations per product, administrative users will see a Variations tab when editing or viewing products. Clicking on the Variations tab link takes you to another page, separate from the main product form. So you'll want to make sure administrative users understand that they need to click the Save button on a product's Edit page before navigating to its Variations page.
A product's Variations page is a draggable list of variations with operations links in the rightmost column. To customize the edit form for product variations, use the product variation type's Manage form display configuration form as described above.
Theming the product form
If you need to customize the layout for your product form beyond what is possible using the administration UI, you can use the product form Twig template as part of a custom theme. Theming is an advanced topic beyond the scope of this Drupal Commerce documentation guide. For an overview, please see the Theming Drupal Guide on Drupal.org.
The default product form template is commerce-product-form.html.twig
Also, you may want to look at the custom css library that's used for the default product form, located within the Drupal Commerce Product module: css/product.form.css.
In the next section, we'll look at customization options for the Product overview page.
Product overview page
This section describes how you can use Drupal Views to customize the Product overview page, located at /admin/commerce/products. If you are unfamiliar with using Views in Drupal, you can read about Creating Listings with Views, in the Drupal 8 User Guide.
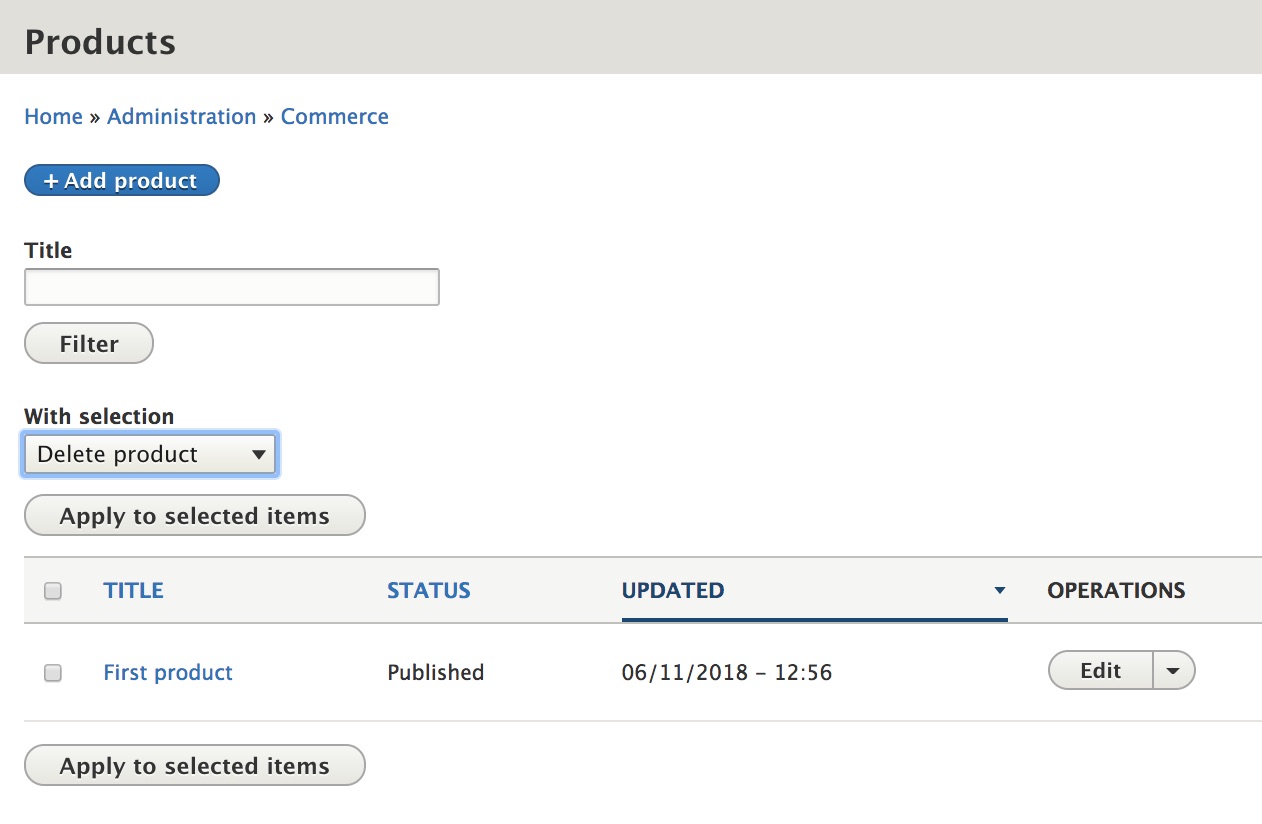
Without any customizations, administrative users can use the Product overview page to:
- Search for products by title (product name) or type (if multiple product types exist).
- Sort the listing by title, product type, published status, or last update.
- Perform delete, publish, and unpublish operations in bulk on selected products.
The functionality of this page is powered by Views. Navigate to /admin/structure/views/view/commerce_products to begin customizing the Products View using the administrative interface:
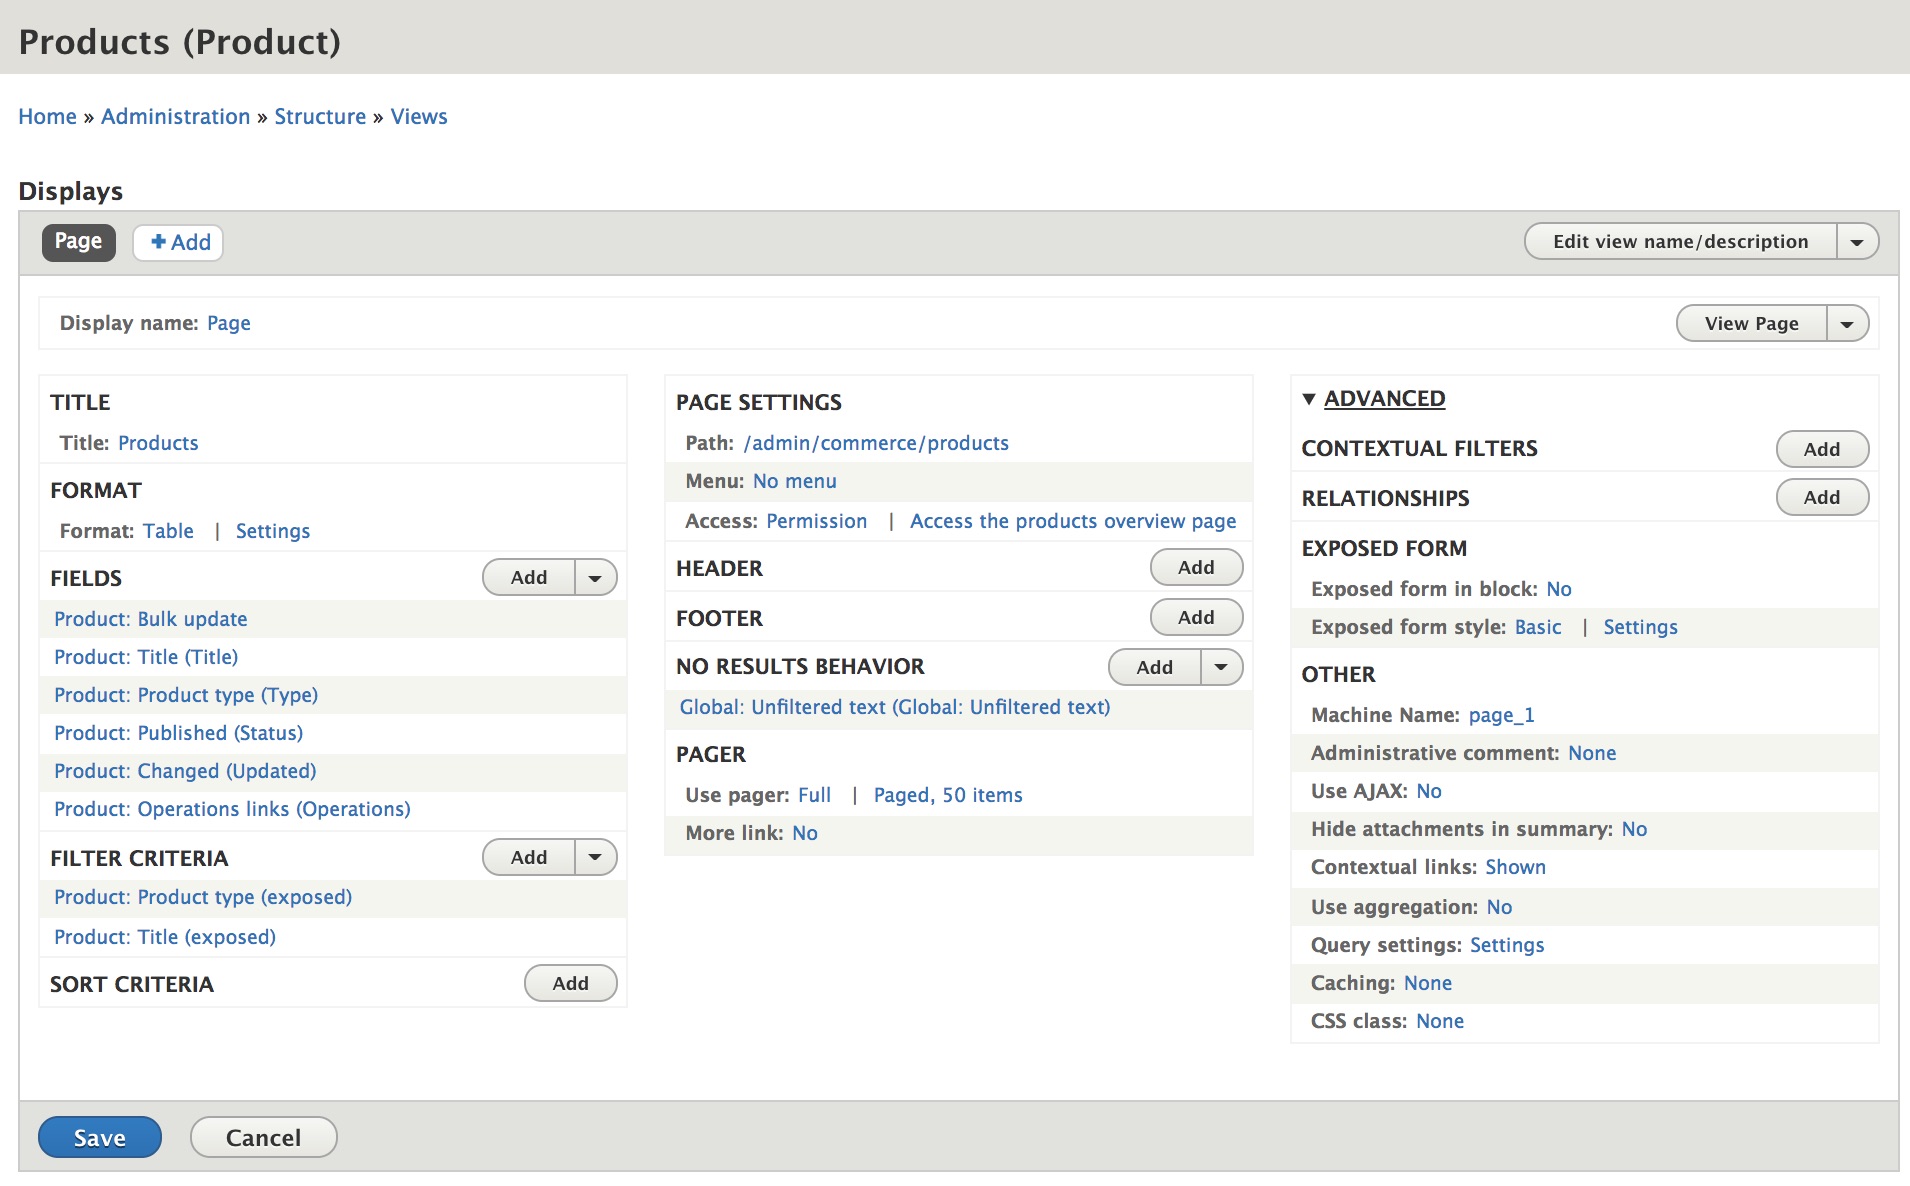
Modify displayed columns
Use the FIELDS section to add, remove, or reorder the columns displayed on the Products overview page. If you look at the list of Fields, you'll see two special items in addition to Title, Type (hidden if there's only one bundle), Status, and Updated. Bulk update and Operations links are two special Fields that will be described below. To control sorting options for the displayed fields, use the Settings link in the FORMAT section.
Modify filter options
You can create additional criteria for filtering products by setting options in the FILTER CRITERIA section. For example, if you want to provide an option for displaying only Published or Unpublished products, add Published as a filter criterion and select the expose this filter to visitors option. In the EXPOSED FORM section of the ADVANCED settings, you can further customize the appearance of the filter form on the products page.
Bulk update options
The Bulk update field provides the checkbox in the first column of the listing as well as the With selection menu. Drupal Commerce provides three options by default:
- Delete product
- Publish product
- Unpublish product
Administrative users with the necessary permissions can execute these operations on selected products. You can remove any of these options by clicking on the Product: Bulk update item in the FIELDS section. You can also add options by creating Action plugins with custom code. Looking at the code for the Publish and Unpublish product Action plugins is a good place to start: Drupal\commerce_product\Plugin\Action\PublishProduct. The, Create an action for custom mass updates with Drupal 8, article is a good introduction to the topic.
Operations links
The Operations menu that appears in the rightmost column of the Products overview page can be modified with custom code, using hook_entity_operation_alter. If you are unfamiliar with hooks, see Understanding Hooks in the documentation provided by drupal.org.
In the next section, we'll look at how you can futher customize the Products View to provide Product Export options.
Importing and exporting
Functionality for importing and exporting products is not built into Drupal Commerce core. This section describes how various Drupal contrib modules can be used to extend Drupal Commerce for importing and / or exporting products. See Extending Drupal Commerce documentation for information on how Drupal Commerce can be extended with additional modules.
Importing products
The Commerce Feeds module can be used to import data in a variety of formats into Products, using the administrative interface. Unfortunately, it is not yet fully ported into Drupal 8. It is built on top of the Feeds module, which does have a pre-release version for Drupal 8 as well as documentation pages. If you are interested on working to develop the Drupal 8 version of Commerce Feeds, this issue has been opened, with a link to the work that has been done so far.
If you are comfortable writing custom code for importing products, then the Commerce Migrate module is a good place to start. There is a version for Drupal 8, documentation, and an explanation of the differences between using Feeds vs. using Migrate for importing products.
Exporting products
You can use the Views data export module to provide product export functionality. If you are unfamiliar with using Views in Drupal, start by reading about Creating Listings with Views, in the Drupal 8 User Guide.
Here is an example of using Views data export for exporting products:
1. Install and enable the Views data export module using composer.
$composer require drupal/views_data_export --prefer-dist
2. Set up a new View page for Product data * Create a new View for Product data, displayed as a table. Create a page and an Administration menu link.

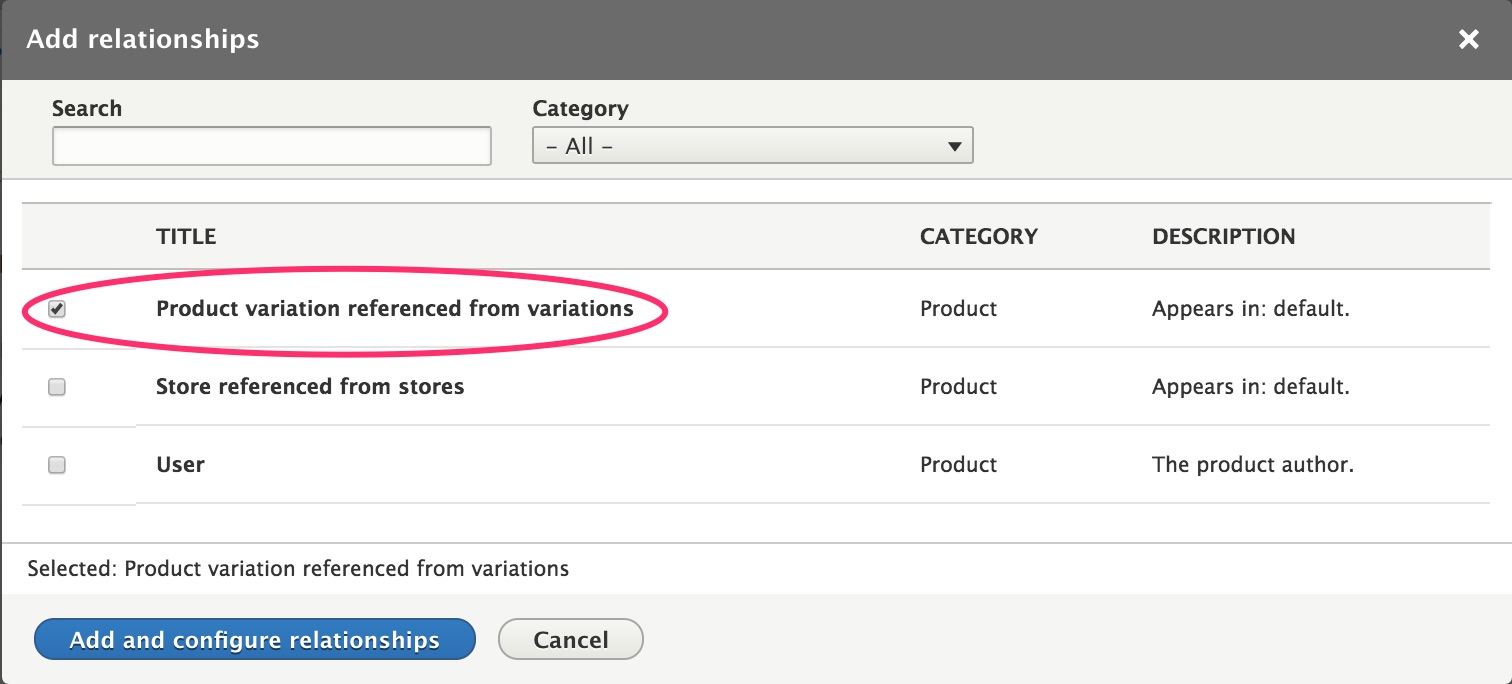
- Under the ADVANCED view options, add a relationship to product variations and set it as required.
-
Add all the product and variation fields you want to export.
-
If you want to add any Exposed filter criteria (so that users can specify subsets of products to be exported), make sure you check the Remember Last Selection option for those exposed filters.
-
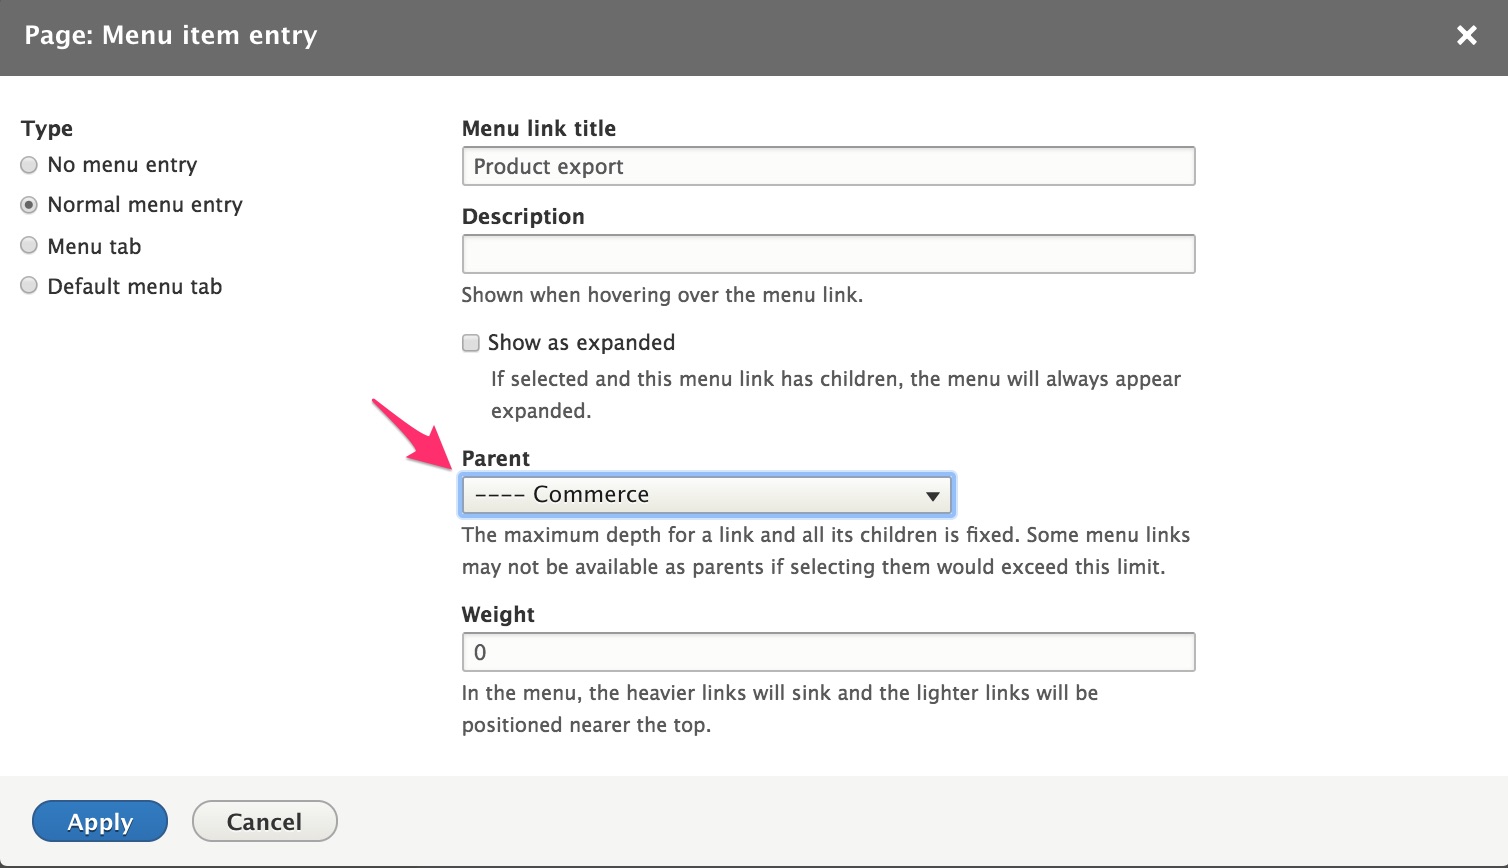
If you want to add Product export as an option under the Commerce administrative menu, click on the Menu link under PAGE SETTINGS, select Normal menu entry as the Type, enter a Menu link title, and specify Commerce (under the
menu) as the Parent.
- Under the PAGE SETTINGS section, you can also set the Path to something like
/admin/commerce/product-exportso that Breadcrumbs will work correctly and set Access to a permission like Access the products overview page to control access to the product export page.
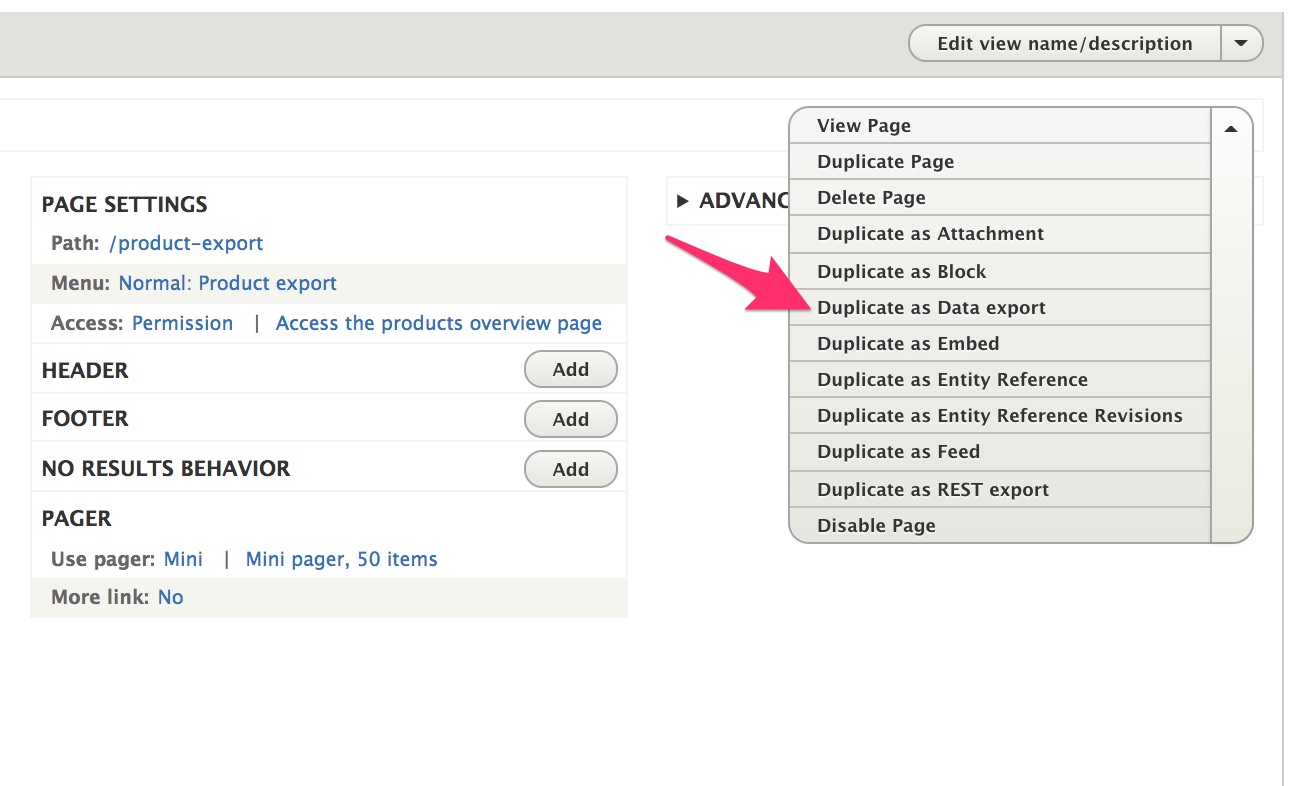
3. Set up a Data export View Display for your Product data View
- Use the View Page dropdown menu to select the Duplicate as Data export option.
- Under the PATH SETTINGS section of the view settings for this new Data export display, click on the Attach to link and select the original Page display. Once the data export display has been attached to the page display, a button will be added to the bottom of the page display, to be used to export the product data.

-
Under the FORMAT section of the view settings, click on the Settings link for the Format. Specify the format and optional settings for the data export.
-
Set the PAGER Items to display to Display all items.
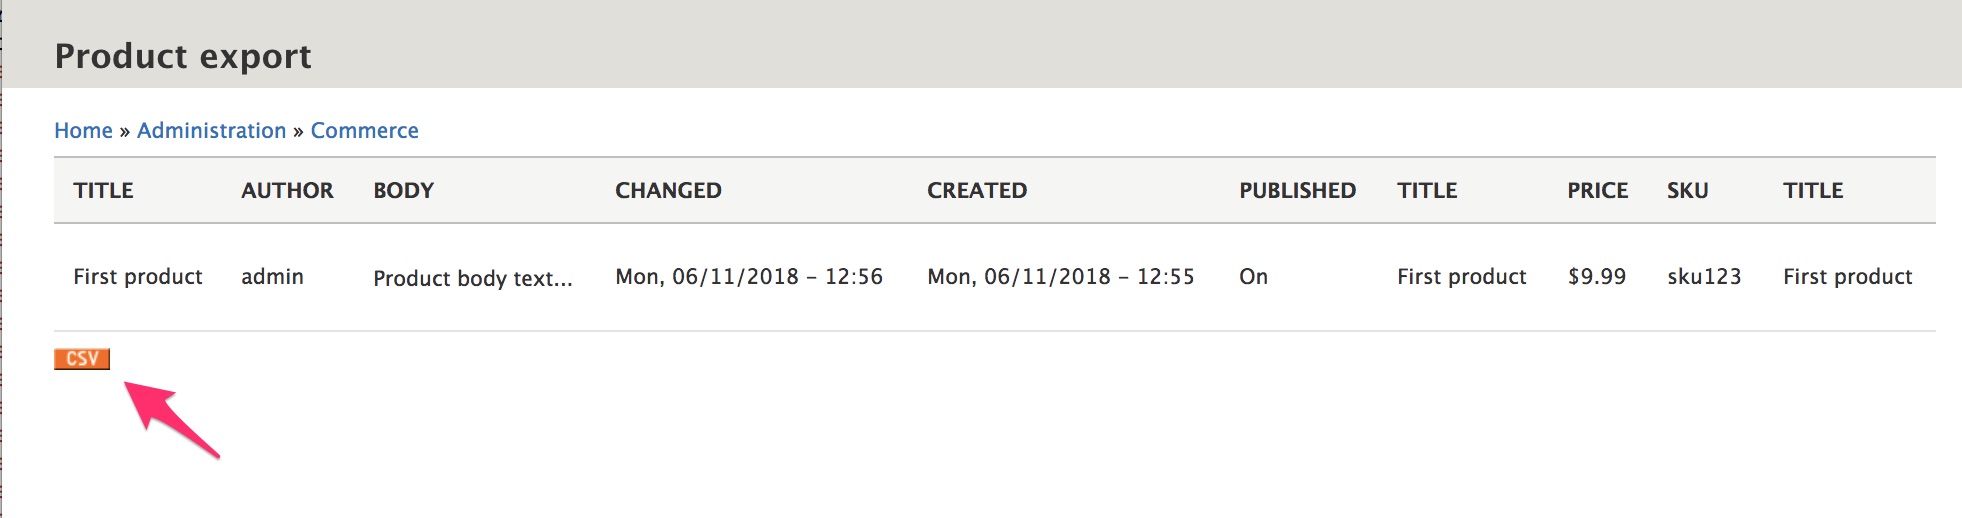
After saving all your changes, you should be able to navigate to your new Product export view page and see a CSV (or other format) button in the lower left-hand corner of the page. Users with access to this page will be able to click on that button to export product data.
In the next section, we'll look at image management in Drupal.
Code recipes
If you want to write custom code to programatically create or manage products, you can use these code recipes as a starting point.
Create:
Load:
Manage product attributes:
- Check if an attribute value exists
- Assign attribute values to a variation
- Alter the product title field label
- Since product variations are the purchasable parts of products, products need at least one variation.
- Since every product belongs to one or more stores, products need at least one store.
    /**
     * uid [Integer]
     *   Foreign key of the user that created the product.
     *
     * type [String] - [DEFAULT = default]
     *   Foreign key of the product type being used.
     *
     * title [String]
     *   The product title.
     *
     * stores [Array(\Drupal\commerce_store\Entity\StoreInterface)]
     *   Array of stores this product belongs to.
     *
     * variations [Array(\Drupal\commerce_product\Entity\ProductVariationInterface)]
     *   Array of variations that belong to this product.
     */

    // The variations that belong to this product.
    $variations = [
      $variation_blue_large,
    ];

    $product = \Drupal\commerce_product\Entity\Product::create([
      'uid' => 1,
      'type' => 'my_custom_product_type',
      'title' => 'My Custom Product',
      'stores' => [$store],
      'variations' => $variations,
    ]);
    $product->save();

    // You can also add a variation to a product using the addVariation() method.
    $product->addVariation($variation_red_medium);
    $product->save();

    // Adding a variation to a product automatically creates a backreference on the variation.
    // You can access the product of a variation via:
    $variation->getProduct();
```php


    /**
    * type [String] - [DEFAULT = default]
    *   Foreign key of the variation type to use.
    *
    * sku [String]
    *   The sku for this variation.
    *
    * status [Bool] - [OPTIONAL, DEFAULTS TO TRUE]
    *   [AVAILABLE = FALSE, TRUE]
    *   Whether or not it's enabled or disabled. 1 for enabled.
    *
    * price [\Drupal\commerce_price\Price] - [OPTIONAL]
    *   The price for this variation.
    *
    * title [String] - [POTENTIALLY NOT REQUIRED]
    *   The title for the product variation.
    *   If the variation type is set to generate a title, this is not used.
    *   Otherwise, a title must be given.
    */
    $variation = \Drupal\commerce_product\Entity\ProductVariation::create([
    'type' => 'my_custom_variation_type',
    'sku' => 'test-product-01',
    'status' => TRUE,
    'price' => new \Drupal\commerce_price\Price('24.99', 'USD'),
    ]);
    $variation->save();

```
Creating values for an attribute
```php

    /**
    * attribute [String]
    *   Foreign key of the attribute we want.
    *
    * name [String]
    *   The name of this value.
    */
    $red = \Drupal\commerce_product\Entity\ProductAttributeValue::create([
    'attribute' => 'color',
    'name' => 'Red',
    ]);
    $red->save();

    $blue = \Drupal\commerce_product\Entity\ProductAttributeValue::create([
    'attribute' => 'color',
    'name' => 'Blue',
    ]);
    $blue->save();

    $medium = \Drupal\commerce_product\Entity\ProductAttributeValue::create([
    'attribute' => 'size',
    'name' => 'Medium',
    ]);
    $medium->save();

    $large = \Drupal\commerce_product\Entity\ProductAttributeValue::create([
    'attribute' => 'size',
    'name' => 'Large',
    ]);
    $large->save();
```
```php

    // Loading is based off of the primary key [Integer]
    //   1 would be the first one saved, 2 the next, etc.
    $product = \Drupal\commerce_product\Entity\Product::load(1);
```
```php

    // Loading is based off of the primary key [Integer]
    //   1 would be the first one saved, 2 the next, etc.
    $variation = \Drupal\commerce_product\Entity\ProductVariation::load(1);
```
nameLoading an attribute value
```php

    // Loading is based off of the primary key [Integer]
    //   1 would be the first one saved, 2 the next, etc.
    $red = \Drupal\commerce_product\Entity\ProductAttributeValue::load(1);
```
Checking if an attribute value exists within a particular attribute type
```php
    // Look up while filtering by Attribute
    $productAttributeId = \Drupal::entityTypeManager()
        ->getStorage('commerce_product_attribute_value')
        ->getQuery()
        ->condition('attribute', 'attribute_machine_name')
        ->condition('field_value', field_value)
        ->execute();
```
Assigning attribute values to a variation
Let's say we want our hypothetical product to have two variations. One will be the color red and size medium, and the other will be the color blue and size large. - If a Product Variation Type has fields for attributes, then variations of that type MUST have those attributes.
    /**
     * attribute_<ATTRIBUTE_ID> [\Drupal\commerce_product\Entity\ProductAttributeValueInterface]
     *   The attribute value entity to use for the attribute type.
     */
    $variation_red_medium = \Drupal\commerce_product\Entity\ProductVariation::create([
    'type' => 'my_custom_variation_type',
    'sku' => 'product-red-medium',
    'price' => new \Drupal\commerce_price\Price('10.00', 'USD'),
    'attribute_color' => $red,
    'attribute_size' => $medium,
    ]);
    $variation_red_medium->save();

    $variation_blue_large = \Drupal\commerce_product\Entity\ProductVariation::create([
    'type' => 'my_custom_variation_type',
    'sku' => 'product-blue-large',
    'price' => new \Drupal\commerce_price\Price('10.00', 'USD'),
    'attribute_color' => $blue,
    'attribute_size' => $large,
    ]);
    $variation_blue_large->save();
Altering the title field label
The following example will change the label for the product name from Title to Product name.

    use Drupal\Core\Entity\EntityTypeInterface;

    /**
     * Implements hook_entity_base_field_info_alter().
     */
    function mymodule_entity_base_field_info_alter(&$fields, EntityTypeInterface $entity_type) {
        if ($entity_type->id() == 'commerce_product') {
            // Change the title field label.
            $fields['title']->setLabel(t('Product name'));
        }
    }
Links and resources
- Drupal 8 User Guide documentation on Concept: Forms and Widgets