Product Architecture
Documentation in this section describes various approaches to product architecture. Learn how to structure your product types to best suit your specific business logic needs.
- Simple product type
- Product type with attributes
- Product with categories
- Most common product achitectures
- Multilingual products
Simple product type
In this section, we're going to walk through the steps involved in creating a simple product type, one that has a single variation per product. We'll also add an image field for our variation type.
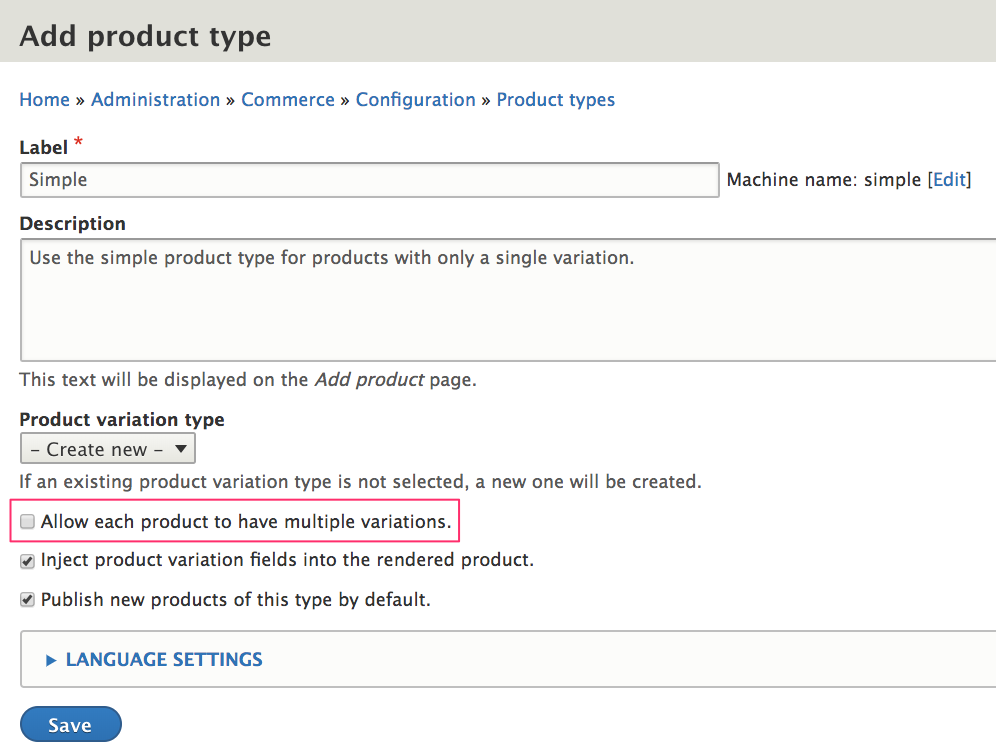
Create a product type
To create a new product type:
1. Navigate to the Product types listing at /admin/commerce/config/product-types
2. Click the Add product type button.
3. Enter "Simple" for the Label.
4. Disable the Allow each product to have multiple variations option.
5. Click the Save button.
Product type configuration options
Label
This is the name of the product type. The label field is only used for administrative purposes and will not be visible to end users.
Description
The description field is also only used for administrative purposes. It is displayed underneath the product type on the Add product page, located at /product/add. If your store will have many different product types, entering a description for each can be helpful for product management.
Product variation type
Typically, each product type will have its own corresponding variation type, and you can create both the product type and product variation type at the same time, by selecting Create new for the product variation type on the Add product type form.
However, it is possible for a single product variation type to be used by multiple product types. In that situation, you could select an existing product variation type to be used by the product type you're creating. For example, suppose all your product variations need only the basic title/sku/price fields, but some of your products are manufactured internally while others are outsourced. You might need a variety of different product-level fields in this situation. You could also have different product types because of different marketing needs.
Allow each product to have multiple variations
This setting affects how product variation data is entered by administrative users. If enabled, product variations are edited in a form separate from the main product edit form. If a product has only one variation, it can be edited directly on the product data entry form. See the Editing products documentation for more information on product forms.
Inject product variation fields into the rendered product
This setting affects how products are displayed for end users. You can learn more about product variation field injection in the Displaying products section of the documentation.
Publish new products of this type by default
Published is an option on the data entry form for products and can be checked (published) or unchecked (not published), by default. Also, it is possible to remove the published setting from the product form completely (for all or just a subset of administrative users). You can learn more about the product data entry form configuration options in the Product management section of the documentation.
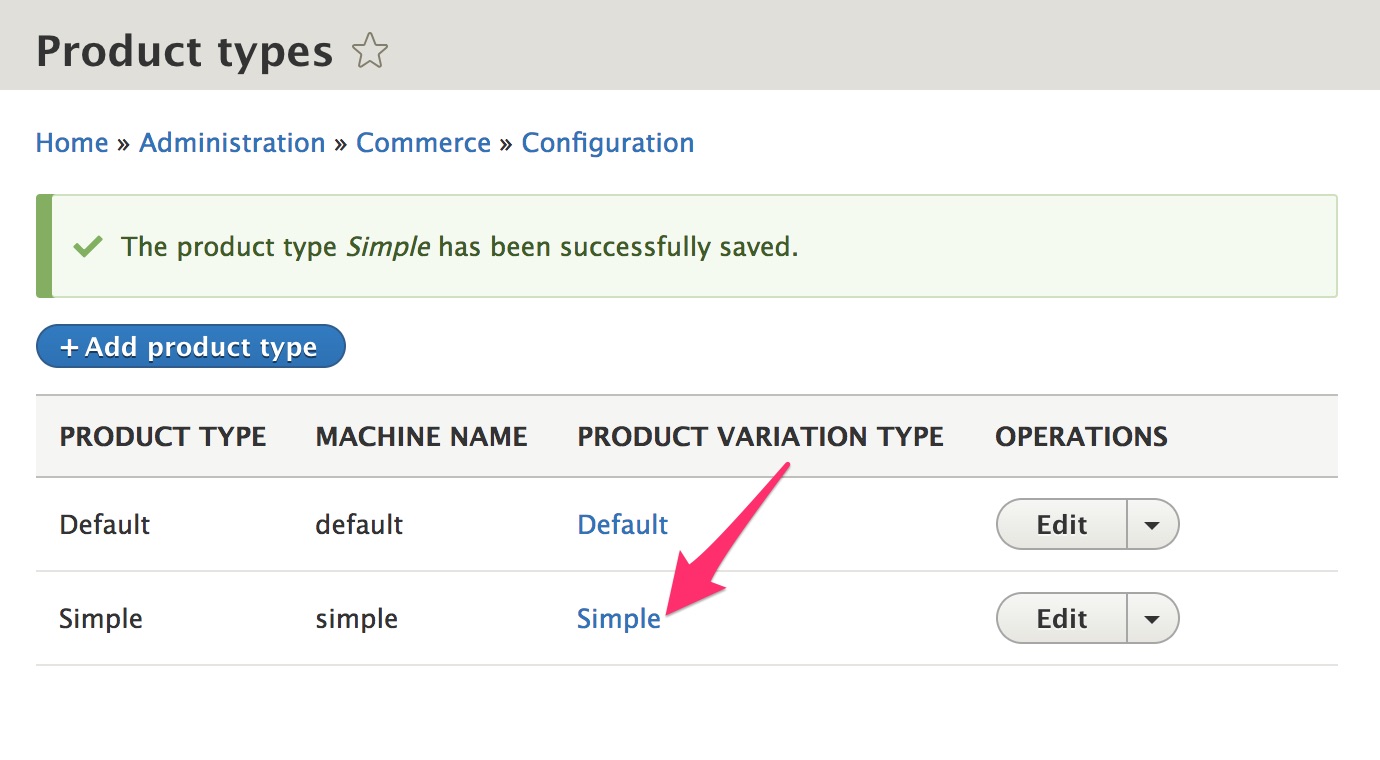
Configure a product variation type
To access the configuration form for a product variation type, you can either navigate to the Product variation types listing at /admin/commerce/config/product-variation-types or use the Product variation type links on the Product types listing at admin/commerce/config/product-types.
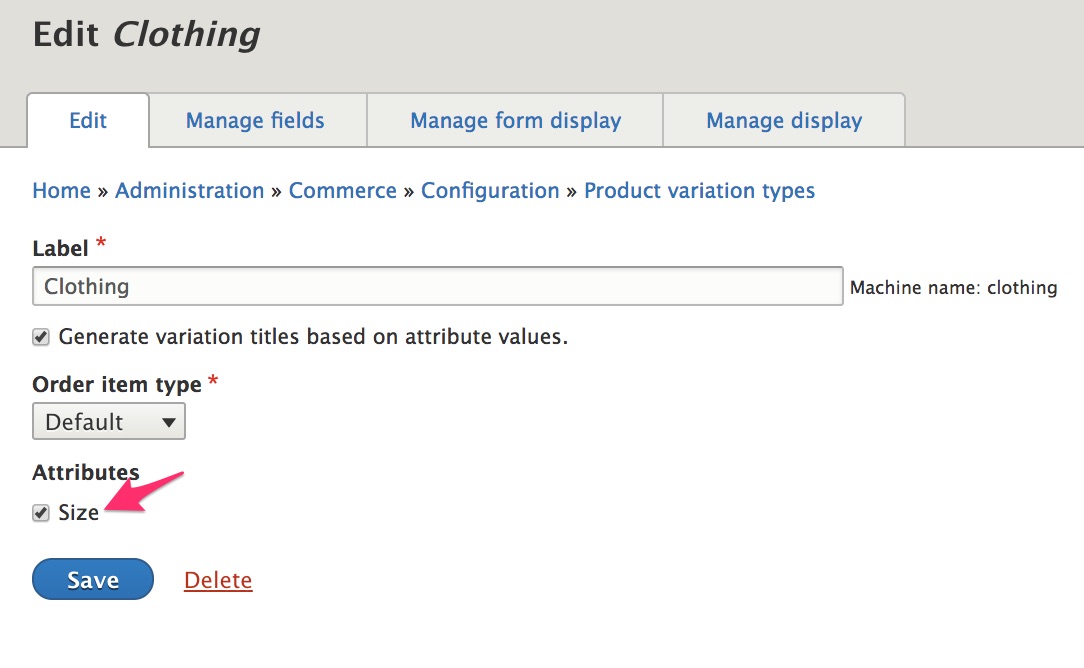
On the Product types listing page, click the link for the Simple product variation type to configure the product variation-level options for the Simple product type.
If you have not created any Product attributes, you should see a configuration form that looks like this:
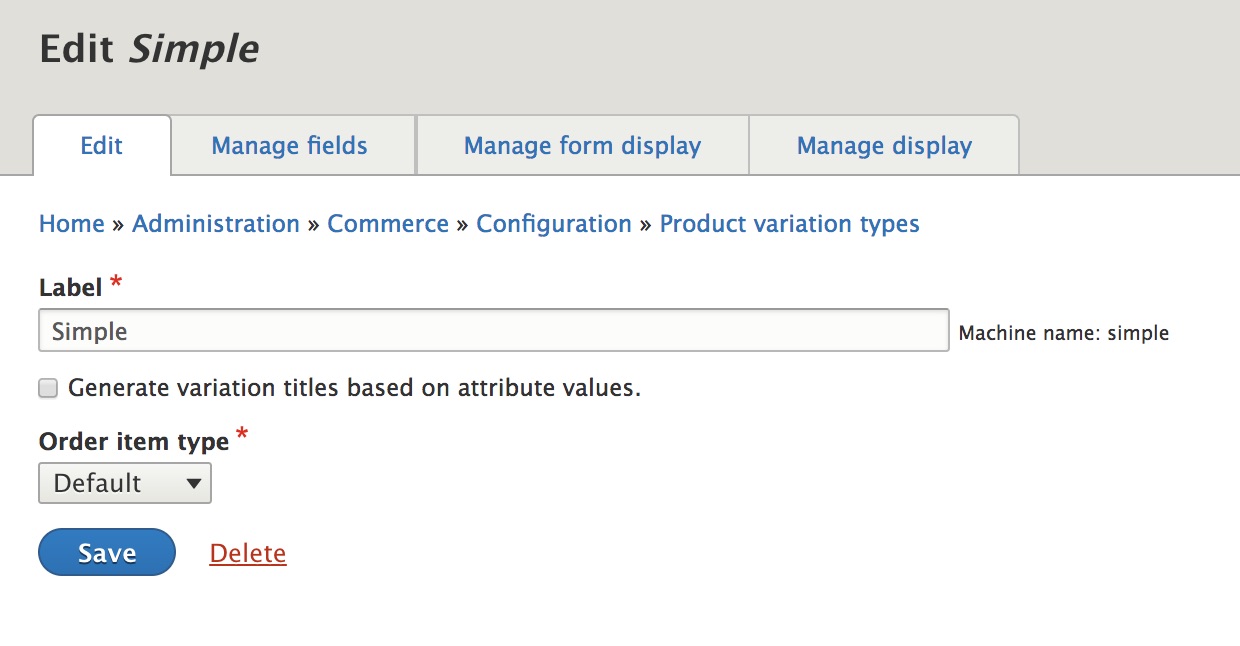
Select the Generate variation titles based on attribute values setting to keep the data entry for our Simple product type as simple as possible. Click the Save button to save the updated product variation type configuration.
Product variation type configuration options
Label
By default, the label for a product variation type is the same as the label for the product type, but the labels do not need to be the same. The label is the name of the product variation type. The label field is only used for administrative purposes and will not be visible to end users.
Generate variation titles based on attribute values
- If this option is not selected, the Title field will be shown on the product variation data entry as a required field.
- If this option is selected, the Title field will not be shown on the data entry form for the product variation. Instead, the value for the product variation title will be automatically generated:
- For a single-variation product type like our Simple product type, there are no attributes. The title of the product will also be used as the title for its product variation.
- For product variation types with attributes, the generated title is the product title followed by a dash (-) and then a comma-separated list of its attribute values. For example, "Drupal Commerce Hoodie - Blue, Small" or "Drupal Commerce Hoodie - Green, Large".
Traits
If you have commerce-related contributed modules installed, you may see additional configuration options. For example, the Commerce shipping module will add a Shippable trait. See the documentation for the contributed modules for information about these traits.
Order item type
When a product variation is added to the cart, it is added as a new line item. The order item type defines the structure of this line item. (See the order items documentation.)
Attributes
If you have defined product attributes, they will be listed here. Select any attributes that are applicable to your product variation type.
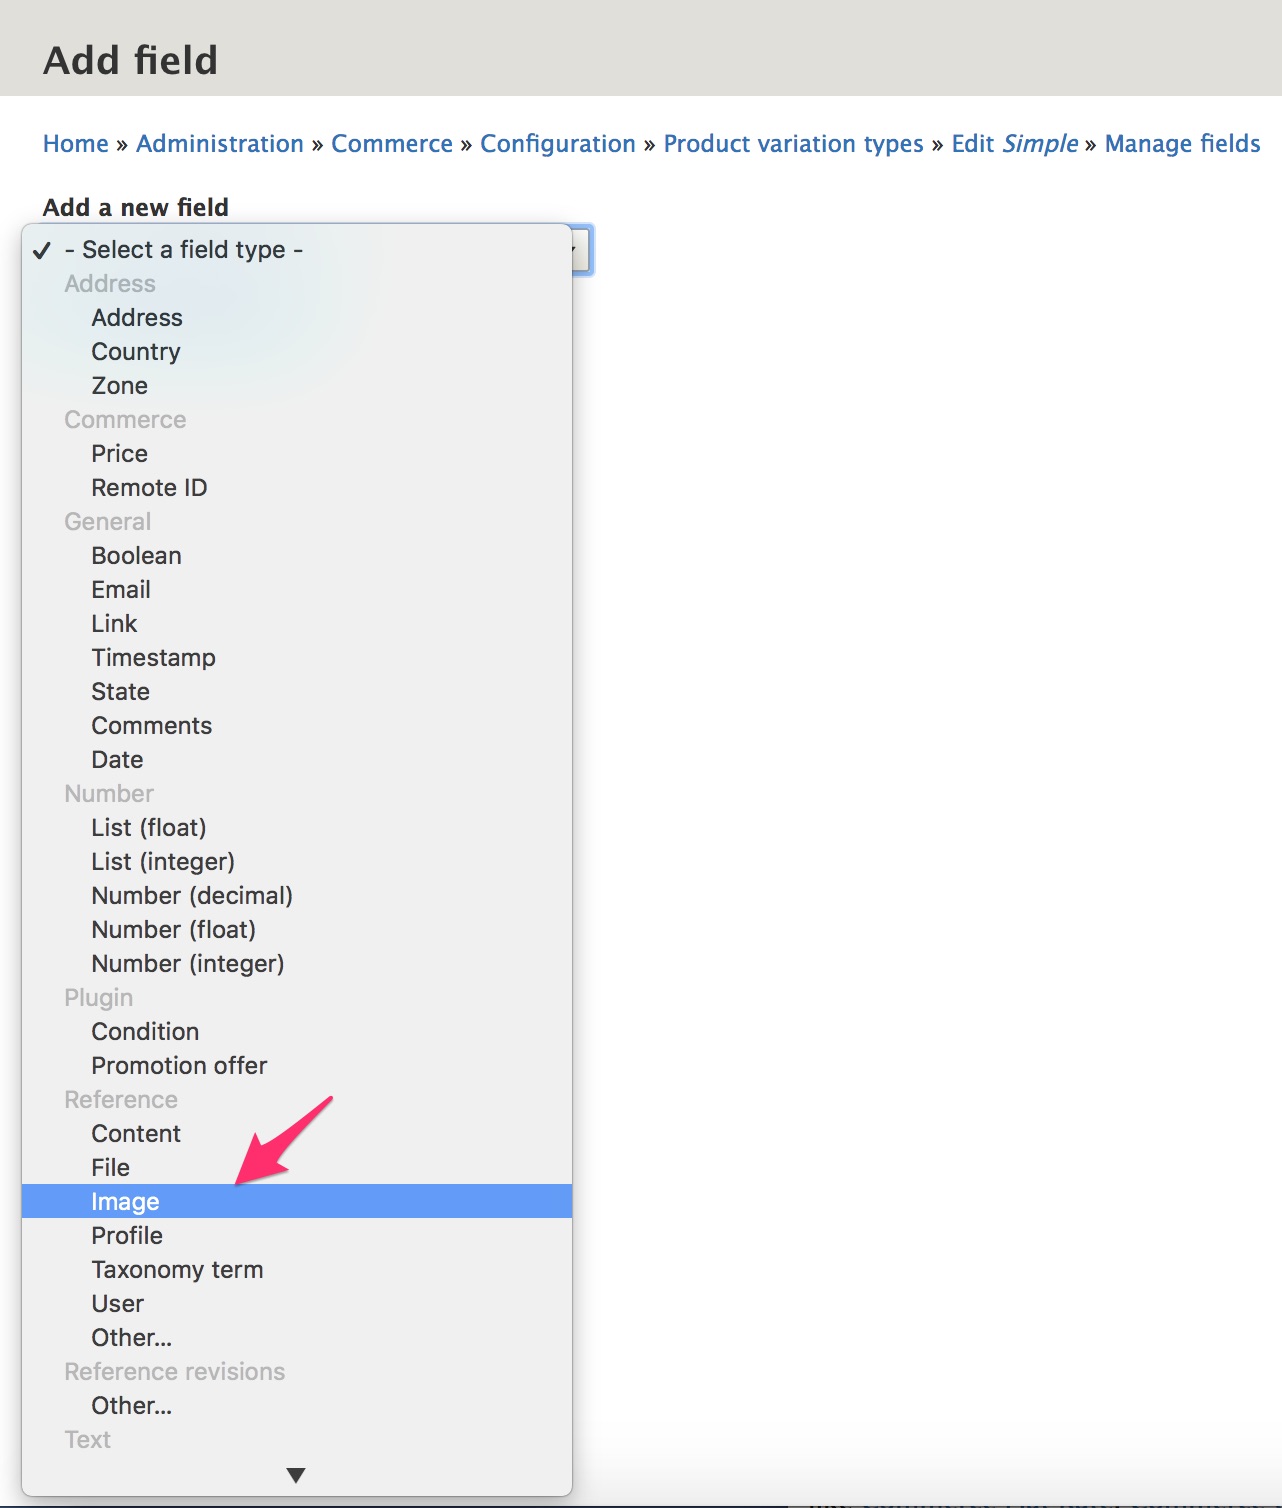
Add images to a product variation type
Custom fields of a variety of types can be added to your product variations. To add a field for one or more images to your Simple product variation type:
- Navigate to the Manage fields page for the Simple product variation type:
/admin/commerce/config/product-variation-types/simple/edit/fields - Click the Add field button.
- Select field type Image (under Reference). (If you do not see Image as an option, make sure that the Drupal core Image module is enabled.)
- Enter "Images" for the Label.
- Click the Save and continue button.
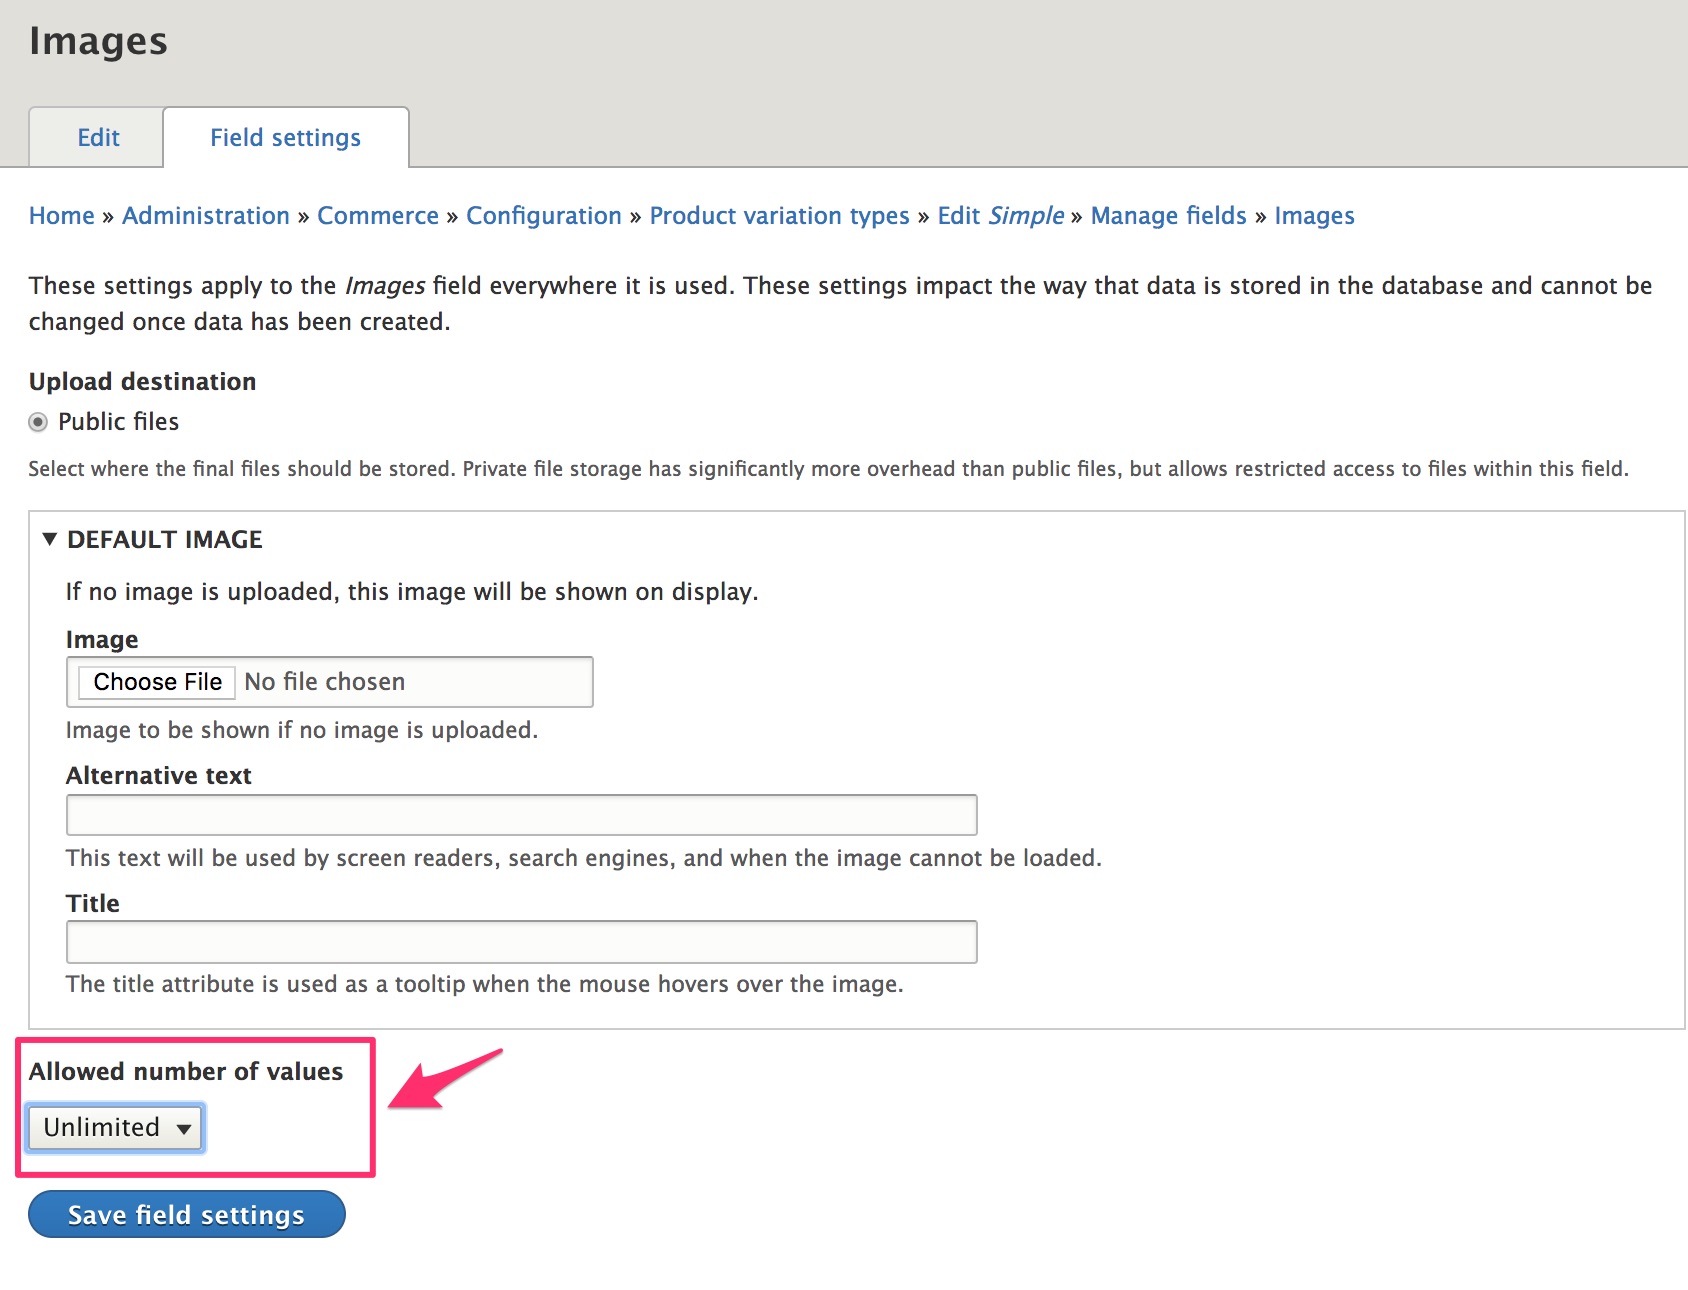
On the Field settings configuration page:
- Change the Allowed number of values from Limited to Unlimited. Product variations of type Simple can have 1 or more images.
- Click Save field settings to continue.
You can use the default values for the rest of the Image field settings. If you are interested in learning more about the Image field settings options, see the Drupal 8 documentation for Working with images.
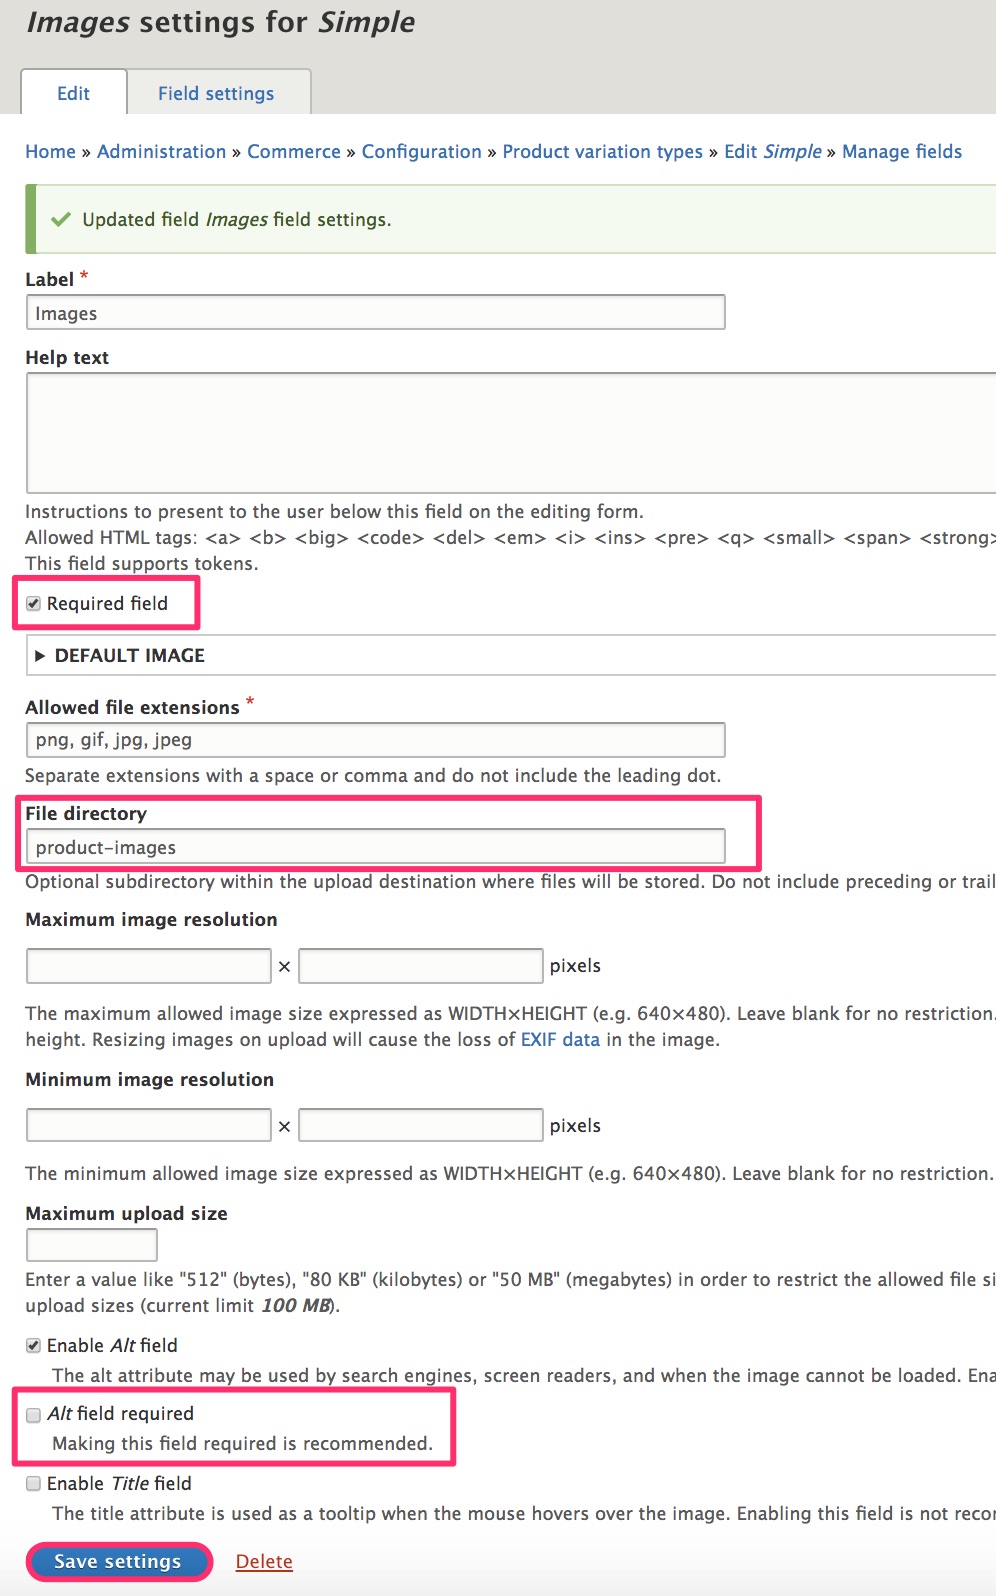
On the Image settings for Simple configuration page:
- Select the Required field option to make images required for product variations of type Simple.
- Change the File directory to "product-images".
- Deselect the Alt field required setting (to simplify data entry for this demonstration setup).
- Click the Save settings button to finish configuring the new Images field.
Images can now be uploaded for Simple product variations and displayed on product pages. See Product display pages for documentation on customizing product displays.
You can use this same general approach to add other fields to both product and product variation types.
In the next section, we'll look at creating a more complex product type, with product attributes and multiple variations per product.
Product type with attributes
If your products have options like size, color, format, or package size, then you need to create product attributes and their values. For example, suppose you are selling a t-shirt that comes in a variety of sizes and colors. Then you need to create a Size attribute (with values like, "Small", "Medium", and "Large"), and you need to create a Color attribute (with values like "Red", "Blue", "Orange", and "Green").

As the above image suggests, a product with a particular set of attributes will not necessarily have a variation for every possible combination. Perhaps the size Large t-shirt is only available in Green, and the Medium t-shirt is only available in Blue and Orange. Product attribute values do not define the complete set of product variations; rather they define a set of possible attribute combinations available to product variations.
Create a basic product attribute
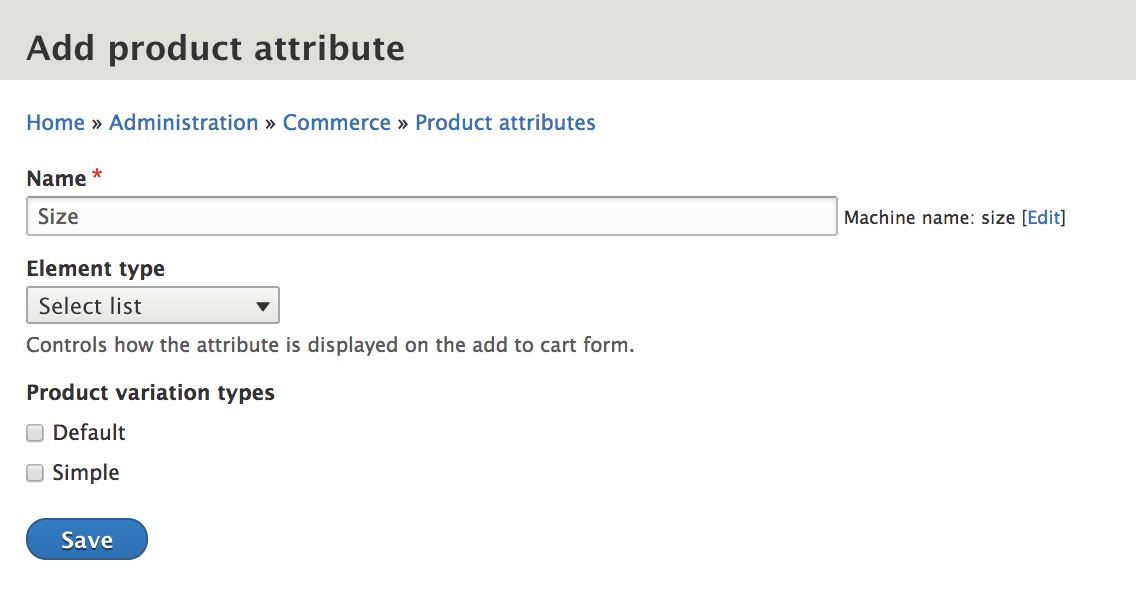
Let's start by creating a Size attribute with values Small, Medium, and Large.
- Navigate to the Product attributes page by using the menu item under the main Commerce menu or
/admin/commerce/product-attributes. - Enter "Size" for the Name.
- Select Select list for the Element type. See Product attributes in the Displaying products documentation for a description of how these options affect product displays.
- Do not select any Product variation types. This Size attribute will not be used for the Default or Simple product types. When we create a new Clothing product type (below), we can come back to update the configuration.
- Click the Save button to create the new product attribute.
Create product attribute values
On the Size product attribute configuration form, add "Small", "Medium", and "Large" as values.
- Enter "Small" for the Name.
- Click the Add value button. A new text field will appear in the list.
- Enter "Medium".
- Repeat steps 2 and 3 to enter "Large" as the third value.
- Click the Save button.

You can use the drag-and-drop handle in the leftmost column, the Reset to alphabetical button, or the Show row weights link and Weight select lists to reorder the values. This order will be used on the form used to enter product variation data.
Add a product attribute to a product variation type
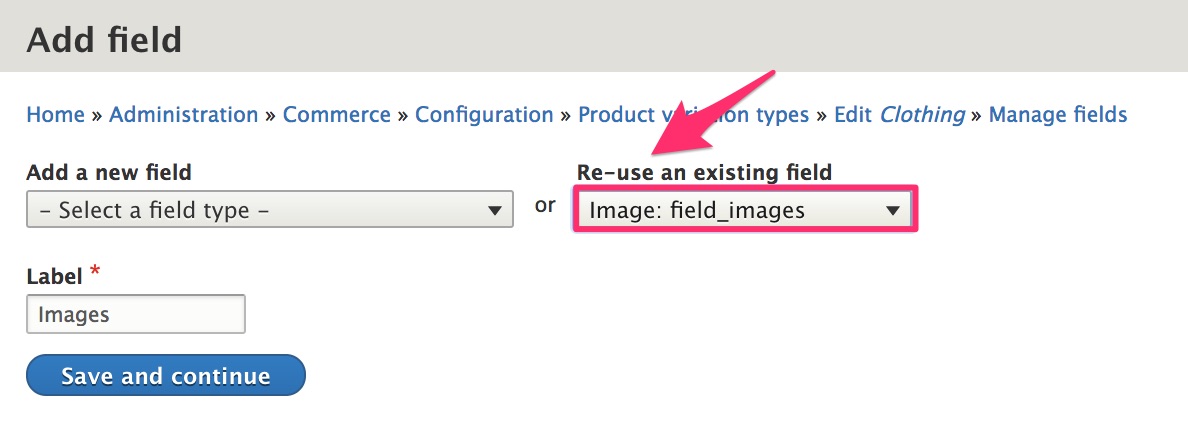
In the Simple product type documentation, we created a product type named, Simple. Use the same procedure to create a new product type named, Clothing, with a corresponding Clothing product variation type. Be sure to enable the Allow each product to have multiple variations setting, since this product type will have multiple variations. When you add the Images field to the product variation type, you can re-use the existing Image field instead of creating a new one:
If you look at the configuration form for any product variation type, you'll see that a new Attributes section has been added, with a checkbox for the new Size product attribute. Select this attribute for the Clothing product variation type: /admin/commerce/config/product-variation-types/clothing/edit.
Make a product attribute optional
By default, all product attributes are required. However, after adding a product attribute to a product variation type, you can change its field settings so that it is not required. For example, to make the Size attribute optional for the Clothing product type, navigate to its Manage fields configuration page at /admin/commerce/config/product-variation-types/clothing/edit/fields. Click the button for the Edit operation for the Size field.
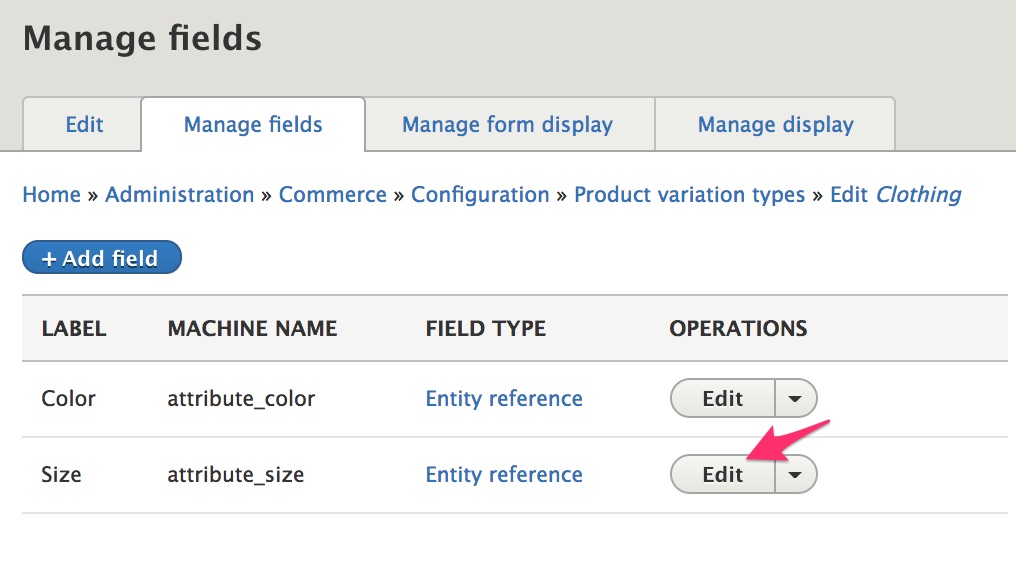
On the Size settings for Clothing page, de-select the Required field checkbox and click the Save settings button to make the Size attribute optional for the Clothing product type.

Add a field to a product attribute
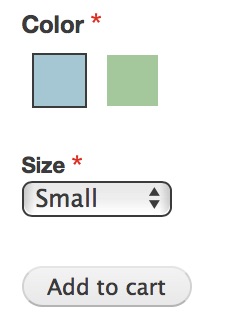
For the Color attribute, we want to present the options as color swatches instead of just the color names. Most of the documentation for this functionality will be covered in the Add to cart form page of the Displaying products section. Here we'll just set up the Color product attribute.
Note
To set up the Color product attribute like this, you will need to install the Color module. See the documentation on Extending Drupal Commerce for an overview of installing contributed Drupal modules.
The initial steps for creating the Color attribute are the same as the steps described above, for creating the Size attribute. Briefly, you need to:
- Navigate to the Product attributes page by using the menu item under the main Commerce menu or
/admin/commerce/product-attributes. - Enter "Color" for the Name.
- Select Rendered attribute for the Element type.
- Select the Clothing product variation type.
- Click the Save button to create the new product attribute.
- Enter "Black", "Blue", "Green", and "Pink" for the Color attribute values.
- Click the Save button.
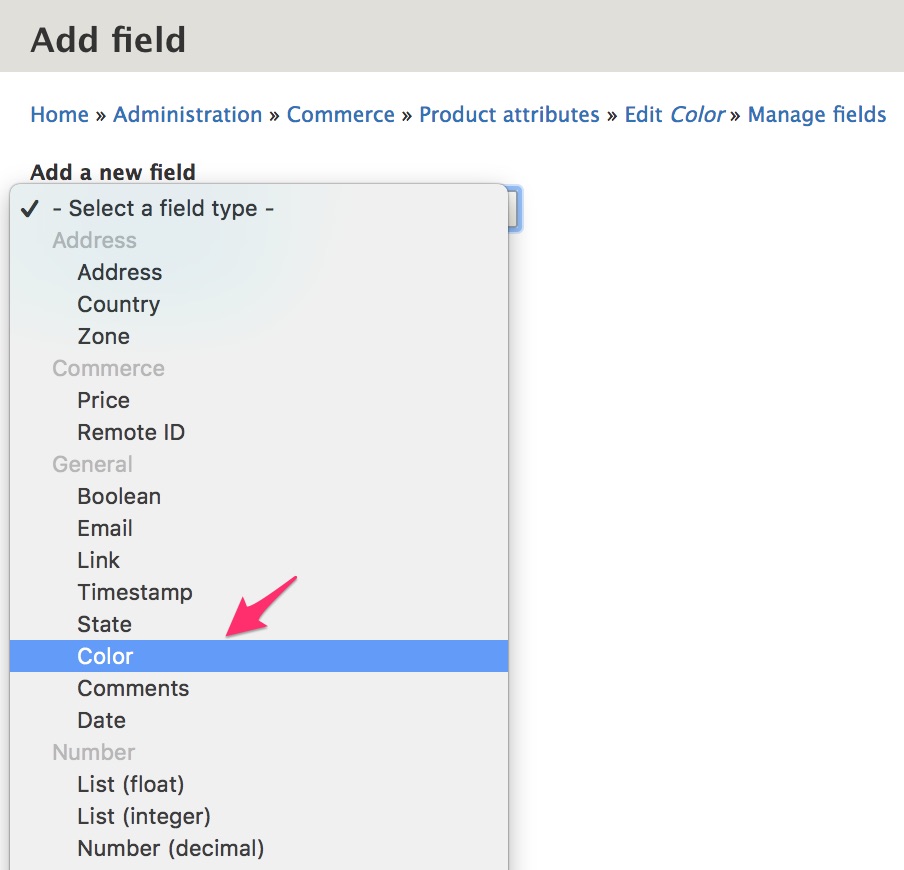
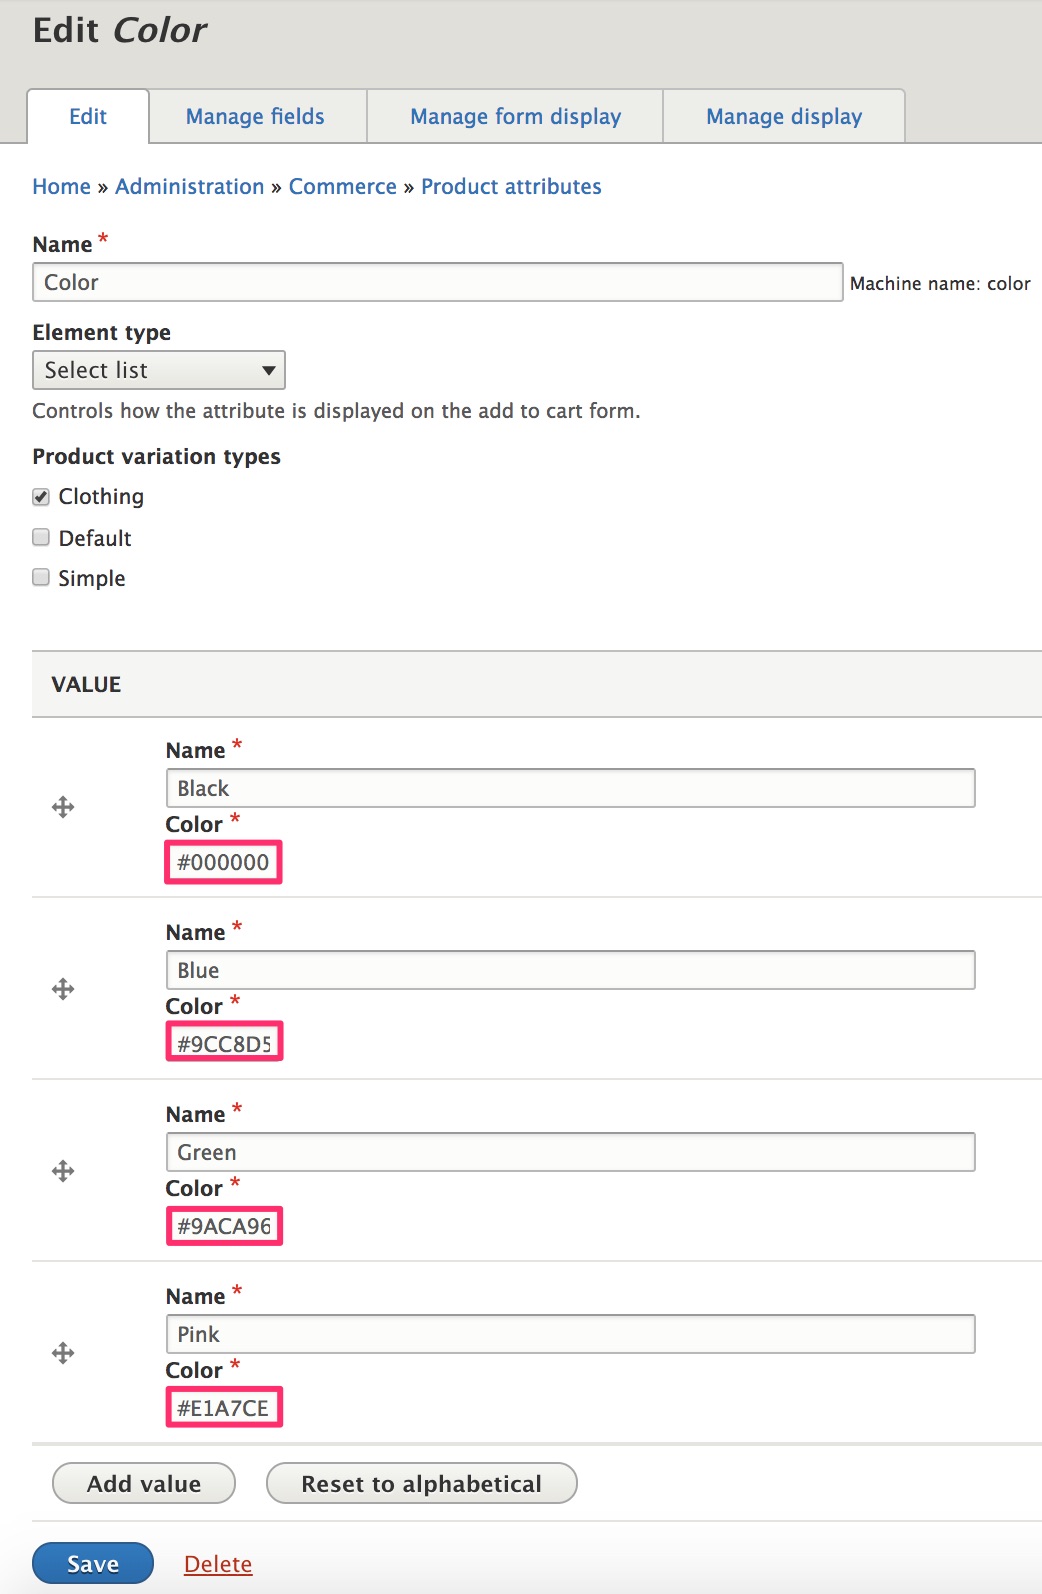
Now that we've created the Color attribute, we can add an additional field by navigating to the Manage fields configuration page for the Color attribute: /admin/commerce/product-attributes/manage/color/fields.
- Click the Add field button.
- Select Color from the list of field types.
- Enter "Color" for the Label.
- Click the Save and continue button.
On the Field settings configuration page, leave the default values are fine. On the Color settings for Color page, enable the Required field option and disable the Record opacity option. After saving the changes, you can return to Edit the page again, to set the default value for the color to "#000000".
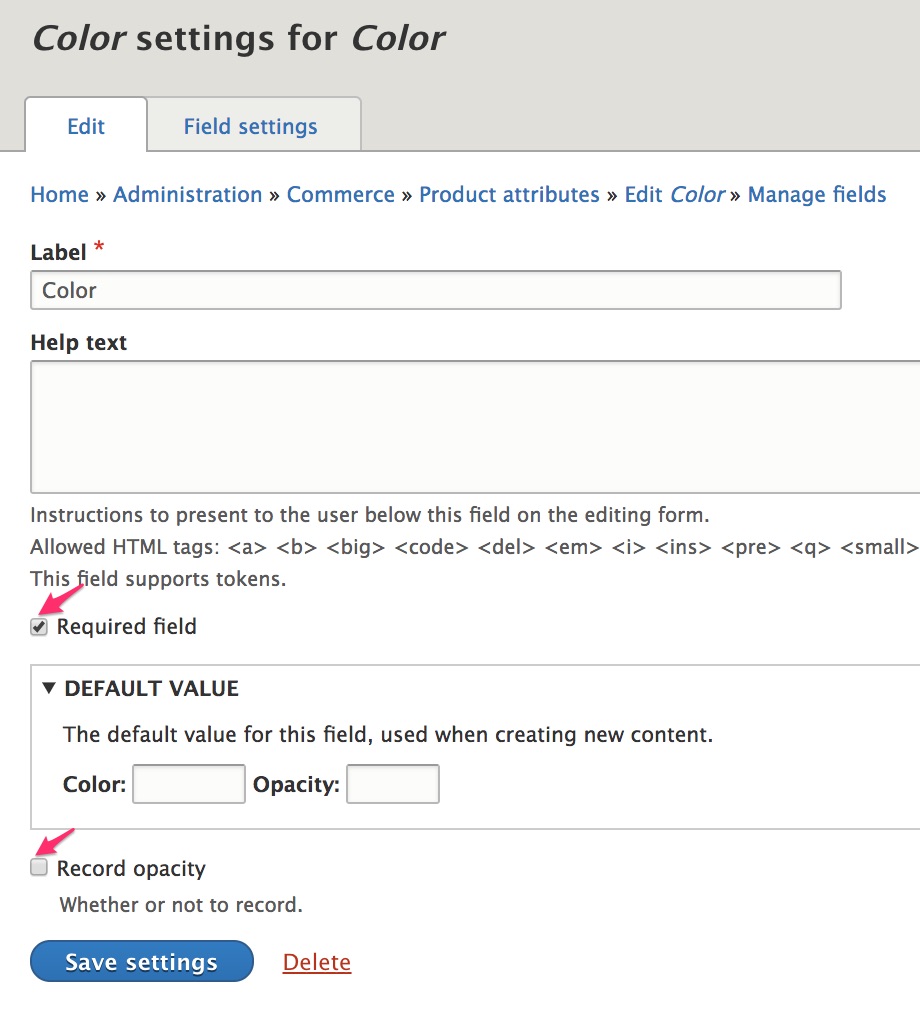
After adding and configuring the Color field, return to the main configuration page for the Color attribute: /admin/commerce/product-attributes/manage/color. Enter the following values for the Color for each attribute value:
- Black: #000000
- Blue: #9CC8D5
- Green: #9ACA96
- Pink: #E1A7CE
Click the Save button to complete the configuration for the Color product attribute.
In the next section, we'll look at creating product categories.
Product categories
In the Simple product type documentation, we added a custom field to a product variation type, to allow product variations to have images. In the Product type with attributes documentation, we added a custom field to a product attribute, to allow a Color attribute to be displayed as a color swatch image instead of just the color name. In this section, we're going to look at how to add fields to product types so that we can organize products into categories that can be used for the product catalog.
Create a basic product category
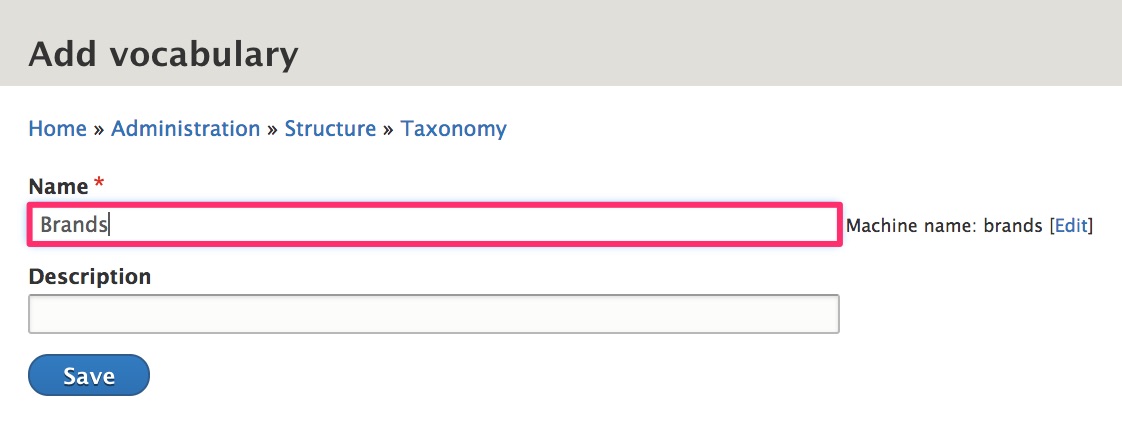
Let's start by creating a Brands taxonomy to organize products by brand.
- Navigate to the Taxonomy page at
/admin/structure/taxonomy. - Click the Add vocabulary button.
- Enter "Brands" for the Name.
- Click Save to create the new vocabulary.
Now you can add terms to the vocabulary or look into using the Feeds module or Migrate Tools module to import your pre-existing data.
Create a hierarchical product category
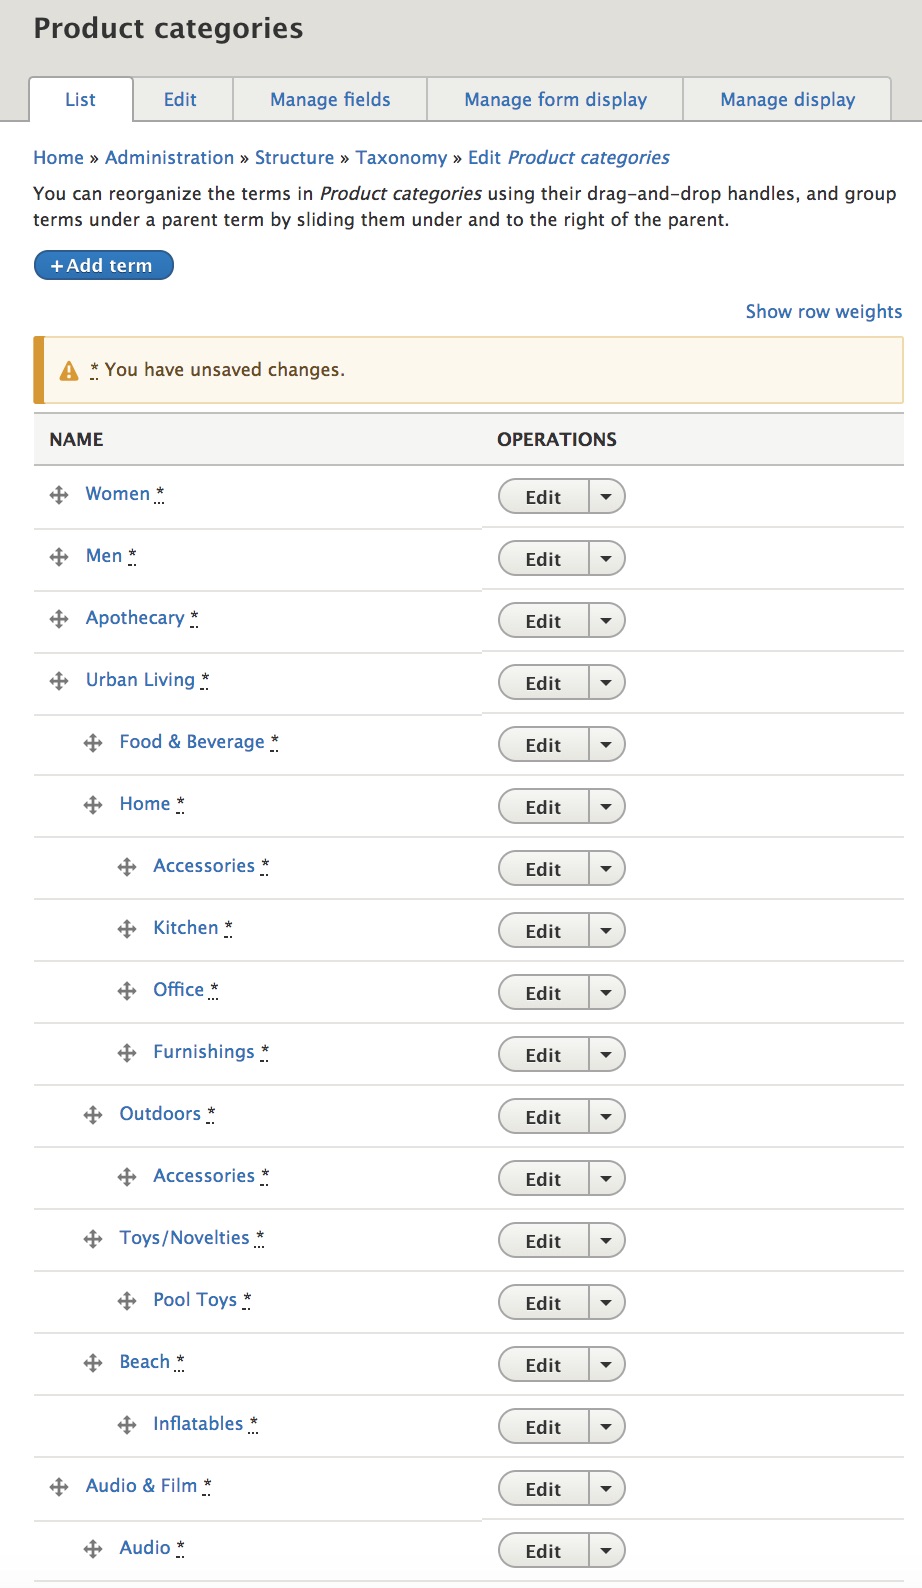
For our product catalog, we're also going to want to hierarchical categories so that customers can use faceted search to "drill down" to specific categories. For example, on the Commerce Demo site, we have an Urban Living product category with sub-categories of Food & Beverage, Home, Outdoors, etc. And within the Home category, we further classify products as Accessories, Kitchen, Office, or Furnishings.
To create a hierarchical taxonomy in Drupal, we can use the same steps we used to create a basic taxonomy. After creating a Product categories taxonomy and adding the terms, we have a listing that looks like this:
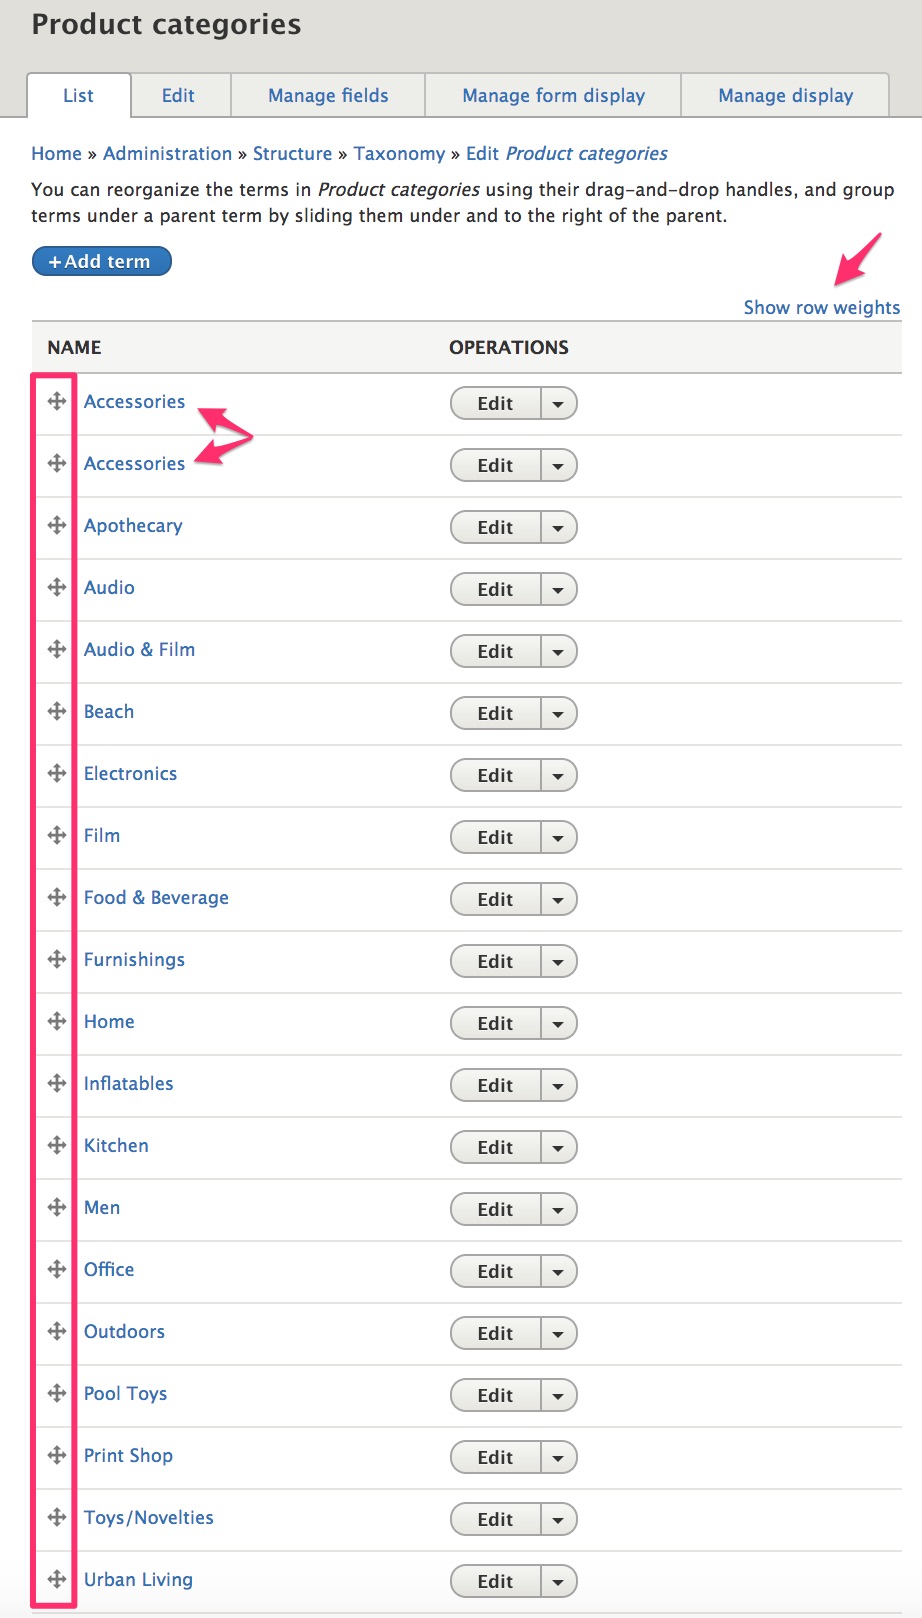
Notice that the Accessories term appears to be duplicated, but that's fine, since one of those terms will be a sub-category of the Urban Living Home category, and the other will be a sub-category of the Urban Living Outdoors category. They have the same label but are actually two completely separate terms.
To transform this simple listing into a hierarchical taxonomy, you just need to use the drag-and-drop icons in the leftmost column to rearrange the terms. You may also find it helpful to click the Show row weights link to set the order of terms within a particular category, especially if there are a great number of items. After moving items around, the Product categories taxonomy now looks like this and all we need to do is click the Save button to save the changes:
Create a term reference field for your product category
Let's add a field that references our Brands taxonomy to the Simple product type we previously created. (If you haven't created the Simple product type, you can use Default or any other product type.)
- Navigate to the Product types page at
/admin/commerce/config/product-types. - Select the Manage fields operation for the Simple product type.
- Click the Add field button.
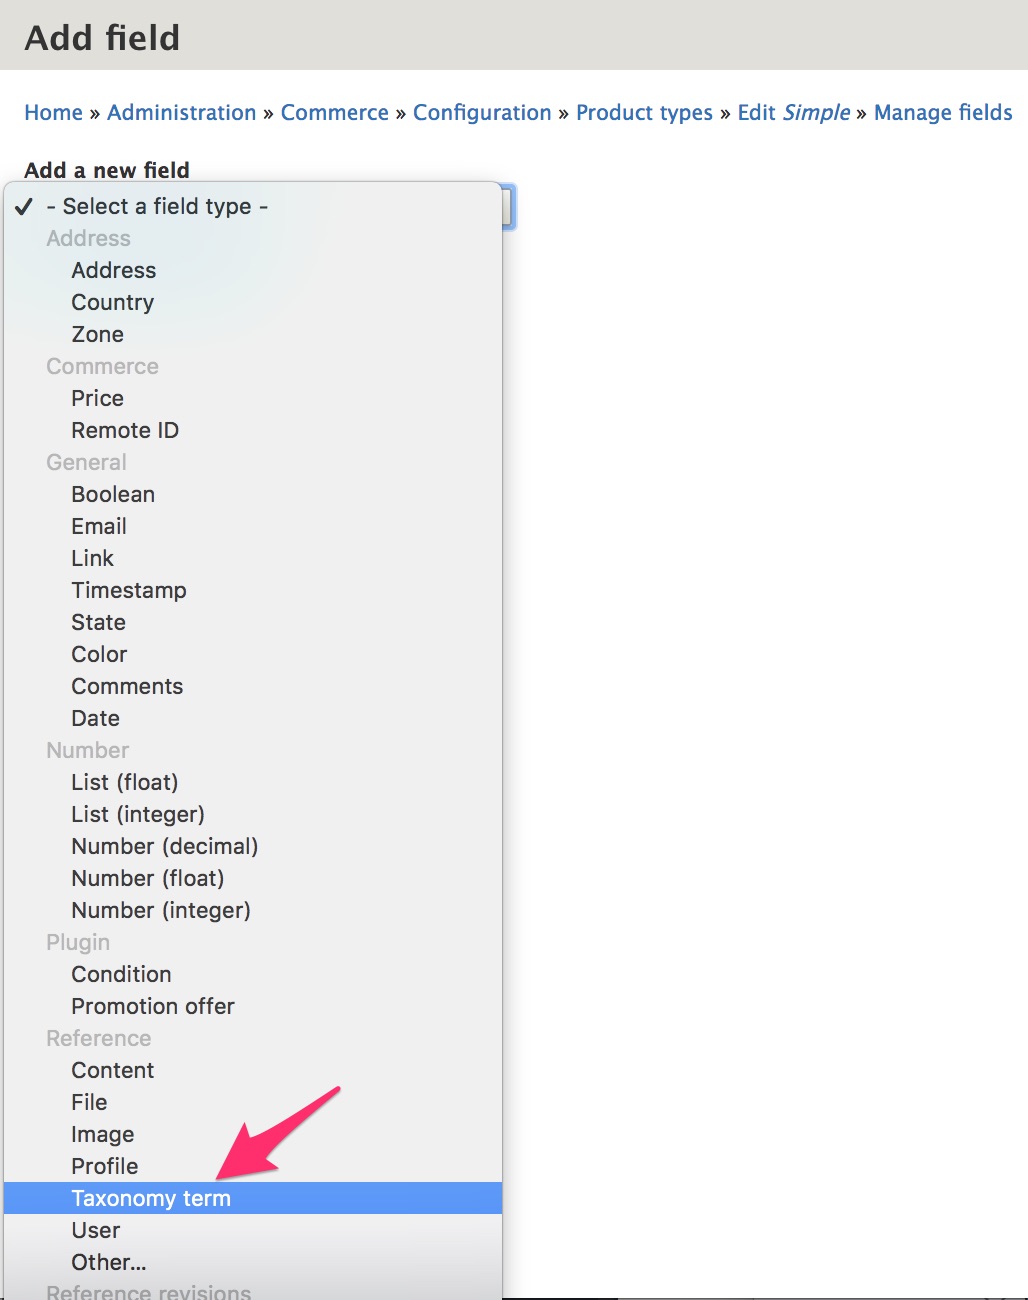
- Select Taxonomy term (in the Reference section) for the new field type.
- Enter Brand for the Label.
- Click the Save and continue button.
- Click Save field settings on the next page to save the default configuration values.
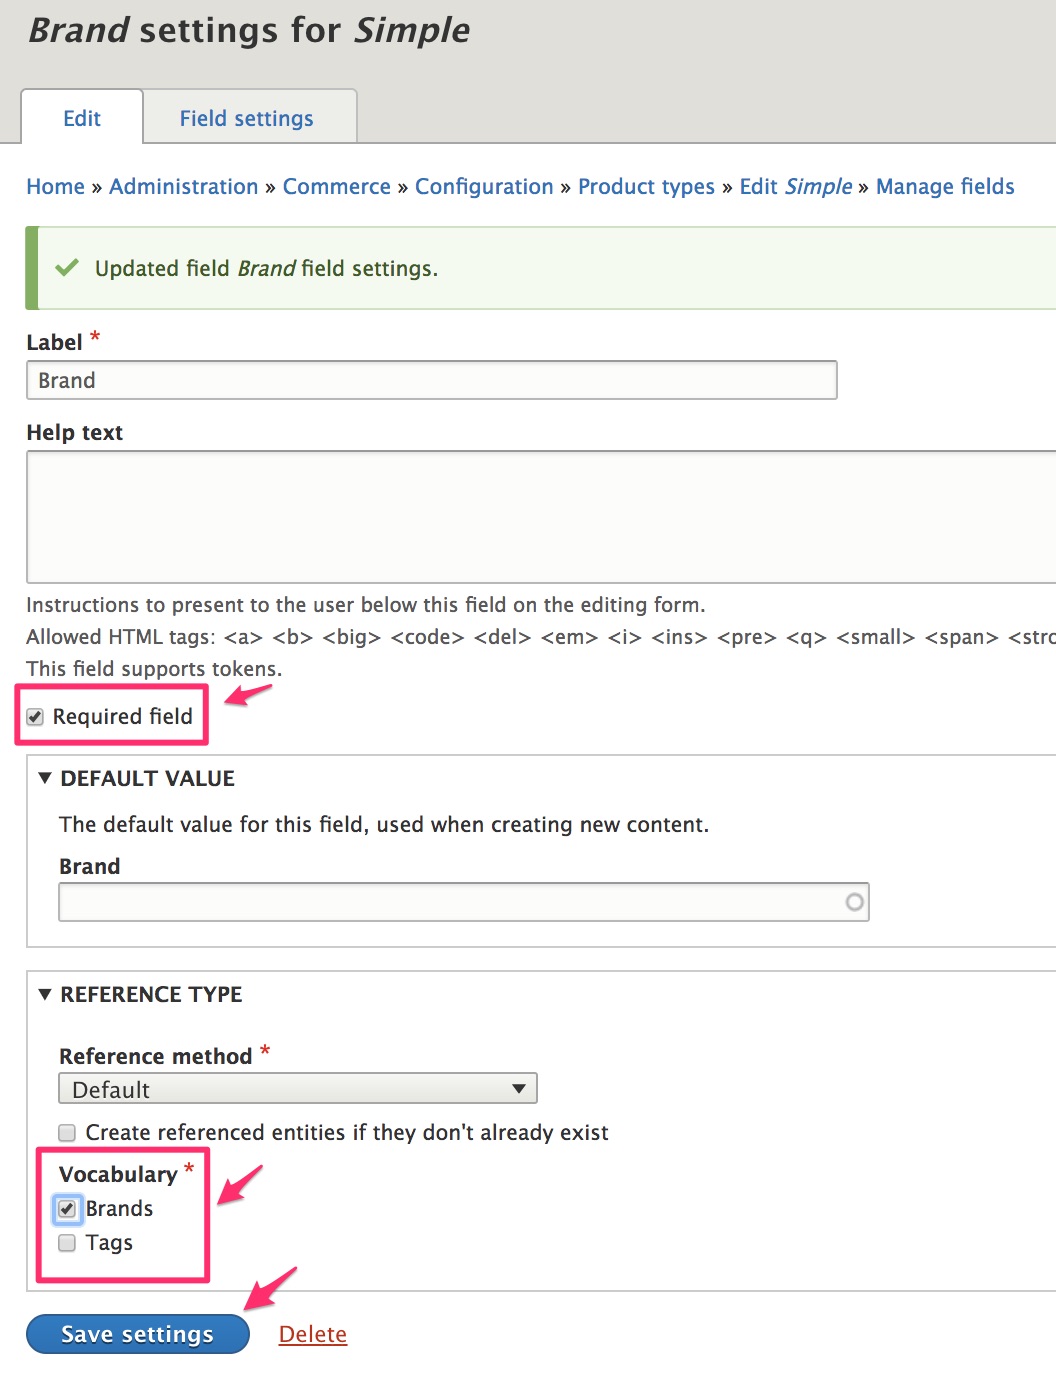
- On the Brand settings for Simple page, select Required field and select Brands for the Vocabulary.
- Click the Save settings button.
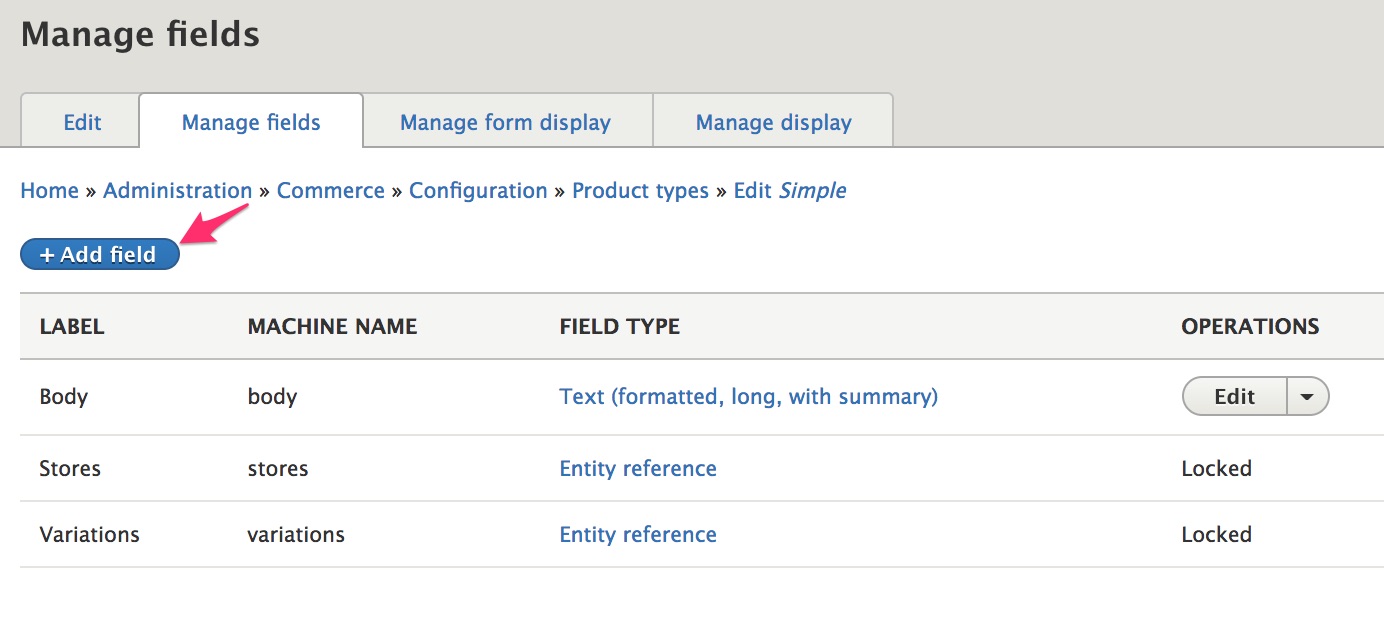
The Brand field has now been added to the Simple product type. To add the Brand field to another product type, you can Re-use an existing field to select this Brand field on the Add field page for the product type.
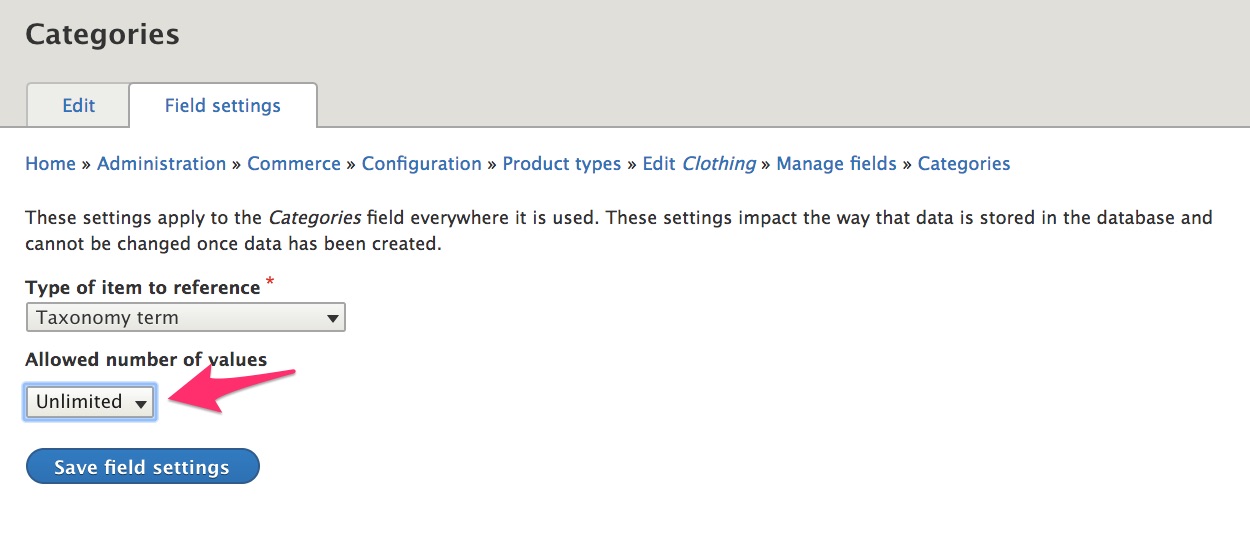
We can also create a new Taxonomy term reference field for our Product categories taxonomy and any other product taxonomies we want to create. Unlike the Brand field, which was limited to a single value, we'll specify Unlimited for the Allowed number of values for product categories:
To learn how to use the Brand and Taxonomy in a faceted product catalog, see the Product catalog with facets documentation.
!!! info In the next section, we'll look at options for product architectures in Drupal Commerce.
Most common product architectures
This section provides a general overview of some of the most commonly used types of product architectures:
- Virtual products
- Physical products
- Configurable / customizable products
- Downloadable products / files
- Subscriptions
- Product bundles
- Unique / none-of-the-above architectures
Virtual vs physical products
In Drupal Commerce, products can be either virtual or physical. A physical product is any product that needs to be shipped or physically delivered to customers in some other way.
If you have virtual products, no special configuration is necessary. Drupal Commerce will work for virtual products as is.
If you have physical products, then you will need to extend Drupal Commerce with the Commerce Shipping module. (See the Extending Drupal Commerce documentation to add Commerce shipping to your project.)
Physical product configuration
After installing Commerce Shipping, navigate to the Product variation types page at /admin/commerce/config/product-variation-types and click the Edit button next to the name of your physical product variation type.
You will see that two traits have been added to the configuration form for the product type:
- Has dimensions
- Shippable
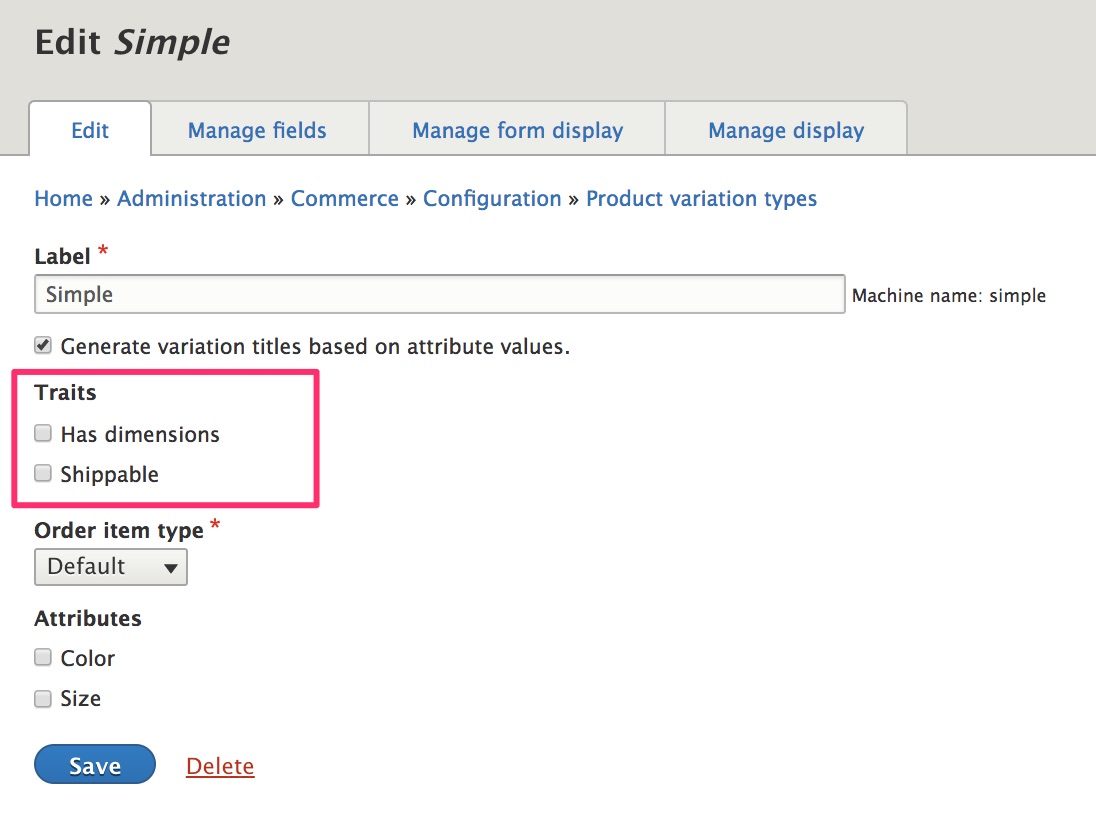
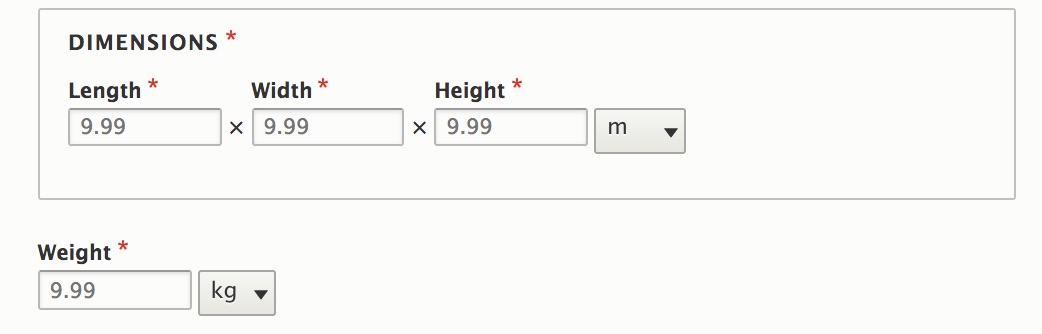
- If you specify that your product variation type has dimensions, then a Dimensions field will be added to your product variation type.
- If you specify that your product variation type is shippable, then a Weight field will be added to your product variation type.
Both these fields can be managed just like any other field in terms of displaying them on data entry forms and product displays. For more information on how these fields are used in the context of the Commerce Shipping module, see the Shipping documentation.
Stock management for physical products
An important aspect of product architecture with respect to stock management is the definition of your product attributes and variations. For each unique combination of attributes, i.e., for each product variation, you get a single SKU. If you need to keep track of the number of units for each color, for example, then Color should be a product attribute.
In contrast, suppose you sell custom t-shirts that can be ordered in any customer-specified color and/or design, and you only track inventory based on Size (Small, Medium, Large, etc.) In this case, you would want Size as a product attribute, but Color would not be a product attribute. Instead, you would want to add a custom Color field that customers can use at the time they order an item to specify the t-shirt color.
The Drupal 8 version for the Commerce Stock module is currently being ported to Drupal 8. It is not yet ready for use on a live site.
Configurable / customizable products
A configurable product is one for which a customer can specify unique information for a product. For example, a product that can be monogrammed with a name or initials is a configurable product. Product attributes, like color or size can only be used when the list of all possible values is known and set in advance. For example, the values for size for an item of clothing might be "S", "M", "L", and "XL".
To implement a configurable product in the context of Drupal Commerce product architecture, the key is to add a custom field to the Add to cart form.
- Customers use the field to enter their unique product configuration.
- Merchants receive the information as part of the order's line item data.
Both single-variation products and products with attributes / variations can be customized as a configurable product. Also, multiple custom fields could be added for a configurable product. For step-by-step instructions, see Add fields for customizable products in the Configuring the Add to cart form fields section of the documentation on the Add to cart form.
Downloadable products / files
For downloadable products / files, we recommend the Commerce File module. The port to Drupal 8 is currently in progress. See the Port to Drupal 8 issue for the current status.
Subscriptions
For subscription products, we recommend the Commerce Recurring Framework module, which provides recurring billing for Drupal Commerce. See the Subscriptions documentation for additional information.
Product bundles
For product bundles, we recommend the Commerce Product Bundle module. The port to Drupal 8 is currently in progress. See the Drupal 8 (Commerce 2) Version issue for additional information:
Purchasable entities
When it comes to product architectures, there is no one true answer. That is why Drupal Commerce needs to support any number of product architectures. Do you need a Commerce solution that uses a unique architecture? Perhaps there's just no way to make the "products/variations/attributes" structure provided by the Product module fits your needs. If so, you can develop a completely custom product architecture but still benefit from the rest of the Drupal Commerce ecosystem of modules (cart, checkout, order, payment, etc.).
The key to Drupal's product architecture flexibility is the concept of a purchasable entity. Product variations are one example of purchasable entities. Every product variation (and every purchasable entity) in Drupal Commerce has 4 key properties:
| Property | What does it mean? |
|---|---|
| Stores | The stores through which the item can be purchased. |
| Title | The name or label of the item being purchased. |
| Price | The base price of the item being purchased. |
| Order item type | The type of order item (line item) to use when a product is purchased (added to order/cart). |
Order line items can be configured to reference any purchasable entity. On the Order item type configuration page, you can specify the Purchasable entity type for your line items. Product variation is just the default option.
If you're interested in writing custom code to define your own purchasable entities, you can start by looking at the PurchasableEntityInterface, which is included in the Code recipes page of this documentation section.
!!! info In the next section, we'll describe the setup for multilingual products.
Multilingual products
If you want to display the products on your site in multiple languages, you'll need to build a Multilingual Drupal site. Multilingual functionality in Drupal is a larger topic, beyond the scope of this Drupal Commerce documentation guide. For an overview, please see the Drupal 8 User Guide section on Making Your Site Multilingual. This page describes basic multilingual setup for products, product variations, and product attribute values.
Prerequisites
- The Drupal core Content Translation module is required for multilingual products.
- If you have product attributes, you'll also need to install the Drupal core Configuration Translation module.
- Before you can translate content, there must be at least two languages. You can add languages at
/admin/config/regional/language/add.
Enable translations for Products and variations
Once the Content Translation module has been installed, you will see a new Language settings section on the configuration forms for all Product types and Product variation types. Click the triangle to the left of the Language settings label to expand the form options.
Alternatively, you can also use the main Content language configuration page to set the language settings for all types of Products and Product variations in the same place. Navigate to /admin/config/regional/content-language to make your selections. When you select the checkboxes next to any content type, a corresponding set of configuration options will appear on the form.
Enable translation for product and product variation types that should be translated.
Once translation has been enabled for a product type, you will see a Translate tab for products of that type.
On the Translations page for each product, you will see options for adding a translation in each of your installed languages. Your content editors can click the Add or Edit button to update the product text for each language.
If you would like to translate the names of your product and product variation types, you can use the Translate tabs on the configuration forms for each type.
Enable translations for product attribute values
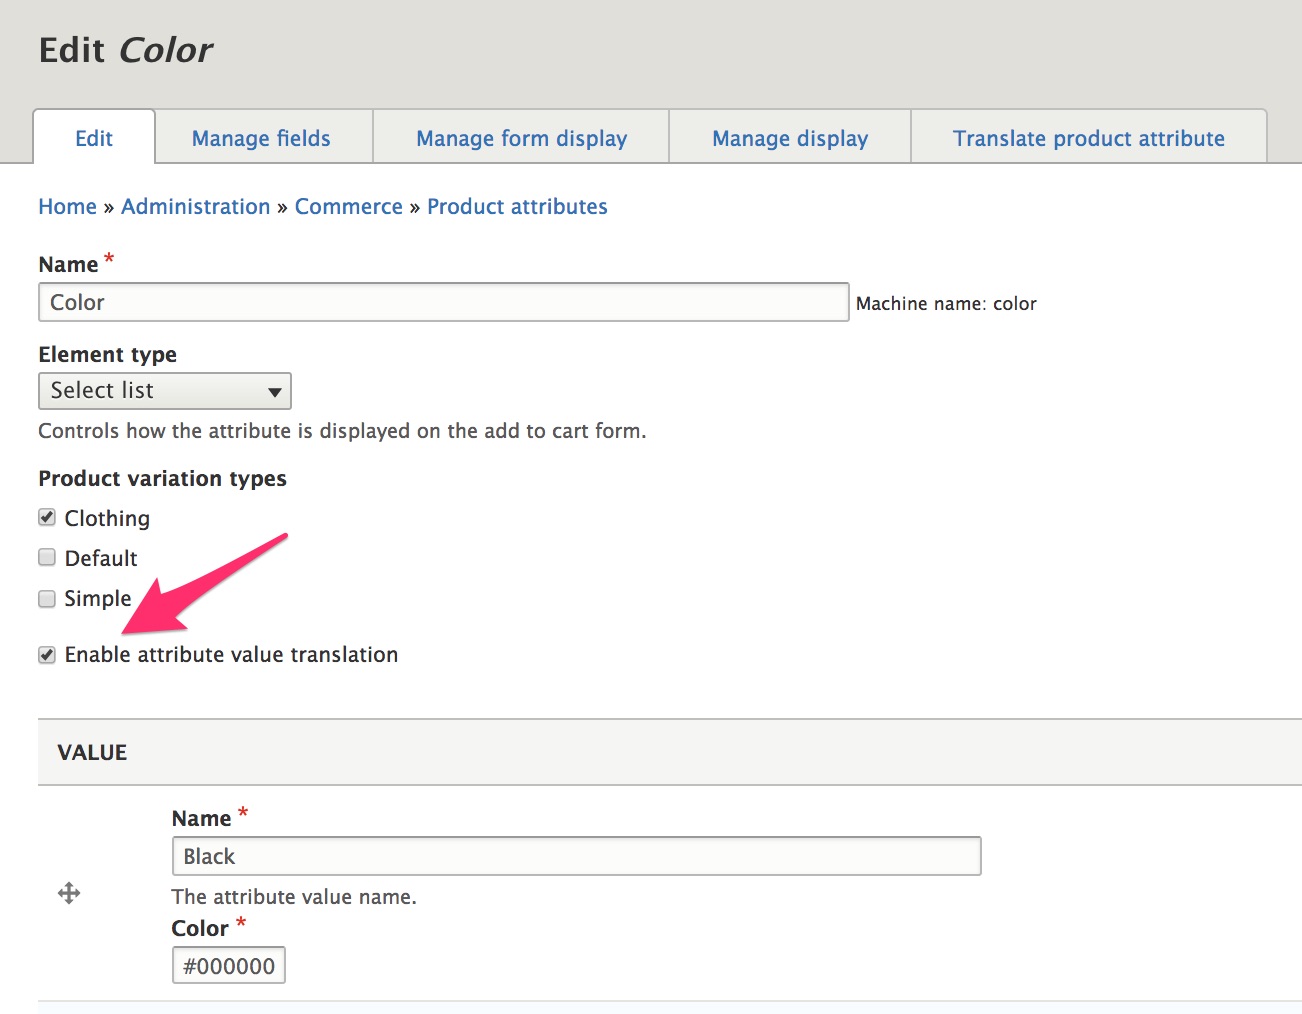
For multilingual product attribute values, you need to enable attribute value translation for each product attribute that requires translation.
- Go to the Product attributes page by selecting the menu item from the main Commerce menu or navigating to
/admin/commerce/product-attributes - Click the Edit button for each product attribute.
- Click the checkbox for Enable attribute value translation.
- Click the Save button (below the list of attribute values).
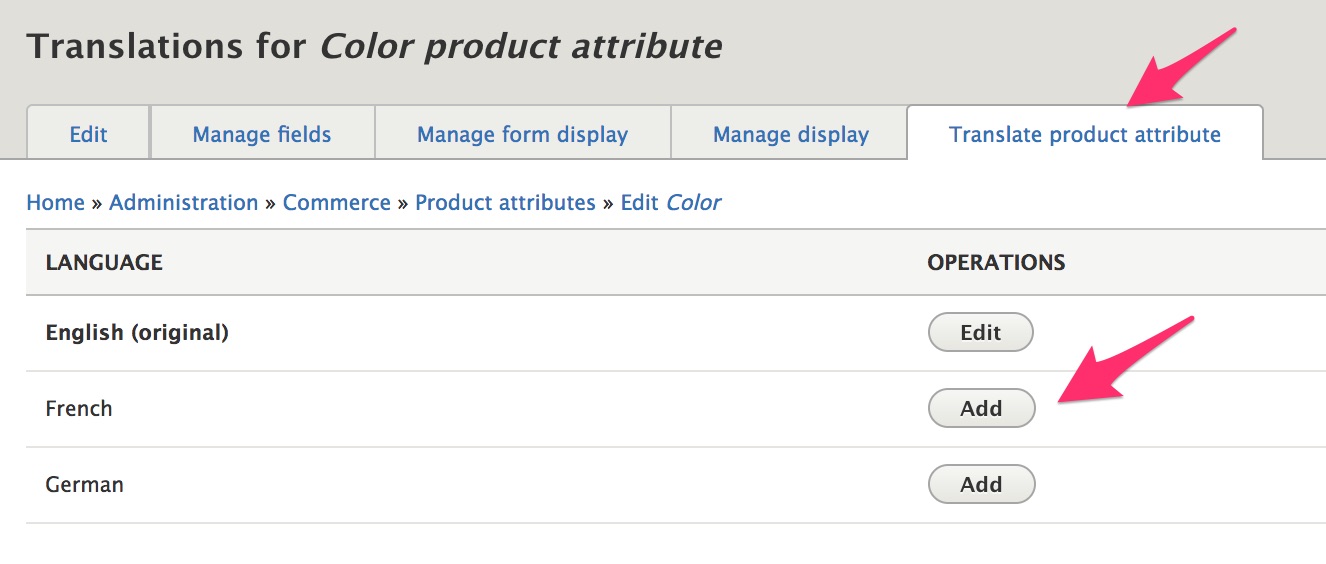
After enabling translation for an attribute, navigate to its Translations page. For the Color attribute, this page is located at /admin/commerce/product-attributes/manage/color/translate. You can also use the Translate product attribute tab link. Click the Add or Edit button next to each language to enter translations.
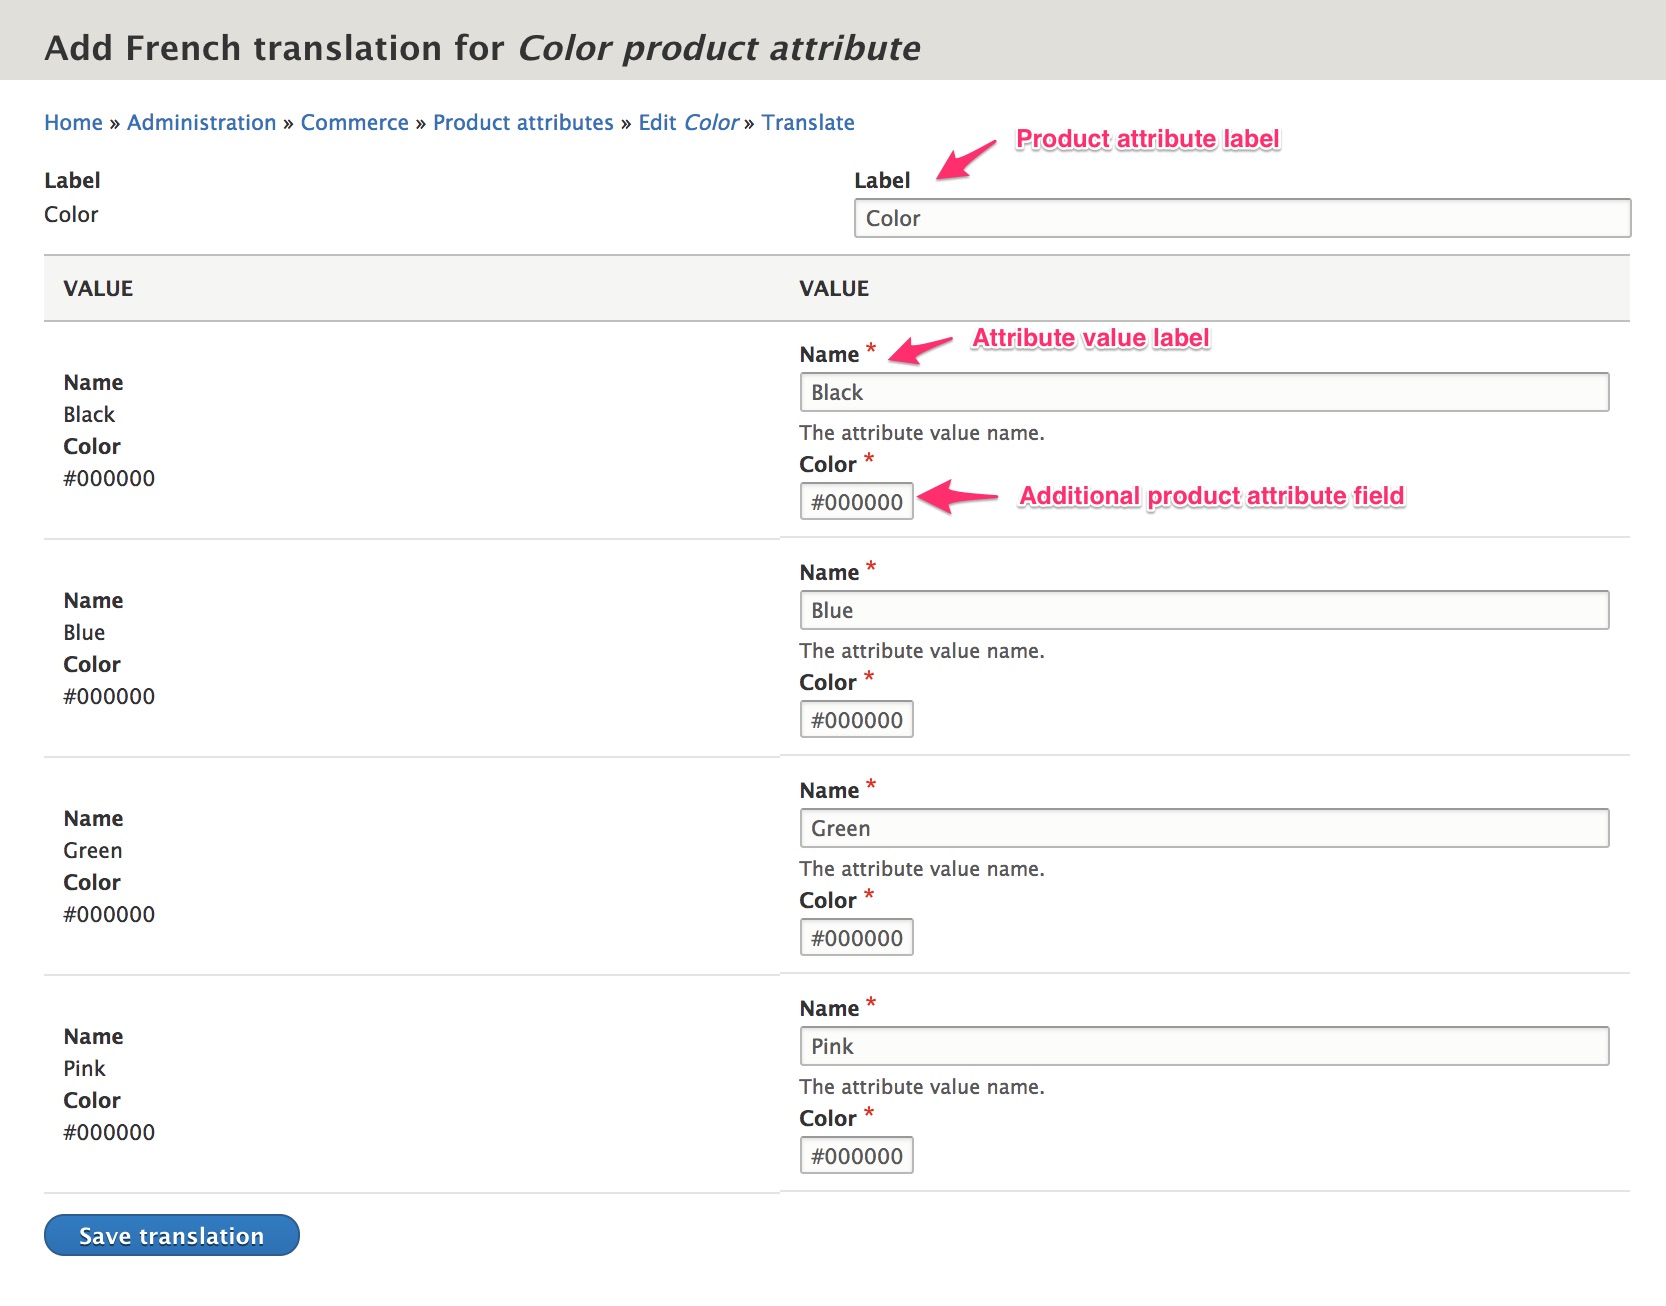
You can add translations for the product attribute label and the names for each of its values. If you added extra fields to a product attribute that also need to be translated, you can enable those fields for translation using the main Content language configuration page, located at /admin/config/regional/content-language. For our Color product attribute, adding a translation for the hex value of its Color field doesn't make sense, but for other added product attribute fields, translations might be necessary.
Code recipes
If you want to write custom code to programatically create or manage your product architecture, you can use these code recipes as a starting point.
Create:
Load:
Implement:
In the Simple product type documentation, we looked at creating a product type through the administration UI. A Simple product variation type was created automatically for us. If you are creating a product type programatically, you will need to create its product variation type before you create the product type.
    /**
     * id [String]
     *   Primary key for this product type.
     *
     * label [String]
     *   Label for this product type
     *
     * description [String]
     *   Description for this product.
     *
     * variationType [String] - [DEFAULT = default]
     *   Foreign key for the variation type used.
     *
     * multipleVariations [Bool] - [OPTIONAL, DEFAULTS TO TRUE]
     *   Whether products of this type can have multiple variations.
     *
     * injectVariationFields [Bool] - [OPTIONAL, DEFAULTS TO TRUE]
     *   Whether or not to inject the variation fields.
     */

    // Create the product type.
    $product_type = \Drupal\commerce_product\Entity\ProductType::create([
    'id' => 'my_custom_product_type',
    'label' => "My custom product type",
    'description' => '',
    'variationType' => 'my_custom_variation_type',
    'multipleVariations' => TRUE,
    'injectVariationFields' => TRUE,
    ]);
    $product_type->save();

    // These three functions must be called to add the appropriate fields to the type
    commerce_product_add_variations_field($product_type);
    commerce_product_add_stores_field($product_type);
    commerce_product_add_body_field($product_type);
    /**
     * id [String]
     *   The primary key for this variation type.
     *
     * label [String]
     *   The label for this variation type.
     *
     * status [Bool] - [OPTIONAL, DEFAULTS TO TRUE]
     *   [AVAILABLE = FALSE, TRUE]
     *   Whether or not it's enabled or disabled. 1 for enabled.
     *
     * orderItemType [String] - [DEFAULT = default]
     *   Foreign key for the order item type to use.
     *
     * generateTitle [Bool] - [DEFAULT = TRUE]
     *   Whether or not it should generate the title based off of product label and attributes.
     */
    $variation_type = \Drupal\commerce_product\Entity\ProductVariationType::create([
    'id' => 'my_custom_variation_type',
    'label' => 'Variation Type With Color',
    'status' => TRUE,
    'orderItemType' => 'default',
    'generateTitle' => TRUE,
    ]);
    $variation_type->save();
    /**
     * id [String]
     *   The primary key for this attribute.
     *
     * label [String]
     *   The label for this attribute.
     */
    $color_attribute = \Drupal\commerce_product\Entity\ProductAttribute::create([
    'id' => 'color',
    'label' => 'Color',
    ]);
    $color_attribute->save();

    $size_attribute = \Drupal\commerce_product\Entity\ProductAttribute::create([
    'id' => 'size',
    'label' => 'Size',
    ]);
    $size_attribute->save();

    // We load a service that adds the attributes to the variation type we made previously.
    $attribute_field_manager = \Drupal::service('commerce_product.attribute_field_manager');

    $attribute_field_manager->createField($color_attribute, 'my_custom_variation_type');
    $attribute_field_manager->createField($size_attribute, 'my_custom_variation_type');
    // Loading is based off of the primary key [String] that was defined when creating it.
    $product_type = \Drupal\commerce_product\Entity\ProductType::load('my_custom_product_type');
    // Loading is based off of the primary key [String] that was defined when creating it.
    $variation_type = \Drupal\commerce_product\Entity\ProductVariationType::load('my_custom_variation_type');
    // Loading is based off of the primary key [String] that was defined when creating it.
    $size_attribute = \Drupal\commerce_product\Entity\ProductAttribute::load('size');
The ProductVariation entity class implements the PurchasableEntityInterface. Any content entity type that implements this interface can be purchased. Line items (order items) have a purchased_entity reference field. If you develop a content entity type that implements this PurchasableEntityInterface, you can set up an order item type to allow customers to purchase your custom entity type instead of standard product variations.
    <?php

    namespace Drupal\commerce;

    use Drupal\Core\Entity\ContentEntityInterface;

    /**
     * Defines the interface for purchasable entities.
     *
     * Lives in Drupal\commerce instead of Drupal\commerce_order so that entity
     * type providing modules such as commerce_product don't need to depend
     * on commerce_order.
     */
    interface PurchasableEntityInterface extends ContentEntityInterface {

        /**
         * Gets the stores through which the purchasable entity is sold.
         *
         * @return \Drupal\commerce_store\Entity\StoreInterface[]
         *   The stores.
         */
        public function getStores();

        /**
         * Gets the purchasable entity's order item type ID.
         *
         * Used for finding/creating the appropriate order item when purchasing a
         * product (adding it to an order).
         *
         * @return string
         *   The order item type ID.
         */
        public function getOrderItemTypeId();

        /**
         * Gets the purchasable entity's order item title.
         *
         * Saved in the $order_item->title field to protect the order items of
         * completed orders against changes in the referenced purchased entity.
         *
         * @return string
         *   The order item title.
         */
        public function getOrderItemTitle();

        /**
         * Gets the purchasable entity's price.
         *
         * @return \Drupal\commerce_price\Price|null
         *   The price, or NULL.
         */
        public function getPrice();

    }
Links and resources
- Making Your Site Multilingual
- Drupal 8 User Guide documentation on Concept: Taxonomy