Products
Product Types represent a standalone product or potentially a single variation in a group of related products (such as a single size of a style of t-shirt). Every product must have a Title, a unique merchant-defined SKU, and a base price in the default Price field. Additional fields to represent internal data or product attributes may be added as necessary, and new product types can be created to facilitate multiple sets of fields.
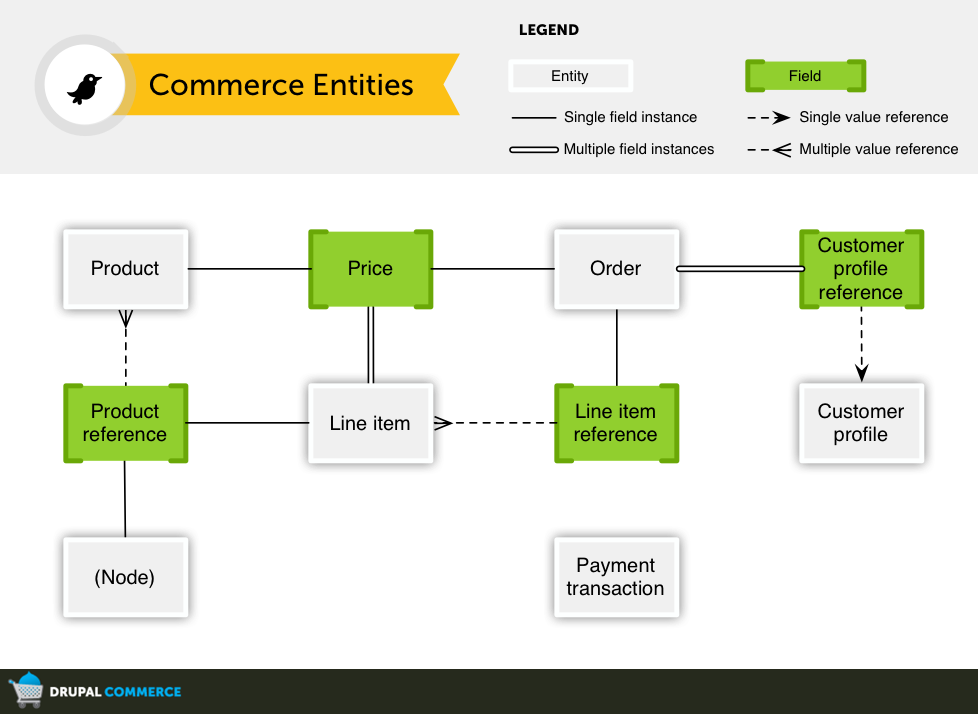
The above graphic shows all of the Drupal Commerce Entities. Note the ubiquitous Drupal node is "grouping" or "referencing" various products. We achieve this with a product reference field. When you add a product to your cart and/or you go to checkout, an order is created with a line item that references your product. Finally, the customer is taken through the checkout process and the order status is hopefully updated to "complete."
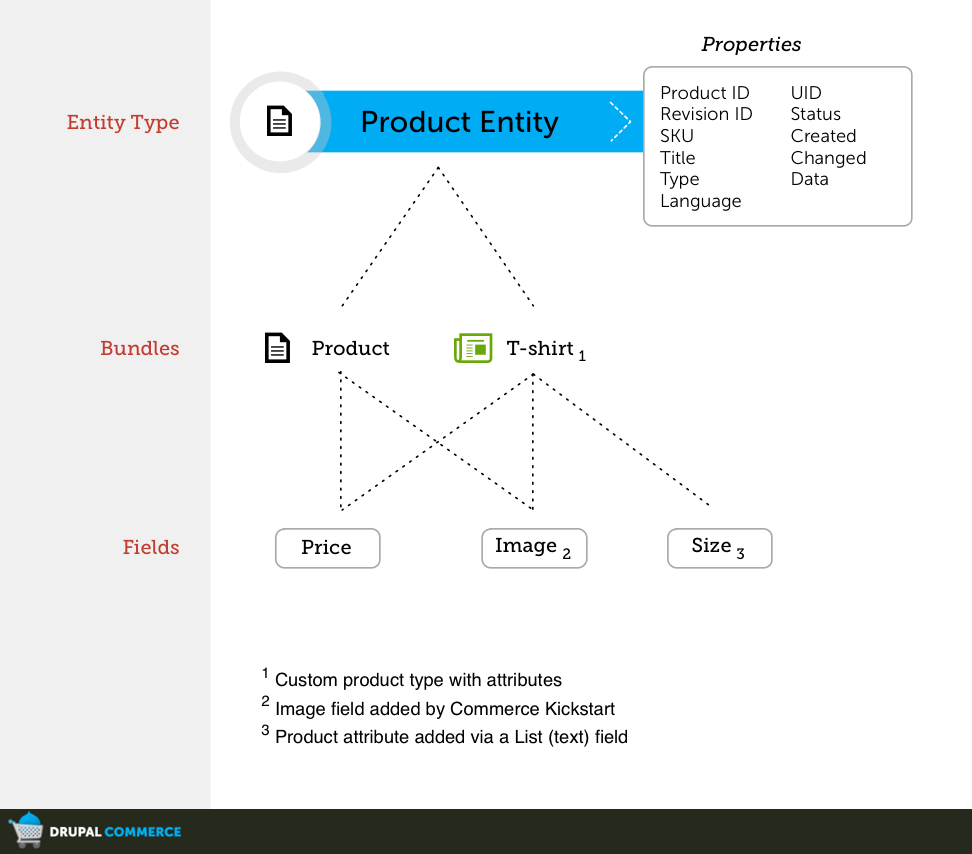
Next, we have a quick look at the product entity. The graphic above shows us that the standard Product Entity can be used to create "bundles" (similar to content types) that have various fields. Some of the fields are absolutely required for each kind of product type (note the properties list).
Product Variations
Page or Variation?
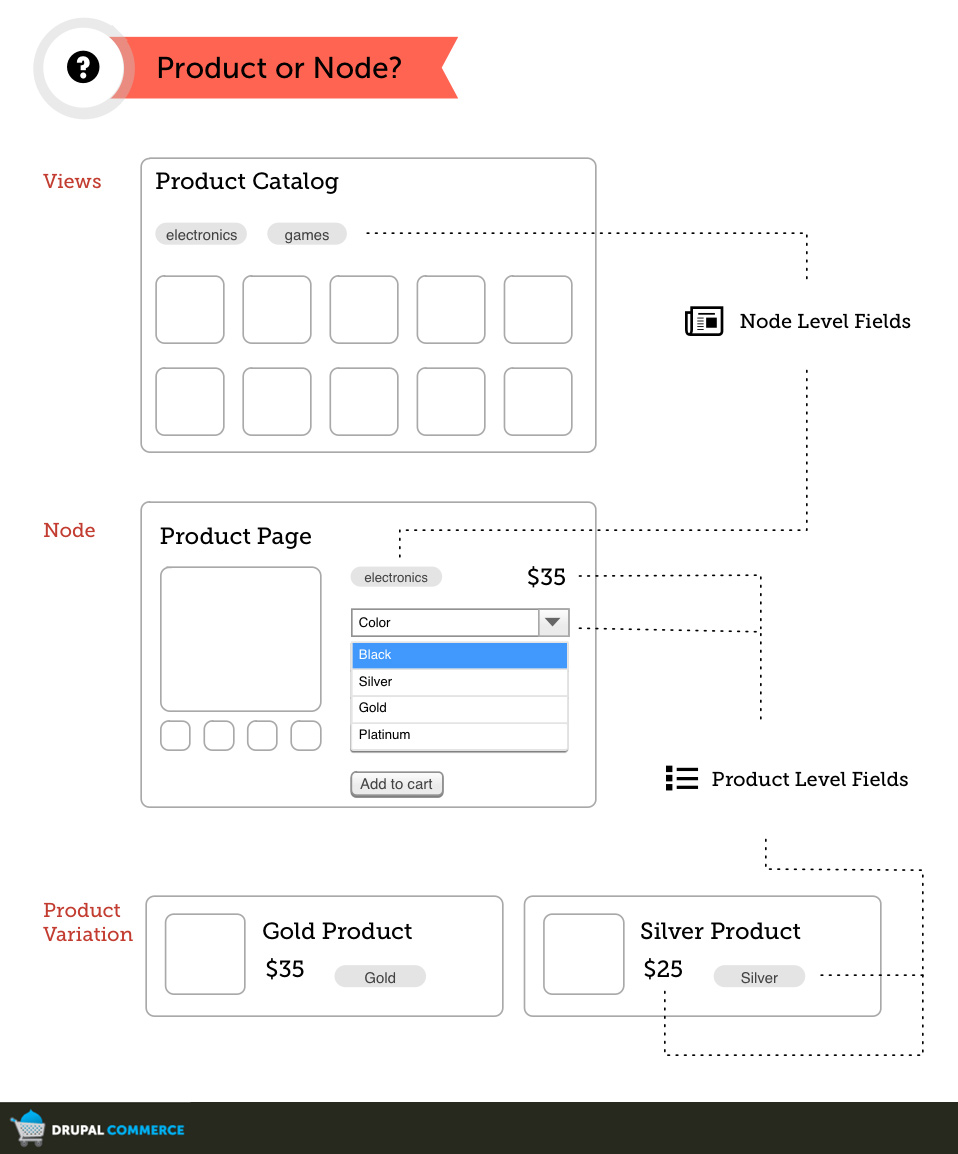
This illustration explains the differences between product pages (nodes) and product variations (products).
Let's say you have a t-shirt shop. One of your products is a very cool blue Drupal-or-Nothing shirt. This shirt comes in a variety of catchy colors and sizes. The way Drupal Commerce works is that it makes no assumption about how you want to organize your products. Very much like a retail outlet, each specific variation ("blue" and "xl") have their own SKU and potentially their own price. But for this t-shirt shop you want to have a product page called "Drupal-or-Nothing" that displays all the sizes in a nice, configurable shopping experience that we've all seen around the web.
That's where the node comes in. In Drupal Commerce, you need to add products separately from product pages. So, to make our Drupal-or-Nothing page, we simply create a product display node and reference all of our Drupal-or-Nothing shirts using the product reference field.
Product Types
Using Drupal 7's entity system has provided us with a very simple paradigm: Nodes have Content Types. Content Types have fields and made lots of sense for content-related items. Product Entities are similar to Content Types. You can create Product Types with various fields.
For example, you may want to sell physical books, ebook downloads, and have a donation system similar to Kickstarter for up-and-coming authors. Each product type can have it's own set of fields, rules, display settings, etc. You can add and edit product types right there in core using strikingly familiar forms (they are literally the same as the content type forms, minus all of the unnecessary content type settings). Let's quickly examine three different product types, with a few fields:
- Physical Books
- Front Cover Image
- Author Image
- eBook Reference Field
- Downloadable eBooks
- eBook Free Preview
- eBook Full PDF Download
- Author Kickstarter Donations
- Donation Level (custom line item type)
- Words of Encouragement (custom line item type)
- T-shirt size (custom line item type)
We're sure you can come up with your own set of really interesting cross-selling kinds of products that push our Product entities to their limits! Let us know here if you have a site that you would like featured in the Showcase.
- Product Attributes and Variations
- Product Displays
- Administering Products
- Setting up a Product Catalog
- Importing Products using Feeds
Product Attributes & Variations
Product attributes are the descriptors we use to define kinds of products. For example, we could describe a tshirt by the color and size. These attributes mean that in the real physical world your store may only carry one red shirt, but you have three sizes or three "variations." Commerce software must deal with product variations in a flexible way. Here's how Drupal Commerce abstracts it:
- Product Types. A product type is a specific bundle based on a custom product entity. Each bundle can have fields attached to it, including pictures and other kinds of information.
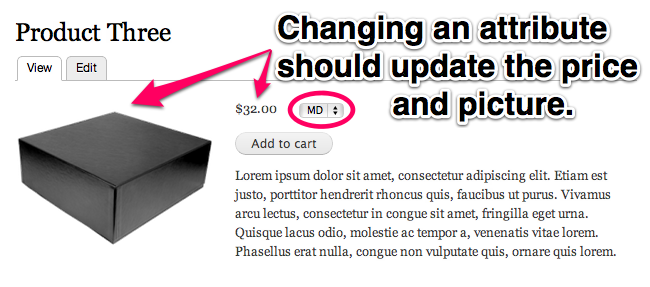
- Product "Informational" Fields. Any field on a product can be a simple "informational" field. Typical informational fields include an image of that specific configuration of a product. For example, if you sell a tshirt with a cool print in multiple colors, each product with a different color could have an image field that, when displayed on the product display node, will change when you select different attributes (like color).
- Product "Attribute" Fields. Any field on a product type with a defined list of options (list of text options, list of taxonomy terms, list of colors). The attribute fields are special because of the way they turn into selection widgets on a product display. Often you will pair an attribute field (like a color dropdown) with an information field (like an image field) to let the user "select" the blue tshirt and the Drupal Commerce system will quickly load the picture associated with the blue product.
- Product Displays. If needed at all, these are groupings of products. You can reference any type and number of products on a product display. In order to make use of product displays, we recommend only showing one type of product per product display. The product display is where you typically see the product with drop downs to "configure" or "order" the right kind of product.
Example attribute configuration
Lets walk through setting up an attribute field on a product type and see how it interacts with the product fields injected on the product display. For this example, we are using Commerce Kickstart 1.x
Product Types
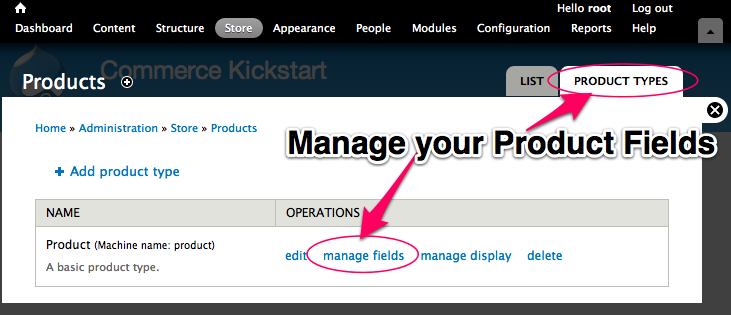
Navigate to your Store page and click on "Products" and then "Product Types" and then "Manage Fields." This is the standard way to find, create, and edit different types of product. You can add as many types of products as you want, but make sure you understand the difference between product types and product displays.
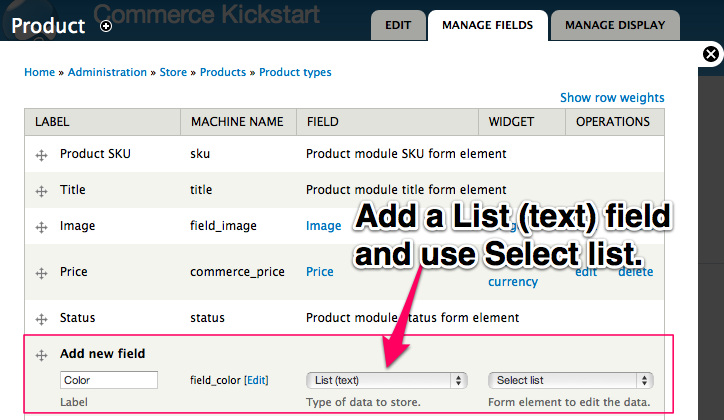
Add Product Field
When you navigate to the manage field screen, if you are a Drupal native, you'll notice that the field screen is just like a manage field screen for content types. We'll need a List (text) using a select list. This could also be a taxonomy term reference, or any kind of simple list field.
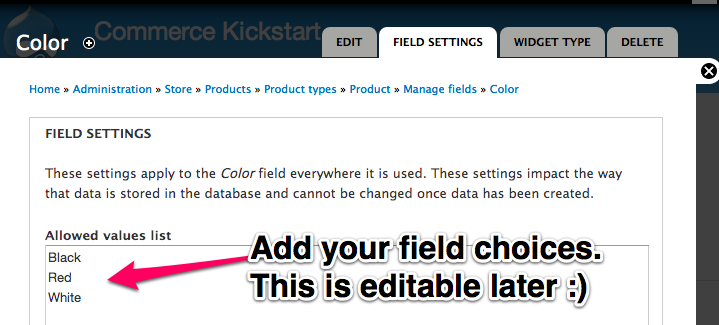
Add Field Choices
This can be any simple list, one for each new line. Let your imagination run wild! Click "Save."
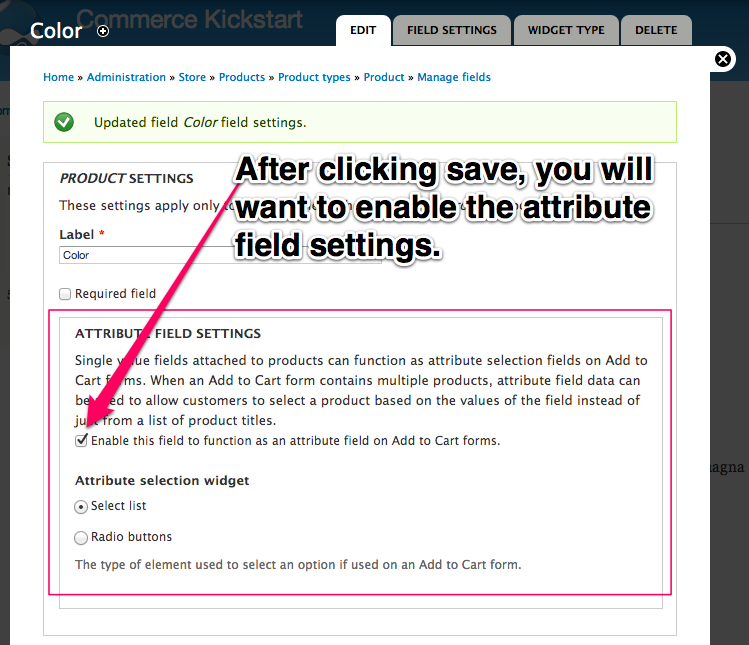
Enable Attribute Field
This is the most important step as it is what turns a normal field into an attribute field that can change the Add to Cart form on update.
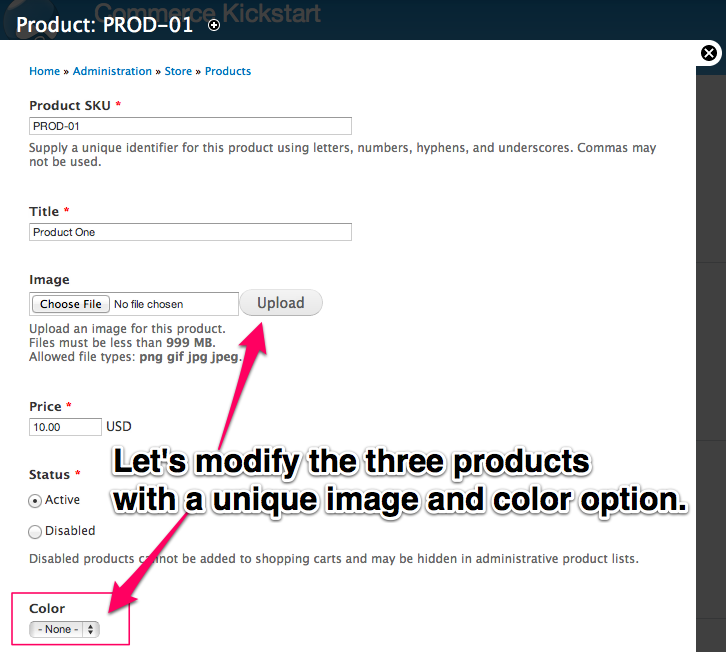
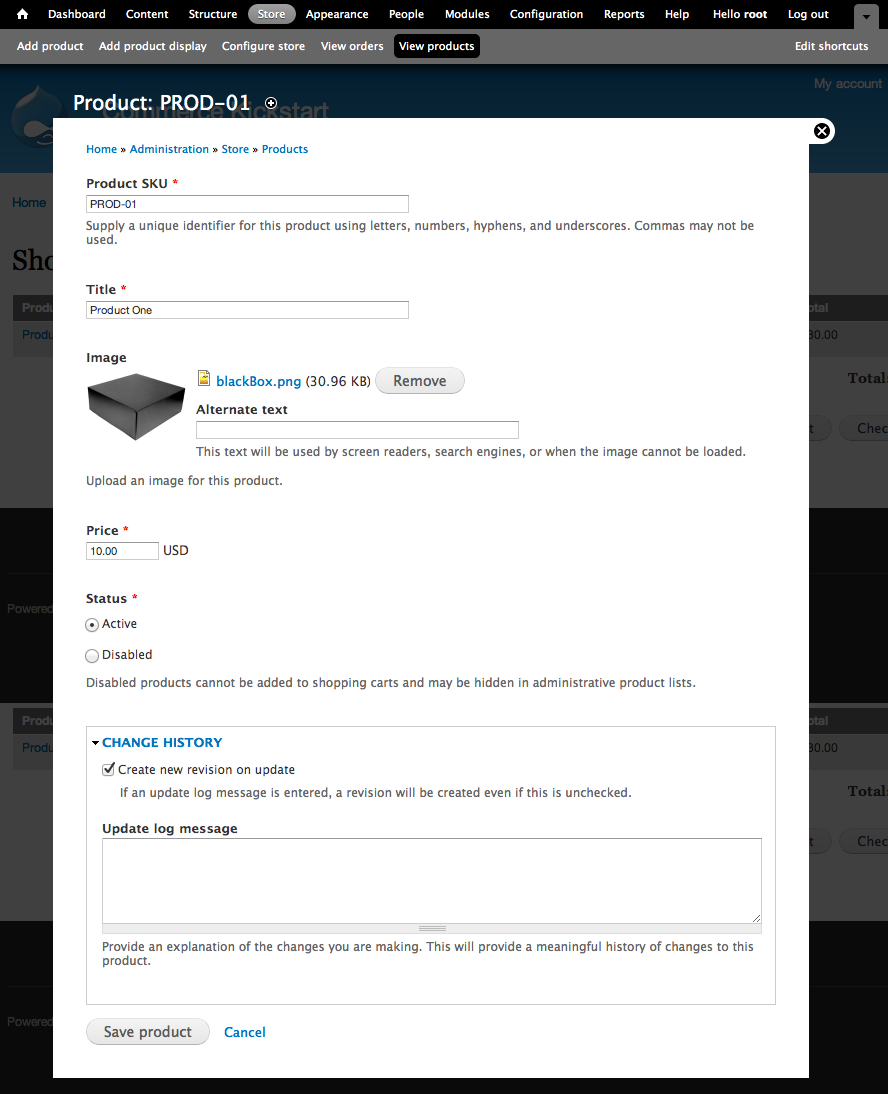
Modify Products
Here is the edit screen of PROD-01 that comes with the standard Commerce Kickstart 1.x. Notice we have a new "Color" field that you have just added to the Product Type. Repeat this for all three products. Add a picture and choose a color.
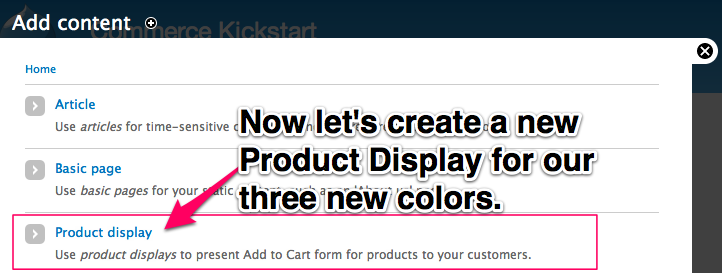
Add Product Display
Navigate to the Content List screen and click "Add Content." This will then list all of the content types on your site. Our Product Display content type is the third one after a Commerce Kickstart install. Select it to create a new Product Display to attach our three products on.
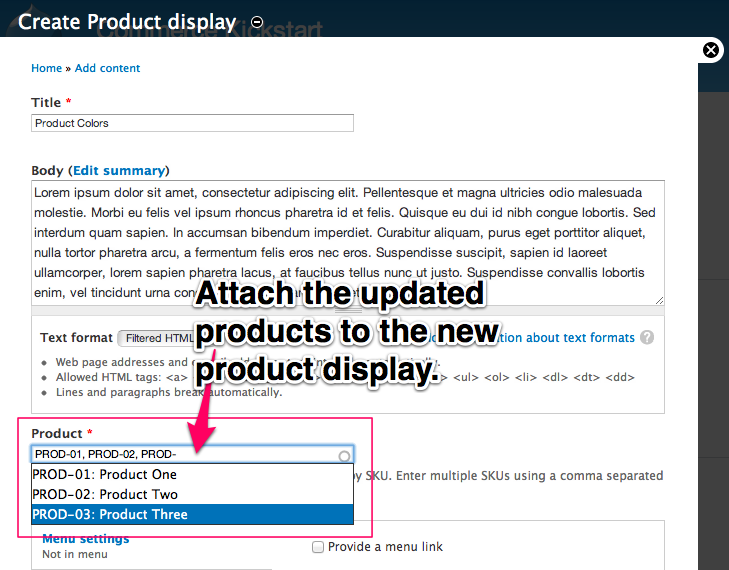
Attach Products
This is the Product Reference Field that is included on Commerce Kickstart's Product Display Content Type. Any content type that has this kind of field is able to connect products and display an "Add to Cart" button. This field will take the three products that we have updated with our new information and create an interactive drop down list of our color field options.
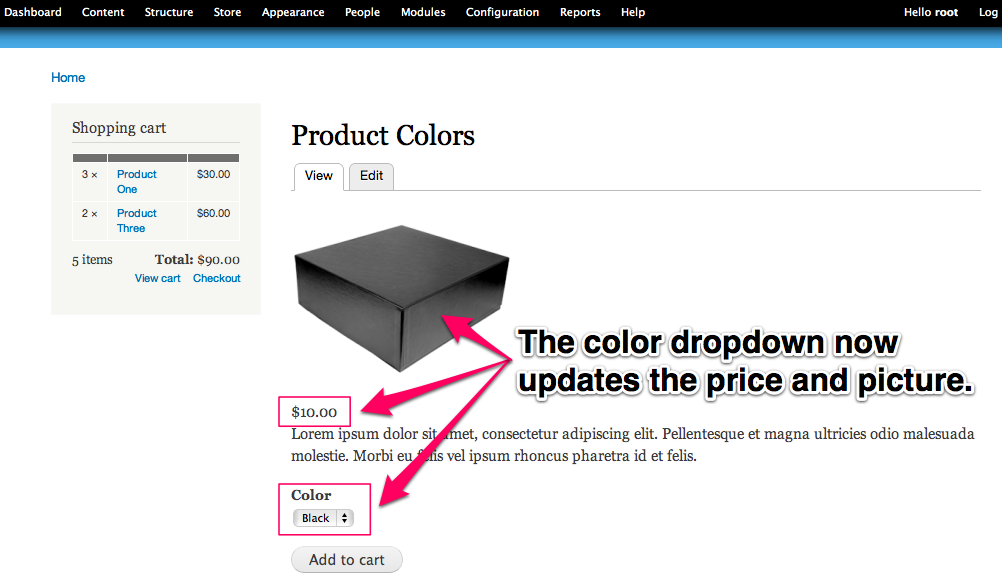
Final Result
The color drop down now updates the price and picture.
Product Displays
Think of nodes as a way of grouping like products together. The most obvious grouping is one product that has variations in size, color, etc. In Drupal Commerce every variation is a product and to group them properly, we use Product Displays.
"Product Display" is the default content type that Commerce Kickstart 1.x creates and it has a product reference field. Technically, any entity that has a product reference field could be considered a product display. Nodes are the obvious product display entity type, and they're privileged because they're the default and standard entity type to use for the front-end display of content. But you could use taxonomy vocabularies, or even users as product displays.
Page or Variation?
This illustration explains the differences between product pages (nodes) and product variations (products).
Advantages of Separating Product & Product Display
A product in Drupal Commerce can represent one of several things:
- A single item for sale on the site
- A variation in a group of items for sale on the site (e.g. one size of a t-shirt)
- A non-tangible product reserved through the site (e.g. event registration)
- An item that is not purchased but which represents the purpose of payment for a particular order (e.g. donation account or campaign)
Depending on the product and the site’s needs, products may be displayed on unique pages, on pages grouping multiple products together (e.g. all the sizes of a t-shirt), on multiple different pages or Views, or not at all. For this reason, Drupal Commerce enforces a separation between the definition of a product and the product display.
This separation allows you to:
- Track stock for a single product regardless of what display it’s purchased through (especially important for multilingual / multi-domain sites).
- Use a different display strategy to fit the site (e.g. a node per product, a single View listing all available products, etc.).
- Easily manage the import and update of particular product data without worrying about updating related display settings.
Attribute Fields
Attribute Fields
Fields attached to products can be exposed on Add to Cart forms as attribute fields. These are common fields among a group of products whose allowed values may be used to select a particular product from the group to add to the cart.
The settings for attribute fields are built into the field edit form. These are typically List fields and Taxonomy term reference fields, because they have a discrete number of options. Attribute fields can use select list or radio button widgets on the Add to Cart form.
Administering Products
There are only about 20 administrative screens that come with Drupal Commerce. Most of those screens are either Views or Settings Forms. Of particular interest to store managers are the screens available for Product management.
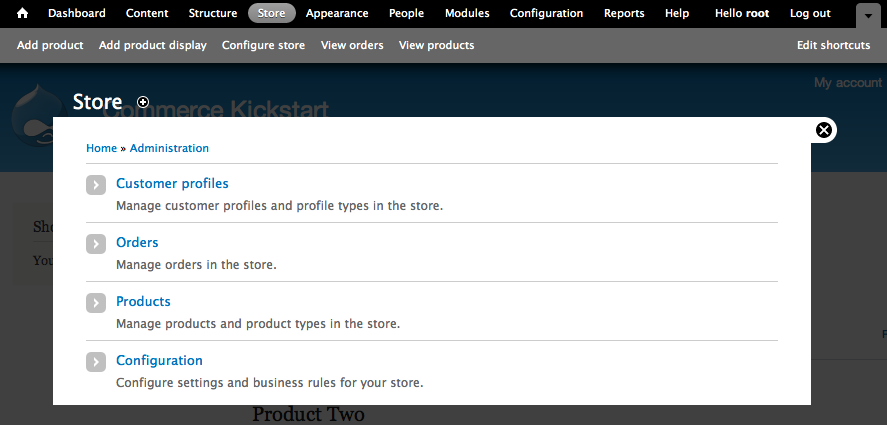
Store Admin Screen
This is the screen you will see when you click on "Store" up in the top toolbar.
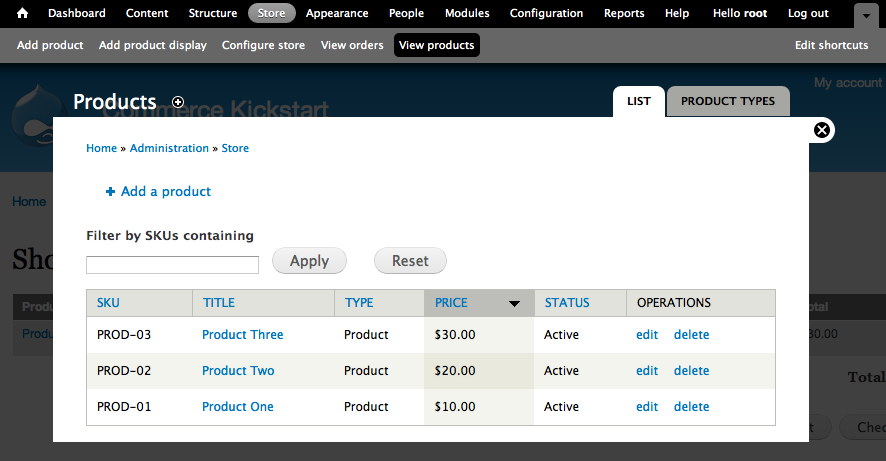
Product Listing
The Product Listing is pretty bare-bones to start with. Below we've made a simple exercise to add a few more filters and an image field. Since this is built with Views, the possibilities are literally endless.
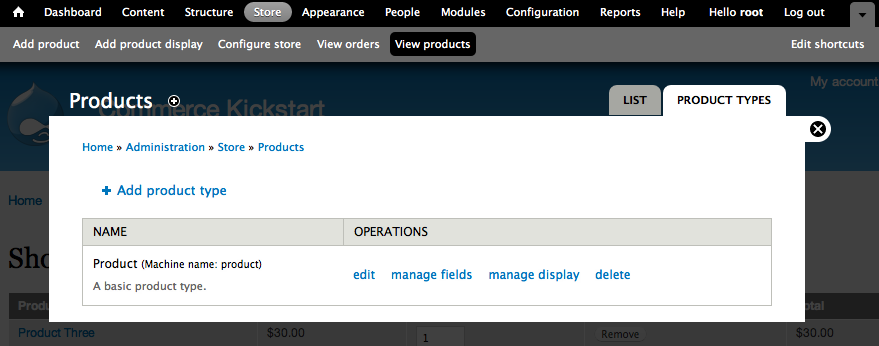
Product Types

Manage Fields
If you click on "Manage Fields" from the standard Product Type this is what you will see. You will note that it is very similar to editing a content type, using the same interface to add fields to product types.See Product Attributes & Variations for more information.
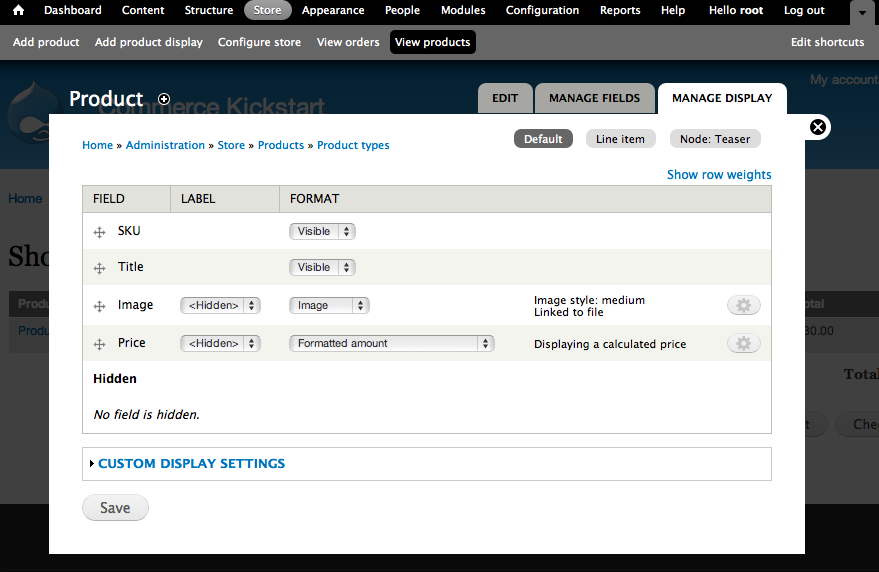
Manage Product Display
This is where you manage how product fields will display in a variety of contexts, such as in the different view modes for product display nodes.
Product Edit Screen
We've included the product edit screen for your benefit to see the Product Entity form in all of it's glory. Pretty simple, we've got the Product SKU and Product Title that are required. Additionally, Commerce Kickstart has added the Image field. The Price can be changed to allow for multiple currencies.
Customizing On-site Product Administration
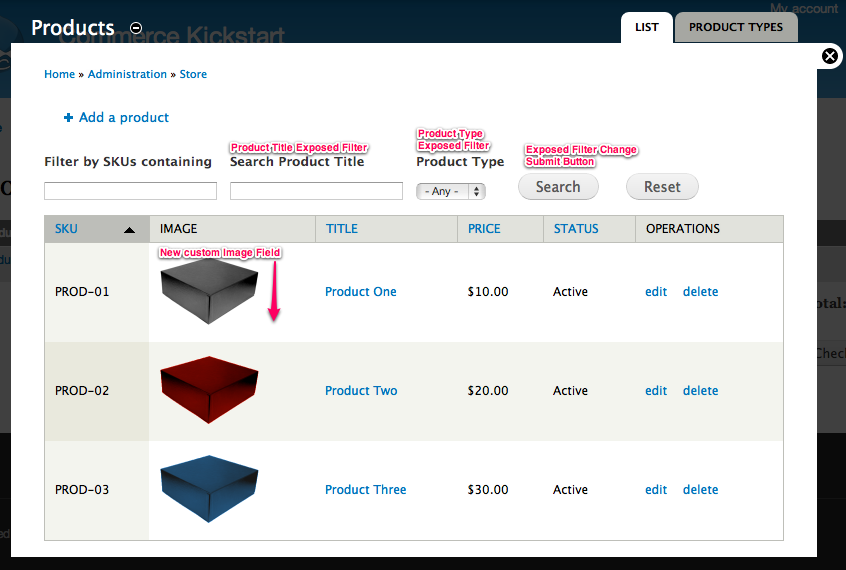
Because all the back-end interfaces in Drupal Commerce are default Views, you have the ability to tailor each page to your needs. The product list includes a simple SKU filter by default but can do much more for you through customization. Below we include a simple exercise where we add an image field, hide the "type" field, and extend a product title keyword filter.
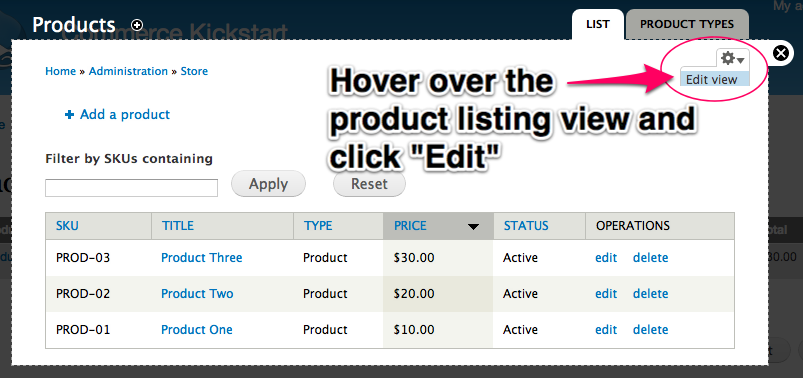
Edit Product View
To start with we are going to use a shortcut to edit the product listing view. This is a very simple way to tweak nearly all of the Drupal Commerce administrative screens.
Remove Product Type
Our first step is to remove the product type. This will be replaced later on with an exposed filter.
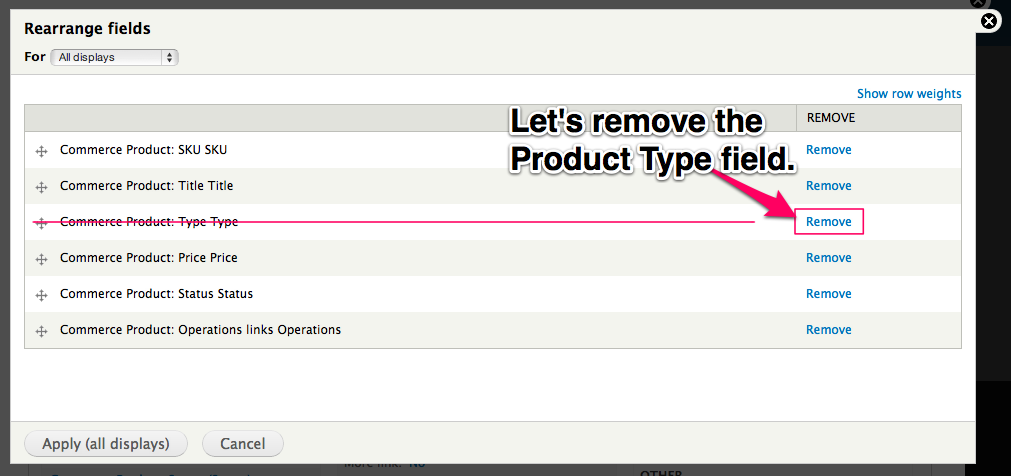
Remove Product Type
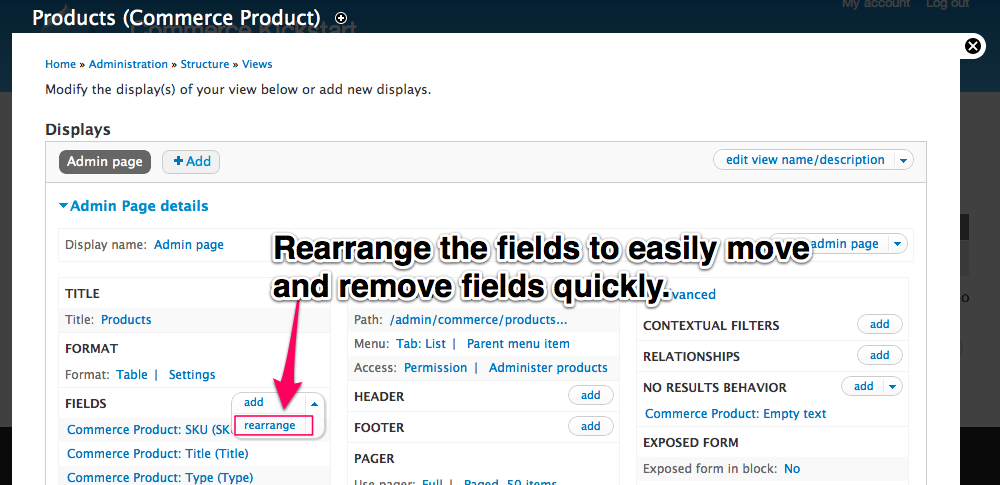
This is a great way to remove and re-order the fields on the product listing table. It's got a nice drag and drop feature as well as a very simple "Remove" capability.
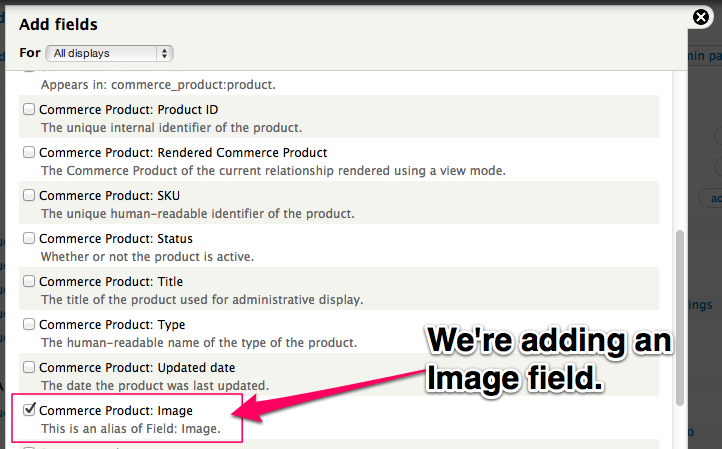
Add Image Field
Go ahead and click "Add" next to the fields list and select "Commerce Product: Image" which is about halfway down in the list. Imagine for a second how many fields are available here for your use. The most useful are probably the "Commerce Product" fields, but there are many more to choose from.
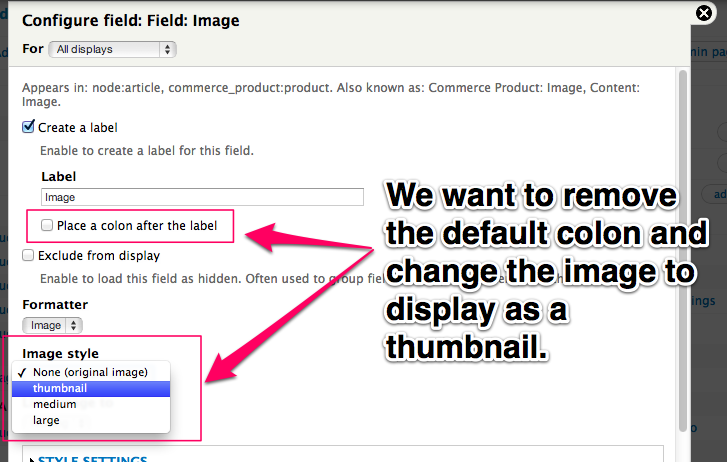
Edit Field Image
We want to remove the default colon and change the image to display as a thumbnail. You may want to go back and re-arrange the fields so that the image field appears closer to the front of the table.See Remove Product Type up above.
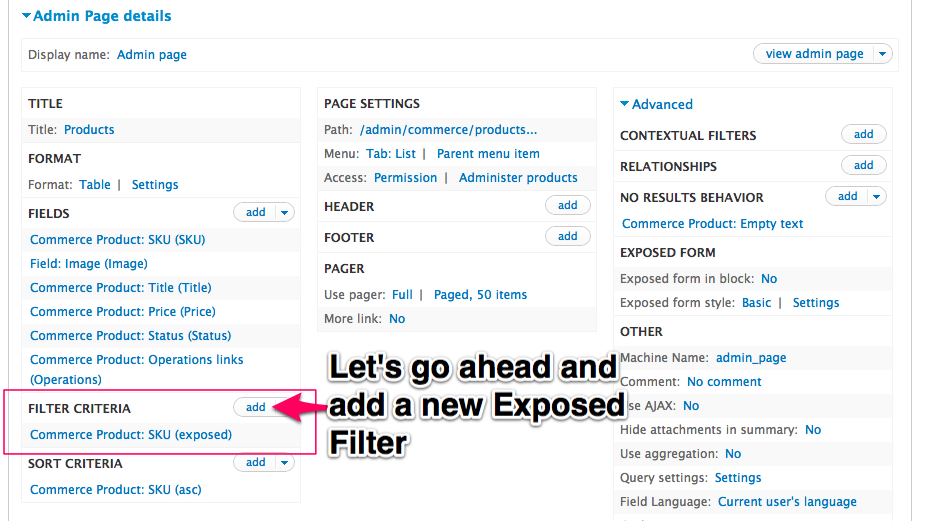
Add Exposed Filters
Exposed filters are one of the coolest features of Views. They create a simple form at the top of the administrative interface and let you setup simple keyword searches and drop downs that are automatically generated.
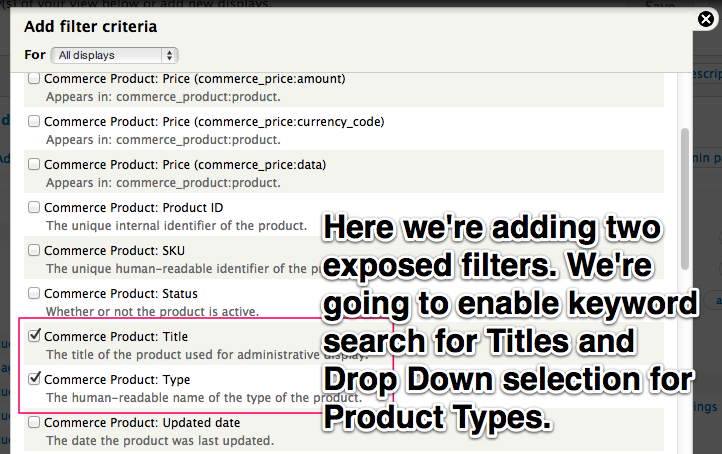
Add Filter Criteria
Here we're adding two exposed filters. We're going to enable keyword search for Titles and drop down selection for Product Types.
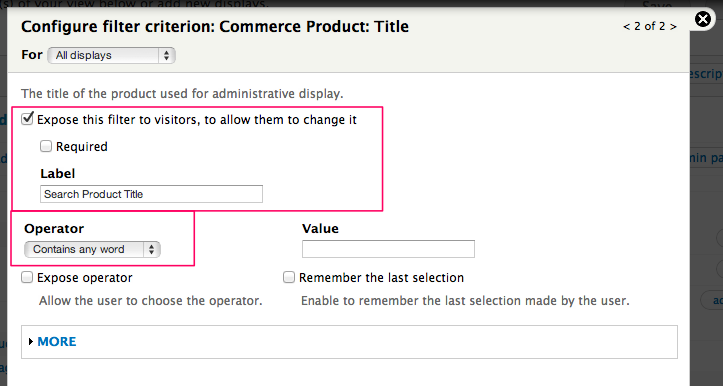
Configure Title Filter
For the title, we will expose the filter and change the operator to "Contains any word."
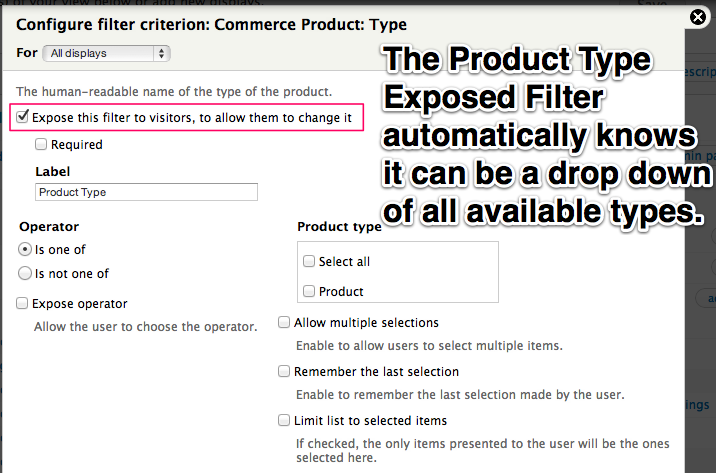
Configure Type Filter
The Product Type Exposed Filter automatically knows it can be a drop down of all available product types.
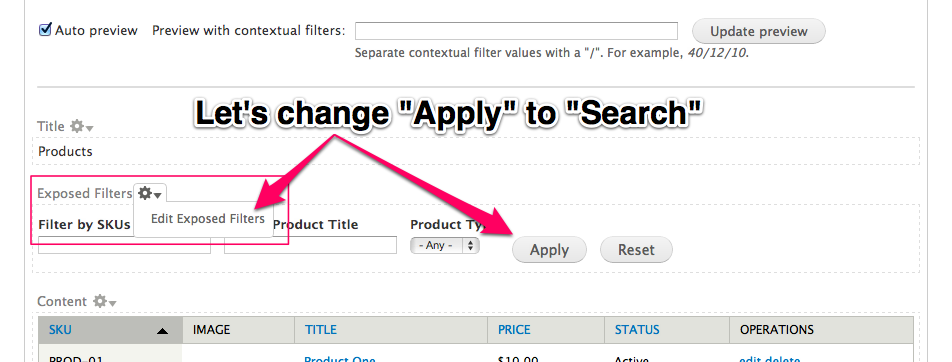
Submit Button Change
Lets change the exposed filter submit button from "Apply" to "Search."
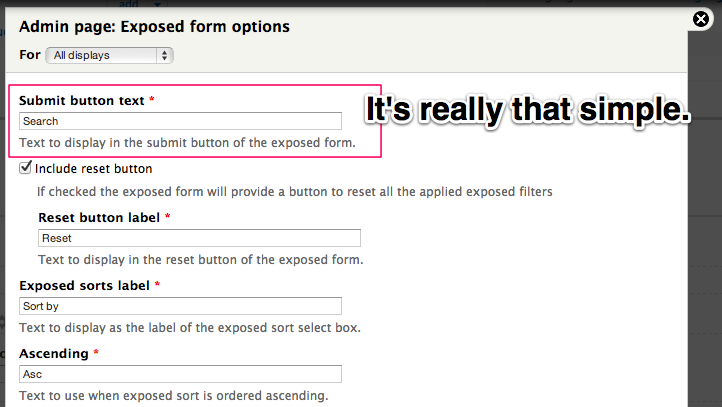
Change Submit Text
It's really that simple. Next we will view our product administration screen. Don't forget to save your View!
Product Admin Screen
Final Customized Drupal Commerce Product Administration Screen.
Contrib Product Administration
If you don't want to tweak Views on your own, we recommend using one or more of the modules listed below to tweak your Drupal Commerce Product Administration experience:
- Editable Fields - http://drupal.org/project/editablefields
- Commerce VBO Views - http://drupal.org/project/commerce_vbo_views
- Admin VBO Views - http://drupal.org/project/admin_vbo_views
On the drupalcommerce.org community site, there is a community-fueled list of all available Drupal Commerce Administrative Modules.
Bulk Product Management with VBO
Using Views Bulk Operations will let you perform batch processes across your whole product list or a subset of the list using specific operations or Rules based operations. The Commerce VBO Views module provides a replacement default product View with a VBO version you can use as an example. Note that it does not overwrite the existing View but disables the default View and enables the VBO View at the same URL.
Further integrating Editable Fields with the VBO powered View will also let you edit individual field values within the View itself even without a batch process.
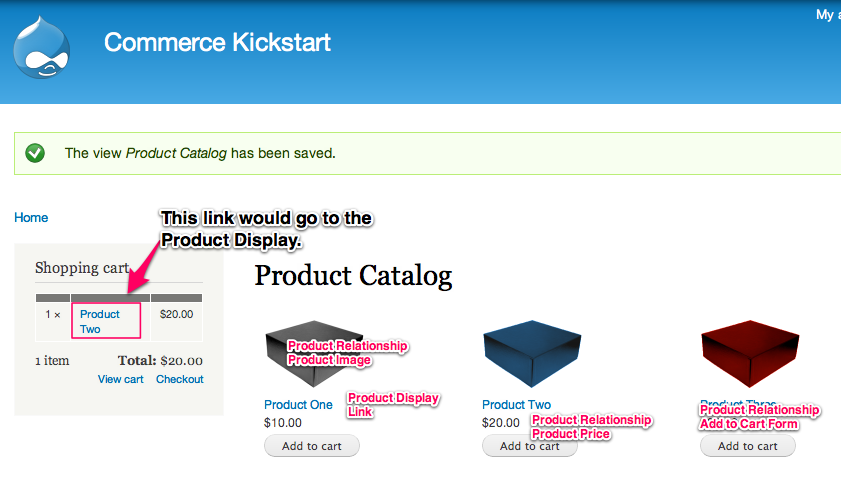
Setting up a Product Catalog
Catalogs or product display listings are critical to the success of your new eCommerce website. Fortunately for your site, it's running Drupal 7 and Views 3. This means just about anything is possible when it comes to displaying your Products.
Before moving forward, you're going to need to know the difference between product displays and product entities. Additionally, it would help if you had more than a passing understanding of what Views does. Particularly in the Views Relationship area.
Drupal eCommerce Catalog Recipes
We have boiled down most catalogs into four approaches. Are there more? Probably. If you can master two or more of these, you are well on your way to making all kinds of eCommerce possibilities.
- Product Display Listing using Views
- Simple Product Listing using Views
- Advanced Product Display Listing using Views
- Taxonomy Listing of Product Display Teasers
Product Display Listing using Views
The first catalog we will create is a simple View that will show product teasers. This is similar to the approach used by Drupal core to populate your homepage on install. Re-making it in Views means you could tweak it using the Views interface.
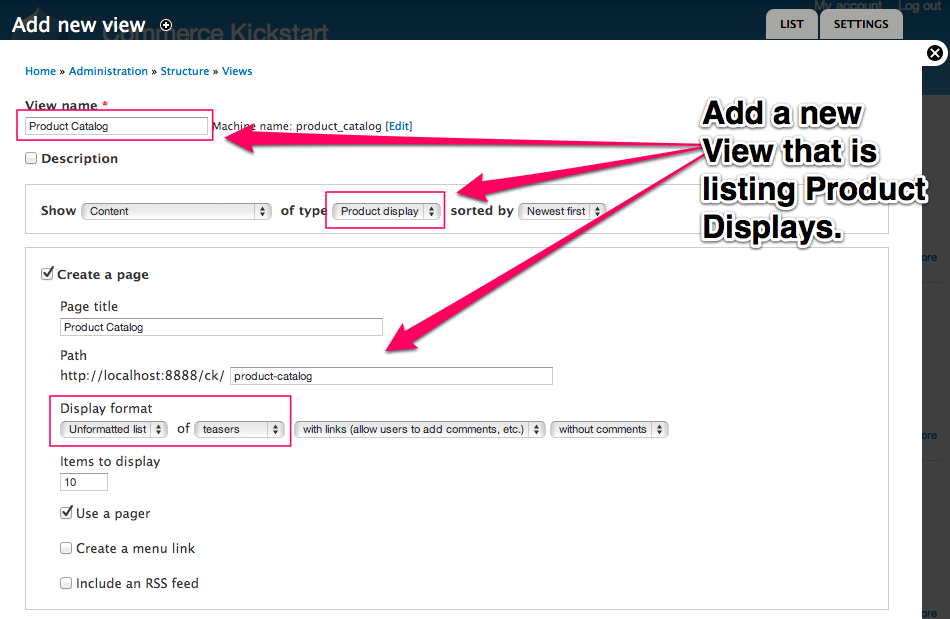
New View
This is the only step in this version of the catalog. You could pick table or perhaps "Grid" to spice it up a bit from the homepage that ships with all Drupal installations.
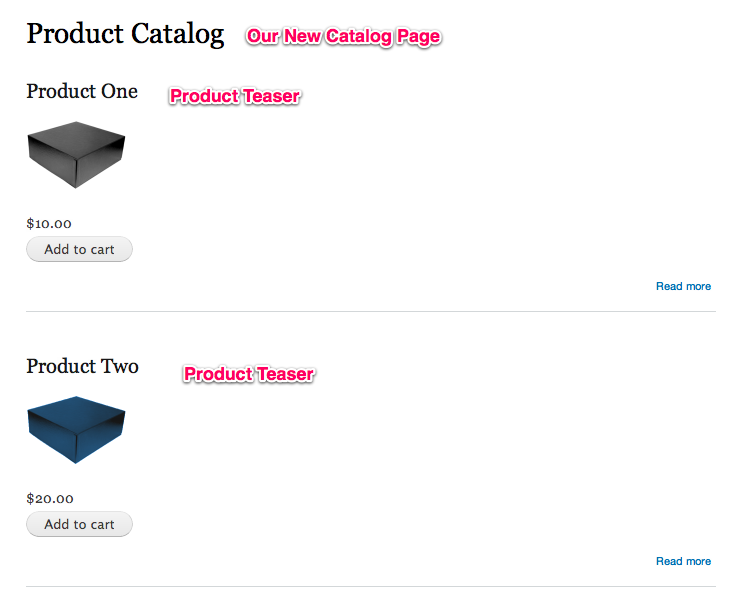
New Catalog Page
The Product Teasers can be controlled via the Manage Display under the Store > Products > Product Types.
Simple Product Listing using Views
This is a simple listing of Product Entities that have no link, just a simple Add to Cart Button and a price. This would be good for a one-page catalog, perhaps a table with available donations, etc.
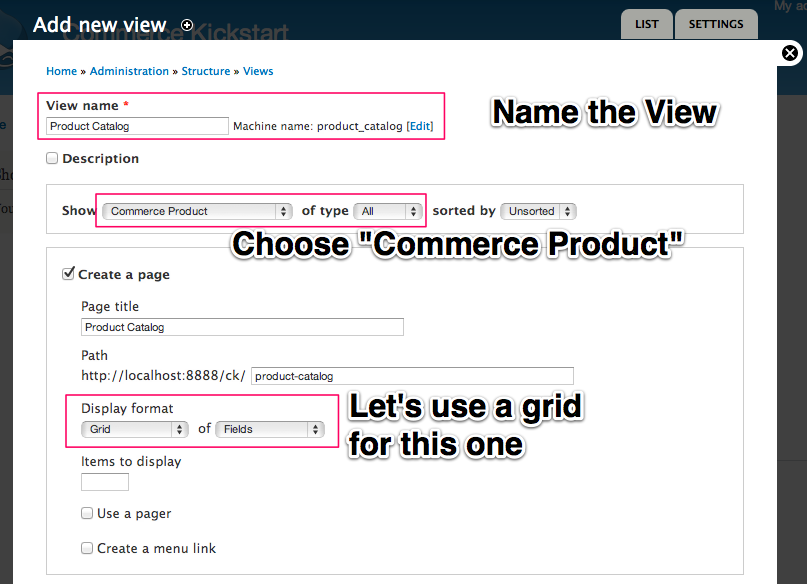
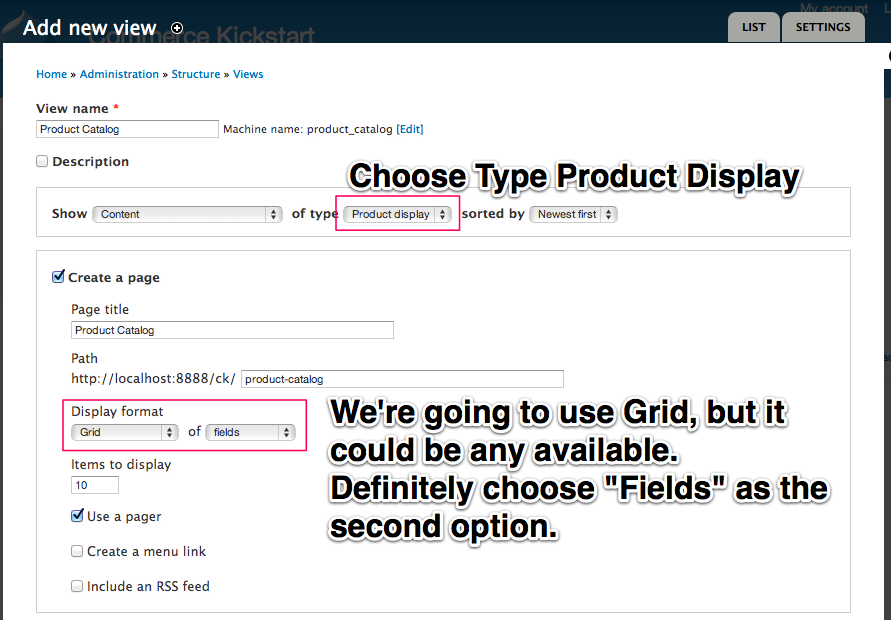
Name the View
Navigate to the Add a New View and fill out the form in a similar manner to the way you see here. Of particular note is the fact that we aren't listing Content, we are listing eCommerce Products. Also note that this view is designed to be a single page with no product details. This has limited use cases. Typically you would want to list product displays and link to them.

Add Fields
This is the first screen of two screens we're going to show you for adding fields.
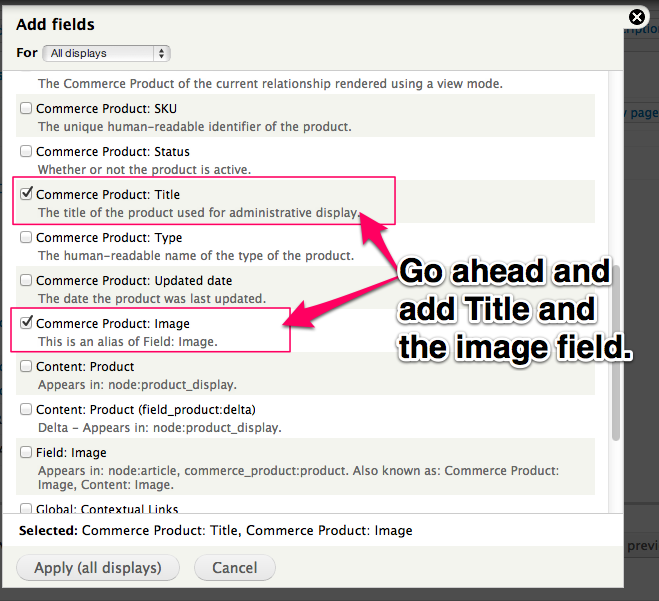
Add Fields
This is the second screen of two screens we're going to show you for adding fields.
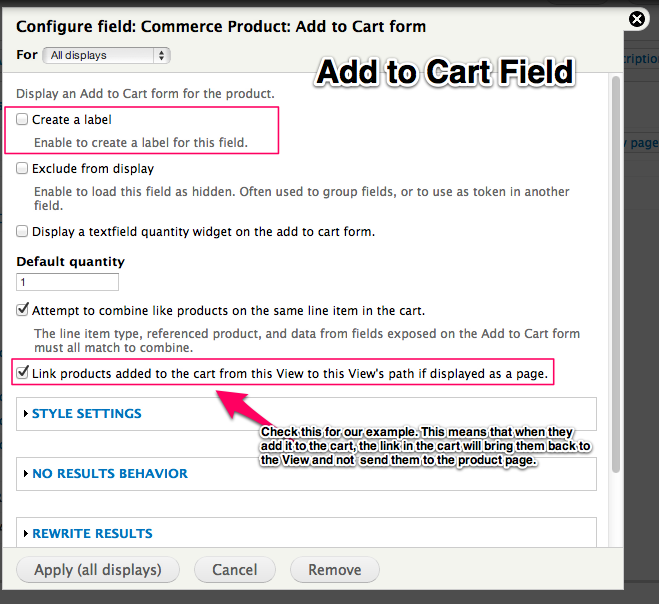
Add to Cart Field
When adding this field, you will want to check the "Link products added to the cart..." This means that when they add it to the cart, the link in the cart will bring them back to the view and not send them to the product page.
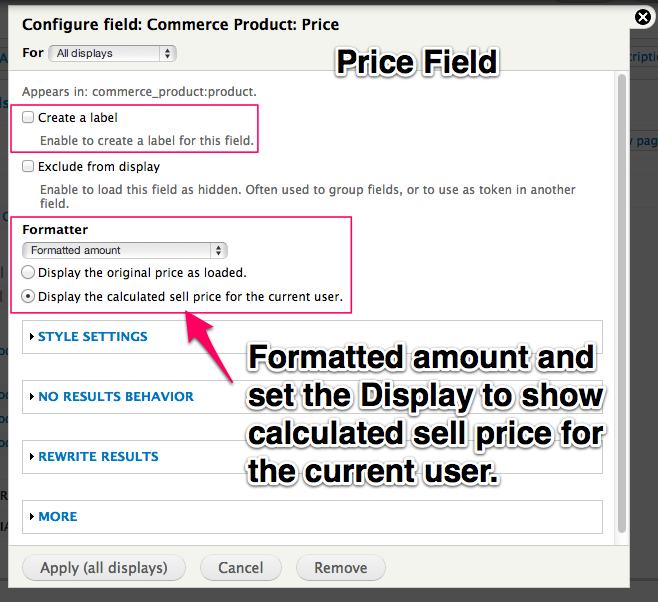
Price Field
Leave off the label, set the formatted amount and display to show calculated sell price. You could show with components if you have complex pricing rules.
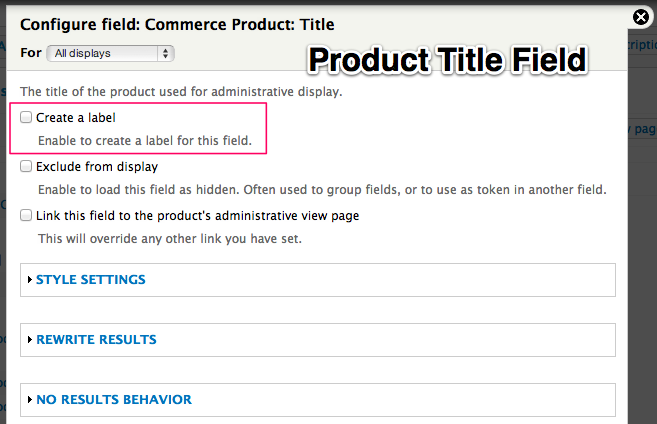
Product title field
The product title field only needs you to remove the label. Do not link the field to the administrative view. Remember, this view should not link to any content.
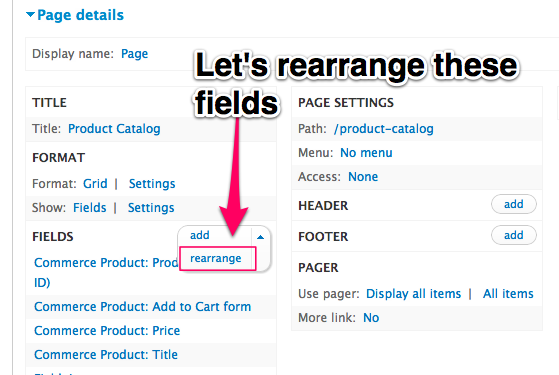
Rearrange Fields
Let's rearrange fields.
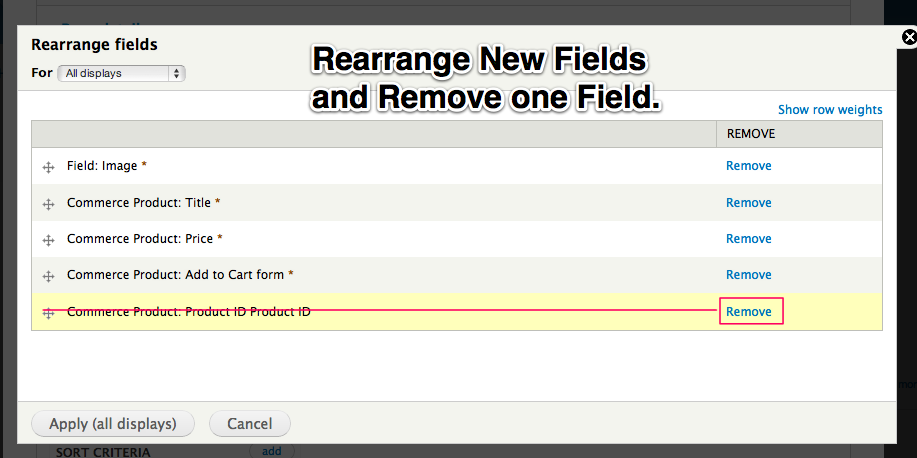
Remove a Field
Let's remove the Product ID and change the order to Image, Title, Price, Add to Cart.
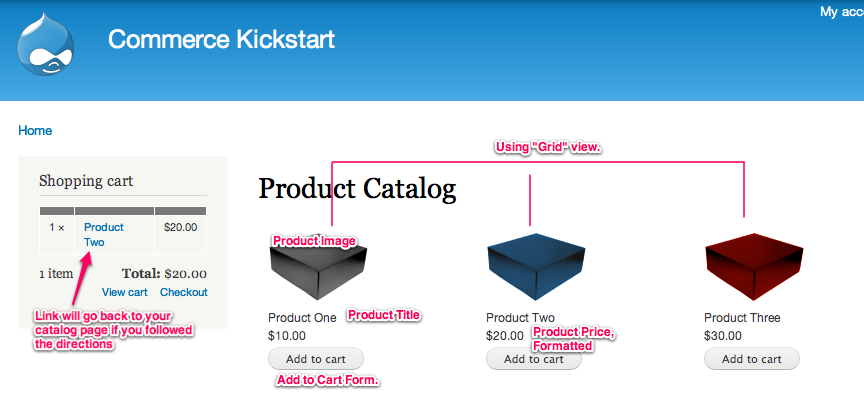
Final Catalog
The final catalog looks pretty nice, but note we are not linking to any of the product display nodes.
Advanced Product Display Listing using Views
The Product Display and Simple Views integration are not likely the most convenient for the site builder to create. In order to create a product catalog for a store that uses Product Displays, you will want to use the following exercise and pay careful attention to when we create the Views Relationship.
If your products have attributes such that product displays reference multiple products, establishing this relationship from the product display node to the referenced product will result in multiple rows in the View per node, basically 1 per referenced product. The workaround for this is to filter on the delta value of the product reference field so that only the first item (delta 0) is displayed in the View.
Additionally, if you're using attributes and want an Add to Cart form in the View, you need to render the product display node's product reference field to the View instead of using the Add to Cart form field from the product table itself. Furthermore, if you want product fields in the View to update when attributes are selected, you can't just add the product fields directly to the View. This is because injected field updating depends on a special wrapper around the product fields that only comes when the fields are rendered through the node output. The solution for this is to render product fields through a view mode of the display node itself, such as putting a teaser of the node into the grid and having the node type configured to inject product fields into the teaser. This will give the product fields the right wrapper to be updated when the Add to Cart form attribute select lists are updated.
New View
We're creating a new view based on Product Displays. Instead of relying on Teasers to get all of the fields, we're going to display fields the way we want them using a Relationship. If this seems dull, imagine adding a default argument for taxonomy and you instantly have a categorized catalog page.
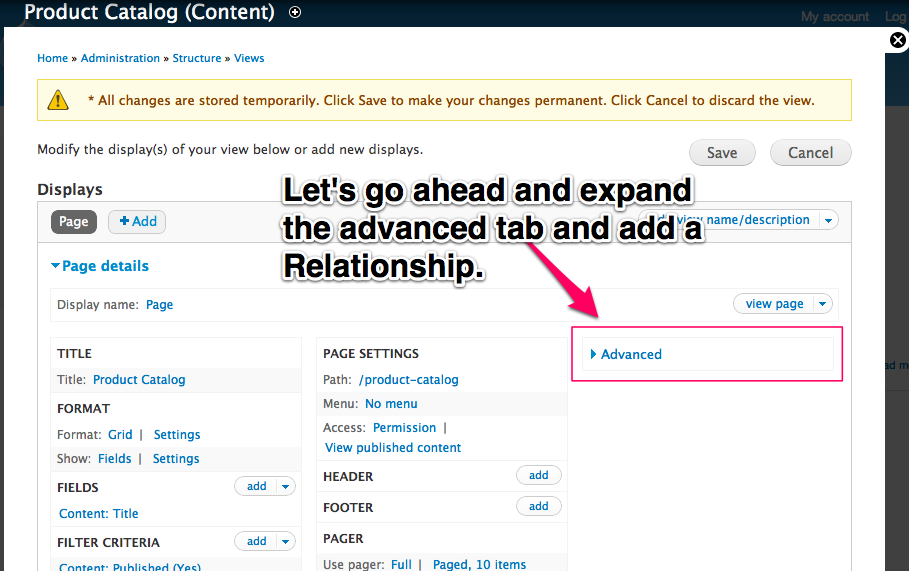
Expand Advanced
If this is your first time opening the View's advanced column, go ahead and expand it. Go ahead and click "Add" next to Relationships once it is expanded.
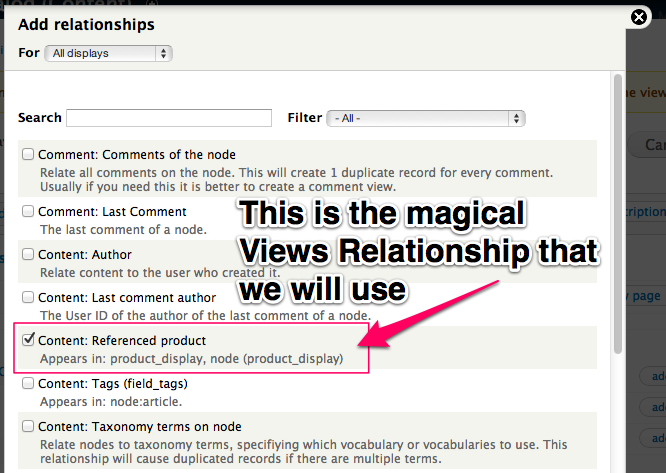
Magical Relationship
There is a product reference field on our Product Displays. This relationship in Views will make all of the product reference fields available to be used in the fields area.
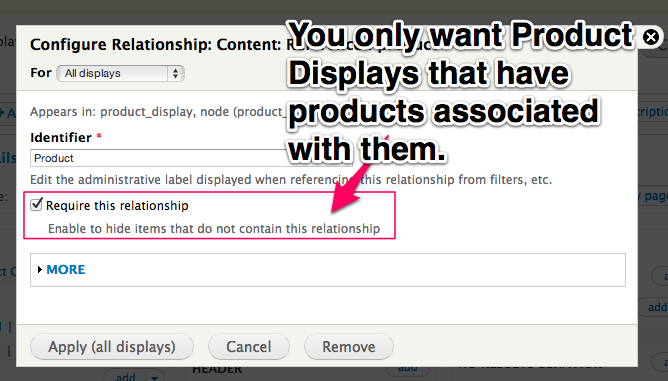
Relationship
You only want Product Displays that have products associated with them. Otherwise, not much to see here.
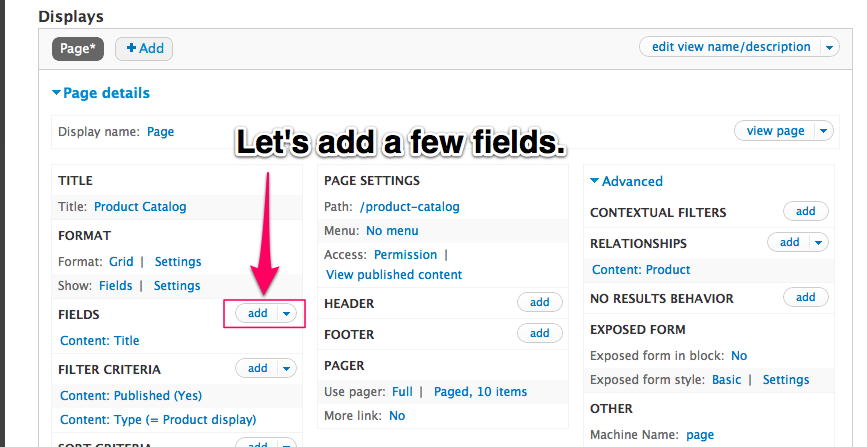
Add fields
Let's add a few fields

Add fields
The three recommended fields are Add to Cart Form, Price, and Image. The best way to view all of these is to choose to filter the "Commerce Product." You might want to add a Product Title, but we will be using the Product Display Title.
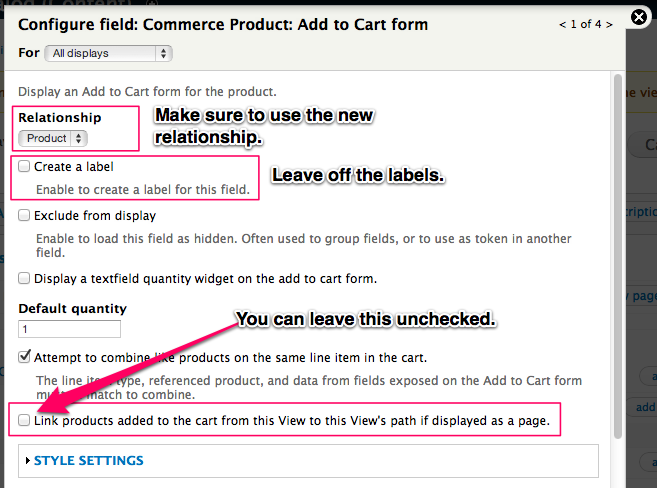
Add to Cart
Make sure to use the new relationship, leave off the labels, and you can leave the "link products" unchecked.
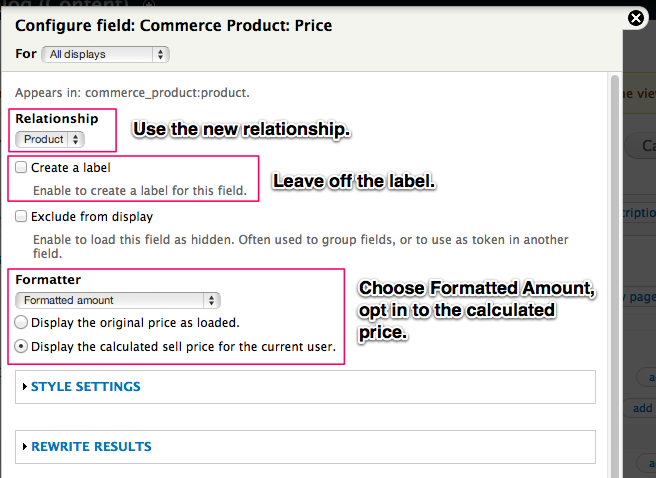
Price Field
Use the new relationship, leave off the label, and choose formatted amount and opt in to the calculated price.
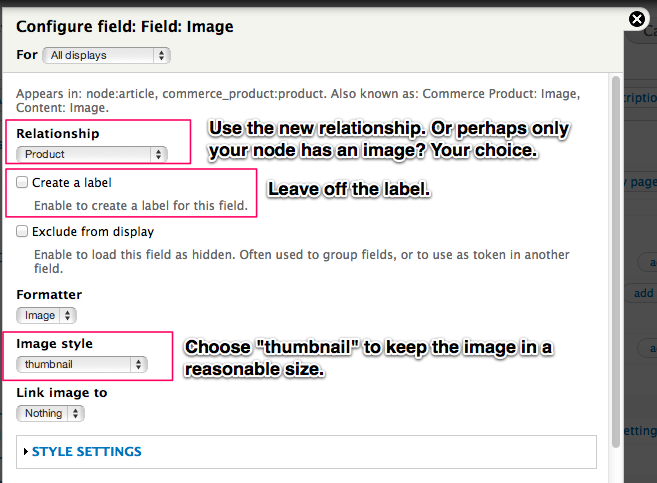
Image Field
Use the new relationship, leave off the label, and choose thumbnail to keep the image in a reasonable size.
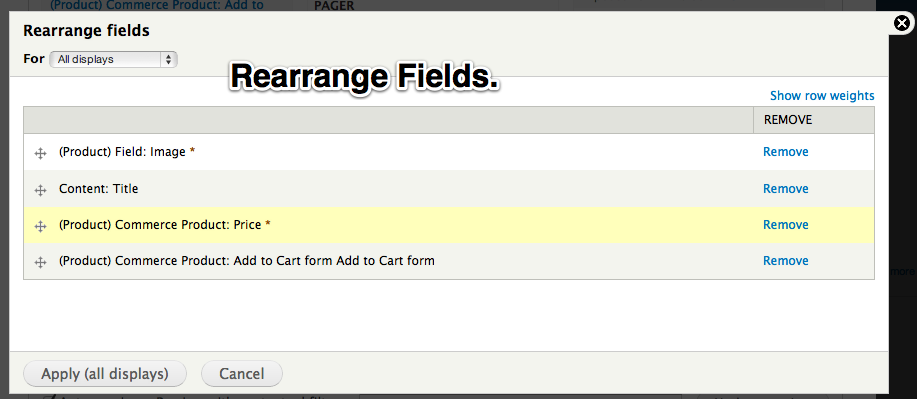
Rearrange Fields
Rearrange Fields to this order: Image, Title, Price, Add to Cart button.
Final Catalog
The final catalog looks exactly the same as the "Simple" view except that this catalog has links to the Product Displays. This is a critical difference and can cause issues if you don't choose the right one.
Taxonomy Listing of Product Display Teasers
Alternatively, you can use the built-in Drupal Taxonomy pages to list products of a certain category. Ryan Szrama has an excellent video showing off this process:
Importing Products using Feeds
The wonderful Commerce Feeds module, with its parent Feeds allow you to import various kinds of feeds as products and/or as product reference nodes. Edit: You may be also be interested in Commerce Migrate and this screencast on how to use it to import Ubercart stores.
Importing Products with Commerce Feeds from Randy Fay on Vimeo.
In this example we'll be bringing in a CSV feed and turning it into both products and product reference nodes in two separate operations.
Our CSV has just a few fields and the first couple of lines look like this:
"SKU","Title","Price","Image","Description"
"0023548568","Computer Graphics Using Open GL (2nd Edition)","11000","http://ecx.images-amazon.com/images/I/51JQbhO0MmL.jpg","Great book blah blah..."
The SKU is the unique identifier for the product, and of course the other items are self-descriptive. The Image is a URL to an image.
You can view and explore the feed at http://d7.randyfay.com/books/feed. Note that this is just an example feed - it could be something other than CSV, the fields could be named differently, etc. We do need a unique identifier (the SKU), which we'll also use to map the product reference nodes to products.
An Outline
- Install and enable feeds and commerce_feeds
- Create a new feed importer named "Product Importer" at Administration -> Structure -> Feeds
- Change the parser to "CSV Parser"
- Change processor to "Commerce Product Processor"
- In "Commerce Product Processor" settings use product type "product" (or whatever your product is) and change the "Author" to your username.
- In "mapping", map
- SKU -> Product SKU
- Title -> Product Title
- Price -> Price: Amount
- Image -> Image
- Set ID as unique target.
- Visit /import, use the Product Importer.
Use http://d7.randyfay.com/books/feed for the URLImport your products
Visit the products page (admin/commerce/products) to view your new productsNote that you can delete items using the feed or with commerce_vboNow we'll import the same data again, but this time we'll turn it into product display nodes.Go to admin/structure/feeds and create a new feeds importerChange the parser to CSVChange the processor to Node ProcessorChoose the "Product Display" node typeSet the author to yourselfUnder mappingsSKU -> GUID (and set unique target)Title -> TitleDescription -> BodySKU -> Product SKU</li>
Visit /importUse the Product Reference ImporterUse the same feed URL: http://d7.randyfay.com/books/feedNow you have 100 shiny new product reference nodes, pointing to products.
If you need to import products with additional attributes or other fields, that works fine too; you'll need the "Feeds Tamper" module for it. Here's the screencast demonstrating it, followed by the recipe.
Update 26 Sept 2011: The "Feeds Tamper" tab is now an Operation as "Tamper" in Feeds
Add your attribute to the product typeAdd the attribute to your csv fileChange the mappings in the product importer to add the attributeImport.Create a node import CSV file that has the list of products as comma-separated within the quotes: "SKU1,SKU2,SKU3"Create a node import feeds importer (or just use the standard one from commerce_feeds_example)Create a feeds tamper rule at admin/structure/feeds tamper that explodes the SKU field in the node as it imports.Import your nodes.
If you need to import prices that are not in minor units (they're $1.50 instead of 150) then this screencast explains how to use Feeds Tamper to transform them on import:
Drupal Commerce: Using Feeds Tamper to change Dollars/Cents to Minor Units from Randy Fay on Vimeo.
NOTE: the above tutorial references an example product feed that is no longer available. We suggest you create your own example file with the required fields to complete the import